When and why an axle bearing fails on a Niva Chevrolet
Chevrolet Niva traces its history back to the regular Niva or VAZ 2121, which entered the assembly line more than 40 years ago. In turn, this VAZ SUV was developed on the components and assemblies of the VAZ 2106 and has many design solutions in common with it - both successful and dubious. The weak point was the ball bearings of the rear axle shaft.
The bearing is located inside the rear axle housing closer to the hub and is pressed tightly onto the axle shaft. The second end of the axle shaft fits freely into the differential of the rear gearbox and is not fixed there by anything. On the wheel side, the axle shaft is secured with a plate with 4 bolts. Therefore, when driving off-road or installing wheels of larger diameter, both axial and radial forces act on the bearing itself. This load is enough to quickly finish off a relatively weak single row bearing. If this problem is not so acute on Lada cars, then on a more massive car, breakdowns are much more common.
Main reasons for failure:
- careless off-road driving, especially in combination with sudden impacts;
- overcoming fords and moisture getting inside the bridge;
- oil seal wear and oil leakage from the rear gearbox;
- displacement of the locking ring due to its incorrect installation or defect;
- radial runout of the axle shaft (usually occurs due to deformation of the shaft itself);
- damage to the landing pads on the axle shaft or inside the axle stocking;
- installation of wheels with a larger diameter and offset than those recommended by the factory.
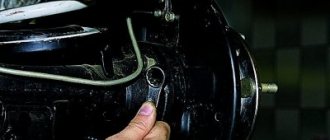
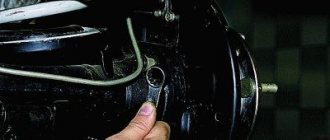
How to install a new oil seal
When the axle shaft is removed from the car, the nearby metal shield used to mount the pads will be essentially loose. It will only be held in place by a thin copper tube filled with brake fluid. To prevent the latter from breaking, the shield must be temporarily secured with a pair of previously unscrewed bolts.
Removing and installing the oil seal is done as follows:
- remove the gasket from the bridge flange (do not tear it, although it is thick, it is still rubber);
- remove the damaged oil seal - pick it up with a flat screwdriver;
- thoroughly clean the area where it previously stood with a cotton, lint-free cloth;
- Before installation, the new seal must be wiped with oil (necessarily with transmission oil);
- place the element in the socket and make sure there is no distortion;
- Press it in with a piece of pipe so that the rubber is not damaged - place the old oil seal on top of it.
Now it is important to thoroughly clean all removed elements from dirt and oil. It is absolutely unacceptable to leave traces of grease on brake parts:
- drum;
- cylinder;
- pads;
- shield
If only the oil seal was changed on the Chevrolet, then it is advisable to inspect the axle bearing as well. The part is checked for wear, lack of play and presence of grease on the rollers. If an element breaks soon, then it:
- rotates tightly;
- makes noise;
- rattles when shaken.
Please note that you cannot replace the bearing yourself. This operation will be performed for you at a car service center.
You can only check if there is lubricant inside
To do this, carefully lift the plastic plug covering the rollers and look inside. In the absence or its obvious insufficiency, ordinary Litol is laid
The plastic ring is then placed in place.
Now you can assemble the knot. Follow all steps described in the instructions in reverse order.
Finally, be sure to check how much oil is left in the gearbox of your Chevrolet. To do this, lower the car onto its wheels and make sure it is level. Then:
- find the neck plug on the casing;
- turn it inside out;
- take a look inside.
If there is not enough lubricant, add it using a hose and funnel. It is better to do the work with a partner - one will add oil, and the other will monitor its level.
Removing the right drive Niva Chevrolet
This is Tough! Removing the right drive Chevrolet Niva. Comparison of Chevrolet Niva and NIVA 21214 in Self-repair
Removing the internal grenade of a Chevrolet Niva
Replacement of the front left outer and inner CV joint at the Niva
Removing the left wheel drive shaft Niva Chevrolet
Replacing the seal of the internal CV joint of the front axle on the Niva. VAZ 21213.
Replacing the Niva front wheel bearing
How to change CV joint boots on Niva yourself
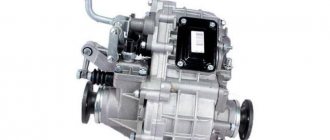
How to remove the front gearbox on a Chevrolet Niva
How to knock out an internal grenade. Do it yourself!
Replacing the gearbox seal yourself
Good day. Yesterday I spent more than half a day replacing the right drive, took everything apart according to the book, and put it back together. I couldn’t pull it out, the beam wouldn’t give, and the lid’s ear clings to it. How to get it out, I spit it in different ways and nothing. Give me some advice!
Comments 10
I've already removed the right drive twice. To avoid any confusion in the future, I unscrewed the studs from the RPM to which the side cover is attached, and screwed it onto the bolts.
Thank you, I’ll probably do that. I thought about that too when I pushed him back.
Is this operation performed by one person or by a team))? I suffered alone!
I repair them, so I make one. And it will be more convenient and faster for both of us. A friend and I installed an axle assembly with drives on a Chevy, it was a Kama Sutra, but they installed it.
2123-2303120 oil seal, right. Nivsky is the same, judging by the number, generally cheap 2101-3103038. Bet from Niva. The Chevrolet one has a rubberized body, that’s the difference.
Thanks, I'll look for it.
I unscrewed the ball joint to remove it
I unscrewed both the shock absorber and the ball joint, moved the fist to the side, unscrewed both bolts of the covers, the cardan, 4 nuts of the rear part of the axle. And nothing: (the cover does not help
I don’t know how to use the alphabet, but in practice the ear mounts are unscrewed, the cardan mount is unscrewed, and the mount to the stabilizer is unscrewed. A good idea would be to remove the left wheel, unscrew the lower ball joint, and hang the fist with the disk so that the drive can move freely back and forth. Move the entire structure of the RPM + drives to the maximum to the left, with the right side shifted towards the passenger. In this position, the right drive can be pulled out.
CV joint on Niva Chevrolet
With its help, torque is transmitted from the engine to the drive wheels. It's mostly front-wheel drive. Due to the CV joint, torque is transmitted uniformly, taking into account the fact that the wheel is at a different angle relative to the car.
On a Chevrolet, a grenade can be:
Like all other parts in the car, this unit has its own specific service life. Therefore, every Niva owner sooner or later is faced with the need to replace the CV joint.
Reasons for grenade failure
The CV joint can fail for the following reasons:
- Long service life of the mechanism. This is the most common cause of breakdown. Usually the part has to be replaced after 10,000 kilometers (on average), but it may happen that repairs are required even earlier.
- Sloppy driving. This could be sharp turns, driving on an uneven road at high speed, or turning the steering wheel when the car suddenly starts. In all these cases, the maximum load is placed on the CV joint.
- Water, dust or dirt gets into the device. For this reason, the hinge may also fail prematurely. Water gets inside due to damage to the rubber boot. The protection can crack due to any factors during operation, so it is recommended to periodically check its condition.
Bearing device.
Like most parts in a car, a bearing has several indicators based on which you can select the necessary part:
- number
- internal and external dimensions
- height
Knowing these parameters, you can select a replacement element that will be suitable for a given car and perform its functions correctly.
The number is the value in the catalog - 21212403080. In most cases, this data is enough to purchase a bearing model for a Chevrolet Niva in a store. If the required element is not available, you can find analogues, knowing the technical characteristics:
- internal diameter 40mm
- outer diameter 80mm
- height (meaning product thickness) 23mm
Grenade replacement
Right inner CV joint close up, you can see the article number and markings
This unit consists of parts that are constantly in motion. As a result, they may burst or wear out, requiring replacement.
But this happens quite rarely, since it is almost impossible to detect damage to the boot in time. It should also be said that the cost of the CV joint is not high, and therefore it can be purchased if necessary.
Troubleshooting
You can determine the malfunction of the grenade yourself. To do this, while the car is moving, turn the steering wheel in any direction until it stops. In this case, the driver will hear a crunching sound in the area of the front wheel. In this case, you need to replace the hinge.
Video on how to determine if a grenade is faulty
Changing a grenade on a Niva Chevrolet with your own hands
To replace a grenade, you must first remove the old one. In the process, you will have to dismantle the axle shaft along with the CV joint (you can find a disassembly video on the Internet). Then the car owner must perform the following actions:
- Clamp the removed assembly in a vice.
- Remove the old boot.
Read more: Drom reviews of Nissan cars
Installing a new hinge
Install the axle with CV joint on the car in the reverse order
Bearing selection by manufacturer
Experienced car mechanics know that it is better to choose a bearing that is completely identical to what was before. It would be good if it was an item with the original box and logo. Such parts often correspond to their counterparts that were originally supplied to the assembly line. The price of the bearing is not always affordable, because they are produced in a limited batch for a batch of cars.
But there are other bearing models whose characteristics are in no way inferior to the original ones. And the cost of non-original bearings is lower only due to the use of a different brand. Here are just a few bearing suppliers that have become popular in today's automotive market.
- SNR – French company;
- SKF is one of the largest manufacturers in the world;
- FAG is a German manufacturer, one of the largest companies;
- NSK - from Japan;
- NTN is another representative of the Land of the Rising Sun.
Manufacturers from Japan often deliver their parts directly to the assembly line. Therefore, practically nothing is known about them on the regular spare parts market. You can ignore the country of origin in the case of the companies mentioned above. It often lists one of many offices and branches around the world.
If a bearing manufacturer is allowed onto the assembly line, this is already confirmation that a strict selection process has been passed in the first stages. This means that the quality system meets the stringent requirements for manufacturers and their parts.
The most common and popular part numbers of Chevrolet Niva bearings
- The part number of the front wheel bearing is 2007108 (catalog number: 2121-3103020-10 , foreign equivalent: 32008 );
- The part number of the rear wheel bearing is 2403080 (catalog number: 6-180508AK2US9 , foreign equivalent: 62208.2RS );
- Clutch release bearing number - 21230160118000;
- The part number of the gearbox input shaft bearing is 50706 (foreign equivalent: 750706 );
- The generator bearing part number is 180201
(foreign equivalent:
6201-2RS
).
Purpose of the part
Niva Chevrolet thrust rods are one of the main suspension elements. The main purpose is to limit the travel of the front steering knuckle. The rear ones adjust the position of the axle. Rods are also necessary to hold the wheels in place in a longitudinal position. Thanks to the rods, the part can only move to the extreme upper or lower position. The lever is attached at two points; bolts and silent blocks are used for this.
The rear links are installed mainly on multi-link suspension. They are necessary in order to avoid oscillatory movements in the transverse direction of the bridge.
For the manufacture of rods, only high-quality elastic steel is used, which is able to withstand constant exposure to high loads. But if they consisted only of metal, they would practically not need to be replaced. But this design also has one weak point - silent blocks.
Their fastening is carried out by welding. This seam is the weak point of the part. With increased load on the element, a small crack may appear at the seam, even unnoticeable at first glance. But over time, this can lead to major damage on the road. Therefore, in case of strong impacts on the suspension, it is necessary to carefully check all components of the system and change them at the first sign of malfunction.
In addition, malfunctions with silent blocks can occur when dust and dirt get inside. This occurs when the protective rubber band breaks. They can be deformed under strong physical impact on the levers, and the structure of the material can also deteriorate over time. It must be remembered that over time the situation will only worsen due to the fact that the lubricant inside dries out and increased wear begins.
Replacing the NIVA wheel bearing
We will show you how to replace a wheel bearing in a NIVA car. To work, we will need new wheel bearings, two wheel seals, and a standard set of car enthusiast tools. The entire repair process is shown from start to finish, with detailed comments from the author along the way.
Owners of this car very often encounter the problem of a humming wheel bearing. It is recommended to remake the bearing for 108, after that there is no need for any adjustments or tightening it once a month. If for some reason you do not want to change the wheel bearing, then you must change the hub seals during disassembly.
Checking the hub and wheel bearing
If, while driving, you hear a sound whose frequency gradually decreases or increases depending on the speed. To diagnose the problem, you can use this method. We hang the wheel, place a stump under the lower arm and lower the car onto it. Next, we grab the bottom and top of the wheel with our hands and start pumping. If you feel any play, you can simply tighten the bearing. If this does not help you, there is still play, then most likely the hub has become unusable and needs to be replaced. If there is no play, there is a high probability that the bearings have failed.
The sound of a faulty wheel bearing is dull; it can be clearly heard at an average speed of 60-80 km if the car is rolling in neutral gear.
Case from practice
The owner of Niva came to the car service center with a complaint about bad brakes. When the brake pedal was pressed, it sank to the floor and only when pressed again did it work as it should. Everything indicated that there was air in the brake system, but bleeding did nothing. In the end, it turned out that the fault was with failed wheel bearings and the hub itself. The inner race of the bearing rotated on the hub.
Arrows indicate production and pitting. For comparison, this is what the new hub looks like.
But what happened to the bearing.
Chevrolet Niva error diagnosis
The most reliable way to identify what is wrong with a car is to diagnose electrical appliances and equipment. The procedure allows you to accurately identify breakdowns and quickly repair your car.
There are two ways to detect a problem in a car.
Self-diagnosis VAZ 2123
The simplest procedure allows the motorist to independently identify the damaged area and repair the damage. Thanks to the successful firmware of the on-board computer, some errors are displayed on the standard display. In this case, nothing happens on its own - you will need to perform several steps manually:
- turn off the engine and turn off the ignition;
- find the daily mileage reset button on the dashboard and press it;
- at the same time turn the key in the starting cylinder;
- if everything is done correctly, all the indicators on the dashboard will light up, and the instrument arrows will make a full circle and return to their place;
- at the same time, the firmware version of the on-board computer will be reflected on the built-in display;
- The next press of the key will display a network error.
- 0 – error 0 Niva Chevrolet indicates that there are no problems in the on-board circuits; most likely, the breakdown is purely mechanical in nature;
- 1 – standard error of the Niva Chevrolet ECU – the processor is not working correctly;
- 2 – for a Chevrolet Niva, error 2 indicates a lack of power to the gas tank float;
- 4 – malfunction of the battery or generator; a critical excess of the rated voltage of more than 16 volts was detected in the on-board circuits;
- 8 – has the opposite meaning; on a Chevrolet Niva, error 8 indicates an excessive voltage drop in the wiring due to a deep discharge of the battery or a malfunction of the generator;
- 12 – error 12 Chevrolet Niva reports a breakdown of the control indicator;
- 13 – signal transmission from the lambda probe is disrupted, you need to check the device and main power lines;
- 14 – on Niva Chevrolet, error 14 indicates a critical antifreeze temperature, the system requires cooling, otherwise the power unit may boil;
- 15 – the motor is too cold for normal operation, usually the error disappears after a good warm-up or replacement of the sensor;
- 19 – malfunction of the DPKV, the encoding indicates an incorrect speed of rotation of the unit;
- 21/22 – the throttle position differs from the calculated values up/down;
- 23/25 – the air mixture on the intake manifold is excessively cooled or overheated;
- 24 – open circuit of the speedometer, accompanied by a lack of response of the instrument needle to the driver’s manipulations;
- 27/28 – incorrect display of the actual amount of exhaust from the calculated value;
- 33/34 – Mass air flow sensor, the indicators of the device are overestimated or underestimated, relative to the actual state of the system;
- 35 – incorrect operation of the engine at idle, you need to check the correctness of the mixture formation settings;
- 41 – the phase distribution sensor or DPRV has detected an open circuit or the data received is erroneous;
- 42 – multiple misfires were detected, the system turned off the fuel supply to the damaged cylinders;
- 43 – the detonation channel sensor generates an error;
- 44/45 – fuel mixture is too rich/lean; you need to check the fuel lines for mechanical damage;
- 49 – the vacuum gauge is out of order or overloaded;
- 51 – ROM has failed, or there is a breakdown in the power cables;
- 52 – RAM is not working correctly, damaged, no power;
- 53 – the adsorber purge valve is faulty;
- 54 – octane corrector controller is de-energized or broken;
- 55 – the calculated load on the internal combustion engine differs from the established one;
- 61 – the oxygen quantity controller in the intake system transmits incorrect data to the computer.
At the same time, you need to accurately understand that, for example, when error 10 is on the display, the Chevrolet Niva tells the driver that there are several problems (standard, unambiguous codes are summed up).
You should also know that Niva Chevrolet self-diagnosis errors do not reflect the exact location of the breakdown. Codings can only show the section of the wiring where you need to look for the cause of the malfunction. Also, these encryptions may be the result of a software failure after an unsuccessful wash or disconnection of the battery. To obtain more accurate data, the user needs to connect a special diagnostic scanner.
Tips for operating Lada 4×4 and Chevrolet Niva
Beginners do not immediately remember at what position of the handle the differential is locked. But this is indicated by a warning indicator on the dashboard. If it lights up, the differential is locked. The front handle of the transfer case is responsible for locking the differential. If it is in the forward position, the differential is unlocked, in the rear it is locked.
The rear handle allows you to engage a lower gear. This must be done before getting into difficult road conditions. Since the box does not have synchronizers, switching must be done when the car is stationary. In this case, you need to depress the clutch. If the switch does not occur, you need to slowly move away, shaking the steering wheel.
When driving on a flat road, the rear transfer case handle should be in the rear position, and the front handle should be in the forward position.
What to do if the front and rear wheels are hanging out? As mentioned above, even locking the differential will not help solve this problem; the car will not move. To set the car in motion, you can pour soil under one of the hanging wheels. If there are passengers in the car, you can move them to the rear or front of the car by loading one of the axles.
Step-by-step instructions for a quality replacement
If the unit has just begun to signal a problem, then repair work can extend its service life. If it is completely worn out (diagnosis is recommended at a service station), it makes no sense to carry out work to resuscitate the parts or put the mechanism in order - a complete replacement is required.
In most cases, if there is severe wear, the outer CV joint on a Chevrolet Niva is replaced.
It is important to remember that the upcoming process will require time and effort. The car needs to be driven to a special pit to facilitate access to the components and the CV joint itself
Tools:
- wrenches (set);
- hammer with extension;
- pullers
Experience in plumbing is required if the replacement is carried out in-house.
Replacing the outer CV joint
To change the outer part of the pair in the assembly, you will need to completely remove the axle shaft with the “grenades” installed on it from the car. The sequence of actions in this case is as follows:
- the body needs to be lifted (a car jack is used);
- install a stand to minimize the likelihood of an accident if the jack fails to cope with the task;
- Anti-recoil shoes are installed.
The safety measures taken will prevent damage and injury. The main point: before lifting the body, you should loosen the hub nut. For this job you will need a socket and a wrench extension. Further sequence of actions:
- remove the front wheels;
- unscrew the lower fastening that holds the front shock absorber;
- move it as far as possible to the side so that further work is not complicated;
- secure (use any available means).
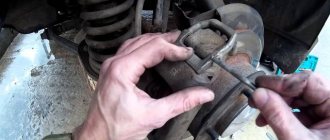
After this stage, you need to unscrew the bolts directly on the ball joint. The next part of the work:
- completely remove the nut on the hub;
- Pull towards you and remove the outer CV joint.
The outer joint can be replaced without first removing the axle shaft. Sequencing:
- it is necessary to release the fastening clamp that belongs to the boot;
- move as far as possible on the axle axis;
- you will need to hit the CV joint body with a hammer (with an extension);
- Continue making blows until it is completely removed from the axle shaft.
Next stage:
- replace the retaining ring, which is located on the axle shaft;
- install a new part.
To install the hinge, all steps will need to be carried out in the reverse order of steps.
We remove the axle shaft, select tools, consumables and accessories
First of all, you should pay attention that when replacing a bearing, you need to install not only it, but also new axle shaft seals and new retaining rings. For cars with and without ABS, the locking rings are different - on cars without an anti-lock braking system, the axle locking ring has a smooth surface, and on cars with ABS, the locking ring is splined. It is impossible to confuse them. We assemble tools and accessories:
- Bulgarian.
- Standard set of tools and screwdrivers.
- Inertia axle puller.
Inertia axle puller.
- Muffle furnace or gas burner (or gasoline blowtorch).
- Repair kit for repairing the axle shaft (bearing, retaining ring, axle shaft seal).
- Sharp chisel.
- A pipe with a diameter of 40–45 mm and a length slightly longer than the axle shaft.
New set - oil seal, retaining ring and bearing.
The tool has been selected and the axle shaft can now be removed. This is done in the following sequence:
- We place the car on a flat surface and install wheel chocks under the front wheels.
- We tear off the wheel mount, jack up the car, and install a stand under the rear axle.
- Remove the wheel and unscrew the brake drum mounting screws.
We unscrew the bolts securing the brake drum to the axle shaft.
We knock down the brake drum, but not directly with a hammer, but through a wooden spacer, otherwise there is a danger of damaging the brake drum.
We knock down the brake drum using a wooden block.
Unscrew the four bearing spacer nuts from the back.
We unscrew the four nuts of the axle bearing mounting plate bolts.
Remove the shock absorber bracket from the bolts.
We remove the axle shaft using an inertial puller.
When removing the axle shaft, you need to try not to damage the oil seal if there is no desire or need to change it. After this, the entire brake mechanism is suspended from the spring using a wire.
When and why an axle bearing fails on a Niva Chevrolet
Chevrolet Niva traces its history back to the regular Niva or VAZ 2121, which entered the assembly line more than 40 years ago. In turn, this VAZ SUV was developed on the components and assemblies of the VAZ 2106 and has many design solutions in common with it - both successful and dubious. The weak point was the ball bearings of the rear axle shaft.
The bearing is located inside the rear axle housing closer to the hub and is pressed tightly onto the axle shaft. The second end of the axle shaft fits freely into the differential of the rear gearbox and is not fixed there by anything. On the wheel side, the axle shaft is secured with a plate with 4 bolts. Therefore, when driving off-road or installing wheels of larger diameter, both axial and radial forces act on the bearing itself. This load is enough to quickly finish off a relatively weak single row bearing. If this problem is not so acute on Lada cars, then on a more massive car, breakdowns are much more common.
Main reasons for failure:
- careless off-road driving, especially in combination with sudden impacts;
- overcoming fords and moisture getting inside the bridge;
- oil seal wear and oil leakage from the rear gearbox;
- displacement of the locking ring due to its incorrect installation or defect;
- radial runout of the axle shaft (usually occurs due to deformation of the shaft itself);
- damage to the landing pads on the axle shaft or inside the axle stocking;
- installation of wheels with a larger diameter and offset than those recommended by the factory.
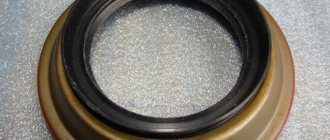
Installing a New Seal
After removing the axle shaft, the metal shield where the brake pads are attached will remain hanging on the copper pipe with the fluid, so it should be fixed by inserting the 2 upper bolts back into the holes. Then follow the instructions:
- Remove the thick rubber gasket from the rear axle flange.
- Pull out the old oil seal by prying it with a screwdriver or pliers. Clean the seat and wipe with a rag.
- Lightly lubricate the new seal with transmission oil and insert it into the socket of the Niva rear axle as evenly as possible.
- Using a round pipe adapter, press the oil seal into the socket with light blows of a hammer. You can use an old seal as an additional attachment.
At the end of the procedure, you must thoroughly wipe all parts free of oil - the brake cylinder, pads, drum and metal shield. Before reassembling, it would be a good idea to check the axle bearing for wear and grease. Wear is indicated by difficulty turning, binding, or slight noise. If you discover a malfunction, take the axle shaft to the nearest car service center; you will not be able to replace the bearing without special equipment.
To check the grease inside the bearing, you need to pry the plastic covering the rollers with an awl and remove it. Then add thick Litol-type lubricant inside and put the plastic in place, and then begin assembly.
At the end, it is important to check the oil level in the rear axle gearbox of the Chevrolet Niva. The test is carried out on a fully assembled car, standing on a level surface.
The filler plug is unscrewed from the gearbox housing, after which the oil level is determined visually or using a thin wooden stick. If there is a shortage, you need to insert a hose of a suitable diameter into the filler neck with a watering can at the end, where the lubricant is poured. It is more convenient to top up with an assistant: you control the level, and the assistant gradually adds oil.
Maintenance frequency
It is worth carrying out repairs and maintenance of the Niva Chevrolet yourself, taking into account the following time periods:
Check the oil level in the engine block, washer water, as well as brake and coolant weekly. You should also pay attention to the optics, tires and battery. If the car is not used regularly, the frequency of such checks is 400 km. Change the oil filter and oil every 8 thousand km, which will extend the life of the power unit. Every 15 thousand km, check the remaining thickness of the front brake pads. The air filter of the ventilation system should also not be ignored. Check the condition of the gearbox, washers and electrical systems, suspension, brakes and steering annually. Also lubricate all moving parts of the door panels and trunk.
If the SUV is diesel, it is important to monitor the number of crankshaft revolutions at idle. The integrity of engine compartment elements, hoses and connections must also be monitored. Every 30 thousand
km the air filter must be replaced. Do not forget to check how well the drive belts are tensioned. Fuel filters or spark plugs must also be replaced, depending on the type of fuel used. Suspension repairs are not excluded at this time. Every 60 thousand km, change the lambda probes and gearbox oil. Repair of body parts is not excluded. Even the slightest scratches cannot be ignored, since corrosion affects this car extremely aggressively. At this stage, the stove can also become weak; you can fix the damage yourself. Even if you service and repair your car yourself, still periodically contact the services of a service station, where they will carry out the necessary measurements of the level of harmful emissions.
Which ones are better to choose for Chevy Niva?
The hub ensures free rotation of the wheel and its reliable attachment to the car suspension. It acts as a supporting structure and allows you not to change the entire hub assembly as a whole, but to separately repair parts (bearing, drum, disk). The hub plays a key role in the operation of the drive, brakes and steering and is subject to severe stress while driving. Therefore, the comfort and safety of driving depend on the strength and condition of this unit.
Front-wheel drive parts for Shnivy are produced by dozens of companies. Products differ in prices, quality, permissible loads and service life. The standard configuration of the SUV includes adjustable hub units, the tightening torque of which must be controlled after 2-3 thousand kilometers. For those who value reliability and are not ready for regular maintenance, manufacturers have introduced non-adjustable (maintenance-free) wheel hubs. They differ in the following indicators:
- The possibility of wear of the bearing seat in the steering knuckle is eliminated.
- The unit does not require lubrication or adjustment during its entire service life.
- The non-removable design of the bearings prevents them from turning.
- Increased service life of the unit.
- Reduced friction due to the use of ball bearings.
Parts with catalog numbers 2123-3103014 and 21230-3103014 are produced by the following companies: IVECO, SKF, Leader, GM-Avtovaz, VolgaAvtoProm and other companies. The cost of the part depends on the manufacturer and design (adjustable and non-adjustable). The price of the products is 1000-6000 rubles. You can also find more expensive units that include brake discs.
The maximum mileage of unregulated IVECO hubs is 100-120 thousand kilometers. Adjustable ones last less and their durability depends on the frequency, correct maintenance, quality of lubricant and manufacturer.
Also interesting: VAZ-2121 technical specifications
For Niva 4x4 you can find on sale reinforced, non-adjustable hubs with double-row bearings from the Iveco Daily truck. According to the manufacturer, this modernized unit has the following advantages over Nivovsky:
- there is no need to adjust (the bearing tightening is precisely set during its production);
- no need for regular lubrication;
- eliminates rotation of bearings on the hub;
- eliminates wear of bearing seats on the steering knuckle and hub;
- a ball bearing reduces friction in the hub assembly;
- The service life of the hub is increased due to thickening (see photo).
Disassembling the axle shaft
To access the inner CV joint, it is necessary to carry out the following disassembly operations:
- Remove the grenade boot clamps and remove the inner CV joint boot.
- Knock the CV joint off the drive shaft.
- To remove the inside of the hinge, you need to remove the retaining ring of its cage.
If, when removing the inner CV joint, chips were found in the boot, and there is any damage on the hinge, then replacing the inner grenade is simply necessary.
Before putting the boot on the new inner
CV joint, it is necessary to fill it with special CV joint grease -4 (quantity 150 cm). Replacing the outer and inner CV joints on a VAZ 2110, VAZ. To ensure that there is enough lubricant in the grenade, it is recommended to stuff lubricants under the boot.
Signs and manifestations of malfunction
To carry out timely repairs, you need to pay attention to signs of malfunction. If problems arise with the CV joint, the driver may encounter the following symptoms:
If problems arise with the CV joint, the driver may encounter the following symptoms:
- a characteristic unpleasant, sharp sound appears when turning the steering wheel;
- the sound occurs when reversing;
- slight crunching sound when turning the leading front ears;
- increased crunching and sharp sounds while moving.
The part will need to be completely replaced if shocks occur in the transmission. Slipping also indicates the need for urgent repairs. If the Niva is often used for transportation, how does four-wheel drive work, what maintenance procedure should be found out in advance.
Replacement of the rear axle axle bearing of a VAZ 2101 / 2107, “Classic”
Replacing the rear axle axle bearing on a VAZ Classic (2101/2107) is a rather labor-intensive procedure that requires a lot of time. In general, if you do not have any experience in car repair, experts do not recommend changing the bearing on the axle shaft yourself. In the service and repair manual for the VAZ 2101 car, the procedure for replacing the axle bearing is described quite dryly, and after reading it you’ll probably be able to change it at home and do it yourself. Most instructions and manuals only talk about recommendations, for example: “replacing the axle bearing is carried out at a service station” or “it is not recommended to replace the bearing and lock ring yourself.” Therefore, we will describe the whole essence in more detail in this article.
After looking at the instructions and assessing the complexity of the amount of work to replace the VAZ 2101 - VAZ 2107 axle bearing, you can already make a decision whether to repair all the houses or send it to specialists.
We remove the axle shaft, select tools, consumables and accessories
First of all, you should pay attention that when replacing a bearing, you need to install not only it, but also new axle shaft seals and new retaining rings. For cars with and without ABS, the locking rings are different - on cars without an anti-lock braking system, the axle locking ring has a smooth surface, and on cars with ABS, the locking ring is splined. It is impossible to confuse them. We assemble tools and accessories :
- Bulgarian.
- Standard set of tools and screwdrivers.
- Inertia axle puller.
Inertia axle puller.
New set - oil seal, retaining ring and bearing.
The tool has been selected and the axle shaft can now be removed. This is done in the following sequence :
- We place the car on a flat surface and install wheel chocks under the front wheels.
- We tear off the wheel mount, jack up the car, and install a stand under the rear axle.
- Remove the wheel and unscrew the brake drum mounting screws.
We unscrew the bolts securing the brake drum to the axle shaft.
We knock down the brake drum using a wooden block.
We unscrew the four nuts of the axle bearing mounting plate bolts.
We remove the axle shaft using an inertial puller.
When removing the axle shaft, you need to try not to damage the oil seal if there is no desire or need to change it. After this, the entire brake mechanism is suspended from the spring using a wire.
The principle of fluid circulation in the VAZ-2123 system
The circulation of antifreeze or antifreeze in the Chevy Niva cooling system occurs in two circles - small and large. In the first case, the liquid moves bypassing the radiator, since it does not need additional cooling and the outside air temperature is sufficient for it to effectively absorb heat from the engine. The tolerance for the heating level of the liquid in this case is about 78 degrees Celsius.
The standard pressure level is 1-1.2 atmospheres, and when the liquid is heated, its excess is “bleeded off” through a special valve. It is located on the expansion tank, which can be further adjusted.
If heating occurs above 80 degrees, liquid circulation begins in a large circle, involving the radiator in cooling. The direction of liquid movement in one of the circles is regulated by a thermostat, which reacts to an increase in the temperature of the liquid in the system, opening and closing if necessary. In this case, circulation is provided by a water pump, which is driven by the crankshaft through a special V-ribbed belt.
Cooling of the cylinder head and block occurs due to a special “jacket” with coolant, which picks up heat and then enters the radiator, where its temperature decreases. To ensure complete tightness of the system and prevent fluid leakage, a gasket and seal are provided. The first ensures tightness on the side of the cylinder block, and the second prevents leakage at the point where the shaft enters the pump housing.
When the liquid circulates in a large circle, it is cooled by the radiator honeycombs, which are blown by the air flow. In most cases, this is quite enough to provide the necessary heat transfer. However, in the hot season or in traffic jams at low speeds, the temperature of the antifreeze increases significantly, until the liquid completely boils.
In this case, the heating is regulated by forcibly turning on the fans, which are attached to the radiator housing from the outside. The factory design provides for the presence of two such elements at once, which are activated independently of each other. The first is when the liquid is heated to 98 degrees, the second - to 102.
The efficiency of the fans is guaranteed only if the temperature sensor inside the radiator is working properly, the readings of which serve as the reason for starting the active air cooling system. In this case, the normal operating temperature of the liquid is considered to be from 80 to 95 degrees.
Important points
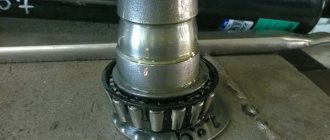
- You need to be very careful when cutting off the old bearing with a grinder so as not to touch the axle shaft itself. It is best to cut off only the outer ring of the bearing and the cage with a grinder. Only a few small cuts (not through) should be made on the inner ring. Then you can insert a chisel into these cuts and, with a few careful and precise blows, split the inner ring of the bearing without touching the axle shaft. The inner ring of the bearing is cut off with a chisel
- The new bearing cannot be placed on the axle shaft without effort. In fact, it will have to be stuffed onto the axle. But in no case should you use only a hammer for this, since there is a high risk of distortion and damage. The best way is to take a piece of pipe whose diameter is slightly larger than the diameter of the axle shaft, and use it to seat the part in place.
- Some car enthusiasts heat the bearings and place them hot on the axle shaft. This really makes it easier to fit the new part because all the metals expand when heated. But it is strictly forbidden to install bearings in this way, since when this part is heated and subsequently cooled in air, it may anneal (that is, heat treatment, which consists of heating the steel to temperatures below critical, followed by slow cooling). Annealing will reduce the hardness of the bearing several times and increase its ductility, as a result, its service life will be reduced significantly.
Replacing a bearing is a difficult task, but it can be done. The main thing here is to avoid damage to the axle shaft when cutting off the bearing and distortions when installing a new part. In addition, you should take into account the fragility of the bearing rings and use the hammer with extreme caution. Otherwise, the procedure is quite within the capabilities of even a novice car enthusiast, who, by doing it with his own hands, can save a significant amount.
- Author: Alexey Stepanov
Copywriter with five years of experience. Rate this article:
- 5
- 4
- 3
- 2
- 1
(11 votes, average: 3 out of 5)
Share with your friends!