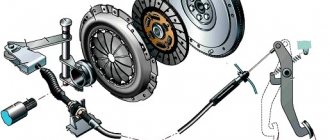
Principle of operation
The node works as follows:
- When you press the pedal, the force is transmitted through the hydraulic clutch to the pressure fork. It puts pressure on the release bearing, displacing it towards the engine.
- The latter compresses the petals of the springs mounted on the clutch basket.
- The driving and driven disks begin to rotate independently of each other, breaking the connection between the engine and the gearbox.
- When the pedal is released, the clutch parts return to their original position under spring pressure.
- The discs connect and again transmit torque from the engine to the transmission input shaft.
Friction linings, release bearings and other clutch parts gradually wear out. In this case, you have to change individual parts or the entire assembly.
Manufacturing a three-point hitch
The hitch is used to connect additional equipment, such as a plow, to the tractor.
The hitch must be movable both in the horizontal and vertical planes. In the first case, mobility helps to reduce the overhang of the nozzle when taxiing. Vertical movement of the suspension is required to lower the equipment into a working position or raise it into a transport position.
The hitch on a mini tractor is made from various parts removed from old agricultural machinery. It is quite difficult to describe how to make a three-point hitch at home. Therefore, it would be more correct to use the following video, which shows the dimensions of all parts of the device.
Common faults
- Knocking or vibration when releasing the pedal. The problem occurs when the driven disk is deformed or its splines are worn out. The malfunction also appears if the engine is poorly secured to the supports or the diaphragm spring of the basket is deformed.
- The pedal sinks when pressed. This happens when the main or working cylinders break down, the hydraulic drive becomes airy, or the return spring or pressure fork breaks.
- The clutch does not disengage when the driver presses the pedal. The reason for this may be clogging or damage to the pipeline and cylinders of the hydraulic drive, deformation of the driven disk, the presence of scoring on its splines, breakage or change in the shape of the pressure fork, or diaphragm spring.
- The clutch is slipping. The problem appears when the friction linings attached to the driven disk are oiled or worn, the hydraulic drive is clogged, the pressure fork is jammed or incorrectly adjusted.
- Noise when pressing the pedal. A grinding, howling or whistling sound when the discs open is due to a faulty release bearing.
To eliminate most breakdowns, it is necessary to replace individual parts or the clutch as a whole.
How to change the fork without removing the gearbox?
You can replace the part without removing the gearbox. To do this, you don’t even have to drive the car onto a pit or a lift. You will need:
The latter will be required for minor modifications to the standard fork. Otherwise, it will not be possible to put it in place without removing the gearbox.
- Using pliers, remove the return spring.
- Unscrew the clutch slave cylinder mounting bolts.
- Unsplit the rod and remove it from the plug.
- Remove the protective cover.
Pull out the old plug. This must be done carefully so as not to break. Otherwise, the operation will be complicated.
Important: the spring must be supported with a screwdriver. The tendrils should fall strictly between the two ribs of the fork.
Purpose
In order to correctly understand where this cylinder is located, you need to have an idea of what the hydraulic drive consists of. It consists of the following nodes:
- Container for filling brake fluid
- The GSC is located under the barrel to which the pipes fit
- Tubes are connected to it and are attached to the return spring.
- The pedal is located under the entire mechanism
The process of operation is as follows: the pedal is pressed, the rod supplies forces to the GCS, and it, in turn, transmits this action to the RCS through a system of tubes, thereby turning the clutch on and off.
The clutch slave cylinder on the Chevrolet Niva on all models has almost the same design, with the same operating principle. It consists of a housing in which the following parts are located:
- Piston
- Retaining ring
- Cap
- Plate
- Union
- Washer with spring
- Boot with O-ring
Thanks to all these elements, the entire device operates correctly.
Over time, the GCS fails; you can understand that the device needs to be replaced by the following signs;
- Brake fluid starts leaking
- The clutch does not disengage completely
- Clutch does not engage fully
Clutch replacement
First you need to provide access to the machine from below. It is not possible to replace the clutch mechanism without dismantling the gearbox.
In addition to the standard set of keys and screwdrivers, you will need a edit for centering the driven disk and a marker. This can be the gearbox input shaft or a tube (rod) of the appropriate diameter.
- Install the Niva on a viewing hole, overpass or lift.
- Remove the gearbox.
- Remove the release bearing and check its condition. It should rotate easily and have no signs of lubricant leakage.
- Use a marker to mark the position of the basket relative to the engine flywheel. This should only be done if you do not plan to replace the pressure plate.
Using an open-end or socket wrench size 8, unscrew the bolts securing the basket to the flywheel. To do this, you need to fix the latter, preventing it from turning.
Remove the driven and pressure plates.
Important: inspect the condition of the friction linings. If chips or cracks are visible on them, the depth of the rivets (distance from the heads to the surface) does not exceed 0.2 mm - the driven disk must be replaced.
Based on the results of the inspection of each clutch part, a decision is made: leave the old one or install a new one. After this, all that remains is to assemble the unit and install the gearbox. When installing the basket, the driven disk should be centered using a mandrel. Next, you need to set the pressure bearing so that the edges of the coupling are positioned strictly horizontally.
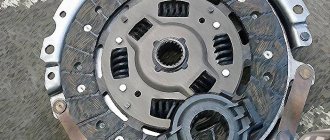
Replacing the clutch on a Chevrolet Niva
The domestic SUV is equipped with a dry-type single-plate clutch, the operation of which is ensured by a diaphragm spring.
According to the instructions, its service life is 30-40 thousand km, but during extreme driving, clutch replacement may be required earlier.
For what faults does the clutch need to be replaced?
The task of the clutch is to transfer rotation from the engine to the input shaft of the gearbox, ensuring smooth driving and starting. When squeezing the dial, you can smoothly engage the speed or shift without jerking.
To extend the life of the clutch, do not constantly keep your foot on the pedal; this greatly reduces the life of the driven disk and release bearing.
The clutch can have two faults:
- Slippage – when the driven disk is not tightly pressed against the drive disk due to wear. In this case, when you release the pedal, the car will not move. The malfunction can also be detected when driving fast, when when you sharply press the gas pedal, the speed first increases and then drops slightly.
- The clutch drives - when you depress the pedal while driving, the car continues to move. If the breakdown is serious, you simply will not be able to turn off the speed.
The first signs of clutch wear are increased noise, jerking and difficulty shifting gears. If these “symptoms” appear, repair work is necessary.
Electromagnetic type
A separate type of friction clutch can be considered electromagnetic.
Structurally, it is very similar to a conventional single-plate “dry” clutch. But it does not have elements that press the drive disk - springs.
Instead, this disk was connected to an electromagnet, and an armature was mounted into its body.
The essence of the operation of this type of clutch is this: when voltage is applied to the electromagnet, a magnetic field is formed that attracts the magnet to the armature. And since it is rigidly connected to the drive disk, this attraction is accompanied by movement of the latter and clamping of the driven element.
This type of clutch has a so-called non-permanently closed engagement mode. That is, unlike conventional types, where the driven disks are constantly clamped, here it is in a free state and is clamped only after voltage is applied to the electromagnet.
Replacing clutch 2123
For convenience, it is better to carry out all work together with an assistant. You need to install the car on a viewing hole or use a lift.
Replacing a clutch is a complex procedure that requires concentration and care. Before starting work, it is advisable to verify the breakdown by checking the operation of the drive mechanisms.
You need to start with the gearbox. To do this, disconnect the negative terminal from the battery.
Drain the oil from the gearbox by unscrewing the plug located in the pan.
Remove the front driveshaft and intermediate shaft by unscrewing their fastenings.
Disconnect the connector from the rear light sensor.
Remove the cover of the variable gearbox lever.
Unscrew the support plate nut from the shift mechanism.
Unscrew the nut from the tie rod securing the shift mechanism rod.
Remove the gear shift mechanism by unscrewing the three bolts.
Remove the clutch pan mounting bolts.
Remove the cylinder from the body without disconnecting it from the pipe.
Carefully move it to the side and tie it to the wire.
Remove the starter by unscrewing its three bolts (the third bolt is not shown in the photo).
Disconnect the exhaust pipe and stabilizer bar. Then unscrew the clutch housing bolts.
During work, an assistant must support the gearbox housing.
Remove the gearbox.
After removing the gearbox we had access to the clutch. To install a new disk, you need to buy a mandrel in advance.
If you have an old transmission input shaft, cut the gear off it and use it instead of a tool.
Let's move on to removing the pressure plate. We hold the flywheel from rotation with a mounting tool and unscrew the 6 bolts.
Press the pressure plate against the driven one with your finger and remove them.
Install new disks. Before tightening, center the drive disc with a mandrel. If this is not done, it will be difficult to install a checkpoint. Further assembly is carried out in reverse order. Don't forget to fill the gearbox with oil and connect the reverse light plug.
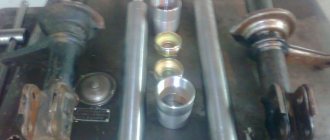
Features of the design and repair of the VAZ-2121 intermediate shaft
The intermediate shaft transmits torque from the transmission output shaft to the transfer case drive shaft.
It consists of an elastic coupling, a flange and a constant velocity joint.
The intermediate shaft is centered on the transmission output shaft by a rubber bushing.
An elastic coupling allows transmission of torque with minor changes in the angle between the shafts of the gearbox and transfer case, protects transmission parts from dynamic shocks and reduces noise and vibration of the driveline during operation.
The elastic coupling consists of six steel liners connected by rubber bridges.
Due to its elasticity, the clutch dampens jerks in the vehicle transmission.
The elastic coupling is attached to the secondary shaft flange with three bolts passed through the holes in the liners.
The other three holes are used to secure the coupling to the flange on the intermediate shaft. There are balancing washers located under the bolt nuts.
When disassembling, we mark their location so that later we can install them in their original places.
In order not to disturb the balancing, we note the relative positions of other parts of the intermediate shaft.
A constant velocity joint is placed on the splined end of the elastic coupling flange. Its structure is similar to the external joint of the front wheel drive.
The hinge is secured from displacement by a retaining ring located in a groove on the flange shaft.
The hinge is protected from dirt by a rubber corrugated cover and a plastic plug in the rear end of the hinge body.
The cover is secured to the flange shaft and the hinge body with special clamps with locks.
Under the large clamp (on the hinge body) there is a protective plastic casing.
On the first VAZ-2121 models, a cross was installed instead of a constant velocity joint.
Removing the intermediate shaft
Remove the transfer case assembly with the intermediate shaft (see Removing the transfer case).
While holding the shaft from turning with a screwdriver, use a 13mm wrench to unscrew the four nuts securing the intermediate shaft to the transfer case flange.
2. Remove the intermediate shaft.
Install the intermediate shaft on the transfer case in reverse order.
3. Before installing the intermediate shaft assembly with the transfer case, we check the condition of the rubber centering sleeve located on the flange of the secondary shaft of the gearbox.
Disassembling the intermediate shaft
We disassemble the intermediate shaft to replace the elastic (rubber) coupling or constant velocity joint.
1. Mark the location of the coupling relative to the flange, as well as the number and location of balancing washers relative to the coupling.
2. While holding the bolts from turning with a 19mm wrench, use a head of the same size to unscrew the three nuts.
3. Disconnect the coupling and flange.
4. By turning the hinge, remove the bolts from the holes in the elastic coupling flange.
5. Using a screwdriver, remove the plastic plug.
6. Squeeze the clamp with sliding pliers and remove it.
7. Use a screwdriver to move the plastic casing
8. Remove the rubber protective cover from the constant velocity joint housing
9. We place the hinge body on the open jaws of the vice and, striking through a soft metal drift at the end of the elastic coupling flange, knock out the flange.
10. Separate the hinge and flange.
11. Pull the plastic casing off the rubber boot.
12. Having pulled out the rubber boot, squeeze the clamp with sliding pliers and remove it
13. Remove the rubber protective cover
14. Using a screwdriver, remove the hinge retaining ring
Disassembling and assessing the condition of the hinge parts are similar to the corresponding operations described in the article - “Repair of front wheel drives”.
We assemble the intermediate shaft in the reverse order.
In the rebuilt or new hinge we put 20 cm 3 of CV joint-4 lubricant.
Before connecting the hinge to the flange of the elastic coupling, install a small clamp of the rubber protective cover.
15. Press the hinge onto the flange, striking through a piece of pipe onto the hinge holder
16. Before installing the rubber coupling, compress it with a clamp
We place the used coupling according to the marks relative to the flange.
We place the previous balancing washers according to the marks relative to the coupling.
When installing a new coupling, the shaft assembly may need to be balanced.
Intermediate shaft tightening torques
Nut of the bolt securing the elastic coupling to the flanges M12×1.25 - 57.8-71.5 Nm (5.9-7.3 kgf m)
Nut securing the hinge housing to the drive shaft flange of the transfer case M8 - 27.4-34.3 Nm (2.8-3.5 kgf m)
How to replace the clutch on a Chevrolet Niva with your own hands
All motorists know the role of the clutch in cars with a manual transmission. Also, every car owner knows such unpleasant moments when the clutch simply disappears. When you try to start, the clutch pedal is pressed idle, which causes a lot of inconvenience. In this case, the only option to correct the situation is to get to the service station and literally pick up the car from repair within 2-3 hours. Although this method can be called fast, it is still considered the most expensive. The only way to save money and get to know your iron horse a little more is to repair and replace the clutch in your garage.
Types of clutch faults
The clutch drive is a whole mechanism, so there are many reasons for the malfunction of this part. We will not consider all the malfunctions, since this information is already available on the global network, but we will pay attention only to the main reasons.
So, the main malfunctions when the clutch drive in a Niva Chevrolet slips, that is, it is incompletely engaged:
- The friction linings are too worn or have burned out. In such a situation, you can solve the problem by replacing the disk.
- The presence of oil on the surface of the friction linings of the driven disk, which indicates a malfunction of the sealing parts. In this case, you can get by by washing the discs with the obligatory removal of the cause of oil leakage.
There are also malfunctions that lead to the clutch starting to move, that is, it is not completely disengaged. The reasons for this phenomenon are as follows:
- End runout or warping of the driven disk. In such a situation, repairs can correct the problem, provided that the damage is minor. But most often, the presence of such a malfunction indicates the need to replace the disk.
- Friction lining rivets are loose. The driven disk will need to be replaced with a set.
- Air in the system. To do this, it is necessary to bleed the system.
- Distortion and warping of the pressure plate. Malfunctions of this kind can be resolved by replacing this part.
There are still malfunctions that will require replacement of some parts and components. Malfunctions can be identified by characteristic signs:
- You hear characteristic noises when you press the clutch pedal;
- Similarly, noises are heard, only when the clutch pedal is released.
All these malfunctions indicate one thing - you need to disassemble the clutch system and repair the breakdown.
Clutch replacement
Having found out the cause of the malfunction, it is necessary to take appropriate measures to eliminate it. Let's look at how to replace the clutch on a Chevrolet Niva together with the release bearing.
So, repairing or replacing the clutch is a fairly long process, so first you need to be patient and carry out all the steps according to the instructions. Replacement includes the following sequence of actions:
- Install the Niva Chevrolet SUV on the inspection hole for ease of repair work.
- Stock up on the necessary set of tools: screwdrivers, wrenches and a mandrel in order to be able to center the driven disk.
- Replacing the clutch requires removing the transmission to get to the unit itself.
- After removing the gearbox, you need to make marks for the location of the casing and flywheel. But this is only necessary if the old pressure plate will be used after replacement.
- Next, using the “8” key, you will need to unscrew all six mounting bolts. These bolts secure the clutch disc to the flywheel itself. To carry out the unscrewing procedure, it is necessary to keep the flywheel stationary.
- Now you can carry out the process of dismantling both disks: driven and pressure.
- It is important to inspect the driven disk. If there are cracks, chips, signs of wear, etc., then such a disk must be replaced.
It is necessary to measure the distance from the rivets to the surface of the lining; if it is less than 0.2 mm, then this disc cannot be used.
At this stage, the process of replacing the main clutch parts is complete. When replacing clutch discs, it is very important to pay attention to the release bearing. It is better to replace it immediately, so as not to have to disassemble the device again in a month.
Replacing the release bearing
The release bearing is also an important element of this device. With its help, the process of disengaging the clutch is carried out. If noise is heard at the moment of switching off, then this is a signal that the bearing needs replacement. The replacement process consists of the following steps:
- The bearing is disengaged from the release fork.
- The fork must be moved to the side and the bearing removed.
- Now, before installing a new one, you will need to clean the seat and thoroughly lubricate it with Litol-24. The bearing itself also needs to be lubricated before installation.
- Reassemble in the reverse order of removal.
When replacing the bearing, clutch adjustment is not required, since the process is automated. You can read more about its replacement in a separate article.
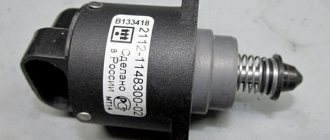
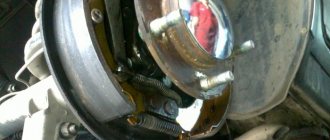
Clutch master and slave cylinders
The main cylinder is designed to transmit impulse from the pedal to the working parts of the device. If there is a fluid leak, as well as incomplete engagement or disengagement of the clutch, the master cylinder will need to be repaired or replaced. In order to make repairs, you must first remove the master cylinder. After removal, you can carry out an inspection, and then decide what is necessary - repair or replacement of the product.
If the master cylinder body is intact and shows no mechanical signs of wear, repairs can often correct the problem. The repair includes flushing all parts with brake fluid. The repair also includes replacing the cylinder components, which are included in the repair kit.
The clutch drive operates through the operation of the slave cylinder. That is, the force when pressing the pedal is transmitted to the fork and release bearing. The master and slave cylinders are connected to each other by a steel tube with a rubber hose on the lower edge. It is due to this rubber connection that periodic fluid leaks occur. As a result, the clutch drive is not completely disengaged. To replace the working cylinder on a NivaChevrolet SUV, you must first remove it. After the product has been repaired, it is necessary to bleed or adjust the clutch.
Clutch slave cylinder in place
You can bleed the clutch drive by the following measures:
- The hose is attached to the valve of the working cylinder.
- The second end of the hose must be lowered into a container with liquid.
- Now you need to depress the clutch pedal at least five times and hold it.
- The valve then opens and air is released. After this, the valve is tightened and the pedal is released. The drive can be considered adjusted only when, after opening the valve, liquid flows without air bubbles. This completes the adjustment.
Let’s look at which clutch is best to install on your Chevy Niva, and what types are known, in a brief review.
Sachs clutch
The Sachs clutch is produced by the German concern ZF. Sachs is famous for its wide network of concerns located in 39 countries. The Sachs clutch kit has the following advantages:
- The kit does not require maintenance.
- There are no asbestos linings.
- Copes well with increased loads.
- The clutch kit from Sachs for the Chevrolet Niva has gained enormous popularity in the CIS countries.
But it is worth highlighting one drawback that is a hindrance for budget car enthusiasts - the high cost of the product. The manufacturer also claims that the Sachs clutch kit has a service life of 100,000 km. But is it really so - you, dear Shnivovody, check. The kit costs approximately 5,500 rubles, but you still need to look for it.
Clutch kit from Valeo
Another clutch kit for the Chevrolet Niva, which is practically in no way inferior to the previous version. This kit is called Valeo and also has a number of its own features:
- High build quality.
- Considerable service life - up to 100 thousand kilometers.
- Easily handles heavy loads.
The cost of the Valeo kit is about 5,000 rubles. Valeo, like Sachs, are excellent solutions for fully equipping the Chevrolet Niva SUV. But the choice, of course, is up to the car owner; it’s only worth noting that the real service life of the Valeo kit even exceeds the 100 thousand km mark. In addition to Valeo and Sachs, there are also cheaper options for clutch kits under the names: FSO (Poland), VAZINTERSERVIS (Russia), Luk (Germany). The cost of the latter is 3,000 rubles, and the price for VAZINTNRSERVICE and FSO is even lower.
Manufacturers of clutch kits for the Chevrolet Niva are now known, and which option is better to choose depends, first of all, on how full your wallet is. Although it is worth noting that Russian production from the VAZINTERSERVIS company is second only to German models in price and service life, which is 2 times lower than that of Sachs and Valeo.
Source
Promval 21213 and its alternative
The trophy raid ended with a technical failure for us. Breakage of the intermediate shaft of our Niva. The technical meeting took place on May 3. We got home in the evening, and it was just brutal. We realized about the leak later, but it looked like this: you’re driving along, and suddenly the traction disappears. In general, the gear is engaged, the engine is running, everything is as usual, but you are standing still. It's like the transfer case is in neutral. So it is, the moment from the box to the RK goes through the groove, and at the junction of the donut and the flange it began to turn. Somehow we got out of the forest onto the highway, 170 km to the city. We started, drove more or less 4th gear for 100 km, trying not to breathe. After 100 km the connection began to disappear. Stop, play with gears, drive slowly. Until at some point they were no longer able to go. The house is 60-70 kilometers away. The navigator, but in fact an excellent pilot, and a friend suggested an option. The steering wheel was loosened on the mounts and pushed forward as far as possible towards the checkpoint. Somehow the wash-out caught a snag, and we quietly paddled home at 50 km/h. And about the trophy raid itself. The breakdown resulted in a study of the device and a debriefing of the flight. It turned out that 21213 uses a CV joint shaft. The CV joint is practically the same grenade as on the wheel drives. The advantage of a CV joint shaft is reduced vibration and greater comfort. At the same time, the 21213 industrial shaft has a stated disadvantage - less reliability compared to the industrial shaft based on crosses as in the 2121 fields. I will remember this for the rest of my life