The oxygen sensor on the VAZ-2112 is designed to measure oxygen in the exhaust gases of a vehicle. Thanks to the results obtained, it is possible to control the level of enrichment of the fuel mixture. It is worth noting that for the VAZ-2112 engine, both a too rich mixture and a lean one are critical. The engine may lose power or begin to consume a lot of fuel. In turn, when the engine is idling, unstable speed will be observed.
Location and service life of the controller
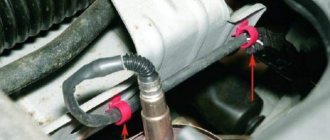
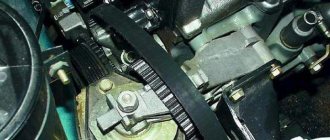
On a VAZ-2112 with engines with 16 valves, the measuring device is located at the exhaust pipe, between the exhaust manifold and the coupling.
To replace the device, you must gain access to the underbody of the vehicle body. For the best convenience, you need to drive the car into a garage with a pit or drive onto an overpass located near the highway. The service life of the oxygen sensor may vary. If a motorist uses a high-quality fuel mixture, the service life will be up to 110 thousand kilometers. In the case when a low-quality mixture is used, the service life is reduced to 85 thousand kilometers.
How to determine that the DC is faulty
The first signs of a lambda probe malfunction or how to check an oxygen sensor
Motorists often ask what symptoms of a malfunction a faulty oxygen sensor may have. Here are the most common of them:
- Unstable starting of a cold and hot engine.
- Errors appeared on the dashboard. Signs of DC malfunction are failures P0137 and P0578. They also often occur when the DTOZH malfunctions, so a check is needed.
- There is too much fuel consumption at short distances.
- Ignition of the working mixture in the cylinders.
- Exhaust gases that are black or bluish-black are also signs of a DC malfunction. This may also indicate a poor quality fuel mixture.
- The engine begins to "trouble". Extraneous sounds are observed. Which indicates that the driver has been using a low-quality fuel mixture for a long time.
conclusions
There are few signs of a malfunction of the oxygen sensor on the 16-valve VAZ-2112 engines, and in order to be completely sure that the oxygen sensor is not working, you need to connect to the computer and look for errors. There is only one method for troubleshooting - replacing the sensor. You can do this yourself, since there is nothing complicated in the process.
Publication date: December 20, 2016. Category: Automotive equipment.
A lambda probe is an O2 concentration sensor (or, more simply, an oxygen sensor) that allows you to estimate the volume of unburned oxygen contained in the exhaust gases. These indicators are extremely important, since by maintaining certain proportions of fuel and air, the most efficient combustion of the air-fuel mixture occurs. The best ratio is 14.7 parts oxygen to 1 part gasoline. If this ratio is violated, the mixture will be lean or, conversely, enriched, which, in turn, will affect fuel consumption and engine power.
Description of the oxygen sensor
DMRV sensor VAZ-2112 16 valves signs of malfunction: check
Let's start with a description of the device. We invite you to familiarize yourself with its purpose, structure, and operating principle.
Purpose and location
The VAZ 2110 lambda probe largely influences the stable functioning of the engine, ensuring the normal operation of its parameters. This controller is an electronic device used to determine the amount of oxygen present in the exhaust gases. This is necessary in order to reduce the volume of harmful impurities and elements contained in exhaust gases. In order to ensure the required proportion of the air-fuel mixture, which affects the reduction in the concentration of impurities, air must be supplied to the engine in the required quantity.
Lambda probe installation location
This is not always achieved, and the reasons may be different. If the controller fails, the carbon monoxide content in the exhaust gases will be about 3-7%, while the standard value is 0.3%. As for the location, this sensor on a VAZ is installed on the exhaust pipe of the muffler, from below. The readings recorded by the lambda probe are transmitted to the motor control unit. And the ECU, focusing on them, adjusts the composition of the combustible mixture, thus setting the required time for the injection phase.
Design and principle of operation
The VAZ 2110 oxygen sensor consists of the following elements:
- steel body;
- insulator component, which is made from ceramics;
- O-ring with wiring and cuffs;
- a special case with holes for ventilation;
- ceramic tip;
- conductive contact;
- a special shield, which also has holes through which gases are released;
- filament coil.
The device is based on two electrodes - internal and external, the first is made of zirconium, and the second is made of platinum. The zirconium electrode is in direct contact with the exhaust gases, and the platinum electrode is in contact with the air. The values that the controller receives are based on the potential difference between these elements. To ensure optimal operation of the oxygen controller, the device must be heated to 300-400 degrees (video author - MotorState channel).
The temperature is quite high, it is achieved through the use of a special heating component, which is built into the structure of the lambda probe. When the engine starts, the control unit adjusts the composition of the combustible mixture based on the readings of other controllers, and not just the lambda probe. In particular, we are talking about mass air flow sensor, throttle opening sensor, antifreeze temperature in the system, etc. And the control unit begins to refer to the lambda probe readings only after the device has warmed up to operating temperature.
Kinds
The first “Ten” injection engines used standard oxygen controllers from the manufacturer Bosch. In 2004, when these car models began to be equipped with more modern injection systems, which were called January 7.2, Bosch M7.9.7, the cars began to be equipped with modernized versions of VAZ oxygen regulators. The latest version differs from the earlier one in that it is equipped with a ceramic heating element, thanks to which less electricity consumption is achieved.
But even this allowed the controller to warm up faster. Currently, Bosch produces seven different types of oxygen sensors with different powers - 12 and 18 W. It should be noted that these devices differ from each other, perhaps, in the values of energy consumption and the number of contacts. In all other respects they are identical.
Device and symptoms of malfunction
To completely burn 1 kilogram of fuel mixture, about 14.7 kilograms of air are needed. Therefore, the lambda probe data is very important in the fuel supply system, since its performance directly affects the smooth and stable operation of your car’s engine. Periodic checking of its performance is very important, however, before checking the lambda probe, we need to study the device, as well as the principle of operation. The oxygen concentration meter sensor, otherwise called a lambda probe, (in our case the VAZ 2112 lambda probe) includes the following elements:
- Metal body with threads for mounting
- Sealing ring
- Ceramic insulator
- Electrical signal current collector
- Wires
- Cuff that seals wires
- Live contact for heating circuit
- Protective shell (outer) with ventilation hole
- Ceramic tip
- A special tank with an incandescent coil in it
- Protective screen, with a hole for the passage of exhaust gases
All parts of the lambda probe are made of materials resistant to high temperatures, since the sensor itself has a fairly high operating temperature, so it is not afraid of overheating, while overheating, for example, a motor will have dire consequences (and this is possible if the probe faulty). Probe sensors can have from one to four wires in the device, respectively, the name comes from them: one and so on up to four wire sensors. By the way, some “craftsmen” claim that the VAZ 2112 works well without a lambda probe, but they are mistaken, it’s just that until the engine is warmed up, the readings of the sensor are not taken into account during injection, since it has not reached its operating temperature, therefore, you can trust such advice drive without it, only on a cold engine. Breakdown of the oxygen sensor is often caused by violations in the maintenance and care of internal engine parts and some other factors, such as:
- Cleaning the body (washing) with products that are not intended for this purpose
- Accidental contact with coolant or brake fluid on its body
- Increased content of lead (metal additives) in fuel
- Severe overheating (red hot) of the sensor housing, which is caused by an unrefined combustible mixture
- In addition, the ingress of highly contaminated gasoline may occur due to a malfunction of the gasoline pressure regulator, or the DTOZh (coolant) temperature sensor, or a clogged fuel filter.
As a rule, if the lambda probe of the VAZ 21124 is faulty, this causes the following very noticeable problems in the operation of the engine:
- Its need for fuel increases, its consumption increases
- The car jerks when driving
- Unstable motor operation occurs
- The operation of the catalyst is disrupted
- Exhausts exceed permissible toxicity standards
Lambda probe replacement kit
In the photo above we see what a replacement probe looks like, which is worth purchasing to replace it yourself.
Checking the probe status
So that you can check the performance of your oxygen sensor with your own hands, you will need the following items:
- Operating instructions for your car, which will tell you where the lambda probe is located in the car
- Digital voltmeter
- Oscilloscope
We have listed only the basic necessary auxiliary tools. The engine will need to be warmed up during the test. Now we’ll tell you how to check the lambda probe on a VAZ 21124 yourself, it’s simple:
- Do a lean test. To do this, you need to take a vacuum tube and provoke an air leak. When your oxygen sensor is working properly, then the voltmeter readings are about 0.2 Volts or lower
Oxygen sensor for VAZ 2112
Signs of a faulty crankshaft sensor on a diesel engine
The oxygen sensor (hereinafter referred to as OS) is designed to measure the amount of oxygen in the exhaust gases of a car for the purpose of subsequent adjustment of the enrichment of the fuel mixture.
A rich and lean mixture is equally “bad” for a car engine. The engine “loses” power, fuel consumption increases, and the unit operates unstable at idle.
Domestic car brands, VAZ and Lada, among others, have one oxygen sensor preinstalled. European and American technical means are equipped with two controllers:
- Diagnostic;
- Managers.
They are no different from each other in design and size, but perform different functions.
The oxygen sensor is located in the exhaust manifold
Before moving directly to identifying the signs, you need to know where it is located and what it is responsible for. A lambda probe is a car sensor that reads the amount of oxygen released from the exhaust gases and regulates the supply of the fuel mixture.
Often, car manufacturers choose the location in front of the catalyst. In this case, the sensor is located in the exhaust manifold. Some automotive critics believe that this location is not entirely correct, since the probe should be located directly in front of the catalyst.
Layout of the oxygen sensor in the exhaust system
Also, to refine the system, oxygen sensors with feedback can be installed and used. To do this, another lambda probe is installed after the catalyst, which is connected to the electronic control unit. This was done in order to more accurately read data from exhaust gases, regulate the fuel mixture and reduce fuel consumption.
Replacement and can it be turned off?
Replacing the oxygen sensor is quite simple, since it only requires disconnecting it from the power supply and unscrewing it from the exhaust manifold. But with the question of whether it is possible to drive with the sensor disabled, everything is much more complicated.
Diagram of the location of the oxygen sensor with feedback
Symptoms and error codes
So, let's look at the main symptoms of a faulty oxygen sensor on a 16-valve VAZ-2112 engine:
- Increased fuel consumption.
- Failure at idle.
- Decrease in engine dynamics and power.
Design features of the oxygen sensor
It is worth noting that other sensors have the same reasons, so to get a more detailed answer, you need to connect to the engine’s electronic control unit and see exactly what errors popped up.
So, let's look at what errors are caused by a faulty lambda probe:
| Error P0130 | Invalid oxygen sensor signal 1 |
| Error P0131 | Low signal level of oxygen sensor 1 |
| Error P0132 | Crankshaft sensor 1 signal high |
| Error P0133 | Slow response of oxygen sensor 1 |
| Error P0134 | No signal from oxygen sensor 1 |
| Error P0135 | Oxygen sensor 1 heater malfunction |
| Error P0136 | Oxygen sensor 2 short to ground |
| Error P0137 | Low signal level of oxygen sensor 2 |
| Error P0138 | Oxygen sensor 2 signal high |
| Error P0140 | Oxygen sensor 2 break |
| Error P0141 | Oxygen sensor 2 heater malfunction |
| Error P1102 | Oxygen Sensor Heater Resistance Low |
| Error P1115 | Faulty oxygen sensor heating circuit |
Reasons for reducing the service life of equipment
- A natural factor due to the duration of operation without intermediate prevention;
- Mechanical damage;
- Manufacturing defect;
- Loose contact on the end switches;
- Unstable operation of the firmware of the electronic control unit as a result of which the input data is interpreted incorrectly.
Crankshaft position sensor VAZ 2110
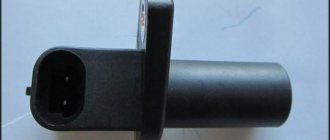
The crankshaft position sensor of the VAZ 2110 injector is quite important, since without it the engine cannot be started. Any malfunction of it brings the “tens” ECU or “brains” of the engine into a stupor. The sensor monitors the position of the camshaft (and therefore the pistons in the cylinders) in real time and allows the spark plugs to work in time. The spark plugs receive a signal from the ignition module that the upper compression point in the cylinder has reached and it’s time to “light” the spark. The sensor itself looks schematically as in this figure -
This is a small electromagnet that picks up the position of a toothed pulley that rotates nearby. The pulley has 58 teeth, which create electromagnetic disturbances. Actually for an injection engine, this is the main and most important sensor.
How to check a lambda probe
It is best to diagnose the lambda probe using specialized equipment at a service center. This is the only way to accurately determine its malfunction, as well as find out the reasons why it failed.
Only rough diagnostics can be carried out at home. And a regular multimeter turned on in voltmeter mode will help you do it. Before checking the oxygen sensor, you will need to warm up the car engine to operating temperature. Next, you need to turn off the motor and disconnect the probe connector. We connect the signal wire of the sensor to the positive probe of the multimeter. We connect the negative contact of the device to the ground of the car. We start the engine, load it to 2500 rpm and look at the instrument readings. If the voltage value is close to 0.9 V, the VAZ lambda probe is working and the cause should be looked for elsewhere. But if the voltmeter readings are below 0.8 V, most likely the sensor has failed.
Diagnostics
It should be noted that checking the functionality of the lambda probe should be carried out in conjunction with vehicle maintenance, at intervals of every 10 thousand kilometers. However, if the car was operated in unfavorable climatic conditions, which is applicable to Moscow, or in aggressive mode, maintenance should be carried out more often. This is the manufacturer's recommendation.
The manufacturer also does not recommend performing independent diagnostics or repairs if there are signs of any malfunction. To fix it, you should contact a service center.
Diagnosis by visual inspection
The beginning of any diagnosis begins with a visual examination. Primary methods for diagnosing an oxygen sensor include:
- visual inspection of the electrical wiring of the lambda probe for integrity and absence of mechanical damage or rupture;
- inspection of the lambda probe itself. There should be no soot or hard deposits on its surface.
Carbon deposits on the oxygen sensor housing indicate a faulty electric heater or an excessively rich combustible mixture entering the combustion chambers.
Solid deposits on the sensor body indicate poor fuel quality and the presence of harmful impurities in it, or an incorrect proportion of the combustible mixture.
If there are no visible causes of the malfunction, more detailed diagnostics are performed.
Detailed diagnostics
At the service center, by connecting a diagnostic computer, all electronic systems of the car are checked. If one of them malfunctions, the on-board computer detects the error and stores it in its error register. Each error has its own code, which makes it easy to find out the source of the problem.
In the absence of a diagnostic computer, plumbing diagnostics are required, which involves partial disassembly and diagnostics with a voltmeter. It consists of the following operations:
- starting the engine and warming up to operating temperature;
- engine stop;
- disconnecting the sensor connector and connecting a voltmeter to it;
- restarting the internal combustion engine and one-time increase in idle speed to 2500 thousand per minute;
- disconnecting the vacuum pipe from the fuel pressure regulator;
- checking the voltmeter readings. If the reading is equal to or less than 0.8 V, the 2110 oxygen sensor is faulty. It cannot be repaired, therefore, replacement is necessary;
- checking the oxygen sensor to detect a lean fuel mixture. In this case, the air supply to the engine is artificially cut off. If the voltmeter reading is 0.2 V or less, the sensor is working. Other readings indicate a sensor malfunction.
Also in the service center, using a voltmeter, it is possible to check the signal supplied to the lambda probe from the electronic control unit. If the supplied voltage is higher than 0.45 V, more detailed diagnostics of the control unit is necessary.
How to extend the service life of a recreation center
To extend the service life of the sensor, you will need to follow the following recommendations:
- Conduct a technical inspection of the vehicle on time;
- use only original spare parts for the car;
- do not allow the use of low-quality fuel mixture;
- Contact a car service if you find problems with engine operation.
You can change the oxygen sensor on a VAZ-2112 yourself without going to a car service center. Only original components must be used. If there are problems starting the engine, you should check the correct operation of the lambda probe.
Use a gas burner or stove
In this case, we will need a gas stove or burner and the already known phosphoric acid.
POPULAR WITH READERS: How to properly install a child car seat, selection criteria
The device is lowered into the acid for a few seconds and quickly brought to the fire.
Be careful not to expose any plastic covers that may be on the device to high temperatures.
After a certain time (you won’t have to wait long), a light gray salt will appear on the surface of the sensor core as the acid boils.
The acid should completely boil away. Do not allow vapors of the chemical compound to enter your respiratory system.
Remove the lambda probe from the fire, and then repeat the procedure again until the salt no longer appears.
Instrument testing
For such work, you can use a tester, oscilloscope or digital voltmeter. Considering the features of these devices, a voltmeter would be the optimal solution.
Examination
The check sequence will be as follows:
- Start the engine and let the car warm up.
- Next, we find the element we are interested in. If there are soot deposits or other external signs of a malfunction, there is no point in carrying out further testing with instruments. And so it is clear that it is out of order and needs to be replaced.
- Also check the condition of the wiring, the presence or absence of mechanical damage on the device.
- If everything looks fine, unplug the connector and connect a voltmeter.
- Now you can start the engine.
- Press the gas pedal in neutral to reach the 2500 rpm mark. After this, release the pedal.
- Remove the vacuum tube from the fuel pressure regulator.
- We check the oxygen sensor for functionality. To do this, look at what the voltmeter shows. If the reading is 0.8 volts or less, the probe is not working.
- It would be a good idea to check the device for a lean mixture. To do this, you need to turn on the air intake using a vacuum tube.
- If the voltmeter reads 0.2 W or less, the oxygen sensor is working normally. Deviation from these indicators indicates a breakdown of the device. Therefore, it needs to be replaced.
Article on the topic: Engine oil volume on a VAZ 2109
Other diagnostic methods
If signs of a lambda probe malfunction appear, you can use computer diagnostics to check its functionality. It allows you to monitor the operating parameters of the oxygen sensor online.
You can use an oscilloscope for diagnostics. If the test shows that the lower limit of the device drops to zero volts, then the controller is working, but it will need to be changed soon. If the time dependence of the voltage at the signal contact is characterized by greater smoothness, then it is time to replace the sensor.
It is correct to start diagnosing four-pin oxygen sensors with a visual inspection; this procedure is recommended to be performed every 10 thousand kilometers. For testing, the controller is removed from the manifold; WD-40 or brake fluid cannot be used, since their contact with the working surface will cause it to break. If special means are used when unscrewing coked threads, their residues are removed before removing the device.
Assess the color and condition of the operating area of the oxygen controller. If traces of soot are visible on it, this indicates an over-enriched combustible mixture in the engine. Its presence leads to contamination of the device, so to ensure better performance, soot must be removed. A gray or white coating indicates the use of additives in motor fluid or fuel. The presence of a shiny coating indicates that the concentration of lead in the fuel used is exceeded. If the coating is intense, then the sensor cannot be repaired; it must be replaced.
Speed sensor VAZ 2110
The VAZ 2110 injector speed sensor is installed on the gearbox, more precisely on the speedometer output shaft. If the sensor is faulty this can cause the car to stall at idle in some cases. When the spirometer needle begins to move abnormally (intermittently) on the instrument panel, this should alert you. After all, this may indicate a malfunction of the speed sensor. The sensor itself looks like this, look at the photo.
The principle of operation of the “tens” speed sensor is based on the Hall effect; when the gearbox shaft rotates, the sensor transmits a pulse signal. The higher the rotation speed, the higher the frequency of the pulse signal. This is how the speed of the car is measured. Two types of sensors were installed on the VAZ-2110, one has a square connecting block, the other has a round one.
If you continue to drive with a faulty lambda probe
Briefly:
• Reduced compression in the cylinders, increased wear of compression rings and cylinders and, as a result, a reduction in engine life. Failure of spark plugs.
• Guaranteed failure of the catalyst and the 2nd lambda probe if you continue to drive with a faulty 1st lambda probe.
• Deterioration of cold engine starts, uncomfortable driving, accompanied by reduced power and floating idle speed and sometimes dips at speed from 2000 to 3000.
• Increased fuel consumption, on average by 5-20% of normal and even up to 50% in severe cases, which ultimately will result in the cost of a new lambda probe over the course of a year.
• A check engine light that simply adds worry to your life and behind which you can see another problem.
More details:
If any malfunction of a modern car appears, it is necessary to hasten to eliminate it, preferably refusing further intensive use until it is eliminated. This applies to lambda probes more than to any other parts. As is already known from the article “What is a lambda probe for?”, this sensor, together with the catalyst, is responsible not only for cleaning exhaust gases from harmful impurities, but also for the correct mixture formation in the combustion chambers. It sounds quite innocent, and many car enthusiasts believe that after the oxygen sensor fails, all that threatens them is an increase in harmful impurities in the exhaust system. However, this is not the case.
Let's try to figure out what happens to the engine and its systems when you continue to operate a car with a faulty oxygen sensor, using the example of two main threats.
Reducing engine life. Let us briefly describe the mechanism of this process, which develops in two directions.
As a result of a malfunction of the sensor or its incorrect operation under the influence of external factors, an over-enriched fuel mixture may be supplied to the cylinders. This mixture does not burn completely, as a result of which the electrodes and insulators of the spark plugs and combustion chambers become covered with black soot. Heavy carbon deposits coke the cylinder compression rings. An incomplete fit and a decrease in compression occurs, as a result of which some of the gases enter the crankcase and “poison” the oil.
But this is not as dangerous as the process that runs parallel to the one described above. The remains of unburned fuel that has penetrated the compression rings wash away the oil film from the surface of the cylinder, causing dry friction, leading to a reduction in its service life, and in advanced cases, to overheating of the engine.
Failure of the catalyst and the 2nd lambda probe. As we have already found out, exhaust gases with remaining fuel enter the exhaust pipe. As a result, the catalyst begins to work in emergency mode, burning out the remaining fuel. Gradually the catalyst is destroyed, the products of its destruction begin to clog its honeycombs. The catalyst begins to overheat and melts, finally sealing its entire honeycomb structure. As a result, the engine power finally drops and the car stops driving due to the fact that there is no room for free exhaust gases. During this process, the 2nd lambda probe is also poisoned.
Another important reason why you should quickly replace the oxygen sensor is the need to turn off the illuminated Check Engine light, since behind an error in the lambda probe, you can overlook the appearance of another error
Catalytic Converter Malfunctions
The catalyst (also known as a catalytic converter) is designed to purify exhaust gases from harmful impurities and plays the role of a kind of filter. Inside the catalyst can there are ceramic or metal honeycombs coated with a catalytic layer of precious metal. Over time, soot from the exhaust gases accumulates, clogs the honeycombs, and the exhaust gases pass through the catalyst with difficulty.
It is not always possible to clean the catalytic converter; in many cases it must be replaced. But since the catalyst is quite expensive and clogs quite quickly (premature failure often occurs due to low-quality gasoline), many car owners try to get rid of this part in various ways:
- remove the catalytic element by knocking out the honeycomb from the can;
- Instead of a catalyst, a flame arrester is installed;
- If the catalytic converter is an integral part of the manifold, it is replaced with a special insert (stinger).
Restoring the performance of the lambda probe by cleaning
In some cases, the oxygen sensor stops working only because the holes in the protective screen and the ceramic tip itself are covered with soot. To restore the functionality of the part, it is necessary to clean the soot from the lubricating zone, but when performing such work, you must follow certain rules
It is important not to use for cleaning:
- metal brushes;
- sandpaper;
- files;
- other objects that can damage the ceramic element.
The best method to get rid of contaminants is to soak the ceramics of the lambda probe in a solution of orthophosphoric acid, but to do this, you must first carefully saw off the protective cap. If acid cannot be found, you can use a rust converter, which is sold in stores selling auto chemicals. Of course, to clean the part from soot deposits, the sensor must be removed.
To soak a ceramic tip, it must be placed in liquid for 15-20 minutes; the soot should disappear from the surface on its own. If the deposits are not completely removed, they can be cleaned with a soft toothbrush. After the procedure, you need to secure the protective screen using camp welding. When it is not possible to restore the lambda's functionality, there is only one option left - to buy a new oxygen sensor.
How to repair a lambda probe
Repairing a lambda probe with your own hands is quite simple; to do this, you need to determine in which particular unit the failure occurred.
If the problem is related to the circuit contacts, then first of all you need to find the break point and check whether the contacts have oxidized. The signal may simply not come from the control unit. Therefore, check the lambda power supply. If the element contacts have oxidized, they must be treated with WD40.
We recommend: Which is better, electric corrector or hydrocorrector for headlights on a VAZ 2110: pros and cons
If a lot of carbon deposits have formed on the probe body, it may be necessary to clean all parts of the system. And here a natural question arises: how to rinse the lambda probe. The fact is that it is strictly prohibited to process platinum electrodes and ceramic rods with sandpaper. Therefore, it is necessary to use specialized products designed to dissolve rust.
To clean the sensor, follow these steps:
- Remove the lambda probe after heating its housing to 50 degrees.
- Remove the protective cap.
- Soak the sensor in phosphoric acid for 30 minutes (it will cope with even the most difficult deposits).
- Rinse the lambda in water, dry it and install the element back. Don't forget to lubricate the sensor threads with a special agent to create a complete seal (but don't use silicone sealant).
Since the cost of sensors ranges from 1000 - 3000 rubles per element, it is quite reasonable to try to repair the lambda probe yourself (see video below), and only then proceed to install a new element.
How does it work
The principle of operation of a lambda probe is to compare the indicators of two electrodes, one of which is located in clean air, and the second in the exhaust manifold.
The VAZ 2110 lambda probe is made of heat-resistant materials, since the exhaust valve system and exhaust system have extremely high temperatures during prolonged engine operation.
The main structural elements of the lambda probe are:
- steel body;
- external platinum electrode;
- internal zirconium electrode;
- ceramic insulator between the inner and outer electrodes;
- electric heater;
- protective casing for the outer electrode.
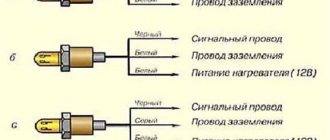
Also, lambda probes, with some technical differences, have a 4-pin connector:
- 1 contact - signal transmission to the electronic control unit;
- 2 - electrical power;
- 3 and 4 - electrical power supply to the electric heater.
The main task of the lambda probe is to determine the amount of unburned oxygen in the exhaust pipe.
The electronic control unit supplies the electrodes of the lambda probe with a voltage of 0.45 V.
The outer electrode determines the amount of ambient oxygen, the inner electrode determines the amount of oxygen in the exhaust gases. Having received the data, the sensor transmits the corresponding signal to the electronic control unit of the internal combustion engine. The transmitted signal is the difference between two indicators.
The control unit, having processed the received signal, makes adjustments to the operation of all components of the fuel system, and also ignites the combustible mixture earlier or later. This contributes to more stable and smooth engine operation.
On VAZ-2110 cars with 8-valve and 16-valve engines, on which an injector is installed, the sensor is located on the exhaust manifold of the car in front of the resonator.
A special feature of oxygen sensors on VAZ cars is their operating temperature. They begin to function when the temperature reaches 300–400 °C.
In the first minutes after starting the engine, its operation is monitored based on the readings of other sensors: mass air flow and internal combustion engine temperature, as well as the throttle opening sensor.
When the electric heater warms the device to the required temperature, the control unit begins to take into account its readings.
On previously produced VAZ-2110 cars, the manufacturer installed simpler lambda probes, the design of which did not include an electric heater. Consequently, the control unit read its readings only after the engine had sufficiently warmed up. At the same time, before warming up and subsequent monitoring of the operation of the internal combustion engine, the exhaust gases contained a significant amount of harmful elements.
After the approval of new legislation concerning a clean environment and a reduction in air pollution, car manufacturers began to install lambda probes that are able to independently warm up to the required temperature and, after a short period of time, provide less toxic emissions into the atmosphere.
Also, on a certain type of VAZ-2110 engine, the manufacturer installed a system of two lambda probes, which is also located on the exhaust system.
The first is located in front of the catalyst. It determines the quality of the exhaust gases before they enter the catalyst.
The second is after the catalyst, thereby checking the quality of its work, which consists of purifying exhaust gases to the level required by law.
Types of sensors and operating principle
The lambda probe is installed in the exhaust system. Sensors are divided into two types: two-point and broadband.
The two-point sensor consists of ceramics, the elements of which are coated with zirconium dioxide on both sides. Installed in front of or behind the catalytic converter.
The principle of operation is to measure the level of oxygen concentration in the environment and exhaust gases. If the level changes and becomes different, a voltage is created at the ends of the sensor elements, from low to high. Low voltage is created if there is excess oxygen in the system.
Otherwise, if the system does not have the required level of oxygen, high voltage will be created. These signals are sent to the engine control unit, which distinguishes them by current strength.
The wideband sensor is a more modern design. It also has two ceramic elements. One of them can be called “pumping”. It is responsible for activating the process of pumping or removing air from the system.
The second element can be conventionally called “two-point”. The principle of operation is based on the fact that as long as there is the required amount of oxygen in the mixture, the current strength on the “pumping” element does not change and is transferred to the “two-point” element.
It, in turn, receiving a constant current from the “pumping” element, maintains a constant voltage between its elements and is inactive.
As soon as the oxygen level changes, the "pumping" element supplies the changed voltage to the "two-point". This, in turn, ensures either pumping air into the system or pumping it back.
Replacing the oxygen sensor
If any damage occurs, the sensor must be replaced. You can try to do this yourself. Let's consider the situation of replacing a lambda probe on a VAZ 2114:
- We put the car on an overpass or drive it into a pit and remove the motor protection (to replace the sensor with the neutralizer).
- We are looking for the wires from the oxygen sensor, and follow them to the sensors themselves, they are located on the catalyst (the first before the converter, the second after).
- We cut the clamps and disconnect the connectors.
- Let the system cool down.
- We take a wrench for “22” or special. head and unscrew the sensor.
- We take a new sensor and install it in place of the old one. We tighten the nuts.
- We connect the wires to the connectors.
- Use new clamps to secure the wires to the cooling system (do not allow contact with the exhaust pipe).
- Install the protection in reverse order.
On other car models, replacing the sensor will be identical.
https://youtube.com/watch?v=68L_IkIfRu4
Replacement problems
When replacing, the old sensor may stick to the pipe. In this case, proceed like this:
Generously pour wd-40 and try to unscrew it. Turn on the engine, heat the exhaust system and unscrew the sensor. Try to heat (being careful) the sensor itself and unscrew it. Tap it lightly with a hammer and try to unscrew it again. If this does not help, try “thermal shock”. Pour cold water onto the well-heated sensor
Try unscrewing it again.
Oxygen sensor price
The price of an oxygen sensor will vary by region and model. It ranges from 1000 to 3000 rubles. Buy a lambda probe in specialized stores and only with a guarantee.
Causes of oxygen sensor failure
- Coolant or brake fluid has come into contact with the sensor housing.
- The fuel used has a high lead content
- Severe overheating of the sensor caused by unclean fuel (clogged cleaning filters)
- The sensor has simply expired
- Mechanical damage to the sensor while the vehicle is moving.
A failed sensor will affect the operation of the vehicle as a whole and lead to additional problems. But using them you can immediately determine a possible breakdown of the sensor and replace it in a timely manner.
Related problems when the oxygen sensor fails
- The car began to consume more fuel than usual
- The car began to move jerkily
- The engine became unstable
- The normal operation of the catalyst is disrupted
- When testing for exhaust gas toxicity, the result gives inflated values.
In conclusion, I would like to give advice: in order to avoid the problems described above in the future, monitor the performance of the lambda probe. Check its condition every five to ten thousand kilometers.
So, many people know that a Lambda probe from tens (VAZ2110) is suitable for the C20NE engine, in terms of parameters it is completely identical, the only difference is that in our native Lambda Probe there are three wires (2 white and black) and on the tens there are four wires (2 white, black and gray). two white ones need to be connected to two white ones (this is the lambda heating), black to black (this is the signal wire), and for the gray one we run an additional wire and screw it to ground.
there are two types of Lambda with tens, on the left with slots (from the 1.5 engine) on the right with holes (1.6 engine)
with the holes it died quickly... it lasted a year and that’s it, before that it was standing with the holes, lasted 3 years (75,000 km)
so I recommend taking it with slots, it is more similar to our native one
Checking the performance of the lambda is as easy as shelling pears; for this you need a multitester.
with the car running, insert the positive wire of the tester into the lambda connector into the black wire, minus the tester to ground
We set the multitester to 2000 millivolt mode
In fact, the oxygen sensor on the VAZ 2110 plays one of the most important roles in the functioning of the engine and exhaust system.
At the same time, not all car owners know what kind of device this is, what tasks it performs, or how to check the functionality of the oxygen sensor. Today we will talk about this and more.
HOW TO CHECK THE LAMBDA PROBE
Check one of the sensor terminals, namely the signal terminal. For this:
- Or use a scanner.
- Or using a motor tester. Using the probes, the connection is made and the recorder is turned on. Thanks to the second method, you can see the waveform, current and peak values. The serviceability of the sensor can be determined by the signal shape.
So that you are not mistaken, I will explain that the main indicator for a lambda probe is not the mixture composition or ignition timing, but the oxygen content. How the process occurs: A reference voltage of 0.45 V is sent from the electronic control unit to the signal pin of the sensor. To be sure, you can remove the terminal from the sensor and take measurements using a multimeter. If everything is so, then the sensor is working.
OPERATION PROCESS OF OXYGEN SENSOR
When the volume of oxygen in the exhaust gases increases, the voltage supplied to the sensor decreases to 0.1 V, when there is less oxygen than required, it increases to 0.9 V. The VAZ 2110 features a zirconium oxygen sensor, due to which the voltage jump, depending on the volume of oxygen, occurs as a percentage stoichiometric mixture, with a ratio of 14.7:1. Given this, the fuel-air mixture ignites.
If you understand how the lambda probe works, you will understand how to make a diagnosis. Well, let’s say the ECU (electronic control unit) error P0131 pops up, which says “Low signal level of oxygen sensor 1”. Here you need to understand that the sensor checks the state of the system and therefore if the mixture is lean, it will report an error. In such cases, replacing the lambda probe is not relevant.
You may ask, “So how do we define a problem? How to find out the problem is in the system or in the sensor? For understanding, I want to consider several situations:
- Case one. So, an error about a “lean mixture” appeared, we check the voltage with a multimeter - low. We perform the following actions: add gasoline supply (you can pinch the return drain hose). If this is not available, you can use a syringe to pour some fuel into the intake manifold. And see if the sensor responds. If the sensor shows that the mixture is rich, then the breakdown is not in the lambda probe, but in the fuel supply system. Fuel is supplied in less quantity than required.
- Random number2. The sensor indicates an over-enriched mixture. We make an artificial suction. You need to lift the vacuum hose and also check the voltage on the lambda probe; if it decreases, then the sensor is working.
- And the last third case. This situation is rare, but still unpleasant. We clamp the return line (by making a suction) and at the same time 0.45 V remains on the sensor - we can say that the lambda probe is faulty. Since it must react to any changes in the fuel-air mixture by changing the voltage at the signal pin, reporting an error. During normal operation of the sensor, during a sharp change in the quality of the air mixture, it should also change the voltage sharply. If the voltage changes smoothly, then the sensor is worn out or clogged with carbon deposits. In this case, you can CLEAN the OXYGEN SENSOR or replace it with a new one.
There is one thing that can be confusing:
If there is a misfire, the output is a mixture with a large amount of fuel and air; the sensor interprets this as a large amount of oxygen in the exhaust gases, and will show errors even if you change the sensor to a new one.
Also, do not miss such a thing as the appearance of a gap in front of the oxygen sensor, through which oxygen can enter from the outside. And isn’t it difficult where this will lead? That's right, the sensor will report a lean mixture. Consequently, the mixture entering the engine will become over-rich, and the sensor will still report lean. In this case, it is not a bad idea to use a gas analyzer, which will show the truth whether the mixture is enriched.
That’s basically it, we figured out what a lambda probe is, how it works and how to diagnose it. I look forward to new meetings at vaz2110-remont.ru.
(votes: 4, average: 5.00 out of 5)
0171 (fuel mixture too lean) - Community “Lada 2110, 2111, 2112, 112, Bogdan” on DRIVE2
Hi all. This is the situation, I bought a 2110 with a jammed engine, a 1.5 16-valve engine, they did a major overhaul, everything was as it should be. After the capital, there are failures at the lower levels, twitching. Error 0171 pops up (fuel mixture too lean), fuel pressure at idle is 3 atmospheres. If you remove the hose from the pressure regulator, then 4 somewhere rises. The fuel pump, mesh, fine filter are all new. The fuel is fine. For air leaks, I also checked the corrugation, which I changed from the air flow sensor to the throttle, and I also changed the idle speed sensor. I also swapped the ignition module from another car and it remained the same. When I unscrew the spark plugs, there is a white coating on them, which means a lean mixture. Before the renovation, there was also such a deposit on the candles. I cleaned the injectors with ultrasound, installed new rubber seals when assembling them, but air cannot be sucked in there either. I talked to the owner and he said that he had installed a new lambda probe and was also looking for the cause. When we assembled the engine, the air pressure sensor was faulty, it worked at idle at all, replaced it and it started working. What I’m thinking is that maybe the old owner changed the lambda and drove with a faulty air flow sensor and because of this he ruined the new lambda probe, could this be the case? Or advise what else I can try. Everything I thought about, I searched everything. Brains January 5.1 I still have thoughts that it might be a matter of firmware
vote
Article rating