Replacing an external grenade on a VAZ 2110 can be a serious problem if you don’t have some special tools at hand. However, for every non-standard situation there is a non-standard way out. How to change a grenade on a VAZ 2110 quickly and without difficulty is in the article.
To begin with, what is a CV joint? This is the correct name for the grenade, the second is a popular name, due to the specific shape of the part. There are 6 bearings installed inside it, on which the inner race rotates. Therefore, torque can be transmitted to the hub at any angle.
Tools for replacing the external CV joint of Lada 2110
There are several specific tools here that you can’t do without. To begin with, you need a 32mm socket, as well as a huge lever to unscrew this very grenade.
Next you will need something like a reverse hammer. The weight of the cargo is about a kilogram. If it is not there, then we will go along the second path, we will describe it below. You will also need a device for removing and installing clamps, either pliers, or just a screwdriver, we’ll talk about this a little later.
We change a grenade on a VAZ 2110 without removing the drive
This is the first, shortest path, which implies the presence of all the specified tools. Everything is quite simple.
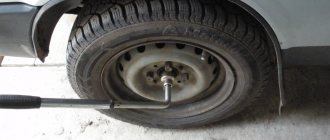
- Before jacking up the car, you need to unscrew the grenade nut. To do this, we seat the assistant in the cabin; he must press the brake pedal with all his might and hold the steering wheel. In order to unscrew a grenade after a conscientious tightening, you need a lever of about a meter, sometimes more. The threads are usual everywhere, right-handed.
- Then we remove the wheel bolts, jack it up and remove the wheel.
- We unscrew the two 17mm bolts that hold the ball joint, disengage the splines, and move the hub to the side.
- Now, using a tool for removing clamps or a screwdriver, depending on the type of clamp, remove it. Don't forget about the small clamp.
- Now we screw the reverse hammer with a welded nut onto the grenade. We clamp the drive with a gas key so that it rests against the forged lever (saber). This is necessary in order not to tear the drive out of the box, otherwise you will have to take the second path. With a sharp blow we rip the grenade off the slots.
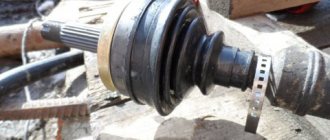
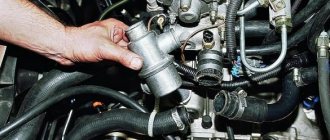
- We remove the boot; as a rule, the grenade fails precisely because it has broken through.
Important! Under no circumstances should you install the anthers that come with the grenade. They are made of very low-quality rubber, become tanned at the slightest cold snap and burst. Therefore, you will soon have to change the grenade again.
- We install a new boot. We do this very carefully, preferably after washing the slots first. The main problem is the thrust ring; carefully throw the boot over it with a screwdriver.
- Now we tighten the inner clamp, screw the new grenade onto the hammer, and then hammer it into place. Theoretically, this can be done with a hammer through an old nut; knocking a grenade down with a hammer is also possible, but there is a risk of damaging the slots if you are not used to it.
- We take CV joint lubricant, it is usually included in the kit. We squeeze it out in a circle onto the balls, removing the boot and turning the grenade inside out.
- Next, tighten the clamp.
- We put everything back together in reverse order.
- It is very important to tighten the nut just as tightly and be sure to tighten it.
Video text
When removing the CV joint, the retaining ring jammed. Before that I screwed in the hub bolt, but it didn’t bring any results, it just became deformed - I could barely unscrew it. Also, shock manipulations were useless. How I solved this problem, watch the video. POPULAR VIDEO OF THE CHANNEL: RESTORING A BALL JOINT WITH YOUR OWN HANDS. HERE: https://www.youtube.com/watch?v=1-CjF.
REPAIRING BENDEX – EASILY WITH YOUR OWN HANDS. HERE: https://www.youtube.com/watch?v=vdeFs.
Good luck to everyone with the renovation!
===================================================== ====Optimization (not for reading!) remove the grenade, CV joint, removing the CV joint, how to remove the CV joint, cannot be removed, car repair, car repair, auto repair, chassis repair, replacing the CV joint, grenade VAZ, grenade, replacing the grenade, outer boot , engine repair, how to remove, dismantling, grenade repair, remove, axle shaft, replacing a grenade with abs, replacing an external grenade, replacing a grenade on a Prior, a grenade with abs, difference between CV joint and abs, CV joint puller (replacing a grenade), splines, removing a grenade , hub, grenade stuck, knocking out CV joint, grenade boot, replacing grenade boot, solaris box, solaris repair, box repair, repair, Solaris, solaris, hub puller, drive, tripoid, OLEG Vinokurov boot, remove grenade, CV joint, CV joint removal, how to remove a CV joint, not removable, car repair, auto repair, auto repair, chassis repair, CV joint replacement, VAZ grenade, grenade, grenade replacement, external boot, engine repair, Car repair, how to remove, dismantling, grenade repair, REMOVE, how to remove CV joint from the shaft, how to knock the CV joint off the shaft, the CV joint cannot be removed, how to knock the CV joint off, how to remove the grenade from the drive, how to knock off the outer CV joint, how to remove the grenade, how to knock the CV joint off the shaft, how to remove the CV joint from the drive, how to remove the CV joint without a puller ,the grenade cannot be removed, how to knock a grenade out of the drive, replacing the CV joint, the outer CV joint cannot be removed, how to knock a grenade off the drive, how to knock a grenade off the shaft, how to remove the retaining ring on the CV joint, the retaining ring of the CV joint, the outer CV joint, how to knock out a grenade, daewoo lanos, how to shoot down a grenade, VAZ 2110, replacing CV joint drives, replacing CV joints, VAZ 2110, 2112, Kalina, Granta, Priora, replacing CV joint drives, outer CV joint, cars, auto, car, car repair, do-it-yourself VAZ, Lada Kalina repair , AvtoVAZ, CV joint replacement, grenade replacement, external grenade, the cv joint replacement, toyota joint replacement, how to change a grenade, replacing a CV joint with your own hands, changing the CV joint, external grenade, external grenade, CV joint boot, cv joint replacement, ersatz gleichlaufgelenk, puller CV joint, replacing a grenade with a puller, a grenade puller, a do-it-yourself puller, how to make a puller, making a puller, how to remove a grenade with a puller, replacing the outer CV joint, extractor, extractor cv joint, ท่านครับ-ตาพวกนายแล้ว ข้อรูปแบบสากล, abzieher gleichlaufgelenk . replacement of the outer Geely grenade, replacement of the Geely ck grenade, grenade, CV joint, puller, replacement of the grenade (CV joint) with a puller, replacement, replacement of the outer grenade and internal drive boot on a VAZ 2112, replacement of the outer VAZ 2112 grenade, replacement of the internal drive boot of the VAZ 2112, replacement grenades and boot of VAZ 2112, replacement of outer CV joint of VAZ 2112, do-it-yourself VAZ repair, do-it-yourself VAZ repair, youtube editor, toyota
In the article we will look at how to change a grenade on a VAZ-2109 and similar cars. The latter include models 2108, 21099, 2113, 2114, 2115. However, all front-wheel drive VAZ cars have a similar design, so our manual can be used when repairing other models. But first, let's look at what a grenade is, what it consists of, and for what purpose it is installed on a car.
Types of clamps on the CV joint boot
Now it’s time to talk about what kinds of clamps there are, how to deal with them, and which clamps for the CV joint boot are better?
First type
Let's start with the most popular. This is the so-called “Ford” clamp. Recently, it can increasingly be found in kits from various manufacturers of grenades for the VAZ 2110 and other domestic cars. Among its advantages, of course, is the full connector, that is, if you accidentally forget to put it on in advance, you can do it at any time. Besides, you can’t “pull him over.”
Among the disadvantages, of course, is its disposability; you can use it a maximum of 2 times. Many may think that there is always a new one in the kit, but they would be extremely mistaken. It also happens that he is not there. Anything can happen.
To install it, you will need pliers or regular bokoser-nippers. We just tighten it as much as we can with our hands, then squeeze it.
Second type
These are purebred Chinese clamps. As soon as you see them, you will immediately understand why there is such an opinion about them. These clamps are simply made almost from foil. That is why they are tightened in two turns. To install, simply place a screwdriver into the plastic to avoid turning, then tighten, bend, bend the antennae, and cut off the excess.
The advantages include ease of installation; absolutely no tools are needed except a screwdriver. Well, the downside, as with the previous option, is that it is disposable, since after installation you will have to cut off the extra tail of the clamp with scissors.
Third type
The third type can only be found on grenades for domestic cars. On the one hand, they are the most convenient, since they are made of thick metal, which, by the way, is quite soft; installation takes about five seconds. It can be installed at least 10 times, it all depends on accuracy. Of course, there is one drawback - the need for a special clamp, the cost of which is several times higher than the cost of replacement at a service station. Of course, if you plan to buy only the same grenades, then you can buy the necessary thing.
Replacement of outer CV joints (grenades) without removing the entire drive. Instructions
To work, you need a garage, but if you wish, you can do it outside. A good jack, rags, a 30mm head and a wrench, 17 and 19mm wrenches, a hammer and a set of CV joints. A puller for steering tips, VD-40, a flat-head screwdriver, pliers , a knife. And also hard wire. 1. We put the car at speed and, if possible, use the handbrake. We fix the three wheels with rollback wheels or bricks. 2 We remove the protective plastic cover from the hub, if possible, align the wrapped hub nut and unscrew it with a wrench and a socket by 30. Let me tell you straight away that it will not work easily. 3 We lift the wheel with a jack, for self-confidence we also put some kind of timber; it’s dangerous to place bricks, they can burst. We remove the wheel. 4 You will need to remove the caliper and hang it. The caliper is held in place by two bolts, use a 17 wrench to unscrew them. 5 Unscrew the two fastening bolts with a ball wrench at 17!6 It will also be necessary to pull the steering tip pin out of the front strut. Remove the cotter pin from the steering tip nut fixation hole and then unscrew the nut with a wrench at 19. Use a puller to remove the pin from the strut. And now you can remove the old CV joint from the hub by pulling the strut towards you and moving the rack to the side.7 Now the CV joint is free, remove the two clamps securing the boot. Cut the boot with a knife and throw it in the trash.8 Using a rag, remove the old grease from the drive and CV joint and use a hard wire to the stationary part of the suspension so that the drive does not jump out. Take a hammer and We knock down the CV joint with one good blow. Remove the retaining ring for fixing the CV joint. This is complete with dismantling the outer CV joint. Then everything is done in reverse order. I HOPE THE INSTRUCTIONS WILL BE INTERESTING TO ALL OWNERS OF FRONT WHEEL VASES!
How to properly remove and disassemble the CV joint in your garage
AUTOSIZE
Hello, dear car enthusiasts! Front drive wheels provide car owners with many bonuses in the form of: more responsive steering, increased maneuverability, stability on slippery roads and other delights.
In return, the machine, namely its chassis coupled with the drive, will require additional attention. The front wheels are able to pull the car only thanks to the presence of a shaft connecting the hub to the variable gearbox.
However, that's not all. It would be impossible to transmit rotation from the transmission to the wheels without special devices installed at the ends of the shaft - CV joints.
A constant velocity joint is, today, the only way to transmit rotational motion between axle shafts located at an angle to each other.
In this regard, any self-respecting car enthusiast should know how to remove and disassemble the CV joint, diagnose, maintain and repair it.
How to remove a CV joint yourself without the help of a car service
Despite the apparent complexity of the front-wheel drive design of a car, regardless of its make and model, the design of this unit is quite simple and similar in all cars.
In order to remove and replace the CV joint, it is enough to have a garage with an inspection hole or an overpass to facilitate access to the lower part of the car, as well as a set of standard tools.
As a rule, experienced car enthusiasts manage their work without any special devices, but if there is a desire to speed up repair work, you can purchase a CV joint puller.
Considering that each drive wheel has two hinges, repair work can be carried out depending on the following types of failure:
- removal of the internal CV joint and its repair;
- removing the outer CV joint;
- Removal and repair includes a shaft and two joints.
How to remove the inner CV joint in the garage
Repairing an internal CV joint is an event that is quite rare, but you must have the skills to handle this mechanism, because for its long life it is necessary to carry out preventive measures, replacing the boot and lubricant.
Before describing the technology that includes removing the internal CV joint, it should be noted that in this case, an inspection hole will be simply necessary, because the joint cage is bolted (6-8 pieces) directly to the differential gears, and this is the lowest point of the transmission.
After all the fastening bolts have been unscrewed, the steering wheel should be turned to free the spline joints from moving freely. Using a pry bar, the CV joint is very easily removed from the mounting socket. Removing it from the shaft is also easy; to do this, you just need to unfasten the retaining ring and the boot clamps.
A strong recommendation to all car enthusiasts: you should not remove the CV joint from the shaft under the car and, especially, do not disassemble it. It is much more convenient and rational to remove the shaft with two CV joints at the same time, and then perform all the manipulations on the workbench with a vice.
How to remove the outer CV joint yourself
The outer CV joint, which is installed directly at the hub, although more accessible, will require more time and effort to remove. Here you will have to almost completely disassemble the front suspension.
The wheel is removed, the hub nut is unscrewed and the lock washer is removed. After unscrewing the lower ball joint, the moving strut allows you to remove the CV joint axle shaft.
Repairing CV joints can be associated with certain difficulties. The first is the inability to remove the axle shafts or shaft from the splined joint. There are several options for getting out of the situation. First you need to take a wooden or brass spacer and try to knock out the axle shaft.
If nothing could be done at this stage, you will need a CV joint puller. One of the most common and simple pullers is made in the form of a horseshoe, which is attached to the axle shaft, and the thrust bolts remove the CV joint when rotating.
It is not difficult to disassemble the CV joint itself; for this you need:
- apply marks on the holder and body for reassembly in the same position;
- tilt the shaft with the holder at the end as much as possible to one side;
- Remove the ball from the holder on the opposite side and perform the procedure with all the balls in turn.
There is an opinion among some experts that it is enough to simply wash the CV joint with diesel fuel and “fill it in” with lubricant again without disassembling it.
In this case, there is a high probability that fragments of old retaining rings or other debris will remain inside. If the CV joint has already been removed, then it is better to disassemble it, wash it, reassemble it and lubricate it.
Installation of the CV joint after replacement or maintenance is carried out in the reverse order of removal.
Replacing a grenade on a VAZ-2110, 2111, 2112
The car drive part responsible for transmitting torque from the gearbox to the wheel is called a CV joint (constant velocity joint) or is also called a grenade due to its external similarity.
The CV joint is a ball bearing that rotates transversely rather than longitudinally. Despite its simple design, the hinge performs a very important function in the vehicle’s chassis system.
The grenade normalizes the constantly changing angle of the axle shafts connected to each other, which allows the front wheels to freely turn left and right.
There are two CV joints in one car:
- The internal one is designed to transmit rotation from the gearbox to the shaft.
- The external one transmits rotation from the shaft to the hub.
Basic faults
The most common failures of a grenade include: failure due to contamination and due to wear of the part (end of service life or defect).
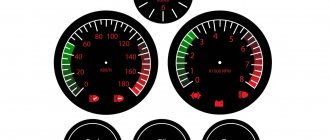
A faulty grenade can itself reveal its unsatisfactory condition in the form of crunching sounds, crackling sounds when turning wheels, and body vibrations. But in this case, you will have to buy a new part, but you can notice the malfunction much earlier (at the stage of damage to the cover) and prevent serious repairs.
There are several ways to identify a breakdown:
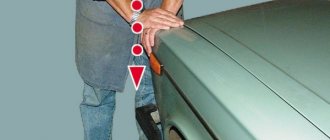
- shake the drive shaft with your hand. If play is detected, the element should be replaced;
- Turn the steering wheel all the way to the left, and then to the right, and at each stage assess the condition of the anthers. If damage (cracks, breaks) is detected, replace them.
The CV joint is protected by anthers from getting dirt into it, which disables the part. But their service life does not last forever; regular inspection of these parts is necessary (as described above) to prevent more serious damage to the grenade.
When operating a car with a faulty joint, also known as CV joint, there is a high probability of it breaking in half. In this case, the vehicle will not be usable. This means repairs will be required and most likely (if this happens on the road) expensive tow truck services.
It is recommended to replace the grenade in a timely manner to avoid unpleasant situations.
Price
An internal CV joint will cost an average of 1,500 rubles, an external CV joint will cost 1,300 rubles. For the anthers they will ask about 150 rubles each. Replacing anthers will cost much less.
Replacing CV joints at a car dealership will cost 1,200 rubles (600 rubles each).
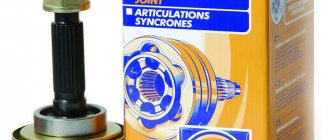
It is recommended to buy a new part using an old one, so the likelihood of an incorrect purchase is minimized. In addition, the purchase of CV joints should be carried out in trusted stores. You should not buy these parts at a disassembly site; it is possible that a breakdown will occur within a few meters.
Functionality check
of the inner and outer CV joints should be examined separately , since the procedures and signs are somewhat different.
External grenade
Grenade
If you want to verify that the outer CV joint is faulty, do the following:
- When starting from a standstill, deliberately create jerks, but not strong ones;
- Try to accelerate sharply and slow down;
- Move the shaft transversely between the CV joints. If you feel any play, then the grenade is definitely worn out.
Internal grenade
But to understand whether an element really needs to be replaced, do this:
- Raise the drive wheels, which will allow you to bring the inner CV joint to its maximum angle;
- Start the engine;
- Turn on first speed;
- If the hinge is at the limit of wear, you will hear a characteristic crunch. This is a signal that you need to change the grenade.
Replacement
It is recommended to drive the car onto an inspection hole or overpass, put the handbrake on, engage the gears and support the rear wheels with wheel chocks to ensure safety during repairs.
We arm ourselves with the following tools: wrenches 17.19, socket 30 and 13-17, mount, wheel wrench, wrench, lift (jack), lubricant and pliers.
Both hinges, internal and external, are located on the shaft drive, which means replacing them is identical and the point is to get to this very drive.
- At the rear on the crankcase protection we unscrew two nuts with a 19mm wrench, and at the front there are also two, but with a 17mm wrench.
- Drain a little oil (less than half) from the box.
- From the required side we tear off the wheel bolts with a balloon.
- Unscrew the nut of the outer grenade using a 30mm socket.
- We lift the vehicle using a jack.
- We remove the wheel by unscrewing it first.
- Find the bolts on the hub that secure the CV joint and unscrew them using a 13mm wrench (only two bolts).
- Use a pry bar to move the hub away from the reaction rods.
- We take the grenade pin out of the hub, to do this we pull the stand towards ourselves.
- We move the shaft drive aside.
- Now you need to remove the inner hinge from the box. To do this, open the hood and, using a pry bar inserted between the parts, jerk it towards the box. The CV joint must move, otherwise we repeat the action. As soon as it works, we go down to the wheel arch and remove the shaft drive with two CV joints.
- Remove the clamps (large and small) of the protective cover from the hinges. If damage to the anthers is detected, we replace them; if the condition is satisfactory, we move them to the side.
- Using a hammer, we hit the inner clip of the inner grenade with force, making sure that it flies off. We repeat similar actions on the other side.
- We remove the old rings from the shaft drive, put on new ones and a boot.
- We install the new hinge using a hammer and lubricate it and the boot with grease.
- Using clamps, we fix the protective cover on the grenade and the shaft. We do the same with the second part.
- We drive the shaft drive into the box, having first screwed the nut onto the CV joint.
- We collect spare parts in reverse order.
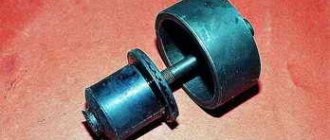
Design
Drive diagram
If you disassemble the CV joint, it will consist of three main elements:
- Inner ring;
- A ring with holes that hold six balls - a separator;
- The hinge body together with the drive shaft.
In a VAZ 2110 car, the CV joint may need to be replaced. But which one exactly? After all, in the “ten” there are two of them - internal and external. They are necessary in order to effectively overcome all obstacles. Here one CV joint will clearly not be enough.
Internal and external
- The first grenade is internal, and it transmits torque to the shaft from the transmission.
- The second grenade is external and engages with the car's wheel hub.
Despite the fact that their operating principle is the same, they differ in design and price.
Replacing CV joint VAZ 2110
A “grenade” or CV joint is a ball bearing with transverse rotation. On all front-wheel drive domestic VAZ cars, including 2110-2112, the front wheels rotate using constant velocity joints - CV joints. Thanks to it, all the torque that comes from the engine to the gearbox is transmitted to the front wheels; This part is used exclusively in front-wheel drive vehicles.
The grenade normalizes the constantly changing angle of the axle shafts connected to each other, which allows the front wheels to freely turn left and right. And it is these nodes that are subject to increased wear.