Rice. 3. Gear shift diagram: a – for a four-speed gearbox; b – for a five-speed gearbox
In Fig. Figure 3 shows a shift diagram for a four-speed (a) and five-speed (b) gearbox. To confidently control the gearbox, remember the difference between first and reverse gears. To reverse, engage reverse gear only when the car is completely stopped, pausing for about 3 seconds after pressing the clutch pedal. When selecting reverse gear, the gear shift lever moves from the neutral position in the same direction as for selecting first gear, and then moves with increased resistance all the way to the left and forward to engage the gear.
VAZ-2109 is a fairly popular car in Russia and the CIS. Serial production of the car started in 1987. Over all the years of production, the “nine” was equipped with only two types of boxes. Both were mechanical. Over the years of operation, these gearboxes on the VAZ-2109 caused many problems and complaints among motorists. Well, let's take a closer look at this box and look at its typical problems.
Characteristic
As we said earlier, a 4-speed transmission was also installed on the car. The assembly of the gearbox for the VAZ-2109 of this type did not last long. Therefore, it is now very difficult to meet “short-winged” cars with a 4-speed manual transmission. It's practically a rarity. 95 percent of the “nines” came with a more modern, 5-speed manual transmission. It was two-shaft, with synchronizers in all gears (except reverse). Structurally, this gearbox is combined with the main gear and differential. It differed from the 4-mortar in a different location of the crankcase ventilation pipe. It was located on the clutch housing (previously it was on the rear cover). A dipstick also appeared. But the gear ratios remained the same.
In Russia, these cars stopped being produced back in 2004. But you can still find spare parts for the VAZ-2109 gearbox in stores. Their price is quite reasonable. If necessary, you can buy a complete transmission for 5-6 thousand rubles.
Tuning the gear knob
Breathing a new spirit into the design of the gear knob is very simple. Today in stores you can see a huge assortment of the most sophisticated accessories in design. But it’s quite reasonable to create something yourself, for example, illumination of the VAZ-2109 gearbox handle. To do this, you should invest in a new pen, the model of which is suitable for these purposes.
When choosing a handle, pay attention to the presence of grooves and holes for wires. Usually the part of the handle on which the gears are marked is not visible because the numbers are chrome-plated. But this shortcoming can be completely corrected.
You can purchase ferric chloride at any chemical store.
Pour the ferric chloride solution into a glass container and place the lid in it. After 10 minutes, remove and rub with a brush. Repeat the operation until all the chrome coating has disappeared. To speed up the reaction, you can add a little hot water to the solution. Next, install the light bulb and wires into the handle body. And now, the new unusual gear knob is ready.
Other differences
- there is no additional bushing on the switch;
- not the same number of passes;
- marking with special paint numbers on the gears of the transmitting elements;
- location of ball bearings in crankcase sockets;
- This gear is equipped with a synchronizer equipped with a locking ring;
- gear 5 of the transmitting element is installed on the spokes of the input shaft;
- The shape of the cover on the rear transmission type system is deeper.
Device
This transmission consists of several elements:
- Primary and secondary shaft of the VAZ-2109 gearbox.
- Transmission box housing.
- Synchronizers.
- Axles with reverse intermediate gear.
- Differential, which changes the gear shift drive.
- Aluminum cover with breather. For better heat dissipation, its surface was ribbed.
So, we looked at the design of a typical VAZ-2109 gearbox. This transmission may need to be repaired for several reasons. Below we will look at the main faults and how to fix them.
Synchronizer
The synchronizer consists of a hub 5 (Fig. 60), rigidly connected to the secondary shaft using splines, a sliding coupling 2, two locking rings 1, three cotters 4 with clamps 3 and springs, as well as synchronizer gears. The sliding clutch 7 (see Fig. 59) of the 1st to 2nd gear synchronizer has an outer ring for engaging reverse gear.
Rice. 60. Synchronizer parts:
1 — blocking ring; 2 — synchronizer sliding clutch; 3 — locking ball; 4 — retainer block; 5 — synchronizer clutch hub.
The synchronizer hub for 1st and 2nd gears is mounted on the splines of the secondary shaft and is secured on the shaft against axial displacement by two locking rings. The hub has six longitudinal grooves, three of which have slots for retainer springs. Rusks 4 (see Fig. 60) with retaining balls are installed in the same grooves. Springs press the clamps against the annular grooves of the coupling. On both sides of the hub there are bronze locking rings I with toothed rims, the pitch of which is equal to the pitch of the internal teeth of the sliding clutch and the gear rims of the gears of 1st and 2nd gears. The locking rings have six protrusions that fit into the grooves of the hub, with three short protrusions going into the grooves in which the clamps are located, and longer and wider ones into other grooves. These projections are installed in grooves with a lateral clearance equal to half the thickness of the coupling (hub) tooth, and limit the angle of rotation of the blocking ring relative to the hub. Thus, the hub rotates together with the blocking rings. With their conical surface, the blocking rings come into contact with the bevel belts of the 1st or 2nd gear gear at the moment the gear is engaged. To break the oil film at the point of contact and increase friction forces, especially fine threads and longitudinal grooves are cut on the conical surface of the ring.
The sliding clutch with its inner rim is seated on the outer gear rim of the hub and can move along the hub. To do this, the gear shift fork fits into the annular groove of the coupling. The ends of the coupling teeth are beveled at the same angle as the teeth of the blocking rings and synchronizer rims.
Disassembly
Having removed the gearbox, you can proceed directly to the main thing - disassembly. This will allow you to change damaged elements as you work, identify existing faults and solve problems on your own.
- Clean and thoroughly wash all external surfaces of the gearbox.
- Place the box in a vertical position and remove the back cover.
- Remove the clutch cable bracket, then use a rubber hammer to knock the rear cover off the gearbox.
- Remove the old gasket. She will be replaced.
- Engage any of the two gears - 3 or 4.
- Unscrew the bolt that holds 5th gear, then turn it on.
- Simultaneously turning on the indicated speeds will allow you to fix the shaft and prevent it from turning.
- Unscrew the nut on the secondary shaft, and then on the primary one.
- Remove the 5th speed synchronizer along with the fork.
- Remove the fork from the coupling. Remove the synchronizer as carefully as possible. If you allow the clutch to move away from the hub, the spring-loaded balls that secure the synchronizer will simply fall apart.
- Remove the 5th speed synchronizer locking ring.
- Remove the 5th speed driven gear from the output shaft.
- Remove the thrust ring located on the needle bearing.
- Remove the needle bearing itself from the 5th speed gear.
- Remove the drive gear from the drive shaft and remove the bearing plate.
- Now the needle bearing bushings should be removed from the secondary shaft, and the thrust washer should also be removed.
Primary shaft
The input shaft 23 rotates in two bearings. The cylindrical roller bearing 26 is installed in the clutch housing socket, and the ball bearing is installed in the gearbox housing socket. The front end of the shaft at the exit from the crankcase is sealed with an oil seal, which is closed by the flange of the guide sleeve of the clutch release bearing. This flange is attached to the clutch housing with three bolts. The sleeve contains the clutch release bearing 31. The rear bearing 18 is fixed on the shaft with a nut and is held against axial displacement in the crankcase socket by an adjusting ring, which is pressed by the cover 17 to the gearbox housing. The nut is fixed by caulking its collar into the groove of the shaft.
The input shaft is made in the form of a block of drive gears of 1st, 2nd, 3rd, 4th gears and reverse. The clutch driven disc is located at the splined end of the shaft.
The transmission goes out
If you lose speed while driving, the gear assembly is most likely worn out. The locks on the gear and clutch also fail. These elements are replaced entirely with new ones.
It is worth noting that the gear on the “nine” can also fall out due to too fast shifting. The manufacturer recommends a two-second pause when switching to increased speed. If you continue to ignore this problem, you may encounter failure of the synchronizers.
Each box has its own noise limit, which is not a symptom of a malfunction. The transmission has gears that constantly rub against each other. And no matter how technologically advanced the design is, it is impossible to completely eliminate sound. As for the 5th gearbox VAZ-2109, its noise regulation is 78 dB. Anything higher is equivalent to a malfunction. And the box may make noise due to insufficient oil level in the box. As you know, gear oil has a higher viscosity than motor oil. And it is not sprayed by the pump. This oil is located in the gearbox housing. When the gear rotates, it dips itself into the lubricant. If the liquid level is below the permissible level, the element will run dry. This entails increased gear wear and wear. As a result, even if the oil level is restored, the problem will not disappear.
About the oil
For good performance of the VAZ 2109, all important components must be coated with oil. Typically, the manufacturer independently determines the brand of engine and transmission parts that are recommended for use in cars of a given model.
If you do not have such information, you should consider the main purpose of the machine:
- if the VAZ is driven on excellent roads in the regional center, there is a certain type of oil for this;
- if you drive a car, a transmission would be the ideal option.
Remember to maintain the optimal oil level
When filling oil, it should be taken into account that the VAZ 2109 box requires a slightly larger amount. Only this approach will help protect and cover all spare parts located at the crankcase outlet.
Since the gearbox is the second most important element of a car, in the event of the slightest breakdown it is necessary to immediately eliminate the shortcomings.
Let's look at the main malfunctions that can occur with the gearbox.
Automatic transmission shutdown
- worn gears and locks on the coupling;
- failure to comply with vehicle operating rules;
- incorrectly selected speed mode;
- incorrect shifting with a poorly adjusted clutch;
- unprofessional gearbox repair (ignoring clutch replacement);
- ignoring repairs in the presence of extraneous noise in the form of crunching.
If you contact a service station in a timely manner, the VAZ gearbox can somehow be saved. If the condition is too neglected, count on expensive repairs.
What do the noises in the 2109 box mean?
There are no silent boxes. Each of them has a maximum permissible noise level, which is established by GOST.
- Extraneous noise from the VAZ box may occur as a result of the operation of gears and bearings;
- Used or low-quality oil also causes noise;
- Sometimes the reason for its appearance may be the operation of the power unit. In this case, the speed may be unstable or a powerful camshaft may be installed.
It takes forever to describe extraneous noises, since each driver hears them differently. To more fully understand the cause, it is necessary to diagnose the transmission.
Crunching sound when changing gear
- Excessive or improper use of the vehicle.
If there is a crunching noise, the synchronizer will need to be replaced. If you decide to save money on it, you should expect to buy a whole block of gears in the future. In addition, the presence of a crunching sound may indicate that it is time to change the used oil. Or perhaps it was filled with the wrong degree of viscosity?
Knocks
- If you hear knocking noises in 21099, you should immediately check the gears. Perhaps one of the pairs has a chip;
- If a knocking noise occurs while driving, or when you switch the gearbox from one gear to another, pay attention to the satellites. Most likely they are the ones that have worn out.
The gearbox on a VAZ burst
- Whether or not to purchase a new box is up to you. Judge for yourself, repairing it can cost you the same price as buying a new one.
The box is unstable and switches hard
- The cause of this type of problem with box 21099 is the synchronizer or gear. In some cases, this situation may occur when purchasing new gearboxes or after repairing them.
In any case, you should know that when buying a new car you need to run it in. Rough operation of the vehicle leads to serious problems.
Advice from experts on manual transmission operation
Like any other complex vehicle mechanism, a manual transmission must be operated in strict compliance with the rules of the vehicle manufacturer. Following these simple rules, as the practice of the Favorit Motors Group of Companies specialists shows, can slow down the wear of parts and reduce the frequency of breakdowns in units.
- It is advisable to change gears in accordance with the manufacturers' recommendations regarding the permitted minimum and maximum speeds intended for each gear. In addition, the manufacturer usually provides instructions on how to operate the vehicle economically. For example, for a Volkswagen Polo car (1.6 engine, 110 hp, 5 manual transmission) there are recommendations for economical fuel consumption: switch to second gear at a speed of 20 km/h, to third when reaching 30 km/h, to fourth at 40 km/h and in fifth at 50 km/h.
- Shifting into reverse gear (reverse movement) should only be done when the vehicle is completely stationary. Even at low speeds, shifting into reverse gear is unacceptable.
- It is recommended to depress the clutch pedal quickly and release it slowly and without jerking. This reduces the friction force on the release bearing and delays the need for repairs.
- When driving on a slippery road (ice), you should not drop the clutch or put the gearbox in neutral.
- It is not recommended to change gears during sharp turns; this leads to rapid wear of the mechanisms.
- Any vehicle needs constant monitoring of the amount of oil in the manual transmission crankcase. If the working fluid is not added and replaced as necessary, the oil becomes saturated with metal dust, which increases wear.
As you can see, it is quite possible to extend the “life” of a manual transmission. To do this, you just need to follow all the manufacturer’s recommendations, and at the first doubt about the quality of work, contact the specialists of Favorit Motors Group of Companies.
The company's technical centers are equipped with all the necessary diagnostic equipment and specialized tools for diagnosing faults and repairing manual transmissions. To perform repair and restoration work, Favorit Motors Group of Companies specialists use technologies recommended by the manufacturer and high-quality certified spare parts.
Auto service technicians have many years of experience and specialized knowledge, which allows them to quickly diagnose faults and carry out any type of repair of manual transmissions. Each specialist regularly undergoes retraining at the training centers of manufacturing plants and receives a certificate for the right to repair and service a certain brand of car.
Customers of the Favorit Motors car service can enjoy convenient work hours, online booking for maintenance and repairs, a flexible loyalty program, a warranty on spare parts and all types of manual transmission repairs. All necessary components and consumables are available at the company’s warehouse.
The price of manual transmission repair depends on the type of breakdown and the amount of repair and restoration work required. By contacting Favorit Motors Group of Companies, you can be sure that the functionality of the “mechanics” will be restored as soon as possible, and the cost of services will not negatively affect the family or corporate budget.
It is difficult or crunching to engage the gear
The problem is a consequence of the failure of synchronizers. The first and second gear synchronizers often wear out. At first, the driver notices difficulties when turning on the desired speed. Then all this begins to be accompanied by a crunch, like on the 53rd LAWN. Do not forcefully press the lever - this will damage the gear block. If there is a problem with the synchronizers, use double squeezing with re-throttle. This is the only way to preserve the gearbox elements while moving to the repair site.
If the box begins to knock when moving, most likely a tooth on the shaft gear or main pair has broken. The element cannot be repaired and must be replaced entirely.
Gearbox Requirements
- high efficiency
- ease of control and shock-free switching and quiet operation
- inability to engage two gears or reverse at the same time when moving forward
- reliable retention of gears in the engaged position
- simplicity of design and low cost, small size and weight, ease of maintenance and repair
To satisfy the first requirement, it is necessary to correctly select the number of stages and their gear ratios. By increasing the number of stages, better engine operation is ensured in terms of dynamism and fuel economy. But the design becomes more complicated, the overall dimensions and the weight of the transmission increase.
Gears are switched using movable gears, gear couplings, synchronizers, friction or electromagnetic devices. For shockless shifting, synchronizers are installed, which complicate the design and also increase the size and weight of the transmission. Therefore, the most widespread are those in which higher gears are switched by synchronizers, and lower ones by gear couplings.
Comparison of short and long stroke
Car enthusiasts describe the difference in options as fantastic. The renovation dramatically improves ergonomics. The amplitude of movements of the gear shift knob decreases by two to three times, but the force on its tip increases. The increase is quite acceptable, since gear shifting occurs in an unloaded state with the clutch depressed and does not require any serious effort.
Some experts believe that an increase in the shoulder leads to an increase in forces on the gearbox rods and to additional wear on the gearbox. There is no statistical confirmation of this point of view yet. Unfortunately, it is not possible to order a short-stroke configuration from the factory. You must install it yourself at your own risk. AvtoVAZ does not approve of such changes in the design of the Nine.
Independent modernization of the design associated with welding the levers lengthens them, and the height of the gearshift knob above the tunnel increases by about 5 cm. Such alteration requires welding work and the involvement of an experienced specialist, for whom cutting the levers using a grinder, installing a pipe and a strip of the appropriate section , and also welding the levers is not difficult.
The lever is dangling
If the gearshift lever on a VAZ-2109 is loose, you should check the serviceability of the gearbox hinge (cardan). They have a tapered bolt that can unscrew. In most cases, the problem is solved by tightening it. Note that this bolt is tightly tightened from the factory. It is unscrewed to adjust the scenes.
Backlash also occurs due to a broken return spring, which is located in the gearbox mechanism. It usually changes every 4 years or 100 thousand kilometers.
The cone bolt also unscrews. It is smaller in size than the cardan and is located inside the box itself under the gear shift element.
How to replace the universal joint
In most cases, it is not the rocker itself that fails, but the cardan. Due to its displacement, even a small one, a failure occurs in the gear shift mechanism.
Standard VAZ-2109 scenes are rarely installed during repairs; similar parts from Lada Kalina are used. The replacement looks like this:
- Using two keys set to “13”, unscrew the clamp securing the cardan to the rod.
- Using a screwdriver, pull the boot towards the box housing. If desired, you can remove it completely, and if it has cuts or other damage, replace it with a new one.
- Unscrew the fixing bolt with a “10” key.
- Knock down the cardan with a hammer, strike carefully so as not to damage anything.
- The Kalinovsky universal joint is much more durable and reliable, so install it instead of the standard one.
- Reassemble the entire structure in reverse order. But do not rush to tighten the bolt on the clamp - adjustment is necessary.
Dismantling the box
If you can hear an incomprehensible noise in the gearbox, the car becomes difficult to change gears or does not want to move at all, you may need to remove this mechanism. Do-it-yourself repair of a VAZ 2109 vehicle can be done in any garage, having all the necessary tools at hand. The VAZ 2109 has a rather complicated gearbox removal, so you should prepare for this procedure in advance.
The box is located deep enough, so it is almost impossible to remove it alone. In this case, you may need special crowbars, the help of other people and some tools in order to properly disconnect it. In general, you can seek help from a service center, where the service will be carried out using special equipment. But, you can repair it yourself by removing it carefully without damaging other important parts.
Backstage
If the gearbox on a VAZ-2109 is ringing, don’t be upset. All owners of "nines" have this problem. Moreover, the rocker rings both on “killed” and on relatively fresh cars. The AvtoVAZ representative office itself is aware of this defect. And vibration occurs due to the incorrect location of the support points of the internal combustion engine and the gearbox. As a result, the nodes vibrate, and the ringing is transmitted to all other parts, including the slide. Some solve this problem by installing an o-ring in the rocker area, others get used to it and drive like that, with a ringing sound.
Oil disappears
Unlike engine oil, rarely does anyone check the transmission oil level. But in vain, because sometimes you can simply get a dry dipstick. If measures are not taken in time, increased noise will appear (since the gears are running dry). For what reasons does oil leak from the box? There are several factors:
- The crankcase cover does not fit tightly.
- Worn shaft seals.
- Loose oil drain cap.
- Cracks in the transmission pan (solved by replacing the element).
Technical characteristics of the VAZ 2109 gearbox
| Type | Mechanics |
| Number of gears | 5 |
| For drive | front |
| Engine capacity | up to 1.6 liters |
| Torque | up to 120 Nm |
| What kind of oil to pour | TNK Trans KP 80W-85 |
| Lubricant volume | 3.4 liters |
| Change of oil | once every 75,000 km |
| Replacing the filter | every 75,000 km |
| Approximate resource | 150,000 km |
The online manual for this box is here
The car jerks when starting, it is impossible to shift into gear
The cause of the malfunction is not always the VAZ-2109 gearbox itself. Repairing it may not save it if the clutch assembly is faulty. But it is this system that interacts with the gearbox and engine. It is through the clutch disc that torque is transmitted from the flywheel to the transmission shaft. Typically, this unit serves at least 120 thousand kilometers. But many “nines” have old-style odometers, which reset to zero at 100 thousand.
It is difficult for the driver to control when this or that part in the clutch has been replaced. If the car jerks at start-up and the transmission is difficult to turn on, most likely the disc has been worn out. The plates wear out on it and the damper springs fly out. The petals on the clutch basket are also bent. We have already said about bearings that they are noisy. All this together affects the behavior of the car on the road.
Reinstalling the gearbox
Gearbox assembly:
- we change all non-working elements;
- workers clean with a rag;
- assembly is carried out;
- degrease parts with threads;
- if necessary, lubricate the elements;
- change gaskets;
- insert the balls and bearings into place;
- we assemble the synchronizer;
- We put all the springs in place and tighten the bolts. When assembling, lubricate all connections with sealant;
- attach the box to the engine;
- add oil;
- connect the battery;
- we start the car and check it.
The VAZ 21099 gearbox is adjusted during assembly. Also, after installing the gearbox, you need to adjust the gearshift lever. It is important to adjust the gearbox and gearshift lever correctly.
It should be remembered that prevention can help avoid repairs and troubles along the way. Taking good care of the gearbox is the key to its long-term operation.
Operating principle of the gearbox synchronizer
Anyone who has ever driven a car knows the purpose of a gearbox. However, both its structure and operating principle often remain a mystery to many. In general, this may be correct, in any case, this approach has a right to exist, however, without studying the box in detail, it is worth touching on such an element as the synchronizer.
- Why are gearbox synchronizers needed?
- Transmission synchronizer operation
- Gearbox synchronizer, care, operation
Repair features
This process is carried out on the box removed from the car. The operation consists of several stages:
- Removing the dipstick from the gearbox.
- Removing the clutch cable bracket and rear cover.
- Unscrewing the fifth-speed fork bolt, as well as the primary and secondary shaft nuts.
- Removing the fifth gear gear with the secondary shaft fork and synchronizer.
- Removing the thrust plate and bushing from the secondary shaft.
- Removing the fifth gear gear.
- Unscrewing the screws of the secondary shaft thrust washers and bearing retaining rings.
- Removing the plugs, springs and balls of the reverse locks. The process is carried out on an inclined box.
- Unscrewing the mounting bolt and 12 nuts of the transmission housing. The element is separated from the clutch housing with a slotted screwdriver.
After disassembling the VAZ-2109 gearbox, you need to replace all worn elements:
- Bearings.
- Shafts.
- Gears.
- Gear shift rod.
- Seal of axle shafts and shafts.
The VAZ-2109 gearbox is assembled in the reverse order. The crankcase is sitting on the new sealant.
The fundamental principle that the design of the VAZ 2109 gearbox must meet is to achieve an increase in the operational characteristics of the vehicle in conjunction with minimizing fuel consumption. The main tools for implementing these tasks in mechanical transmissions in general, and in the VAZ 2109 manual transmission in particular, are:
Rational selection of the number of gears.
Optimization of gear ratios.
Increase in the quality level of the gear shifting process.
The importance of the latter can hardly be overestimated, since smooth switching guarantees not only a significant increase in the degree of reliability of the vehicle’s systems, components and assemblies, but also a reduction in the driver’s asthenicity (fatigue). The device that ensures smooth shifting is the VAZ 2109 gearbox synchronizer, the diagram of which is presented below.
Synchronization of forward gears is carried out by equalizing the rotation speed of the secondary shaft of the gearbox and the rotation speed of the constant mesh gears that rotate freely on it.
Many domestic car enthusiasts are interested in the question: “How to disassemble the VAZ 2109 gearbox yourself?” This is dictated not only by considerations of economy, but also by the desire to gain practical experience in repairing your “iron friend”.
Dismantling the VAZ 2109 gearbox
The main indications for performing this process, which is characterized by sufficient labor intensity, are: replacing failed gearbox elements or carrying out major repairs. Preliminary activities include:
design features of the gearbox of cars VAZ 2108, VAZ 2109, VAZ 21099
Gearbox design features
Depending on the vehicle configuration, a four- or five-speed gearbox can be installed, combined with a differential and final drive, the gear ratio of which can have several values (see “Technical characteristics of vehicles”). The input shaft 23 (Fig. 5.7) is made in the form of a block of drive gears, the drive gears are in constant engagement with the driven gears of all forward gears. The drive gears are located on needle bearings on the secondary shaft 33. In addition to them, two synchronizers are installed on the secondary shaft of the gearbox. The main gear drive gear is made together with the secondary shaft. The differential is two-satellite. The preload in the differential bearings is adjusted by selecting the thickness of the ring 4. The driven gear 34 of the main gear is attached to the differential box flange. The gearbox control drive consists of gear shift lever 38 (Fig. 5.8), ball joint 36, rod 34, gear shift lever 19 and gear selection and shift mechanisms. A lever 20 is attached to the inner end of the rod 19, which acts on the three-arm lever 11 of the gear shift mechanism. This mechanism is made as a separate unit and is attached to the plane of the clutch housing 23. Two axes are fixed in housing 1 (Fig. 5.9) of the gear shift mechanism. On axis 4 there is a three-arm gear shift lever, two locking brackets 8 and 13 and a bushing 12. Another axis 3 passes through the hole in the hub of the locking brackets, securing them from turning. The arm of the gearshift lever 2 is used to engage forward gears, the arm of the lever 11 is used to engage reverse gear, and the third arm is used by lever 20 (see Fig. 5.8) of gearshift lever 19. A lock 9 is mounted in the hub of the gear shift lever (see Fig. 5.9). A fork 10 for engaging reverse gear is installed on axle 7.
0:3486
1:504
Rice. 5.9. Gear shift mechanism:
1 — gear shift mechanism housing; 2 — gear shift lever (forward); 3 — guide axis of locking brackets; 4 — gear shift lever axis; 5 - spring; 6 — retaining ring; 7 — reverse fork axis; 8.13 — locking brackets; 9 — gear shift lever lock; 10 — reverse fork; 11 — gear shift lever (reverse); 12 - thrust bushing For a five-speed gearbox, the primary and secondary shafts at the exit from the crankcase are extended. On this part of the shafts there are drive 8 (Fig. 5.10) and driven 2 gears of the fifth gear and its synchronizer 3. For a five-speed gearbox, bushing 12 (see Fig. 5.9) is not installed in the gear shift mechanism. Gearboxes are available with different final drive ratios. To distinguish the secondary shafts, grooves are machined on their gear rims: two on the left (the shaft crown is located to the right of the observer) - for a seventeen-tooth rim, one on the left - for a sixteen-tooth rim, one on the right - for a fifteen-tooth rim. The driven gears of the final drive are marked with a gear ratio (for example, 65/15). To distinguish gearboxes by their final drive ratios, they are marked with paint. The marking is applied to the upper part of the gearbox housing: 01 - for gear ratio 3.9; 02 - for gear ratio 4.1; 03 - for gear ratio 3.7; 00 - for gear ratio 4.1 five-speed gearbox.
1:3211
2:504
Rice. 5.10. Five-speed gearbox rear:
1 — driven gear of the fourth gear of the secondary shaft;
2 — driven gear V of the secondary shaft transmission; 3 — 5th gear synchronizer; 4 - secondary shaft; 5 — rear cover of the gearbox housing; 6 — breather; 7 - input shaft; 8 — drive gear of the 5th gear; 9 — thrust plate for fastening bearings; 10 - gearbox housing USEFUL TIPS The manufacturer does not give clear recommendations on gearbox oils.
Either motor oil or various transmission oils are recommended. Therefore, decide which oil to use depending on the operating conditions of the car. If a VAZ 2108, VAZ 2109, VAZ 21099 car is operated mainly in a big city with frequent gear changes, then use motor oil, since in this case a relatively long service life of the synchronizers is ensured. If you mainly drive on highways at high speeds, but with relatively infrequent gear changes, it is better to use transmission oil, which provides an increase in the life of gears and bearings while slightly reducing the durability of the synchronizers. When filling the gearbox, try to fill it with a little more oil (about 100 ml) than recommended by the manufacturer. This will provide better operating conditions for the fifth gear bearing, which is located high in the crankcase and is lubricated only by splashing. four-speed gearbox
2:3251
3:504
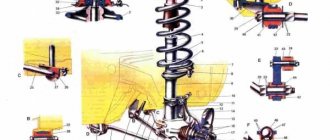
Rice. 5.7. Four-speed gearbox:
1 — gearbox housing; 2 — filler and control hole plug; 3 - drain plug; 4 — adjusting ring; 5 — left front wheel drive; 6 — driven gear of the 1st gear of the secondary shaft; 7 — synchronizer clutch for 1st and 2nd gears with reverse gear; 8 — driven gear of the second gear of the secondary shaft; 9 — retaining ring; 10 — thrust half-ring 1 — driven gear of the third gear of the secondary shaft; 12 — synchronizer clutch hub for 3rd and 4th gears; 13-driven gear IV transmission of the secondary shaft; 14-needle bearing of secondary shaft gears; 15 — thrust washer of the 4th gear gear; 16 — ball bearing of the secondary shaft; 17 — rear cover of the gearbox; 18 — ball bearing of the input shaft; 19 — breather; 20 — synchronizer blocking ring; 21 — sliding clutch for synchronizer of 3rd and 4th gears; 22 — retainer block; 23 - input shaft; 24 — retainer ball; 25 — fork of the sliding clutch for the synchronizer of 3rd and 4th gears; 26 — roller bearing of the input shaft; 27 — clutch release fork lever; 28 — clutch release fork bushing; 29 — clutch housing; 30 — clutch release fork; 31 — clutch release bearing; 32 — roller bearing of the secondary shaft; 33 - secondary shaft; 34 — driven gear of the main gear; 35 — tapered roller bearing of the differential; 36 — differential box; 37 — satellite; 38 — retaining ring of the side gear; 39 — semi-axial gear; 40 — speedometer drive gear; 41 — right front wheel drive; 42 — speedometer drive; 43 — satellite axis; 44 — retaining ring of the satellite axis; 45 — protective cover of the gear shift drive hinge
gearbox control drive
3:3620
4:504
Rice. 5.8. Gearbox control drive:
1 - secondary shaft; 2 — fork for shifting 1st and 2nd gears; 3 — fork for shifting III and IV gears; 4 — 5th gear shift fork; 5 — rod of the 5th gear shift fork; 6 — retainer ball; 7 — clamp spring; 8 — clamp cover; 9 — guide axis of locking brackets; 10 — reverse light switch; 11 — three-arm gear shift lever; 12 — reverse fork lock plug; 13 — reverse fork; 14 — gearbox housing; 15 — blocking brackets; 16 — gear shift mechanism housing; 17 — gear shift lever axis; 18 — gear shift lever spring; 19 — gear shift rod; 20 — gear shift rod lever; 21 — fork rod for shifting III and IV gears; 22 — rod for shifting 1st and 2nd gears; 23 — clutch housing; 24 - bushing; 25 — rod seal; 26 — conical screw for fastening the hinge; 27 — protective cover of the hinge; 28 — housing of the gear shift drive rod hinge; 29 — hinge bushing; 30 — hinge axis; 31 — hinge tip; 32 — gear shift drive rod clamp; 33 — gear lever housing; 34 — gear shift drive rod; 35 — protective cover of traction; 36 — ball joint of the lever; 37 — spherical lever finger; 38 — gear shift lever; 39 — lever axis; 40 — lever axis bushing; 41 — locking bracket
possible gearbox malfunctions, causes and methods for eliminating gearbox malfunctions
| Cause of gearbox malfunction | Method for troubleshooting gearbox |
| Gearbox noise 4:3388 | |
| Wear of gear teeth Wear of bearings Insufficient oil level | Replace worn parts Replace worn bearings Add oil. If necessary, replace damaged or worn seals |
| Difficulty shifting gears 4:571 | |
| Incomplete release of the clutch Deformation of the gear shift control rod or torque rod Loosening of the screws securing the hinge or gear selector rod lever Incorrect adjustment of the gear shift drive Wear or breakage of plastic parts in the gear shift drive | See subsection. “Clutch” Straighten the rods or replace the rods Tighten the screws (see "Gearbox") Adjust the gear shift drive Replace damaged parts |
| Spontaneous gear shutdown 4:1743 | |
| Damage or wear of the ends of the synchronizer teeth on the gear and clutch Increased vibrations of the power unit on the supports due to cracks or delamination of rubber on the rear supports Lack of gears due to incorrect adjustment of the gear shift drive or incorrect installation (tension) of the protective traction cover | Replace worn and damaged parts Replace damaged parts Adjust the drive (see “Removing and installing the gearbox”). or adjust the traction cover |
| Noise (“crackling”) when shifting gears 4:2855 | |
| Incomplete release of the clutch Worn locking ring of the gear synchronizer | See subsection. "Clutch" Replace the locking ring |
| Oil leak 4:390 | |
| Wear of the input shaft oil seals, constant velocity joint housings, gear selector rod or speedometer drive shaft seal. The crankcase or box cover is loose or the sealant under the box cover or between the box housing and the clutch housing is damaged, the drain plug is loose. | Replace oil seals, seal Replace sealant, tighten bolts and nuts, tighten drain plug |
4:1299 next article:
repair of the secondary shaft of the gearbox on VAZ 2108, VAZ 2109, VAZ 21099 cars
1. With slight force, clamp the secondary shaft (Fig. 5.11) into a vice with soft metal pads on the jaws.
5:2197
Rating 0.00 [0 Vote(s)]
28315
Dismantling
To dismantle the box, we recommend that you rely on the instructions, strictly follow the sequence and reinforce your skills with visual videos.
- Disconnect the negative terminal from the battery and drain the oil from the gearbox system.
- Unscrew the bolts that hold the crankcase guard in place and remove it.
- Disconnect the ground (wire) from the clutch housing.
- At the end of the clutch cable, loosen the tension on the nuts slightly.
- Remove the cable end from the clutch lever.
- Disconnect the block from the traction relay.
- Disconnect the wire going to the starter traction relay.
- Dismantle the starter itself directly.
- Disconnect the drive rod from the joint tip. We are talking about traction, which switches gears.
- Disconnect the cable from the car's speedometer drive.
- Unscrew the tie rod ball joint.
- Remove and press the steering rod hinge pin out of the strut swing arm.
- The shank of the inner CV joint of the front wheel drive should be pressed out and moved to the side.
- Disconnect the second CV joint.
- Remove the clutch housing shield.
- Release the gearbox from the fasteners holding it to the engine.
- Remove the box.
Carefully remove the gearbox
Be sure to move it horizontally away from the engine before directly removing the gearbox. Then disengage the input shaft. Be careful not to damage the clutch spring petals.
Differential
The differential is two-satellite. Its box 36 (see Fig. 59) rotates in two tapered bearings 35, the preload in which is adjusted by selecting the thickness of the ring 4. The driven gear 34 of the main gear is attached to the flange of the differential box, and the plastic gear 40 of the speedometer drive 42 is pressed onto the differential box. Gear 34 is in constant mesh with the drive gear of the main gear of the secondary shaft.
The satellites 37 and the semi-axial gears 39 have spherical bearing surfaces. The use of a solid sphere in the differential box, coupled with gears and satellites, made it possible to eliminate the support washers of the semi-axial gears.
The satellites are located on an axle 43, which is held in the holes of the differential box by retaining rings 44. The landing journals of the axle have grooves to retain lubricant. The holes of the semi-axial gears have internal splines into which the splined shanks of the housings of the internal hinges of the front wheel drives fit.