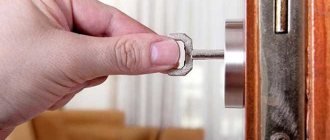
The internal door handle of the VAZ 2107 is a standard device that opens the door structure. Replacement will be required after the internal rod breaks, mechanical damage, or if you want to replace the domestic opening mechanism with a euro one. The price of a regular device is half that of a European pen. The door handles of the entire Zhiguli family have the same configuration, so dismantling is carried out by analogy.
Replacement of VAZ-2107 door handles
Owners of the domestic VAZ 2107 car know how inconvenient and sometimes unreliable door handles are. These elements often fail, especially if you do not pay attention to them, which entails the need to replace them. In the material we will pay attention to the question of how they are replaced with a VAZ-2107, as well as the main features of the work.
Typical breakdowns and their causes
The interior door handle of the VAZ 2107 is made in black, like the main part of the car’s interior. The wear of this element depends on the activity of transport operation. Over time, scratches or microcracks begin to appear on the device. The filling of the handle dries out, begins to jam, creak, and jam. Damage may be caused by time, an accident, or the door breaking. What can break:
- The hardware has come off. The fastenings need to be tightened.
- The door does not close, the gap between the body or body part is widened.
- Mechanical damage.
- There was an attempt to break into the car by attackers.
- The outer manipulator of the mechanism is damaged.
Sometimes the reason is hidden in body deformation or poor door adjustment. If part of the handle is broken, it will have to be replaced completely. This plastic element is non-separable and quite fragile, unlike a Euro pen.
The average cost of a car handle is 900 rubles.
Selection of new mechanisms and handles
There is a fairly large selection of accessories and spare parts in retail and online stores. When selecting, special attention should be paid to the following issues:
- Typically, external handles are sold in three colors: white, black and unpainted.
- Different manufacturing companies are engaged in the production of pens of a new form, respectively, their prices and quality are different.
- The use of locking mechanisms from 8 Series cars will require modifications to the devices and doors themselves.
In the process of selecting the necessary spare parts, the quality of their manufacture is assessed. Silumin and plastic parts do not have sufficient strength, especially at low temperatures. High-quality installation of new handles is possible only if its dimensions and seat configuration exactly correspond to the standard ones.
Preference should be given to those manufacturers of Euro handles for the VAZ 2107 car who have proven themselves accordingly. This kind of information can only be obtained from car owners who have previously purchased such parts and installed them. In preparation for installing parts, they must be painted in the same color as the body, if this is in the owner’s plans.
Typical breakdowns and their causes
The interior door handle of the VAZ 2107 is made in black, like the main part of the car’s interior. The wear of this element depends on the activity of transport operation. Over time, scratches or microcracks begin to appear on the device. The filling of the handle dries out, begins to jam, creak, and jam. Damage may be caused by time, an accident, or the door breaking. What can break:
- The hardware has come off. The fastenings need to be tightened.
- The door does not close, the gap between the body or body part is widened.
- Mechanical damage.
- There was an attempt to break into the car by attackers.
- The outer manipulator of the mechanism is damaged.
Sometimes the reason is hidden in body deformation or poor door adjustment. If part of the handle is broken, it will have to be replaced completely. This plastic element is non-separable and quite fragile, unlike a Euro pen.
The average cost of a car handle is 900 rubles.
Tools accessories and consumables
It is better to modernize a VAZ 2107 car in a well-equipped room in an electrified garage. To perform the work you will need the following tools and accessories:
- Portable lamp with protected deflector.
- Electric drill with a set of drills for working on metal.
- Angle grinder with cutting and sharpening disc.
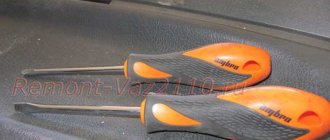
- Locksmith tools: a set of keys, screwdrivers with a Phillips or flat tip, pliers.
- Plastic disposable clips for fastening door trim.
- Grease (Fiol, Litol, graphite or other).
- Bolts with nuts and washers.
Installation of new-style handles and locking mechanisms on a VAZ 2107 car is carried out with modifications to these devices and the base. All envisaged operations must be carried out with the highest possible accuracy.
Removal and installation of components in the door
Euro handles for a VAZ 2107 model car, prepared and painted in the desired color, are assembled and tested for functionality. Preparatory work includes the following operations:
- Removing door trim.
- Removing the handles, locking mechanism and counter part of the lock installed on the rack.
- If the car is equipped with central locking, then it is better to remove the solenoids.
Before installing a new locking mechanism, it is necessary to grind off the plastic housing evenly from the inside. The thickness of the part should be reduced by approximately 5 - 7 mm so that it does not cling to the rack. The work of installing the lock and handle is performed in the following order:
- Place the body of the locking device vertically from the outside and mark the attachment points.
- Drill holes for the bolts according to the marks.
- We combine the parts and connect them together with screws.
- We close the doors and check whether there is sufficient clearance between the lock and the pillar. Using chalk, mark the position of the mate.
- On the body, according to the mark applied, we install a bolt, for which a through hole is drilled through both walls.
At the end of this stage of work, we check the functionality of the lock by opening and closing the door several times. Seizing or hitting of parts against each other is not allowed; adjustments are made if necessary.
Repair of the internal door handle of a VAZ 2107
Repair of the internal door handle of a VAZ 2107
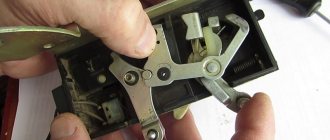
And so, we have VAZ 2007 , 2001 in stock. At one point, the inner handle shot a spring into the finger... Well... obviously it needs to be replaced. In the store, in exchange for as much as 10 UAH, I received a Chinese g... comparing it with my native one, I refused to take the Chinese one. Curiosity got enough - I went to take it apart. It turned out that the plastic(!) pin was broken. The poor fellow was 13 years old. Having removed the handle , I saw what all the fuss was about. It would seem like a no-brainer, but there were some pitfalls.
The cause of the failure is a broken pin
Door handle VAZ 2017 disassembled
I started thinking about how to replace the pin. We went through a lot of bolts, but everything was wrong... Due to the smaller diameter than the base hole, there was some play. Empirically, it turned out that the “weaving” nail was ideal.
As you can see in the photo below, there is no gap. The nail fits perfectly.
Next, using a drill, the nail was processed
Before and after treatment
The pin itself should be so long that it subsequently protrudes beyond the dimensions of the base of the handle by several millimeters.
Fitting. The pin is the perfect length.
Fixing recesses of the handle lining. The cover is fixed on a pin.
At the end of the work carried out, we have a result. The cover fits perfectly. Denser than it was at the factory. (and why they installed plastic pins at the factory is not clear)
In the photo below, what all the fuss is about) - USSR quality
The catch was that there was no nail at hand. Because It was in the evening and I had to go to the construction market (wasting fuel).
Having poked through at that moment that the handle cover is attached to the pin, I did not guess the length of the pin itself. The original version was made flush with the base of the handle. Subsequently, a new pin had to be cut.
When installing the handle in the door, it turned out that the rubber “lock” on the rod was cracked, which turned into an absurd and long search for a piece of rubber. (the guy helped me out at the construction market, and from the stash he also sold a Soviet gasket from the water supply system)
Replacing pins in hinges
So, if the repair only involves replacing the fingers, then the first thing you will need to do is remove the door to gain access to the hinges (3-4 fasteners are simply unscrewed, depending on the model). Next, the fingers are knocked out. If they do not come out due to corrosion or deformation, then you should first thoroughly fill everything with WD-40 to remove the rust and repeat the operation. If this fails, you will have to drill out the pins or replace the hinges completely.
When installing new pins, be sure to lubricate them with grease or oil, and after installation, adjust the door (lower or raise it a few millimeters through a tightening rod). The door should fit accurately into the catch when closing without additional physical effort. Otherwise, the wear and tear on both doors and hinges will be much higher. After 1-2 years of such operation, you will have to completely replace the door along with the hinges.
The main difficulty in repairing VAZ door hinges is to correctly knock out the pins (the same fingers). It’s most convenient to just rivet it and then straighten the loop if necessary. The most aesthetic method is to drill out each end of the finger, after which its edges are ground off or simply squeezed. The drill is immediately taken to the minimum size, then gradually increases literally by millimeter. This will take quite a lot of time, but the loop will not be damaged.
If the finger has other deformations, it may be necessary to make a through hole through the pins. This will not prevent the use of new fingers in the future. For this purpose, either an impact screwdriver or a powerful drill with a high-quality drill bit (carbon steel is ideal) will be useful.
INSTALLING NEW STYLE HANDLES
The doors of the VAZ 2107 car have slots for external elements. The new handles exactly match the size of the seat and do not require any modification. Installation of handles is carried out with the obligatory use of a sealing gasket, which is included in the delivery set. Fastening is carried out using nuts and studs built into the body.
When installing handles of this shape, no special problems arise; most manufacturers maintain the shape and dimensions with sufficient accuracy. Local adjustment is usually required for the locking mechanism, or rather its connection to the drive. This type of work is carried out locally; experienced craftsmen perform it directly on fixed units.
We connect the rods from the installed door handle of the VAZ 2107 car with the corresponding lock levers. If necessary, they are adjusted into place by simply bending them using pliers. During the fitting process, checks are made to ensure that the mechanism operates correctly when opened from the inside and outside.
Door assembly and final finishing
After completing the main work on installing the lock on a VAZ 2107 model car, you must perform the following operations:
- Installation and connection of solenoids with performance testing.
- Installation of facing panels with replacement of old pistons with new ones.
- Installation of all internal elements: handle for raising and lowering window glass, handle for opening and closing doors and locking device.
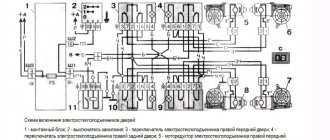
The installation of central locking electromagnets is usually done in the same place, however, when using non-standard mechanisms, some difficulties may arise. Improper fastening of the electric drive can cause misalignment, which leads to jamming and failure of the device. It is also important to select the required length of the rods that connect the locking device to the drives.
Work on the installation of new-style handles and more reliable locks on the VAZ 2107, now both the driver and passengers can enjoy the softness of closing the doors. In combination with high-quality noise insulation, it is quite possible to achieve the same effect as that of foreign-made cars.
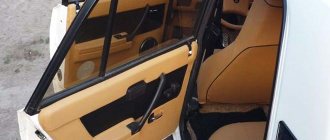
How to remove the door trim on the doors of a VAZ 2107 with your own hands
The cladding covers the iron body element, but over time it can deteriorate or tear. Replacing the material allows you to change the appearance of the interior. Before you worry about how to remove the door trim of a VAZ 2107, you should dismantle the door structure, select a replacement material, and also think about the sound insulation of the door leaf.
How to replace a door trim
The factory facing of Zhiguli is made of leatherette or leatherette. The first stage of work is the selection of material, only then begins the study of the instructions in order to understand how to disassemble the doors of a VAZ 2107 and replace the facing fabric. The canvas is measured, a list of necessary tools for dismantling, adhesive, and fasteners is compiled. Spare clips are also purchased, because when removing the old coating, the plastic elements break.
Materials for upholstery
When choosing fabric, you need to take into account quality, wear resistance, price, and color. The fibrous structure should stretch, this will allow the fabric to be securely fixed to the panel. Possible varieties:
- Genuine Leather. It looks beautiful, but is expensive. Creates sound insulation and withstands humid and harsh climates. The ease of care is dictated by the fact that the fabric does not absorb dirt and does not deteriorate when using aggressive detergents.
- Eco-leather or substitute. It has high wear resistance and is durable. The characteristics are identical to the natural base, only the substitute does not tolerate the effects of chemical detergents. With improper care, microcracks appear, which are then filled with dirt.
- Alcantra. Consists of thin and viscous fibers. The material has a high rate of moisture rejection, so it does not shrink. After the Alcantura is stretched on the panel, it will take the shape of the structure and will not sag over time. There is only one minus - the low level of sound insulation.
- Vinyl and leatherette. They provide strength and durability, and they are also very convenient for reupholstering. The material transmits sound well, so you will need to install an additional layer of insulation.
- Carpet. This is an artificial automotive fabric. This lining will last for many years. It withstands temperature changes, repels dirt, cleans quickly, and blocks the growth of fungus.
Some car enthusiasts are experimenting and upholstering door panels with velvet and even faux fur. Such fabric will partially create sound insulation, but will cause difficulties during cleaning.
Features of dismantling the casing
Equipment with fasteners will help you remove and then fix the cladding. Required:
- screwdrivers;
- knife;
- key to 8;
- clips;
- hardware.
If replacement of the skin was required because the inner panel was deformed after an accident or cracked, then you can replace it with a piece of plywood. The main thing is to cut out an identical layer. Instructions on how to quickly remove the door trim on a VAZ 2106:
- The handle is removed. To do this, two bolts are unscrewed: lower and upper.
- The bracket that holds the window regulator is pulled out.
- The speakers are removed (if any).
- A knife is used to remove the clips holding the cladding panel.
- The trim is removed from the door card.
It’s easy to install a new element using the same algorithm, just in a different order.
Soundproofing doors
It is necessary to disassemble the door not only because of damage to the cladding; sometimes this is done to increase sound insulation. The driver's door is soundproofed first. This procedure will reduce the level of extraneous noise, ensure silent closing of the structure, and improve the sound of music. The silence is broken not only by the bustle of the street, but also by the operation of the propulsion system, transmission, and suspension elements.
Before installation, raw materials for insulation and adhesive are selected. You need to purchase material based on bitumen or mastic using aluminum foil. Good glue has sealing properties, which help protect metal body parts from corrosion. Types of building materials for automotive insulation:
- Bimasts are multilayer raw materials. Their thickness is from 2 to 4 mm. External covering: fabric or paper.
- Vibroplast is flexible and elastic, has high vibration and sound insulation rates.
- Vizomat MP is a material with the addition of foil and aluminum fibers. Absorbs vibration shocks well.
THIS IS INTERESTING: How to set the ignition on a VAZ 2108
Any material can be used for door trim. Installation of sound insulation is carried out before the door element with trim is installed in place. The selected material is attached to the panel.
The process of manufacturing and installing a door card with trim
Making a door fragment with trim is no more difficult than dismantling the old one. To do this, you will need a standard set of tools, as well as: glue, soundproofing products, and a drill with attachments.
First, a piece for covering is cut out from the purchased fabric, and an old piece of material is used in the form of a pattern. If measurements are taken from a panel structure, then you need to leave an allowance of at least 1–2 cm at the edges.
It is important to immediately cut holes for the handle, speakers, and fasteners. Manufacturing instructions:
- The fabric is stretched, folds are straightened, holes for fastenings are drilled.
- The fragment is cut out with an allowance of 1 cm, then fixed with glue to the plywood.
- The finished element is mounted in the door using clips.
For cladding, it is better to use a solid sheet; otherwise, you need to make sure that the fasteners do not get into the joints.
Part three: assembly.
Before assembly, we wipe off dirt from the outside of the door, the hole where the new handle is inserted. It is best to lubricate the rubbing parts with aerosol or grease.
Now we put the new handle in place of the old one. Having inserted it into the hole, we first tighten the bolts, then we insert the rubber band into the hole of the lock and only after this procedure we tighten the bolts securing the handle. When tightening the bolts, make sure that the rubber gasket fits evenly and tightly.
The dirty work is over, you can wash your hands and with clean hands take the door trim of the VAZ 2107. We install the trim in the door by simply pointing the clips into the holes in the door and knocking on the trim with your hand.
We put a decorative trim on the door handle. We install the window lifter handles by first putting a washer on the shaft, then a handle, then insert a stopper between them, making sure that the slots in the handle and on the window lifter shaft match.
We fasten the three bolts of the door handle, insert the plugs and this completes the replacement of the VAZ 2107 external door handle.
Beet lifter malfunctions
When the window regulator is functioning properly, it is better not to touch it, unless you are going to install an electric one. The mechanism is well regulated at the factory, so any interference with its operation usually ends in breakdowns.
However, like everything else, window regulators sometimes fail. The following signs indicate this:
- jamming;
- creaking;
- glass warping.
Unpleasant sounds that appear when you try to lower the window indicate wear and tear on the moving elements. As a rule, this symptom appears shortly before the final failure of the entire node. Getting rid of the problem is not very difficult - open the door, vacuum the inner cavity and lubricate (or replace) the rollers.
Sometimes unwanted noise appears when the glass no longer fits tightly to the rubber bands. In this case, dust gets into the grooves - that’s why it creaks. Here:
- wipe the seals with a sponge soaked in soapy water;
- dry;
- treat with silicone grease;
- open and close the window several times.
Occasionally the glass simply gets stuck. This happens because:
- serious wear of the star-shaped cable winding mechanism;
- breakage of the pressure plate;
- traction misalignment.
Often older cars have all of these problems at the same time.
Repair is carried out by replacing a failed part or the entire mechanism assembly. It happens that there is a pause between the start of turning the handle and the lowering of the window. In severe cases, the glass does not fix at all or falls inside the door. This breakdown is caused by a weakened cable due to the break of one of the rollers. A part that has become unusable must be replaced with a new one.
Step-by-step instructions for dismantling the rear right (left) door lock on a Lada Grant
We carry out the work modularly: dismantling the card, removing the internal filling, handle, lock.
- We repeat the previous steps.
- Using a screwdriver with a Phillips bit, unscrew the fastening of the intermediate lever of the locking rod and move the base of the lever.
- We remove the locking tab from the standard hole. Use a screwdriver to unscrew 3 bolts
- From the end of the door, unscrew the three screws securing the lock at the base.
- We remove the lock assembly with an electric drive through a special technological window.
- We press the latches on the sides and disconnect the block with wires from the product.
- If necessary, remove the rod, press out the plastic lock, and turn it around the axis.
We lubricate the moving mechanisms, install a new lock, and assemble the parts in the reverse order.
Rear door lock device
Review of Manufacturer Prices
| Name/article | Price, rub.) |
| Rear door lock 21900-6205013-10 | From 2000 |
| 21900-6205012-10 | —/— |
| 21900-6205013-00 | From 650 |
| Locking pin 11180-6105228-00 | From 150 |
| Screw 21080-6105268-00 | —/— |
| Bushing 11180-6105276-00 | From 100 |
*prices are current as of November 28, 2018.
How to replace a door lock on a VAZ 2107
1)
Raise the windshield all the way up.
2)
Remove the upholstery.
3)
Find the lock and manually disconnect 2 rods from it: the switch and the outer handle.
4)
Next, you will need a regular screwdriver, use it to disconnect the lock release button rod.
5)
Using a Phillips screwdriver, unscrew the 2 screws that secure the groove. They are located at the end of the door.
6)
Then lower it a little and remove the tongue from the groove. Then move the groove along with the seal.
7)
Using a Phillips screwdriver, remove the 2 screws securing the inside handle, and then insert it into the door.
Next, unscrew 3 more screws.
9)
Now you can remove the lock, and at the same time the rod along with the inner handle.
10)
Trace the fastener with a felt-tip pen (this will make reassembly easier), and then use a 10mm wrench to unscrew the 3 bolts that secure it.
11)
Remove the retainer and its shims. Attention! There is no need to throw away the gaskets; they may come in handy.
12)
Lubricate the new lock, connect the rod with the inner handle to it, and then reassemble in the reverse order.
After installation, the lock must be adjusted in order for it to work correctly. Therefore, do not rush to install the upholstery, but close/open the door several times to evaluate where adjustments are needed. As a rule, regulation is carried out by adjusting the position of the latch or internal handle.
How to adjust the door lock on a VAZ 2107
If the problem is that the door is in the wrong position, then loosen the nuts securing the clamp by moving it:
- Outward (with very tight closing);
- Inward (if closing is too loose);
- Up (when lowering the door in the closed position);
- Down (when raising the door in the open position).
If the issue is poor unlocking using the inside handle, then:
- Loosen the screws that secure it and move the handle to the right/left. If the problem is not resolved, repeat the procedure again.
After completing the adjustment, be sure to tighten the screws in both cases.
As you can see, replacing a door lock is a fairly simple operation, it does not require a rich set of tools, deep knowledge of the car’s structure, etc. It takes several tens of minutes, after spending which you will be sure that the door of your car closes securely.
Preparation for dismantling
To unscrew the fasteners and remove the door trim, you need to prepare a simple set of tools:
- screwdriver with cross slots;
- long flat screwdriver;
- a pointed tool, such as an awl.
Door disassembly tool
Since the door card of the Lada Kalina car is held on by plastic fasteners (otherwise known as clips, pistons), there is a warning regarding the working conditions. It is strictly not recommended to dismantle door trim in the cold, when the plastic becomes brittle and easily destroyed. Hence, there is a risk of breaking all the clips during the process of removing the decorative panel. Therefore, in winter, perform this operation in a heated garage or box.
In the summer, there are no requirements for premises; remove the casing even in the open air. There is only one recommendation: in windy weather it is better to drive the car into the garage, otherwise a lot of dust will be brought into the interior when the doors are open.
This is what the door card lock looks like
What you will need to complete the work
To carry out work on changing handles, you need to stock up on a standard set of tools. The changeover procedure is not particularly difficult, but it will take a lot of time. After all, in order to carry out the replacement work, you will need to remove the door trim, and after that begin the dismantling process.
In addition to the standard set of tools, you will also need to purchase new mechanisms and cylinders to replace the front door locking device. Let’s take a closer look at what the procedure for removing and installing them on the “seven” is.
Changing the external handle on a VAZ 2107
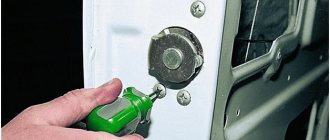
Removing the external door handle on the “seven” is carried out by performing the following manipulations:
Features of replacement, algorithm of actions
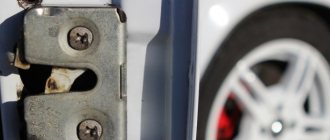
To change the door handle of a VAZ 2107, it is worth considering that they come in left and right. On the driver's side, the structure connects to the door lock. During disassembly you will need to disconnect the wires. The part is screwed to the card with three bolts, but first it is fixed to a special built-in attachment. Before attaching a new device, the opening and closing of the door fragment is checked.
The inner element is connected to the outer handle. If it breaks, you will have to replace the external fixator. To replace the old opening device with a Euro handle, you will need a flat-head screwdriver. The fasteners are hidden under plugs and can be easily removed by prying them with a sharp part of the tool. After this, the process is carried out according to a simple algorithm:
- The front bolt is unscrewed, then the rear one, which is located under the armrest.
- The outer cover is removed.
- The cladding is being dismantled.
- The electrical wiring of the lock and power windows is disconnected. The rear view mirror wires are detached if the front door handle is removed.
- There is access to an additional screw that holds the handle. After removing it, the handle must be removed.
Before installing a new fragment, you need to clean the internal niches from dust and dirt. If detergent is used, you should wait until the elements are completely dry. Experts advise treating with alcohol: it cleans hard-to-reach places well, dries quickly, and erodes.