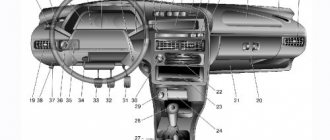
In a Lada Vesta car there is an on-board computer with a small screen located under the speedometer. This device increases engine efficiency, reduces fuel consumption, the concentration of harmful emissions, optimizes the operation of the gas distribution system, and synchronizes the interaction of units. Setting up the computer helps the Lada Vesta driver navigate the technical data/parameters. Read the article and find out more about the on-board computer.
Parameters of the standard on-board computer - description of functions
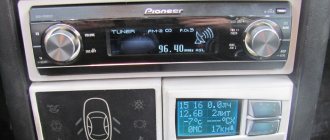
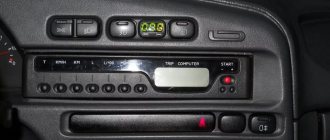
BC Lada Vesta performs various functions - displays this data on the screen display. The standard settings of the Lada 2180 computer reflect the indication of parameters on the monitor: • the total mileage of the car in kilometers; • vehicle mileage per trip (km); • total travel time, including hours/minutes; • Digital Watch; • average speed along the route (km/hour); • gear shift prompt; • transmission number; • on-board voltage indicators (volts); • current fuel consumption (l/100 km); • fuel costs per trip (l/100 km); • remaining fuel in terms of kilometers (km); • speed limit indicator; • cruise control speed indicator; • outside air temperature. The Lada Vesta instrument cluster has a built-in trip computer, with a number of useful functions not available in the BC of other competitive cars. For example, you can find out the voltage of the on-board network or the speed limiter.
Auxiliary equipment
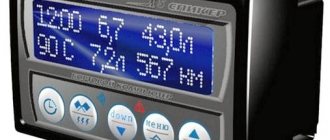
If the Lada Vesta is not equipped with a BC, it can be purchased and connected at one of the service centers, where it will be configured. All options will be supported. However, some models have a function for displaying error codes.
The cost of BC for Lada Vesta varies from 5 to 10 thousand rubles. The price will depend on the manufacturer and build quality.
The BC has become an indispensable device in cars in our time.
It monitors and corrects a number of important indicators, which include speed or fuel consumption, and also diagnoses the car for faults.
Additional functions
The display also displays other parameters of the Lada Vesta, which greatly facilitate driving not only for beginners, but also for experienced drivers. For example, data from parking sensors ensures easy parking of a car by generating light and sound signals. On-board computers are provided on the entire Lada vesta sw cross line, station wagons and other luxury models. The operation of standard electronic devices is ideally complemented by additional equipment; its installation is carried out at service stations or with your own hands. For example, the standard cruise control of the Lada Vesta successfully interacts with the additional onboard onboarder. Modern onboarder models have advanced functions: they are integrated with a satellite navigation system, equipped with an Internet connection and TV.
Possible errors and methods for correcting them
When operating a car, sometimes malfunctions occur, information about which is displayed on the BC screen in the form of digital codes. The most common errors are: • 0217 – engine overheating; • 0230 – fuel pump failure; • 0301 – ignition fault; • 0351 – damage to the ignition coil; • 0654 – tachometer failure; • 1617 – bad road. The standard onboarder for Lada 2180 not only shows malfunctions of car components, it is also susceptible to errors in operation. These faults can be checked quite easily: if no information appears on the screen when the ignition is turned on, you need to check the connector between the ECU and the computer. Display of incorrect information appears when the protocol fails. To correct the error, you should reboot the bookmaker, in the menu that appears, select the protocol that matches the characteristics of Vesta and install it. If more serious faults are detected, it is better to contact the warranty service. Leaving a car in the open air and in the cold for a long time negatively affects the operation of the BC, so you can remove it for this time. It is also prohibited to operate the Lada Vesta on-board computer if water gets into the unit or if the electronic equipment is faulty.
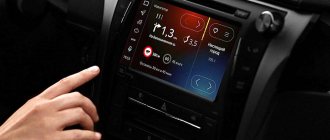
Lada Vesta head unit with navigation: review, technical specifications
The standard car radio with navigator is equipped with a multimedia screen. There are no external buttons on the sides; at the bottom there is a rotating knob and Mute and Mode buttons.
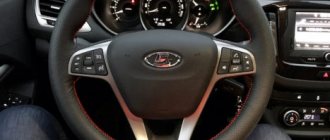
There are 3 pairs of keys on the steering wheel:
- with arrows and a picture of a handset for scrolling through files and songs, and in the “Phone” mode – for managing calls;
- duplicate Mode and Mute;
- adjusting sound volume.
You can control the multimedia system without being distracted from the road. Loading and shutting down the MMC occurs automatically when you turn the key in the ignition.
System filling
Installed software – Windows CE. The software requires a small amount of memory (32 KB) to operate. The RAM capacity of the standard MMC is 256 MB.
The processor is not the fastest, but it is powerful enough to process GPS and Glonass signals. 2 GB of internal memory are allocated for the firmware, another 8 GB are intended for storing cards.
Screen and menu
The 7-inch screen is equipped with TouchScreen technology. Vesta's manufacturers chose a resistive display that can operate without failures at subzero temperatures and in hot weather. One of the disadvantages of this type of screen is that finger touches are poorly recognized. You have to use a stylus or a substitute object.
Vesta owners complain about the poor placement of the screen: the display is placed at an angle, the image cannot be seen if the panel is illuminated by the sun.
The icon sizes are large: the buttons are grouped on separate tabs. On one you can control radio, audio, telephone and navigation. Photos, videos and a button for activating the AUX connector are transferred to the second.
Setting the clock on Lada Vesta
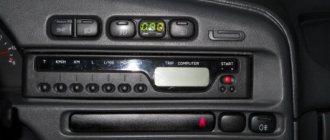
Vesta bookmaker is equipped with useful functions, such as a clock - a convenient function and always at hand. Let's learn how to configure them. To enter the clock setting mode, you need to press the top BC button (↑) and hold it for a while. Once we get into the required display mode of the on-board onborder, only numbers will remain that reflect the current time, and the right one will blink continuously. Here you can set the clock. In the Lada Vesta BC, each of the time digits has a separate adjustment, and therefore does not depend on the neighboring one. To set the first digit, short press the buttons (↑,↓) of the on-board computer. After setting the first digit, you should move to the next one by long pressing the top BC button (↑). In a similar way, you need to set each of the digits to the exact time, after which you can leave the clock setting mode.
Radio Receiver Capabilities
Modes:
- “Radio” mode (manual and automatic search for radio stations)
- “Audio” mode (listening to audio files from an SD card, USB flash drive or phone via bluetooth)
- AUX mode (To play audio from an external source)
- Hands-free Bluetooth mode
Setting up audio parameters (short press on encoder No. 7 in the main menu):
- Switching and changing the radio settings is carried out by rotating the encoder (position 7) in the following order: Equalizer, Bass tone, Treble tone, Balance, Front/rear balance, Loudness, Output.
- There is an equalizer, the settings of which are carried out in the following order: EQ JAZZ, EQ POP, EQ CLASSICAL, EQ VOCAL, EQ USER.
System settings (long press of encoder No. 7 in the main menu) allow you to:
- set the time display format (Clock mode);
- manually set the current time (Setting hours/minutes);
- on off. function of adjusting the current time using RDS signals (RDS CT);
- on off. function of automatic switching to an alternative broadcasting frequency (RDS AF);
- on off. search function for radio stations by a given program type (RDS PTY);
- on off. function for receiving regional radio stations (RDS REG);
- on off. CB band (AM band);
- on off. Bluetooth function (phone connection);
- on off. button press confirmation signal (signal);
- on off. noise reduction function (noise reduction). Affects only operation in “Radio” mode;
- reset the radio settings to factory settings (factory settings). After resetting, the radio settings are set in accordance with Table 2 (clause 1.2 “Description of controls”).
Secret menu of the Lada Vesta on-board computer
Managing the secret menu of the vesta onboarder is not described in the manual. It exists to customize the clicks of the turn signals: you need to hold down both keys (↑, ↓), then turn on the emergency lights to customize the sounds “to suit you.” Use the (↑) or (↓) keys to change the values, and the sound of the turns changes.
When you simultaneously press the keys (↑,↓), you move to the next menu item:
• P1 and d1 values – setting the sound and tone of the first click; • P2 and d2 values – setting the sound and tone of the second click. When you hold the keys (↑,↓) on the “SET” bar for a long time, the sound settings are reset to standard.
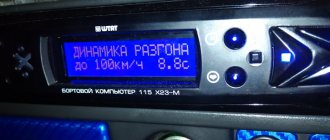
The presence of an onboarder significantly simplifies the life of the car, providing assistance to the driver in difficult situations, signaling details of malfunctions. The data displayed on the device’s screen is essentially notes from the car’s logbook. Their analysis allows the driver to make objective decisions.
How to use
The joystick is located on the right, under the steering wheel, and is connected to the column. The control panel is located on the handle. It has 2 arrows with lower and upper pointers.
If you turn on the lower or upper indicator once, then the instrument panel will display different data in turn:
- fuel consumption;
- temperature;
- current mileage.
The image appears on the right in the 2nd row, on the main screen at the bottom. By briefly holding the joystick in the middle, the driver can switch the indicator in the center of the panel on the bottom line. The temperature parameters, the counter for measuring the number of revolutions and time are changed one by one.
To edit you need to hold down for 3 seconds. top arrow.
The display will flash “0.0 km” in the second line from the left.
If you press the arrow again, the time indicator will blink, for example, “12:40”. It takes 3 seconds to set the clock. hold the top button to change the value.
Only the first value “1” of “10:40” will flash. You can use arrows to change the tens values. To go to the time, you again need to hold for 3 seconds. the top key, after which “2” will start flashing. Use the joystick to set the required values. Using the same principle, we change the number of minutes.
After setting the clock, you need to fix it and exit the editing function so as not to upset the indicators. To do this, we hold down the top arrow not briefly, but for a long time.