Operating principle: The turn signals light up when the side lights are turned on (they work with low and high beam headlights, respectively). When you turn on one of the turn signals, one lights up, and the second begins to blink; when you turn off the turn signal, both light up again. The same story with the emergency lights, both turn signals go out completely and light up in time with the rest of the repeaters.
2 capacitors 4700uF 25volt 2 diodes IN5819 2 5-pin relays and 2 connectors for them (can be bought at any auto parts store, I personally only found them there) mother/father terminals - I only needed 4 terminals. Straight hands and at least basic skills in using a soldering iron.
And so at home I figured out how everything should be! IMPORTANT! Install the diode correctly, otherwise the circuit will not work.
According to the diagram, someone wired the capacitor to separate wires, but I soldered the capacitor and diode directly into the connector under the relay (it seemed to me more compact and easier), and I went to try it.
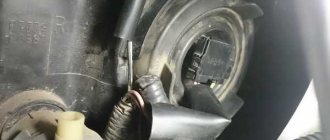
Approximately threw some wires to check functionality
Expert opinion
It-Technology, Electrical power and electronics specialist
Ask questions to the “Specialist for modernization of energy generation systems”
The backlight of the VAZ 2107 clock does not light. Some drivers add light bulbs to enhance the effect, but this is unnecessary if you replace the standard elements with more efficient diodes. Ask, I'm in touch!
How to change light bulbs on a VAZ 2107
Good afternoon dear friends. Today we will deal with light in our favorite classic - “seven”. In this instruction I will try to change the VAZ 2107 light bulb in all possible places : headlights, interior, dashboard, taillights and glove compartment. Detailed videos will help prevent plastic parts from breaking and make the replacement process easier.
First of all, let's look at what kind of lamps are used in the seventh model Zhiguli car?
Battery drains quickly
One of the problems of the Seven is that the battery discharges to such a level that it does not turn on the starter. This is caused by an insufficiently charged battery or a large loss of current. This may indicate poor contact on the relay regulator.
When the battery on the device lights up on a VAZ 2107
, which means the battery is not charged. The indicator showing the battery charge should go out when the engine is turned on. If the battery light on a VAZ 2107 is on
, and the battery is discharged, then the reasons may be the following:
- malfunctions on the relay regulator;
- worn or stuck brushes in the brush holder;
- One of the diodes in the generator is not working.
Good battery for VAZ 2107
serves from 5 to 7 years. Since the batteries of most “Sevens” quickly go out of working order, the battery model deserves your attention - Autopower. It is considered the best in quality, in addition, a 3-year warranty period is provided by the Czech Manufacturer AUTOPOWER.
| Characteristics | Car battery Autopower A60-L2X 12V 60Ah 540A | Car battery Berga BB-H5R 60 12V 60Ah 540A | Battery for car AKOM 6ST-55.1 pp 12V 55Ah 460A |
| Manufacturer | AUTOPOWER | Berga | AKOM |
| State | Czech | Germany | Russia |
| Warranty period from the manufacturer | 3 years up to 100 Ah / 1 year over 100 Ah | 4 years up to 100 Ah / 1 year over 100 Ah | 3 years up to 100 Ah / 1 year over 100 Ah |
| Service | — | not serviced | not serviced |
| Capacity | 60 Ah | 60 Ah | 55 Ah |
| Polarity type | Straight | Straight | Straight |
| Cold crank current (-18): | 540 A | 540 A | 460 A |
| Length Width Height: | 242mm*175mm*190mm | 242mm*175mm*190mm | 242mm*175mm*190mm |
| Current output | To terminals | To terminals | Terminals |
| Characteristics | Battery for car Tyumen Standard 6ST-60 L+ 12V 60Ah 520A | Car battery SMART ELEMENT 6CT-60.1 VL3 12V 60Ah 480A |
| Manufacturer | Tyumen | SMART ELEMENT |
| State | Russian Federation | Russian Federation |
| Warranty period from the manufacturer | 24 months up to 100 Ah / 12 months over 100 Ah | 6 months |
| Serviceability | — | not serviced |
| Capacity | 60 Ah | 60 Ah |
| Polarity type | Straight | Straight |
| Cold cranking current (at -18): | 520A | 480A |
| Length Width Height: | 242mm*175mm*190mm | 242mm*175mm*190mm |
| Current output | To terminals | To terminals |
Of the two battery models presented, the Smart Element is the better because it consumes less electricity to turn the car's starter. The battery life is longer on average by 2-3 years.
On the website of our company the price for the battery for VAZ 2107
accessible to any car owner, as well as high product quality standards. All models have official warranties, and each one contains the necessary details of the manufacturer.
The cost of a battery is affected by its quality, capacity and other characteristics. Buy a more expensive battery model and you will be sure that there will be no problems with turning on the car for the next 7-10 years. It is possible to save money and buy a battery for a VAZ 2107 cheaper
. It will also be of high quality and with a guarantee from the manufacturer.
How to replace the lamp in the headlight unit on a VAZ 2104, VAZ 2105, VAZ 2107?
Replacing the low and high beam lamps, as well as the side lamp:
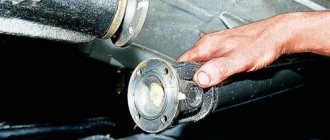
It couldn’t be easier to replace, you will first need to open the hood and after that you can immediately begin replacing, to do this, twist the lid and immediately remove it (see small photo), when it is gone you will have excellent access to two lamps at once , namely to the halogen lamp and to the side lamp, in order to get the halogen lamp, you will need to disconnect the wire block from it (Indicated by the red arrow) at the beginning, and then pry off the retainer (It is metal, if you take a closer look you will immediately see it, it is like a bracket goes) and remove it from the lamp and after which you can pull out the lamp itself, simply by pulling it, to do this, install the new lamp in the reverse order, now let’s say a little about the side light lamp, it is even easier to change, you just need to grab the socket with your hand (Indicated by a blue arrow) and after that, by pulling the socket you will need to pull out the lamp, and when you have it in your hands with the socket, you will have to press the lamp (Push it into the inside of the socket) and turn it counterclockwise and it will come out of the socket .
Replacing the turn signal lamp:
On the new classic (this is the one we are disassembling), turn lamps of type A12-21-3 (P21W) are installed, when purchasing them, be sure to indicate the markings, otherwise they will not suit you, they are changed in the same way, under the headlight unit you will need to crawl up from the back side and there you will find a protruding cartridge, next to it there is also a hydraulic headlight leveler installed (It is indicated by a red arrow, it was installed exclusively on cars of approximately 20005, perhaps even on early models it was present), so this cartridge you will need to turn it counterclockwise and remove it together with the lamp from the headlight unit, and then turn the lamp itself in it (It turns in the same way as the side light lamp, that is, you will need to press on it and turn it counterclockwise, see small photo, this lamp is inserted into the socket in the reverse order).
Additional video: A detailed video with instructions for replacing halogen lamps can be found below:
Problem solving
When the low beam lamps are turned on, all four filament elements must be activated
If one of them is found to be weak or does not light up at all, you should pay attention to whether the fuse is intact. You can check it from inside the car
When driving fast, pebbles hit the car, so there is a risk of damaging the surface of the product.
If the check shows that the fuses are intact, you will need to inspect the lamps themselves. To do this, open the hood, remove the rear casing, and then remove the coil of wires. The spring is removed from it, as well as the light bulb holder itself. Having taken it out, a new light bulb is inserted there.
There are times when replacement does not bring the desired result. In this case, you need to check the two relays, which are marked accordingly on the surface of the low beam lamp. The problem is usually oxidation of the contacts. It can be eliminated by simple cleaning. In some cases, you will have to completely replace the relay.
Replacing light elements
When carrying out a test that does not give the desired result, you should reconsider the mounting of the block, its reliability and performance
Likewise, it is important to test the wires responsible for the operation of the headlights. First, the easiest way to check the fasteners located next to the battery and air intake
After this, we find the second element, which is located near the adsorber.
If this does not help, you should pay attention to the headlight control unit - its switch may break. Need to check contacts
When the car is exposed to rain and the low-beam headlights are of poor quality, fogging occurs.
Dimensions of VAZ 2104, 2105, 2107 do not light up
On VAZ 2104, 2105, 2107 cars there are 4 side lights (dimensions): one in the front headlights and one in the rear lights.
Failure of any of them to work is a fairly common occurrence. Let's look at the reasons for this malfunction - “why the lights on VAZ 2104, 2105, 2107 cars don’t light up.”
Symptoms of a malfunction: “VAZ 2104, 2105, 2107 dimensions do not light up”
One dimension, two dimensions (front or rear, right or left side, crosswise) or all of them may not work.
Causes of the malfunction “dimensions of VAZ 2104, 2105, 2107 cars do not light up”
The side light bulb is burnt out
The most common reason. One light bulb, or several at once, can suddenly burn out. In some cases, it may be impossible to visually identify a burnt-out light bulb. Therefore, we replace the burnt out one with a known good one. You can use a similar one from a nearby headlight.
The contacts of the light bulb in the socket have oxidized
We rotate the light bulb in the socket several times to remove the oxidized layer and restore contact. In the future, you can clean everything with sandpaper.
Lost ground to headlights or taillights
Loss of contact with ground leads to failure of not only one size, but also the entire headlight or rear light.
The “negative” wires of the front headlights and rear lights with side lights on VAZ 2104, 2105, 2107 cars are attached to the car body. It is necessary to clean the mounting location to ensure good contact with ground. Usually the negative wire is the black wire from the headlight connection block, attached to the body next to the headlight or tail light.
Broken contact in the headlight or rear light connection block
Either it has oxidized or the block is not attached tightly. In such a situation, either one side lamp or the entire headlight may not light. We put on and take off the pad several times to restore contact.
The track in the rear light board has crumbled
During long-term use of the vehicle, or if a low-quality part is installed, the track to the side light lamp socket in the rear lights may shed (burn out).
Contact is broken in the connecting blocks of the relay and fuse mounting block
Check the pads Ш12 (Х12), Ш13 (Х13), Ш9 (Х9), Ш6 (Х6) of the mounting block. Or Ш2 (Х2) - terminals 1 and 3 if all the dimensions do not light up.
The fuse in the mounting block has blown
If fuse No. 14 (F14) is blown, the side lights in the front left headlight and rear right headlight will not light. If No. 15 (F15), then the marker in the front right headlight and rear left lamp will not light up, that is, crosswise.
The fuses must be replaced with serviceable ones and the cause of their burnout must be determined in the future. There may be a short circuit in the electrical circuit.
The external lighting switch on the instrument panel is faulty
All dimensions will not light up. Remove the switch and remove the wire block from it. Connect the leads of the black and yellow-red wires with a piece of wire. Turn on the ignition. If the dimensions light up, the switch is faulty and must be replaced.
“Open” in the electrical circuit connecting the side lights
It is necessary to check the sections of the circuit responsible for the non-burning light using the connection diagram. Read more: “How to find an open circuit in a car’s electrical circuit.”
Scheme for switching on the external lighting of a VAZ 2105 car
Wiring diagram for dimensions 2107.
Connection diagram of dimensions (external lighting) of a VAZ 2107, 21074 car
Notes and additions
— For a mounting block with finger fuses, the designation of the pads is “Ш” and the fuse is “№”. For mounting block with blade fuses “X” and “F”.
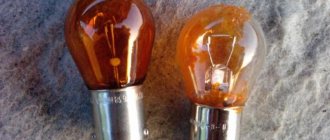
— On VAZ 2104, 2105, 2107 cars, A12-4-1 (T4W) side light bulbs are used in the headlights and rear lights.
What to do
The cigarette lighter is not directly responsible for the operation of any component of the car, but its operation negatively affects the comfort of the driver and passengers of the car. If the device is damaged, it must be repaired or replaced.
Where is the fuse for the cigarette lighter?
The VAZ-2107 cigarette lighter fuse is located in the fuse and relay mounting block. In VAZ cars this block is located in the engine compartment on the passenger side. To gain access to the fuse, you must remove the transparent plastic cover of the mounting block. The cigarette lighter fuse is marked F 6 and is rated for a current of 10 amperes.
How to disassemble the cigarette lighter
The socket and removable cartridge are inexpensive parts that can easily be found at any auto store. If they stop working, it is impractical to repair them; a complete replacement is performed. To do this, disconnect the ground bus from the battery and disassemble the socket fixed on the front panel of the VAZ-2106, performing the following procedure:
- remove the heater cartridge from the socket;
- we pick up the panel on which the clock and cigarette lighter are located and drag it with a flat-head screwdriver until the latches click;
- carefully remove the dashboard; there may be short wires behind it;
- remove the dashboard connection terminals;
- unscrew the locking nut;
- remove the outer casing along with the backlight;
- remove the internal cigarette lighter socket.
Domestic cars have also changed a lot with the introduction of Euro-3 standards. Lada Kalina, Lada Priora and even Lada Niva 4x4 are now much more difficult to maintain and repair.
what to do if the car won’t start, how to charge the battery, how to start the car in cold weather. The answers to these questions can be found on the pages of the website and books. presented here
Automanual - from English. manual - manual. A guide to repairing a car or motorcycle. A distinction is made between factory manuals and books published by specialized automotive publishing houses.
The Automanual website does not bear any responsibility for possible damage to equipment or accidents associated with the use of posted information.
Expert opinion
It-Technology, Electrical power and electronics specialist
Ask questions to the “Specialist for modernization of energy generation systems”
Why is it necessary to change the backlight bulbs? The standard dashboard of the VAZ 2107 is quite laconic and gives the driver only the most basic information about the car and its driving characteristics. Ask, I'm in touch!
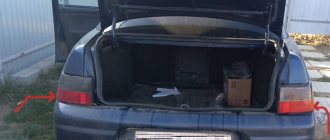
Removing and replacing side lamps in the rear light
The replacement process involves sequentially performing the following steps:
- the trunk opens;
- to gain access to the headlight, remove the carpet covering it from the inside;
- the board contacts are disconnected;
- the bar is removed (all the rear light bulbs are on it).
A special latch is provided to secure the board. To remove the board, you need to unclip it.
Replaced with a new side light bulb (the side light bulbs on the VAZ 2114 have the smallest size, so it will be difficult to confuse them); The board with the new light bulb is installed in its original place.
If replacing the light bulb in the front/rear marker does not produce results and the side lights still do not work, then you need to check the appropriate fuses or look for other causes of the malfunction.
Preparing to set the headlights correctly
If you decide to adjust the headlights yourself at home, you must do this either at night or in cloudy weather. This will make it possible to significantly better determine the installation angles of the optics by eye. In addition, you will need to perform several preparatory steps:
- carry out diagnostics of the suspension to make sure it is in good condition. It is better to correct all problems immediately in order to achieve the most accurate tuning results;
- check the pressure in the wheels and, if necessary, inflate them to the required level;
- place a load weighing 50-80 kilograms in the driver’s seat;
- dismantle the optics lining;
- fully refuel the car, and also secure the necessary cargo in specially designated places - a jack, a spare tire, tools used when traveling.
In the next step, you will need to mark up the screen. A pre-prepared sheet of plywood 1.7-2 meters long and 1 meter high can be used as it. You can also make adjustments in front of a solid wall or in front of a garage door.
For the most accurate settings, it is advisable to mark the screen as shown in the diagram above. However, you can do without this, but in this case you are unlikely to be confident in the high accuracy of the procedure.
VAZ-2107 fuses
F1 (10 A) - lamps in the reversing lights, heater (heater electric motor), heated rear window . If your reverse light does not work, check this fuse, then the lamp itself, and it may also be the reverse light switch (on the rocker or gearbox). If the heater does not work, but this fuse is intact, the fault may be in the wiring or in the heater motor itself, as well as in the switch on the panel.
F2 (10 A) - electric motors for windshield wipers, headlight cleaners, windshield washer pumps and headlights . If the wipers or washer do not work, check this fuse and connector 1 for the relay. A relay or jumper must be installed in it. It could also be the wiring or the wiper motor itself.
Headlight lenses are faded - solves the problem by polishing or replacing
Dull headlight lenses are one of the serious problems for motorists. Yellow glass or a dark inner side are troubles that indicate a malfunction of the optics mechanism itself or a too long service life. Yellowed and scratched glass can be polished if it is smooth using the following options:
- buy a special polish for car glass, do not skimp on this product, otherwise it will not help remove microcracks and various other minor problems;
- prepare the headlight in a garage or other dry place for polishing, wash it and wipe it dry (it is not necessary to remove the optical device);
- Next, apply the required amount of polishing paste to the glass and rub it with a soft cloth over the entire surface; you can first polish a small area;
- then rub the polish into the glass surface with quick circular movements and watch for changes in the appearance of the headlight; the procedure can take quite a long time.
It is often recommended to use expensive toothpaste as a polishing material. In fact, this does not always work, so it is better to buy special products for such cases. Moreover, you can significantly delay the very expensive replacement of headlights by carrying out this operation correctly. Cloudy glass is one of the first causes of reduced light intensity in your car.
What to do if the headlight lenses are constantly sweating?
The issue of headlight glass fogging is also quite complicated. It often happens that the optics sweat, and this greatly reduces the penetration of light during the trip. It is best to check the tightness of all elements of the headlight unit, look for the presence of rubber seals and tightly closed covers. If you cannot find the reason on your own, take the car to a mechanic. Most likely, the headlight will have to be changed (it is better to perform this process in pairs for two optical elements).
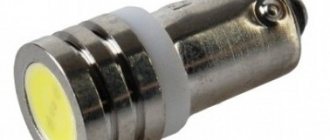
Side lights VAZ 2101, 2106, 2107 CLASSIC
American dimensions in the VAZ 2107
Operating principle: The turn signals light up when the side lights are turned on (they work with low and high beam headlights, respectively). When you turn on one of the turn signals, one lights up, and the second begins to blink; when you turn off the turn signal, both light up again. The same story with the emergency lights, both turn signals go out completely and light up in time with the rest of the repeaters.
Here is an image of the diagram on which the work was carried out.
2 capacitors 4700uF 25volt 2 diodes IN5819 2 5-pin relays and 2 connectors for them (can be bought at any auto parts store, I personally only found them there) mother/father terminals - I only needed 4 terminals. Straight hands and at least basic skills in using a soldering iron.
And so at home I figured out how everything should be! IMPORTANT! Install the diode correctly, otherwise the circuit will not work.
According to the diagram, someone wired the capacitor to separate wires, but I soldered the capacitor and diode directly into the connector under the relay (it seemed to me more compact and easier), and I went to try it.
Approximately threw some wires to check functionality
It turned out that all the turn signals light up along with the dimensions (on the left side because that’s where the work was actually done). I thought about what could be there, and turned to a guy who was already putting together such a circuit for himself. It turned out that the main thing is to disconnect the + that goes to the turn signal from the turn signal itself and run it through the relay (according to the diagram).
Dimensions in the turn signals of the VAZ 2104
I decided it wouldn’t be a bad idea to add some dimensions to the turn signals.
1. Holder for a baseless light bulb from a VAZ 2107 turn signal repeater (which is on the wing). 2. TWO baseless light bulbs (with antennae), each 5W - you can supply more power. 3. Wires and females.
Don't be afraid to drill, nothing bad will happen - I checked. There is only one “but” - when you start drilling a hole for the light bulb holder, be sure to remove the 21-watt turn signal bulb with a socket from the headlight unit, otherwise you may hit it with the drill and then you will have glass in the headlight unit. As for the wiring, I think you’ll figure it out - there’s nothing complicated... Be sure to insulate the mothers that are plugged into the light bulb holder - just in case. Sorry that I can’t post a photo with the dimensions turned on, I can’t set up the camera so that it shows how the turn signals are shining normally, I just took a photo from my phone (there’s a terrible glare and the colors are smeared), the other day I’ll take a photo with a normal camera and post the photo, no no doubt, it looks very nice, such a soft light in an orange block, it looks nice. Some people also do it with a two-pin light bulb, but I abandoned this idea - there you have to saw the CARTRIDGE, drill it, stretch some wires there, solder the contacts. Then this whole structure is not easily accessible, and if the light bulb burns out, it is difficult to change. There is one contact that needs to be unsoldered, in short, it’s difficult!
FakeHeader
Comments 65
I have the same ones, I leave them on the sidelights, everyone says that the headlights were not turned off, the battery is good, right?))))
Same crap.”that Acoma is good?”.exactly
They look beautiful. In my photo the dimensions actually look bluish =)
Think about it, they don’t fit in mine, I also bought one of these)))) I put one of them in the interior for additional lighting and in the glove compartment, now it’s as bright as day)))))
It turned out great, just describe the process in more detail? I plan too, but there is no diagram anywhere. Tell me please?
what the hell is the process, I took out a regular light bulb from the dimensions, installed a diode, that’s it! 1 minute business.
very useful information, probably no one knew how to change a light bulb on a Lada. Also show me how to replace the air filter.
I've met dudes who can't even install a spare tire (they don't know how).
It's like the neighbor is on)))
They look really cool! They'll just burn out soon. ... You need to immediately install a voltage stabilizer on them. Look on Ali or eBay. It's worth a penny.
They won’t burn out, I’ve been driving for a long time and there are no problems.
And I have a month and a month for a replacement, a month and a replacement. Here I connected the DRL through a stabilizer.
what kind of stabilizer is this? show me a link at least
It’s a hat for me) The yellow ones look somehow more menacing or something))))
You are a MEEEEEGAATUNER! Well done Ida!
When will such vehicles be banned? It seems like 25 years already, but it feels like 16.
I agree, I don’t even know what to say...
A guy found something like Instagram for himself
How to change a headlight bulb without removing the optics?
There are two ways to access the headlight to replace the Camry 40 size: from the wheel arch side and from the bumper side.
How to change a headlight bulb without removing the optics?
In the first case, this task is much easier to implement:
- turn the steering wheel in the direction opposite to the location of the headlight (if we change the bulbs in the left front headlight, then turn the wheel to the right, and vice versa);
- remove the wheel arch protection clamps and move it to the side by hand;
- take the base of the lamp and turn it 15 degrees counterclockwise, pulling it out of the socket;
- press the latch of the lamp socket connector with your finger and remove it completely from the headlight along with the socket.
How to change a headlight bulb without removing the optics?
If the lamp burns out, it must be replaced with a new one. To replace a Toyota Camry v40 light bulb, you will need model 2825 (W5W). If there is a need to replace the high beam headlight bulb, you should purchase model HB3 (9005) in advance. The low beam requires an H11 bulb, and the turn signal requires a 7440A.
It is not difficult to determine where exactly the headlight bulb on a Toyota Camry 40 is located: it is located slightly above the turn signal bulb. You can recognize the side light bulb by the black color of the socket. You can remove it in the same way as described above: take it by the base and turn it 1/4 turn counterclockwise, disconnecting the cartridge and the power supply. A new light bulb is installed using the same principle - you need to insert it into the socket and return it to its original place in the headlight housing, turning the base 15 degrees clockwise. In the same way, you can replace the high and low beam lamps, as well as the turn signal bulb.
TOYOTA Camry 40 Replacement of front marker lamps. Removing headlights and bumper.
One of the ways to replace the front marker lamps on a TOYOTA Camry 40
.
TOYOTA Camry 40 PTF fog lamp replacement.
Replacing the fog lamp PTF lamp on a TOYOTA Camry. Without a pit lift and overpass in 2 minutes.
Workflow Description
Preparation
- If the low beam on a VAZ 2107 has disappeared and as a result of the check it is found that the lamps are to blame, then you should purchase new products. This model uses the AKG12-60+55 modification with an H4 socket; this marking indicates that the product has a power of 60 W for high beam and 55 W for low beam; you can purchase such an element at any store that deals in spare parts for domestic cars.
The working process
- A huge advantage of the work is that, unlike modern models, access to the headlights is not limited in any way; this greatly simplifies doing the work yourself and allows you to achieve the best result, since you are in complete control of the process.
Important! To prevent the battery contacts from oxidizing during operation, they should be protected with lubricant; if there is no special composition, then ordinary solid oil would be an excellent option - it will protect lead from oxidation and ensure excellent contact over a long period of time.
- If there is no low beam on a VAZ 2107 on only one side, then you can replace one lamp, although experts advise installing two at once, since the light may vary. One way or another, the work begins with any headlight that is convenient for you, first wipe the inside, since most often it is dirty and debris can get inside later.
- First of all, it is necessary to remove the plug, which covers the installation site of the light bulb and serves as protection against moisture and dirt getting inside the housing. This element is removed very simply: grab it and turn it counterclockwise until it comes off, usually this happens in half or even a quarter of a turn.
Advice! When disconnecting a block, it is better to immediately check how well the wires fit, since long-term use may cause the connection to break.
- Next you will see a spring clamp that presses the lamp to the body and ensures its immobility during operation. To release it, you need to press the element on top and carefully move it to the side, everything is very simple and very quickly, when you see this knot, you can easily figure out how this is done.
Illuminated license plate VAZ-2107
To illuminate the license plate in VAZ-2107 cars, AC12–5-1 (C5W) type lamps are used. The license plate illumination is turned on by the external lighting switch - the first button on the left under the gear shift lever. To replace the license plate light bulb, you need to lift the trunk lid, use a Phillips screwdriver to unscrew the two screws holding the backlight light and remove the lampshade from the light housing, then replace the light bulb.
The rear lights of the VAZ-2107 car are a key element of the lighting system and perform a number of functions related to the safety of the vehicle. Proper operation and timely maintenance will extend the life of the rear lights and ensure comfortable and accident-free driving. You can give your car a more modern appearance by tuning lighting fixtures, including taillights.
vote
Article rating