Window lifter handles are most often found on older or budget car models. Almost all domestic cars (except for later models designed by Steve Mattin) are equipped with a mechanical window lift drive. The handle can also be found on older models of foreign cars. Some modern car models (for example, Renault Logan 2) are available with a push-button window regulator for the driver and passenger sitting in the front, and window lifter handles in the rear seats. If the handle breaks, you should not immediately contact a car service center. Everyone can independently figure out how to remove the window lifter handle. As an example, we will give the process of removing the handle on Russian cars.
How to remove the window lifter handle on a VAZ-2114?
On a VAZ-2114 car, window lifter handles are present on the rear doors. Handles have the advantage that such a window lifter mechanism is easier to repair. Of course, automatic window lifting is more convenient, but if it fails, you cannot do without a service station. In general, it is not difficult to break the handle. It is enough not to calculate the effort when raising/lowering the glass. Therefore, the problem occurs quite often. To install and dismantle the new window lifter handle, you will need: a flat-head screwdriver and a purchased new handle, sold complete with a latch and washer.
Handles with a set are sold in specialized stores. If we are talking about how to remove the window lifter handle on a Lada Kalina or any other modern Russian car, then the kit can be easily purchased in stores. There are also a lot of spare parts left for older models. You can search on trading platforms or flea markets.
Removing the old handle
No pullers or other tools are needed. To remove the handle, follow these steps:
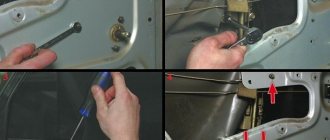
- A flathead screwdriver must be placed between the latch and the washer. The latch must be pryed and unfastened in such a way that you can easily remove it by pulling it towards you.
- Remove the damaged old handle.
- Remove the handle washer.
As you can see, the operation is quite simple, but the problem does not always lie in the handle itself. If the window lifting mechanism jams, moves with tension, or does not work at all, the problem may be in the cable that raises and lowers the window. Alternatively, the gear splines of the window lift system may be worn out. In this case, you will have to change the entire mechanism.
What to do if the problem is in the window lifting mechanism?
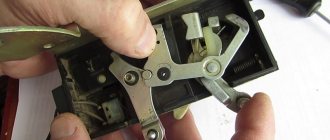
It is necessary to disassemble the car door. It is imperative to remove the door handles and armrest. To do this, you need to pry off the decorative plugs with a screwdriver. Next, take a Phillips screwdriver and unscrew the screws holding the armrest handle. To remove the door pocket, you need to unscrew the screws holding it. There is a pad on the handle that opens the door. It needs to be pryed up and also removed. This is done in order to unscrew the button blocking the door. Next, use a flat-head screwdriver to pry off the upholstery. The upholstery is held in place by eight pins. By removing the pistons, you can easily remove the upholstery.
The glass is attached to the window lifter using two bolts. You can remove them using a 10 mm nozzle. The glass rises up. Using the same head, you need to unscrew the nuts with which the window lifter mechanism is attached. The parts are removed through the door panel window. After replacing the window regulator, it is necessary to reinstall all components. After installing the new window lift mechanism, you need to secure the glass by installing a new handle. After installation, check whether the glass goes up and down. Until you are sure that the system works, do not replace the upholstery, lock button, armrest, handle pad and pocket.
how to supply and install the mechanism, repair and diagram
The VAZ 2106 window lifter has a reliable design, but, like any mechanism, it can fail. The article discusses typical malfunctions of power windows on the “classic” and provides instructions for removal and installation.
Design and types of window lifters
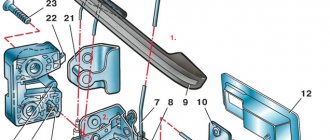
The mechanical window lifter on the VAZ 2106 has a simple design and consists of a control handle, a glass lift transmission system, a cable and three rollers.
Many drivers install electric windows instead of classic ones.
They come in two types:
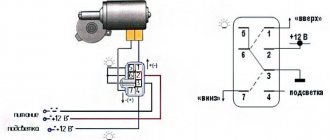
- Cable. The design includes an electric motor with a drum on which the cable is wound, and a gearbox. The upper drum is connected to a conventional window lifter using a spline. With its help the cable is activated.
- Rack and pinion. They use the principle of a steering rack in a car.
To install the electric mechanism, you need to purchase a kit consisting of wires, fasteners, backlit control keys, a decorative plug, and installation instructions (the author of the video is VALENTIN VERNIGORA).
Common faults and solutions
Over time, the window lifting mechanism becomes unusable - it is impossible to raise or lower the glass.
There may be several reasons for a device malfunction:
- cable break;
- foreign objects entering the mechanism;
- gearbox wear.
There is no point in repairing window regulators, since their cost is low; it is easier to buy a new device and replace it.
Electric lifts may have the following faults:
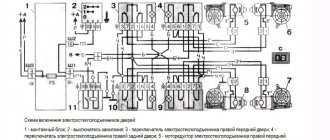
- All power windows do not work: the fuse is blown, there is no connection to ground, the wiring is broken. The repair consists of replacing fuses, restoring ground connections and electrical circuits.
- The lift on one of the doors does not work. The switch is faulty, the reverse current relay is broken, the electric motor is broken, the wiring is broken, the connector is disconnected. Faulty parts should be replaced, the wiring restored, the connector connected.
Removal instructions
To complete the work you will need the following tools:
- Phillips and flathead screwdrivers;
- a set of keys;
- knob;
- extension.
The removal procedure consists of the following steps:
- First of all, you need to remove the casing.
- Next, the glass is lowered as far as possible. Use a Phillips screwdriver to unscrew the bolt holding the clamp.
- After unscrewing the bolt, lower the clamp down.
- Then on the left side of the door, just loosen the roller nut using a wrench.
- The cable is now free and can be removed from the roller.
- Next, unscrew the three nuts holding the window regulator.
- When unscrewing the third bolt, the mechanism should be held from the inside.
- When the window lifting mechanism is free, move it to the side.
- After unscrewing the last nut, you can remove the window regulator from the door.
Next, repair or replacement is carried out. The rear mechanism is installed in the same way.
Installation Features
Installation of a new or repaired window lifter is carried out in the reverse order of removal.
Photo gallery “Installing a window lifter”
To install a power window, follow these steps:
- Dismantle the door, remove the door trim. Next, the electric window lifter is installed using self-tapping screws.
- After installation, you need to check the sliding of the glass.
- Connection to the vehicle's electrical network should be made according to the electrical diagram.
- Next, the door is installed on the car.
- A control button is mounted on the toolbar.
After installation, the electric window lifter must be checked for functionality. You can install a heated rear window.
Video “How to change window regulators on a VAZ”
This video demonstrates how to replace a window lifter on a VAZ (car video - Pavel Pavek).
How to remove the window lifter handle of a VAZ-2107?
The removal process is practically no different from that on the VAZ-2114. The exception is older parts, which may be much more difficult to remove. In addition, the VAZ-2107 has window lifter handles on both the rear and front doors, since the model is older. In the event of a breakdown, you can replace the handle for both the driver and passengers. Spare parts for the model can be purchased at the aftermarket. Since the VAZ-2107 has long been out of production, new spare parts are no longer produced. You can always take kits for more modern models, since they are generally universal. The kit for Kalina or Priora may well be suitable.
A small characteristic of the node
Replacing power windows on a VAZ-2106, as many experienced car owners know, is a fairly simple operation, but fraught with some pitfalls. As almost all experienced car enthusiasts know, the design of the VAZ-2106 is not much different from the design of the very first VAZ model, which, in turn, is in many ways a copy of the Fiat-124
, introduced almost half a century ago.
Cars of that time were distinguished by a simple and unsophisticated design of all components, which means that the VAZ-2106 window lifters have a simple and understandable design, which is quite easy to disassemble. In this article we will tell you in detail how to change the window regulator on a VAZ-2106 with a description of each step
.
conclusions
Replacing the window lifter handle is a simple operation that any car enthusiast can do. When purchasing a kit in the markets, you risk receiving a defective product. In this case, it is better to purchase a kit for a later model in a specialized store. Experts also recommend checking the mechanism itself during replacement, since there are parts that fail over time.
Especially if a problem is found in the glass lifting mechanism. To extend the life of the mechanism, you should not make sudden movements when raising and lowering the glass and you should not pull the handle. The entry of foreign objects into the mechanism is unacceptable. Good luck and easy travels!
Mechanical defects
How to choose a torque wrench for a car?
overview of all points What can interfere with the correct operation of an electric motor? It is recommended to inspect the drive panel.
If, when pressing the button, the driver hears a characteristic growl, but the windows do not move, it means that the plastic gear of the gearbox is badly worn. Repair is not possible here - only replacement.
Another reason why the window regulator (Kalina station wagon is no exception) does not work is moisture getting inside the door and oxidation of the moving systems. As a result of oxidation, the mechanisms jam.
If a very loud noise is heard while the glass is moving, then the gearbox bearing needs to be replaced. If the glass twitches when you try to close the window, it means it is warped or foreign objects have gotten into the roller.
It also happens that the mechanism does not work even after replacing the electric motor. Then the problem is hidden in the cable. It should be replaced. For a Lada Kalina car, the replacement price will be approximately 300-400 rubles, since this cable is not sold separately.
Replacing the window lifter handle with your own hands
Over time, the power window handle may break. If this happens to you, do not rush to contact a car service. This work can be done independently without difficulty and a lot of time. As an example, I will look at how to replace the window lifter handle on a VAZ 2108.
To replace the window lifter handle you will need:
1. Flat head screwdriver. 2. A new handle, which will come with a washer.
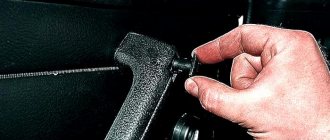
So let's get started. First we need to remove the old window handle. To do this, insert a screwdriver between the handle and its washer. Hook up the handle and pull it towards you. The handle will easily “come out” of its seat. Also remove the handle washer. Install the new handle in reverse order. Before installing the handle, hit the window regulator splines. After you have placed the handle on the slots of the window regulator, secure the handle with the latch. Check the operation of the handle.
This happens when the glass goes down and up with force. In this case, simply replacing the handle will not help. If the window does not go down well, this means that the window lift cable has worked, or the window lift itself will soon break. The window regulator will need to be replaced. To replace the window regulator, you will need to disassemble the door. Remove the door trim and window handle.
You now have full access to the window regulator. Unscrew the two bolts with a 10 mm wrench that hold the glass. Lift the glass up and unscrew the bolts securing the window lift mechanism. For this you will also need a 10 mm wrench. Remove the old window regulator. Install the new window regulator in reverse order.
Read more on the topic >>>
Retaining ring
This mount often confuses car enthusiasts. Few people know how to properly remove this type of handle. This causes the handle to break. Which can be quite painful for the budget on many foreign cars. Therefore, it is still better to remove it carefully, especially since if you do it correctly, the chances of breaking the handle are minimal. It’s worth mentioning right away the method that is undesirable to use. This is dismantling with a rag. This way you are guaranteed to break the handle. It is better to proceed in the following order when dismantling:
- Using a slotted screwdriver, lightly press the handle to open access to the locking ring;
- While holding the handle with a screwdriver, use another screwdriver or a wire hook to remove the locking ring. Sometimes it breaks, but finding a replacement is not that difficult;
- The handle is removed from the slots.
Splined fastening. This is the simplest option. It is used on budget cars, this is due to the minimum number of parts in the design. Which reduces its cost. This handle simply fits onto the slots without any additional fastenings. It is dismantled by simply pulling it off the slots. As a result, the disassembly process is as simple as possible. The disadvantage of this type of design is the gradual wear of the splines, as a result of which the handle begins to dangle on them. And it can fall off. This can only be cured by replacing the mechanism or handle, depending on the specific location of wear. Window lifter mechanism. Quite often, the reason for dismantling the handle is poor operation of the window regulator. The reason for this behavior is often rust on the cables and gears. Therefore, be sure to lubricate these structural elements. Sometimes it may be necessary to adjust the mechanism
In this case, it is important to achieve the ideal length of the cables at which the glass will move freely. If the adjustment is poor, the cables may become tangled, which will lead to jamming of the mechanism or their breakage
If significant wear of parts is detected, the mechanism should be replaced. When choosing it, keep in mind that on many models the rear and front window lifters may differ. Conclusion. The window lifter handle can be removed in a variety of situations. In fact, it must be dismantled whenever the door trim is removed. Therefore, many are interested in how to remove the window lifter handle without breaking it. After all, this plastic part is quite fragile. In fact, even absolutely correct dismantling will not save you 100% from the need to buy a new handle. But, the chances of avoiding a breakdown will increase significantly.
Replacing the door window lifter on a VAZ 2113, VAZ 2114, VAZ 2115
Welcome! Window lifter - this mechanism is found in almost any car, depending on the car, it can be either a mechanical type (With a handle for adjusting the position of the glass) or an electric one (In this case, the handle is removed and a button is placed together with it), in addition, we immediately note the fact that the window lifter and the glass itself are two different things (some people just confuse it) and thanks to it you can adjust the position of the glass in the car (raise it higher or lower it).
Note! To carry out the procedure for replacing the window lifter on the door, you will have to stock up on: Various types of screwdrivers, as well as a set of wrenches, if you have an extension cord with union heads, then you can use it, and thin pliers or pliers may also be needed, and if you have them If you have one, be sure to take them!
This is interesting: Repair kit for Mitsubishi trimmer carburetor
Summary:
Where is the door window lift located? On cars of the Samara 2 family, different types of window lifters are installed, namely, there are electric ones in the front, and mechanical ones in the back (If the car is in a top configuration, then there are electric ones in the back), both types are hidden in the door itself and you won’t see them without removing the trim, so for For clarity, in the photo below, the trim was removed from the front door of the car, and the window regulator itself is indicated by a red arrow in this photo.
When should you replace your door window regulator? If we are talking about an electric window lifter, then as a rule, when it fails, the glass stops going up and down when you press the corresponding button, in addition, on some cars (you most likely have already paid attention to this) it happens that the glass somehow goes down (Slowly ) and almost does not rise (you have to help with your hand), this also indicates that the window lifter has become unusable and requires replacement, but by the way, in some cases, due to the fact that the glass does not rise and fall poorly, it may not even be the window lifter itself that is to blame glass, it’s just that over time its fastening weakens and thus the glass becomes skewed, which is why problems occur with lowering and raising the glass on the car, but as for mechanical window lifters, everything is simple here, if by rotating the handle the glass has ceased to be adjusted, then the window regulator itself has failed and requires replacement.
Possible malfunctions and ways to eliminate them
In the case of mechanical joint ventures, there may not be so many faults; all of them are caused by mechanical damage to the system. For example, this could be wear of rollers, brackets, cable breakage, etc. The situation is much more complicated with electrical systems, since they are equipped with more complex elements. Signs of ESP malfunctions include either complete failure of the power windows, or their insufficient operation, as well as noise.
For what reasons can malfunctions occur:
- Damage to the connection wiring, cable break, insulation breakdown. If the wiring is damaged for some reason, then the ESP electric motor will not be able to receive a signal to open or close the glass. In the case of an insulation breakdown, current leakage is possible, so the ESP will operate too slowly or intermittently. Sometimes the cause is due to insufficient contact between the electrical circuit and the device. Damaged wires need to be replaced with new ones; if the contacts have oxidized, then they need to be cleaned or also replaced.
- Failure of the system electric motor. If the gear motor breaks down, the ESP will refuse to work at all; such a malfunction usually manifests itself after several years of intensive use of the devices. You can try to replace or repair the drive itself; the complexity of the repair depends on the malfunction.
- Problems with the operation of the control unit on which the buttons are located. If all ESPs refuse to function at once, this may indicate that the control module has failed. It is possible that the reason is a damaged contact with the vehicle’s on-board network; the circuit located inside the unit is also susceptible to malfunctions. If it happens that only one ESP or several do not work, then most likely the fault should be looked for in poor contact of the control key with the electrical network. It is necessary to check for possible presence of oxidation and remove it.
- Burnout of the safety device that is responsible for the operation of the ESP. This part can be located in the corresponding block in the engine compartment or on the power supply circuit from the power windows to the battery. If the reason lies in burnout, then the device must be replaced.
- Wear of rollers or gears. Malfunctions of this type are associated with long and intensive use of ESP. Over time, gear teeth can become damaged due to wear; usually such devices cannot be repaired, they only need to be replaced (video author - Sanya Kachan).
My DRIVE - Installing ESP on a VAZ classic
How to replace the door window lifter on a VAZ 2113-VAZ 2115?
Note! The window lifter on both the rear door and the front door is replaced almost identically, although there are small nuances, but you don’t even have to pay attention to this, and therefore if you learn how to replace the window lifter at the front, then you can also replace it on the back door and vice versa, but there is just one But! The window lifter can be replaced both with the glass removed from the door and with the glass installed (How you do it is up to you, if you don’t want to remove the glass, then in this case you can simply fix it with a screwdriver, but if suddenly the door moves a lot, then the glass may fall and break, but this won’t happen to you with the glass removed), if you still want to remove it, then in this case read the article entitled: “Replacing glass on a VAZ”, if you don’t want to remove the glass and are sure that it will not fall, then start reading the article; in it we just described the process of replacing a window lifter with the glass installed on the car door!
Removal: 1) Let's start with the front doors, but even if you replace the power windows only on the rear doors (And this is point 2), then still study point 1, because they are interconnected and from all these points you will understand more than you read only one of them, in general, before replacing, it doesn’t matter which door, but you will need to remove the trim from it, because the mechanism is located inside the door and without removing the trim you simply won’t get to it (For information on how to remove the trim, read the article: “Replacing the front door on a car” points 1-8), after the trim is removed, disconnect the wire block and the connector that go to the window regulator (see photo 1), then remove all the nuts (there are only three) that secure it mechanism to the door (see photo 2) and then unscrew the two bolts securing the window lifter slider to the glass frame itself (see photo 3), when the bolts are unscrewed, lift the glass to the very top if you have not removed it and fix it in this position (You can fix it using a screwdriver, see photo 4, or you can ask an assistant to hold the glass in the upper position).
Note! So that the window lifter mechanism can be removed from the door and thereby completely removed, unscrew the two screws that secure the door opening handle to the car (see photo 1), after unscrewing the screws, remove the handle by pushing it into the inside of the door and through remove the cutout in the door (see photo 2), then using thin pliers or pliers or simply by hand, disconnect the rubber holder that holds the rod on the handles (see photo 3) and after that disconnect the rod from the handle and you you can completely remove it from the car in this way (see photo 4) and therefore, when the handle is removed, remove the window lift mechanism itself through the same cutout in the car door!
2) As for the rear door and window lifter, in order to remove it, take a wrench in your hands and use it to unscrew the three nuts that secure the mechanism to the door (see photo 1), as soon as the nuts are unscrewed, unscrew the two bolts that The slider with the glass is attached to the window lifter holder (see photo 2), then fix the glass in the same way as described in the first paragraph (see photo 3) and finally, when the glass is already stationary, unscrew the three nuts securing the mechanism to the door (see photo 4) and, also grabbing it with your hand, remove it from the door and thereby completely remove it.
Installation: Everything is installed in its place in the reverse order, or, to put it simply, everything is put in its place in the reverse order of removal.
Additional video: An interesting video on repairing the front door window lifter, you can see in the video that is attached to our website just below:
Plastic latch
This method of fastening raises the least number of questions among car enthusiasts. At first glance, everything is simple here. You need to press and pull out the latch, this is enough for dismantling. But, strangely, these are the handles that are broken most often. Therefore, let us pay attention to some of the nuances of this work:
- Take a slotted screwdriver and insert it between the latch and the washer. Your task is to move the latch back a little. Often a crunching sound is heard in this place, this means the handle is broken. In this case, you can skip the next point;
- Using the same screwdriver, the latch is pulled out entirely;
- The handle itself is removed from the slots and the washer is removed.
Assembly occurs in reverse order. It is advisable to place the handle in the most comfortable position for yourself. Also, before installing the latch, twist the handle a little, this will allow it to fit perfectly into the slots.
Similar articles:
- How to remove and check the starter of a VAZ 2106 repair with your own hands why it clicks and does not turn, replacing the relay instructions with video and photos
- VAZ 2106 steering wheel: which one is suitable, how to remove and disassemble, instructions with photos and videos
- Replacing the window regulator VAZ 2106 and 2105: how to supply and install the mechanism, repair and diagram
- How to remove and replace the VAZ 2107 gear shift lever yourself: description and instructions with video
How to remove the window handle?
- How to remove the window handle?
- What you need to remove the window lifter handle
- How to remove the window handle
- Replacing the window handle
If your small fleet consists of a car that is made by a domestic manufacturer, then be prepared for the fact that problems may arise with the window lifter handles. From time to time they may break, so you should have a minimal idea of how to replace this element without resorting to the help of specialists. Even if your experience in repairing car interior elements is minimal, you can still cope with such an easy task.
What you need to remove the window lifter handle
In order to remove and install a new window lifter handle, you will need to obtain:
1) Flat screwdriver;
2) I just bought a handle that comes with a washer and a latch.
No special pullers or rare tools are needed. That is why repairing the window lifter mechanism will not be prohibitively expensive from a financial point of view.
How to remove the window handle
To remove the power window handle, you will need to follow these simple steps:
1) Place a flathead screwdriver between the handle washer and the latch. The latter needs to be lifted and pressed away from the surface so that later you can remove it by simply pulling it towards you. The handle will easily come out of the “seat”.
2) After removing the handle, you need to remove the washer of the old handle.
That's all. But it’s not always possible to fix everything by replacing the handle. For example, if difficulties arise in raising and lowering the glass, you should pay attention to the window lift mechanism itself. Maybe the cable that lowers and raises the glass is to blame. The cause may also be worn out gear splines of the window lift system. If this is the case, then the entire mechanism will have to be changed. To do this, you do not need to remove the glass. The steps are as follows:
1) First you need to disassemble the car door itself.
2) Remove the handle and armrest. To do this, just pry off the decorative plugs with a screwdriver, after which, using a Phillips screwdriver, you will have to unscrew the screws that hold the armrest handle itself. After unscrewing the screws that hold the door pocket in place, remove it.
This is interesting: Checking the starter from the battery
3) There is a pad on the handle that opens the door. It needs to be lightly pryed and then removed. Next you need to unscrew the button that blocks the door.
4) Using a flat-head screwdriver, you need to pry off the upholstery, which is held in place by eight pistons. After that, remove it.
5) The glass is attached to the window regulator with two bolts, which must be unscrewed with a “10” head. Lift the glass up. Using the same method, you need to unscrew the nuts that secure the window lift mechanism itself. The parts must be removed through the door panel window. After replacing the window regulator, reassemble everything in reverse order.
6) After installing the new window lift mechanism, you will need to secure the glass and install a new handle. Next you need to check the operation of the system. Only if everything is in order will it be possible to return the upholstery, lock button, armrest, pocket and handle pad to their place.
In principle, no problems should arise. This work is not particularly difficult.
Replacing the window handle
Installing a new window handle is carried out by performing the above steps in reverse order. You need to take the washer that comes with the new handle and insert it in place of the old one. This washer must be held with your hand, while inserting a new handle in place of the old one. Many experts say that the new handle needs to be turned several times.
This will facilitate better adhesion of the new handle to the splines of the lift gears.
Only after you are sure that the handle holds well can you install the latches that come with the handle. After completing all work, check the operation of the window lifter handle.
Just raise and lower the window several times. It should go smoothly. If this does not help, then you will have to go to the mechanism itself. So, even the most inexperienced car owner can replace the window lifter handle with his own hands. Experts say that it would be useful to check the serviceability of the entire mechanism, so as not to return to a similar problem later. Only if you are unable to solve the problem with the window regulator yourself, you should turn to professionals for help or advice. But there is a high probability that such actions will not be necessary.
Subscribe to our feeds on Facebook, Vkontakte and Instagram: all the most interesting automotive events in one place.
Types of fastenings
How to remove the window handle? Drivers are afraid of dismantling this element. This is due to the minimal amount of information on the Internet, as well as stories from experienced drivers about a large number of broken handles. To properly dismantle the unit, you need to know its design, in this case the method of fastening. All types of fasteners 3:
- Plastic latch;
- Retaining ring;
- Splined fastening.
The first option was most often used on VAZs, and also on some European cars. The retaining ring can be found on the vast majority of modern foreign cars. Renault cars are equipped with handles with slotted fastening.
Removing the front door trim
Plastic spikes or “herringbones” for fastening may break during the process of removing the skin. We purchase in advance a quantity sufficient for the update. It is better to buy double white-orange or transparent clips.
- Open the door and remove the 3 screws securing the podium. The screws are unscrewed with a Phillips screwdriver. The podium carefully turns down and detaches from the body.
Do not remove the casing with jerks or sudden movements. The sockets that attach the trim to the door can be damaged.
- We remove the wires from the locking mechanism from under the top of the casing. We remove the door trim of the VAZ 2114, evenly moving it away from the door.
- After removing the trim, you can replace the glass, the trim itself, repair window regulators, install acoustics, etc.
If you are planning to replace the trim, before purchasing it, compare the dimensions of the trim installed in your car with the new one in the store. The location and diameter of the holes for the handle and for fastening may not be the same.
Installation of the casing occurs in the reverse order.
Removing the rear door trim
The sequence of actions for dismantling, or how to remove the rear door trim on a VAZ 2114 and mount it back.
- Using a flat-head screwdriver, press out the decorative molding of the door handle and remove it.
- Remove the door handle.
- Using a flat-head screwdriver, press and remove the door handle trim.
- After unscrewing the fastening screws, remove the inner part of the handle.
- Using a flat-head screwdriver, remove the door lock handle trim.
- Unscrew the cap of the door locking mechanism (lock) and remove it.
- Use a flat-head screwdriver to disconnect the 10 door trim fastening studs.
- Carefully remove the trim, moving it evenly away from the door.
Installation of the casing occurs in the reverse order.
After removing the trim, it is recommended to carry out anti-corrosion treatment and check the condition of the internal cavities of the door.
If the door does not close, after removing the trim, you need to lubricate the rod of the central locking electric drive with silicone spray.
Sometimes you need to remove the trim from a door when it is jammed. In this case, space is made in the cabin for trim parts and work is carried out from the inside.
To improve sound and heat insulation, foil foam rubber is installed inside the casing. The pattern is made according to the pattern of the old casing. The material is cut with a margin of a few centimeters so that it can be folded. A hole is cut out for the handle. It should be slightly smaller in size than the handle itself. Insulation adhesive is selected depending on the type of material.
Sometimes, after removing the trim, decorative inserts are replaced. Typically, leatherette, Alcantara, carlet and tapestry fabrics are used for replacement.
Information on how to remove a VAZ 2114 door or door trim is required not only to change decorative panels or install sound insulation, but also to replace a power window or glass.
Replacing the window regulator
To replace the window regulator, you need an extension, a wrench and a 10 mm socket.
Having freed the front door from the trim, remove the 2 bolts securing the glass to the bar. Usually they are tightened tightly, so it is more convenient to use the head as a lever.
Remove three nuts securing the electric motor, one nut under the glass, two in the center and one nut at the bottom of the door.
After removing all the nuts, disconnect the power plug from the electric motor.
After removing the structure, the electric motor is first checked. If it is faulty, it is replaced. If the cause of the breakdown is not obvious, replace the window regulator.
Glass replacement
It is better to buy glass and a glass holder as a set for replacement.
To replace, you need an extension, a wrench, an 8 and 10 mm socket and an assistant.
The side glass is blocked with a screwdriver to prevent it from falling out. The door trim is removed. A felt-tip pen marks the places where the glass frame is attached to the door on the frame and on the door. The bolts securing the glass frame to the window regulator are turned out.
The window regulator bar must be fully raised. The cable on the roller from the bottom of the glass is dismantled. Then the seals (velvet covers) are carefully removed.
Hold the glass during this time so that it does not fall out. After removing the seals, the glass is lowered down about 10 cm, tilted to the side and removed from the groove.
The new glass is installed in the reverse order. Apply WD-40 or a similar lubricant to the glass frame, insert the glass and leave to dry. After the grease has dried, the glass is installed in the door. New glass is installed in the seals.
If the seals have become unusable, new ones are cut out of rubber, while the old ones are used as patterns.
The glass with seals is inserted into the groove, aligned and lowered into the stopper. The window lifter handle is lowered to its lowest position. The glass is fixed with bolts and the cable is installed in its original place.
The operation of the window regulator is checked and, if necessary, the cable tension and the position of the seals are changed.