Replacing the VAZ 2112 thermostat is necessary if it has stopped opening the valve that releases antifreeze in a large circle to cool the engine, as well as if the valve remains in the open position or is jammed. Replacing the thermostat on a VAZ 2112 16-valve engine is no different from replacing it on an 8-valve engine. The only difference is that the thermostat of the 16 valve VAZ-2112 engine has an increased resistance of the bypass valve (throttle hole), due to which the fluid flow through the heater radiator increases.
Design and tasks of the VAZ 2112 thermostat
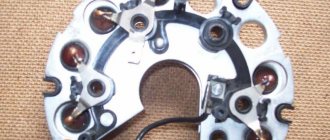
On cars under the Volzhsky Automobile Plant brand with a carburetor, and even on injection cars, until 2002, a thermostat was installed in an all-metal housing (i.e., on 8-valve gasoline engines). The unit was secured using four pipes. People call the VAZ thermostat a 4-hole thermostat. The first terminal of the housing is connected to the engine, the second is connected to the radiator, the third goes to the heater and the cooling system pump, the fourth (the thinnest) is connected to the expansion tank.
Until 2002, a four-hole tremostat was installed on carburetor and injection internal combustion engines
Inside the case there was a heat-sensitive element - a thermostat. You can see it only after complete disassembly. The operating principle is based on changing the shape of a bimetallic plate when heated or cooled.
When the engine starts, antifreeze circulates in a cold circle. When the power unit warms up, the coolant also heats up. At +87 degrees Celsius, the thermostat opens slightly and some of the antifreeze begins to flow in a large circle. When 102 degrees is reached, the temperature-sensitive element opens completely. A radiator is connected to the engine cooling process.
A car thermostat regulates the flow of antifreeze in the cooling system
On injection VAZ 2112 since 2002 (the engine by this time had become 16-valve), a thermostat is installed in a collapsible housing with six outputs. One additional terminal is connected to the stove when antifreeze circulates in a small circle. The second pin is used to heat the throttle valve.
Since 2003, a new type of unit has been installed on the VAZ 2112, as well as on the Priora and Kalina. The housing has 6 pins and is attached to the power unit unit using 2 nuts
When using a housing that can be disassembled, there is no need to purchase an assembled unit. Since 2003, on the VAZ 2112, Priora and Kalina, in the event of a malfunction, only the temperature-sensitive element must be replaced.
Where is the thermostat installed on the VAZ-2112?
Regardless of the type of power unit, the thermostat is located in one place - below the air filter housing. There you can see the cover of the device, under which the required element is installed.
This simplifies the search and replacement of the thermostat on a VAZ 2112 of any modification.
The role of the thermostat in the engine cooling system
The engine cooling system is divided into two circuits: large and small. The small circuit encloses the internal elements of the engine and the heater radiator for heating the interior. The large circuit includes the small one, but in addition passes through the cooling radiator located in front of the engine. Thus, when the coolant temperature reaches a set level, the valve opens the flow into a large circuit and the antifreeze is cooled by oncoming air, entering the cooling radiator. If there is not enough oncoming air, the engine temperature sensor transmits a command to the control unit, which in turn turns on the cooling fan located in front of the radiator.
As soon as the air entering the radiator cools the liquid to a certain temperature, the valve closes and the antifreeze again flows through the small circuit. As a result, the engine temperature is maintained in operating condition.
Principle of operation
VAZ 2112 injector thermostat 16 valves
The operating principle of the thermostat is characterized by the following points:
- Inside the thermostat there is a valve filled with a special substance. This very substance, due to its chemical and physical properties, expands with changes in temperature. Thus, when the substance expands, it acts on the valve, which overcomes the force of the spring and opens the flow of fluid from the radiator to the outlet - the outlet pipe.
- In addition, the design of the thermostat implies the presence of a bypass valve located on the antifreeze path from the engine to the outlet pipe.
- It is noteworthy that at a time when the antifreeze temperature is low and the engine is running but not warmed up enough, the coolant circulates in the so-called “small circle”.
Note. A “small circle” of coolant passage implies the opening of the bypass valve, resulting in rapid warming up of the engine.
- The main valve opening begins at temperatures between 80.6 and 81.5 degrees. It is at this moment that the liquid begins to move in a large circle, implying circulation through the radiator.
This is interesting: Scheduled Maintenance Schedule for the Ford Focus 3 model (Ford Focus)
VAZ 2112 injector thermostat
- When the temperature reaches 94 degrees, the main valve opens to its maximum value, approximately 6 mm. In this case, the bypass valve closes completely, and the coolant moves only in a large circle and is automatically cooled as it passes.
Note. In most cases, failure of the thermostat implies jamming of the valve stem, which naturally leads to the circulation of coolant in either a small or large circle. If the movement of antifreeze in a large circle is not so dangerous, then the first case threatens to overheat the automobile unit. How to check the thermostat status
VAZ 2112 injector thermostat
The simple test below will help you do this:
- The engine warms up to operating temperature (the arrow should be vertical);
- We feel the lower thermostat pipe with our hand, which should be slightly warm and gradually warm up.
If the lower pipe is cold, then most likely the thermostat is not functioning normally and the liquid circulates only in a small circle. If the lower and upper pipes have similar temperatures, then the probability of the valve being open is one hundred percent.
What should the engine operating temperature be?
Engine operating temperature shown on the instrument panel
If we take the information from the international convention of automobile manufacturers dated December 1, 1992, then the uniform standard for engine operating temperature is considered to be 90 degrees Celsius. With such indicators, the engine operates as efficiently as possible and does not create residual negative effects.
When switching to more advanced engine manufacturing technologies in 2004, it was accepted that a specific indicator of this indicator cannot be held in one position, and therefore they made a gradation of acceptable standards, which amounted to 85-105 degrees Celsius.
Engine overheating shown on the instrument panel
According to data from the manufacturer AvtoVAZ, on a 16-valve VAZ-2112 engine, the operating temperature of the engine is considered to be 87-103 degrees Celsius.
At this temperature, all systems function normally, and the motor is not subject to negative factors and consequences.
Cooling system design
The engine cooling system has many components that are interconnected, and if one fails, the entire system will not be able to function. So, let's look at the location diagram and decoding of the indicators for the cooling system of a 16-valve engine.
Diagram of the cooling system operation
1 – heater radiator; 2 – steam removal hose of the heater radiator; 3 – outlet hose; 4 – supply hose; 5 – coolant temperature sensor (in the block head); 6 – pump supply pipe hose; 7 – thermostat; 8 – filling hose; 9 – expansion tank plug; 10 – coolant level indicator sensor; 11 – expansion tank; 12 – exhaust pipe; 13 – liquid chamber of the carburetor starting device; 14 – radiator outlet hose; 15 – radiator supply hose; 16 – radiator steam outlet hose; 17 – left radiator tank; 18 – sensor for turning on the electric fan; 19 – fan electric motor; 20 – electric fan impeller; 21 – right radiator tank; 22 – drain plug; 23 – electric fan casing; 24 – timing belt; 25 – coolant pump impeller; 26 – supply pipe of the coolant pump; 27 – coolant supply hose to the throttle pipe; 28 – coolant drain hose from the throttle pipe; 29 – coolant temperature sensor in the outlet pipe; 30 – radiator tubes; 31 – radiator core.
Main malfunctions and ways to solve them
In fact, there are quite a lot of components in the cooling system that are susceptible to failure. This depends not only on the service life, but also on maintenance, as well as the quality of the parts. So, let's look at the main components, faults and methods for solving them.
Cooling radiator
Cooling radiator pulled from the engine
As practice shows, this part lasts quite a long time. The main cause of failure is clogged internal channels. So, if the blockage is sufficiently dense, the engine begins to heat up, the high pressure created by the pump can lead to a rupture of the tube and the radiator will leak.
Some car enthusiasts have it soldered and cleaned, but as practice shows, after a short period of time, a leak forms again. Therefore, if this part fails, it must be replaced with a new one.
Heater radiator
Heater radiator assembly with fan
Pipes
KIT kit of cooling system pipes
One of the main components of the cooling system, since it is through the pipes that the fluid circulates through the system.
The main malfunction is considered to be wear, namely the appearance of cracks and leaks of coolant. To fix the problem, you need to replace the damaged element.
Of course, it is recommended to change everything in sets, since it is unknown how many kilometers later another one will have to be replaced, and the process itself requires draining the coolant.
Water pump
Water pump removed from the car
The pump circulates coolant throughout the system. So, if a leak occurs from the water pump bearing or noise increases, these are the first signs that the part needs to be replaced.
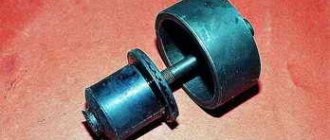
Thermostat
Thermostat disassembly process
The thermostat is the part of the cooling system that is most often replaced.
Thus, the first signs of a unit malfunction are considered to be an increase in the operating temperature of the engine to the maximum, as well as frequent turning on of the cooling fan. To fix the problem, you need to replace it with a new product.
Radiator cooling fan
Electric fan with casing removed
This part provides cooling of the liquid, but if there is insufficient oncoming wind flow, it is this part that additionally creates an air flow. The cooling fan prevents the temperature from rising to a critical level.
It turns on at 100 degrees Celsius, and turns off at 94.
Cooling system sensor
Cooling sensor location
Part of the engine management system that sends a pulse to the ECU to turn the cooling fan on or off and also reports the status and changes in engine operating temperature. If it fails, the part must be replaced to eliminate the malfunction.
Symptoms of a problem
There are several main signs of a malfunction:
- The engine takes a long time to reach operating temperature.
- While driving, the engine overheats even on short trips.
- The engine temperature drops while driving and rises if you stop and let the engine idle.
- A few minutes after starting the engine (in warm seasons), the lower pipe is warm. This indicates that the thermostat is opening very early.
- If the engine (coolant) temperature is close to boiling and the lower hose is cold, it is most likely a stuck thermostat valve.
Technical features
On “tens” and “dvenashki” there are 2 types of thermostats. They differ in the number of holes through which coolant is passed. The basic configuration uses a version with 5 holes, but such thermostats have one significant drawback: they limit the heating of the stove.
It is worth noting
that you can find old and new thermostats on sale. The main difference between them is the ability to disassemble the part. Until 2003, cars were equipped only with collapsible thermostats, after which non-dismountable options began to be installed. Technically, they are practically indistinguishable and can be interchangeable. But, for some types of tuning, only old-style thermostats should be used.
The thermostat's job is to regulate coolant flow. At low temperatures, only a small circle is used, so the thermostat is closed. As soon as it reaches a certain temperature, it is triggered and coolant is released through the radiator. All this allows you to quickly warm up the engine, but at the same time effectively fight against overheating. It is worth noting that some tuning methods slightly increase the engine warm-up time.
Verification methods
There are several ways to check the VAZ 21102 thermostat, in particular:
- check without removal;
- checking a removed thermostat
To check without dismantling, start the engine and wait until it reaches operating temperature. Next, grab the lower pipe with your hand (it comes from the thermostat). At first, the pipe should be warm, and after a few minutes it should gain temperature. If the lower pipe is cold and the coolant temperature approaches 100-110 degrees, then the thermostat is not working and needs to be replaced.
There is also a simple and working way to check the thermostat removed from the engine. Heat the water to 80 degrees and lower the thermostat into it. Next, heat the water another 10 degrees and watch the thermostat; the valve stem should gradually come out.
It is not advisable to repair the VAZ 2112 thermostat due to the low cost of a new spare part.
conclusions
The operating temperature of the 16-valve VAZ-2112 engine is 87-103 degrees Celsius.
If this indicator increases, the engine may boil, which in turn can lead to serious negative consequences, such as bending of the cylinder head or major engine overhaul. It is worth carefully monitoring the condition of the components and parts of the cooling system, because they ensure normal cooling and operation of the power unit.
The thermostat is an important component in the engine cooling system of any car. The stability of cooling and the performance of the engine itself depend on its operation. The article describes the purpose of this part, how to check its performance, replacing the thermostat on a VAZ-2112 with a 16-valve engine, the best original components and their factory part numbers.
Tips before starting the procedure
- Before you begin removing the thermostat on a VAZ 2112, be sure to ensure that it has completely cooled down after operation.
- The thermostat is removed when it is replaced due to unstable engine temperature conditions (overheating, insufficient heating). To carry out this procedure, completely draining the coolant is not necessary.
- To check the condition of the thermostat, start the car engine and touch the lower radiator hose, at first it should remain cold, and only after the coolant temperature reaches about 90 degrees, the hose will begin to gradually heat up. If there is no such reaction to the manipulations performed, remove the thermostat from the car and check its functionality; if defects are detected, it must be replaced with a new one.
This is interesting: How to choose the right Renault Megane spare parts: advice for an inexperienced driver
Diagnostics with dismantling
A very simple way. To check, you need to remove the part from its seat. Further:
- Fill the container with water.
- Heat the container.
- Immerse the part being tested completely in the liquid.
- Monitor the temperature of the liquid using a technical thermometer.
After heating the water to t = 85–95 degrees, the rod should begin to extend and the thermostat valve should open. If this does not happen, the part is considered faulty.
After the valve has opened, the thermostat must be removed from the heated water. Cooling of the removed part will cause the valve to close. If the valve remains open, this means that the return spring has lost its elasticity and such a thermostat is considered unusable.
The already removed part can be cleaned of scale and dirt. Then repeat the check. If the result remains the same, the part must be replaced.
How to replace a thermostat yourself
Replacing a faulty thermostat in a VAZ-2112 with 16 valves is a fairly simple matter, so even minor skills in car repair will help the car enthusiast to perform this operation on his own. The part is replaced in stages:
- Start work only with a cold engine to avoid getting burns on your hands.
- All liquid intended for cooling must be completely drained, since replacing the part involves disconnecting the pipe in which it accumulates. To avoid spilling liquid during this process, you should place a container of the appropriate size under the bottom of the car.
- For ease of operation, it is recommended to remove the hardened air filter housing.
- Using a screwdriver or wrench, unscrew the connectors that secure the hose to the thermostat. There should be two such hoses - one is for the radiator, the other is for the thermostat.
- Using a hex wrench, unscrew the bolts, in triplicate, that prevent the element cover from moving when the car is running. After removing the fasteners, you should simply carefully remove the part from its permanent place.
If, upon inspection of the cover, any defects are revealed in the sealing ring, for example, cracks or deformation, this will indicate that the ring has also become unusable and needs to be replaced.
All car parts should be assembled in the reverse order that was used during disassembly.
The information described indicates that replacing a faulty VAZ-2112 16-valve thermostat is an easy operation, and if you approach the event responsibly and carry out the process step by step, then everyone will be able to correctly replace the faulty part on their car.
Removing and correctly installing the thermostat on a carburetor engine
1. Remove the plug from the expansion tank and unscrew the drain plug at the bottom of the radiator. Drain the liquid from there and screw the drain plug back on.
2. Disconnect the three hoses from the thermostat housing, having first loosened it. 3. Next, you will need to loosen the clamp and remove the device along with the hose. 4. After all the above steps, warm the water to 80 degrees and lower the thermostat into it. Just as with an engine with a fuel injection system, heat the water together with the thermostat, while constantly stirring it to 87–90 degrees. 5. At this temperature, the main thermostat valve will begin to open. If this opening does not occur, you will need to replace it. Installation occurs in the exact reverse order of removal.
Replacing the thermostat on a VAZ-2112 with an injection 8-valve engine
To replace thermostats on an 8-valve VAZ-2112 engine (injector), proceed as follows:
- Prepare your instrument. You will need a tee with tubes with a cross-section of 1.9 cm (not necessary to redo the connection diagram), a half-meter hose, a container (a plastic bottle will do), several clamps 2.5 cm in diameter (two or three pieces), a key to “ eight", screwdriver, hex wrench 5.
- Purchase the necessary materials - gasket for the case, silicone-based sealant, thermostat, rags, antifreeze.
- Unscrew the bolts holding the filter shell.
- Loosen the clamps on the throttle pipe and crankcase ventilation hoses, and then tighten the throttle cable fixing bolt.
- Separate the electrical connector.
- Remove the rubber cushion from the hole in the housing bracket, and then remove the air filter.
- Tighten the bolts on the clutch housing and cylinder block, and then remove the ignition module. The described action is necessary to gain access to the coolant drain plug.
- Unscrew the drain plug on the radiator and cooling system block, and then drain the coolant.
- Loosen the clamps on the thermostat pipes, remove the device and twist the temperature control sensor. Here, remove the controller connector.
- If the design allows you to replace the main valve, then use a hex wrench to disassemble the thermostat and replace it.
- Install the new device and connect the pipes to the same places. If possible, replace the hose with a longer one.
Wipe the pipes and housing terminals with a rag, change the gasket between the housing and the motor and tighten the clamps. Add antifreeze and check the system for leaks. After 10-20 kilometers, inspect the joints again.
This is interesting: Power steering: problems, spare parts, do-it-yourself pump repair in a garage
How to change the thermostat on a VAZ-2112 with an injection 16-valve engine?
When replacing a faulty device with a 2112 with a 16-valve engine, the required tool and algorithm of actions remain virtually unchanged:
- Drain the coolant from the system;
- Remove the air filter;
- Loosen the fixation of the water pipes (inlet and outlet) connected to the thermostat;
- Tighten the bolts holding the device to the block.
- Remove the cover (if necessary);
- Remove the main valve from the casing;
- Return everything to its place in reverse order. Be sure to change the rubber used to seal the case.
Installation
On the VAZ 2112 you can easily install a thermostat from the injection VAZ 2111. The advantages of such an upgrade:
- You will have to use one less hose and only two clamps, which minimizes the possibility of leakage;
- Smaller dimensions;
- Compact monoblock design;
- Large circulation through the stove due to the reduced cross-section of the small circuit;
- Placing the expansion tank in a convenient place, which allows you not to heat the engine until the thermostat opens;
- Relatively simple procedure for replacing a new thermostat.
What you need for installation
- Coolant sensor or plug bolt of the appropriate type;
- Long hairpin on M8;
- New thermostat;
- Gaskets and two clamps.
Narrowing of the bypass channel
If you decide that it is the bypass channel on the VAZ 2110 that needs to be adjusted, then the 6-hole thermostat should not have any problems. But with a 5-hole one, malfunctions may occur due to the fact that the cold pipe of the stove (outlet) will not be washed. Therefore, think about whether you need such a modification; maybe it’s better to immediately install a Granta thermostat or a six-hole one.
To reduce the bypass, you need to do the following:
- Cut a plate out of sheet aluminum so that it fits exactly inside the vehicle;
- Secure the plate with a rivet or cold welding, but so that the fastening does not interfere with the flow of coolant in a small circle;
- In this plate you need to drill a new hole of 5 or 6 mm (instead of the standard 8 mm);
- In addition to the steps described above, on a 6-hole heater, the stove return is connected to a thermostat.
After this modification, you will notice that the interior will warm up better and faster, but engine warming up will slow down somewhat.