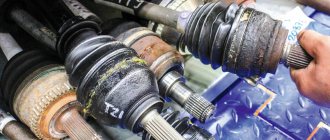
A constant velocity joint (CV joint, “grenade”) is a device that transmits torque from the car engine to the wheels. It was invented in the 20s of the XX century. Before the advent of the CV joint, cars with front-wheel drive, which were distinguished by high cross-country ability and maneuverability, lost power when cornering, vibration occurred, and torque was distributed unevenly.
Created for a special purpose, CV joints have high strength. There is an opinion that the CV joint mechanism - with proper care and proper handling, of course - can even outlive the car itself. Unfortunately, problems can arise with the grenade. Read on to learn about the characteristic signs of problems and how to replace a CV joint with your own hands.
Drive Features
Making a car with driving front wheels allows constant velocity joints (CV joints), which are used in the drive design. The peculiarity of this type of hinge is the ability to transmit torque without loss when rotating one component of the drive relative to another at an angle of up to 70 degrees.
Car front wheel drive shaft
The drive shaft of a vehicle with a front drive axle must perform several functions, and simultaneously. It must transmit torque to the wheel hub from the gearbox, provide the ability for the wheel to move relative to the body (when driving over uneven surfaces), and also allow changing the angle of the wheel, that is, making turns (which is accompanied by the need to change the length of the shaft). And all this is done thanks to constant velocity joints.
In general, the design of the drive shaft of a front-wheel drive car consists of three elements:
External CV joint
Inner CV joint
- shaft (with splines at the ends for connection with hinges);
- internal CV joint (which connects the drive to the gearbox);
- external CV joint (for connection to the wheel hub).
There are two such drive shafts in a front-wheel drive car, one for each drive wheel.
How to identify a crisp CV joint
The procedure for replacing the timing belt
Finding out which “grenade” is crunching is quite simple. First of all, you need to understand that the characteristic crunching or creaking noise when turning is produced by the outer CV joint. The inner joint may make a clicking noise on a straight road. We will touch on diagnostic algorithms below.
The crunching sound of the outer CV joint usually occurs when the driver turns with the wheels fully or strongly turned (in their direction). This is especially audible if you also “give on the gas” at this time. At this moment, the hinge experiences maximum or close to this load, and if it is faulty, then the mentioned sounds occur. Externally, this may manifest itself in the fact that you will feel “kickback” in the steering wheel when turning.
As for internal CV joints, their failure is more difficult to diagnose. Usually a similar sound comes from them when driving on an uneven road, and the deeper the holes the wheel gets into, the greater the load the joint experiences, and accordingly, the more it crunches. In some cases, a malfunction of the internal CV joint is diagnosed by vibration and “twitching” of the car during acceleration and at high speeds (about 100 km/h or more). Even when driving on a straight and level road (symptoms resemble a situation when the wheels are not balanced).
Next, let's move on to answering the question of how to determine which CV joint is crunching, internal or external. There are several verification algorithms. Let's start with the outer hinges.
Types of CV joints, their design and operating principle
CV joint device: 1. Right front wheel drive; 2. Gearbox; 3. Left front wheel drive; 4. External joint housing; 5. Retaining ring of the hinge cage; 6. 18. Hinge cage; 7. 19. Hinge separator; 8. 17. Hinge ball; 9. Outer clamp of the cover; 10. 15. Protective cover for the hinge; 11. Thrust ring; 12. 14. Left wheel drive shaft; 13. Inner clamp of the cover; 14. Internal hinge lock; 15. 20. Retaining ring of the inner joint cage; 16. 21. Shaft buffer; 17. 22. Internal hinge housing; 18. 23. Axle gear retaining ring.
There are several types of CV joints, but only two are widespread in passenger cars:
- Ball.
- Tripoid.
The design of a ball CV joint includes two cages - an internal one, in the form of a spherical fist (fitted onto the shaft), and an external one (made integral with the shaft end, which is inserted into the hub or gearbox). Between them there are balls placed in special grooves, which are kept from falling out of the hinge by a separator. It is the balls and the grooves along which they move that are the main working elements of the CV joint, since they transmit rotation and allow you to change the angle of one race relative to the other.
To prevent the inner race from coming off the shaft, it is secured with a retaining spring ring located in a special groove on the shaft. The locking ring is also used on the shaft ends of the outer race of the internal joint.
The tripoid joint does not have an internal race; instead, a three-pin fork mounted on the shaft is used. Each cleat on this fork has spherical rollers on needle bearings. Thanks to these rollers, rotation is transmitted, the shaft with the fork can change the angle relative to the cage, and also move longitudinally relative to the outer cage (enter into it), which makes it possible to change the length of the drive.
The connection between the fork and the shaft is splined, but at the same time it fits onto the shaft quite tightly. Additionally, the fork is secured with a retaining ring to prevent it from jumping off.
It is noteworthy that tripoidal CV joints are used only on the gearbox side, but they are not used on the hub side.
Ball joints can be located on both sides. That is, you can find drive shafts on cars with two ball joints, internal tripoid joints and external ball joints, but never with two tripoid CV joints. This is due to the peculiarities of the operation of each of these types of hinges.
It is interesting that some cars (for example, Volkswagen Golf 2) use an internal ball joint of an interesting design - the outer race with the shaft end is not made at the same time, but they are connected to each other by bolts. We'll touch on them a little later.
When to change CV joint
There may be several signs of problems with the operation of such devices. Usually, drivers determine by the sounds from the car's suspension that the CV joint needs to be replaced. This is indicated by a crackling noise when the car turns sharply. To make sure that you urgently need to replace the CV joint, you should stop and turn the wheels to their extreme position. A crunch that appears after starting means that the damaged front CV joint needs to be replaced.
The appearance of the same sounds when the wheels are turned in the opposite direction means that the mechanism on the other side of the wheel has come to an end. In such a situation, the condition of the protective covers should be assessed. It is better to put the car on a lift and inspect them carefully. If fresh signs of grease are visible near them, the bellows need to be replaced. If its rupture is clearly visible and there is no lubrication, you will need to immediately replace the CV joint.
Basic hinge malfunctions and their symptoms
The comparative simplicity of the design and the small number of components makes this unit quite reliable and capable of working for a very long time without any intervention. But this hinge also has a drawback - it is very sensitive to contamination.
The working elements of the unit - balls, rollers, grooves along which they move, and needle bearings - have a high degree of surface treatment. And sand and dust have a fairly strong abrasive effect, so when they get inside, they lead to intense wear of the surfaces, which ultimately causes the destruction of the unit.
Rubber boots are used to prevent contamination from entering. So they are the “weak point” of the angular velocity hinge. During the operation of the car, the rubber, constantly in contact with the environment, gradually “ages”, and cracks appear in the boot, through which sand gets into the joint.
In general, this is the only reason why these nodes can break. And since they cannot be repaired, they are replaced.
There is also one sign of CV joint failure - a distinct crunching sound when turning. Moreover, at an early stage, this crunch appears only when the wheels are turned completely, but as the unit wears out, it will be heard even during small turns.
Note that the appearance of a crunch indicates that the hinge has already received damage that cannot be repaired. There are some measures you can take early on. First of all, you should wash the hinge, apply new grease and replace the boot. Then you can change the sides of the installation (that is, for example, swap the left inner hinge with the right one). Another option is to add small shavings of soft plastic to the lubricant.
But since the component parts have already been damaged, all of the above measures only slightly extend the service life and ultimately the unit will have to be replaced, and it is better to do this before it completely collapses, which usually happens along the way.
From the above, it can be understood that the only way to preserve the hinge is to periodically check the condition of the boot and, if even the slightest damage is detected, immediately replace it. After all, a rubber element will cost much less than a CV joint.
Replacing a CV joint is a relatively simple operation to perform, but there are a number of nuances when carrying out an operation with an external and internal unit. Also, the specifics of the work depend on the design of the hinge.
Next, let's look at how to replace external and internal CV joints using the example of several cars that use different types of drive shafts.
Preparation
Removing the inner CV joint is an event that is not carried out very often among motorists. This is due to the fact that the internal part of the grenade during operation experiences less load than its counterpart, but only from the outside. In addition, any hinge is a fairly durable part, which only requires proper and timely care. You shouldn’t just touch and disassemble the car’s suspension, especially when dealing with grenades. However, it is necessary to remove the inner CV joint in the following situations:
- if necessary, additionally lubricate the hinge or replace its boot;
- if any problems arise with the CV joint to repair it;
- in the case when it is necessary to replace the internal part of the grenade due to its wear.
Before starting repair work, it is necessary to carry out some preparation. Preparatory activities consist of two main procedures:
- selection and purchase of a new part or its individual elements for repair;
- preparation of the tools necessary for removing the internal CV joint and certain environmental conditions.
First of all, you need to purchase the drive assembly, its internal part separately, or any hinge part specifically for your car model. To avoid mistakes when choosing, one of the following procedures will help:
- selection of parts by VIN code;
- selection of parts according to the example, that is, you first need to remove the internal CV joint and find the decals;
- selection of parts by contacting service stations, usually specializing in your car brand;
- selection of parts in stores of your car brand.
Having purchased the necessary spare part, you can prepare the necessary tools and conditions for repairs. First of all, you will definitely need the following:
- set of wrenches and sockets;
- rags;
- hammer and pry bar or special puller for CV joints;
- lubricant for the hinge and lubricant for “frozen” nuts or bolts;
- jack;
- Sometimes you may need pliers and special pullers for wheel nuts and locking washers.
Preparation of some conditions consists of such activities as:
- Cleaning the suspension repair area from dirt.
- Organization of an inspection hole or overpass (optional, you can get by with a jack).
- Finding an assistant, which is also optional, but sometimes you can’t do without an assistant.
Having carried out simple preparatory procedures, you can begin repair work to remove the internal CV joint.
Important! Removal and subsequent repair of the internal CV joint can be easily done independently, but for this it is important to know the basic basics of auto repair and be confident in your abilities. In other cases, it is better to entrust repairs to professionals.
Replacement of external CV joint
Since the external CV joint on all cars is a ball joint, the further sequence of work is almost the same for any model, with the exception of some minor nuances. We will consider dismantling the unit and replacing it on the VAZ-2110 model.
It is noteworthy that CV joints are one of the few components in a car design that do not require pair replacement. That is, if one joint begins to crack, then only replace it; there is no need to touch the rest.
The tools you will need to carry out the work are:
- a set of keys and a set of sockets with a knob and rods (a 30 socket head is required);
- jack;
- mallet or regular hammer with a wooden handle;
- rags;
- steering wheel end remover.
Parts and consumables you will need:
- new hinge;
- new shaft end mounting nut;
- anther;
- clamps (it is better to purchase not tape clamps, but screw clamps);
- “CV joints-4” lubricant or its equivalent (intended for use in constant velocity joints);
Next, we will consider the disassembly sequence, and also indicate some tricks that will help carry out the work more quickly. So:
- We place the car on the inspection hole and immobilize it.
- While all the wheels are still in place, take the 30mm head, tear it off and loosen the nut securing the shaft to the hub. This nut is pinned, so unscrewing it will not be easy, since it will require significant force, for which you can extend the wrench with a piece of pipe. On a jacked car with a wheel removed, it will be very difficult to loosen the nut.
- After loosening the nut, jack up the required wheel and remove it.
- To pull the hub off the shaft end, you need to ensure that the stand can move freely. To do this, unscrew the fastening of the ball joint of the suspension arm to the hub.
- Using a puller, disconnect the steering tip from the rack.
- Unscrew the nut completely.
- We grab the brake disc and pull the hub towards ourselves to pull it off the shaft end.
- After the shaft comes out, move it to the side;
- When replacing the outer CV joint, it is not necessary to completely remove the drive shaft, that is, there is no need to pull out the inner joint.
- Next, we dismantle the external assembly itself from the shaft. To do this, we loosen or cut (cut) the clamps, and then pull the boot off the CV joint (you can simply cut it, since it is no longer needed).
- We climb under the car and, using a hammer with an adapter, knock the hinge off the shaft. The blows applied should be of little force, the main thing here is to knock the assembly off the retaining ring, and it will come off the shaft splines themselves even with the force of your hand.
After this, assembly is carried out. First, a new boot is put on the shaft, and then a new hinge is placed on its splines. All that remains is to seat it so that the retaining ring fits into the groove made in the inner race. To do this, we again use a hammer with an adapter and, with gentle blows, press the hinge into place.
We apply lubricant (do not regret it), pull the boot onto the edge of the outer race, after which the rubber element must be slightly squeezed by hand to remove air. All that remains is to fix the boot on the holder and shaft using clamps.
We install the assembled shaft with the new hinge into the hub, attach and tighten the nut until it stops. Next, we put everything back together - install the steering tip, the suspension ball joint, and the wheel.
After removing the car from the jack, tighten the fastening nut with a wrench with an extended shoulder. All that remains is to secure it to prevent spontaneous unscrewing.
How to properly assemble the inner CV joint
The presented instructions “how to assemble the inner CV joint” are suitable for all “Constant Velocity Joints”. Sometimes, after removing the inner CV joint, it becomes necessary to assemble it correctly. If a person is not familiar with the assembly procedure, then most likely he will not succeed. In this publication, you will become familiar with the device and learn how to correctly assemble the outer CV joint of a car.
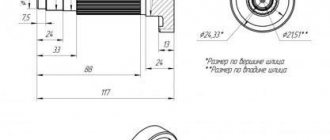
Internal CV joint device
- -outer ring
- -inner race
- -separator
- -balloons
A CV joint is somewhat similar to a bearing, but its parts do not rotate relative to each other, but only have a certain degree of freedom of movement. On most VWs, internal CV joints come in two diameters, 94 and 100 mm. For Golf 2 with a 1.3 engine, the outer part is slightly different, the outer race of small CV joints is symmetrical
large, 100 mm, on the side adjacent to the box flange, have a recess for a cork gasket
The inner race is also not symmetrical, the part that needs to be oriented towards the gearbox flange
The side that should be facing the drive shaft has a pronounced entry for the splined part
Internal CV joint. Assembly
Now all this needs to be collected into one unit. First, insert the inner race into the separator, turning them perpendicular to each other.
then we place this sandwich inside the outer ring
And this is where attention is required: if you look closely at both races of the inner CV joint, you will find that the distances between the grooves for the balls are different. And you need to assemble the inner CV joint so that the small gaps are opposite the large ones
Now you need to insert the balls. To do this, you need to tilt both the separator and the inner race at the same time and at the same distance.
insert the first ball
slightly recess the cage with the separator in this place, and lift the adjacent sector
and so on in a circle
It is quite difficult to move the race of a new inner CV joint without lubrication, so you can apply a thin layer to both races before assembly. And now the inner CV joint is assembled. If it is 100mm, glue the gasket to the outer part (it is not provided for smaller diameters)
Now you need to put the inner CV joint on the drive. First of all, put on a duster
then put on the disc spring
This spring is a cone spring, it is very important to install it correctly. Cone from CV joint
then put on the CV joint and the retaining ring
make sure the stopper is completely recessed into the groove
Now you can start lubricating the CV joint. Pull it towards you without twisting it
apply lubricant to protruding parts
Move the outer race back and forth several times. Spread the resulting excess lubricant evenly over parts of the CV joint. Do the same on the other side.
but the grease should not get on the gasket the drive is ready for installation
Yakov Finogenov
Motorist's benefit
Replacing the internal hinge
Next, we’ll look at how to change the internal CV joint (ball joint) on the same VAZ-2110. An additional tool will require a mount.
Some of the work does not differ from those described above, so they will be listed briefly. The replacement is done like this:
- We park the car, jack it up, remove the wheel (no need to loosen the nut).
- Disconnect the ball joint and steering tip.
- We climb under the car. We take a pry bar and drive it between the inner hinge and the gearbox. Using it as a lever, we push the limit switch out of the box, while asking an assistant to pull the hub towards himself.
After the limit switch comes out of the gearbox, we carry out the replacement identically to that described above - cut off the boot, knock down the hinge. Then we put a new boot on the shaft, use a hammer with an adjuster to seat the new CV joint, add grease, put on the boot and secure it with clamps. Next, we install the shaft end in the gearbox and push it into the hub into the box until it stops (you cannot seat it with hammer blows on the hinge, so as not to damage the new boot).
Now a few words about replacing the internal CV joint on a Volkswagen Golf 2, in which the hinge is bolted to the end switch. This design makes disassembly even easier because it does not require disconnecting the suspension arms from the hub.
To remove the hinge, you just need to unscrew 6 bolts, after which the shaft together with the hinge can be lowered down to remove (knock down) the CV joint; you do not need to remove the limit switch at all. And then we install a new boot, seat the assembly on the shaft, lubricate and secure the clamps. We place the shaft with the new hinge to the end switch and connect them with bolts.
Preparing to remove the outer CV joint
In order to remove the CV joint, you need to do a little preparatory work. This work consists of unscrewing the CV joint nut from the wheel side.
As you can see in the photo, the nut is covered by a cap; it must be removed, but this requires removing the wheel.
The car needs to be jacked up. And set additional stops so that the car rests on these stops and not on the jack.
Hanging the car is the most important procedure in all repairs. The car must be positioned in such a way that you can live under it. Drink coffee and watch TV. And you don’t worry about something falling on you from above. The jack is intended exclusively for raising and lowering the car. And if only the jack is under the raised car, it cannot be used.
If there are no factory stops installed with the jack. Wooden blocks or boards will do. You cannot lay bricks. They split and the car falls. In general, even if you spend the whole day securing a lifted car safely, it’s not a big deal. And much better than remaining crippled. Sorry for the digression. But we can't rush.
After hanging the car, you need to remove the wheel. to remove the protective cap. Then the wheel must be installed back. And lower the car until it makes full contact with the floor. This must be done in order to unscrew the CV joint nut. It tightens with great effort. And stalled. In the groove of the CV joint.
To unscrew it, you will need a powerful wrench. On which you can put the pipe as an extension. This is why you have to put the car on the floor so that there is support. And the gearbox did not turn over due to the applied effort. After the nut is unscrewed, the car must be returned to its jacked state and the safety stop must be securely positioned. And remove the wheel.
Features of replacing a tripod CV joint
Finally, let’s look at how the internal tripod joint of angular velocity changes using the example of the Ford Focus 2. The tools you will need are the same as those indicated above, as well as a universal three-legged puller and pliers for removing the retaining rings.
The difficulty of replacement is that you will have to completely remove the drive shaft. Everything is done like this:
- We take out the external hinge from the hub (identical to the VAZ-2110).
- We climb under the car, cut off the large clamp of the inner CV joint, and tighten the boot.
- We remove the shaft (there remains an assembled outer joint on one side and a three-pin fork on the other, while the outer race remains in the gearbox).
- We remove the outer race (push out the limit switch using a pry bar driven between the race and the gearbox);
- Using pliers, remove the retaining ring holding the fork.
- We pull the fork itself from the shaft with a puller.
- We place the boot and the new element on the shaft and install the retaining ring back.
- We put the outer ring in place (you can carefully hammer it in with a hammer with an adapter).
- Install the drive shaft.
- Apply grease, pull the boot onto the outer race and secure it with clamps.
- We collect everything removed in reverse order.
The indicated instructions are suitable for almost any car, but it is necessary to take into account the design features and this primarily concerns the disconnection of the lower arms from the hub.
As you can see, there is no particular difficulty in replacing CV joints, and all work can be done independently in a garage.
How to change a grenade on the rear axle
- Hang up the rear of the car.
- Determine what is easier to unscrew - the fastening of the shock-absorbing strut arms or the gearbox (this operation is performed differently even on the same car, depending on who and how it is more convenient).
- Lower the gearbox or pull the stand towards you to remove the grenades from their seats. On some vehicles, the external grenade sticks to the hub. If this happens, you will have to remove the strut, heat the hub with a gas cutter and knock out the hinge shaft from it.
- Replace the grenade in the same way as described in the previous section.
- Install the drive shaft in reverse order.
- Don't forget to tighten the outer grenade nut.
What lubricant to use for CV joints
The main tasks of lubricants used in CV joints are protection against friction and prevention of corrosion. Also, the lubricant must be inert with respect to the polymer boots, which prevent moisture and debris from entering the mechanism. Most of the above requirements meet the following types of lubricants:
1. Lithium. These are viscous yellowish compounds, which at low temperatures acquire an even thicker consistency, making it difficult to spread on parts. They are able to significantly reduce friction and loads acting on the hinge elements, protect them from moisture and neutralize accidentally trapped dirt. Their only drawback is the ability to dissolve some types of anthers made from organic polymers. One of the representatives of this type of lubricant is the domestic Litol-24, which is replaced after a run of 100 thousand km.
2. Based on molybdenum disulfide. More universal lubricants that are characterized by increased resistance to corrosion. Their composition has a reduced content of organic acids, thereby reducing aggressiveness towards polymer products. Such lubricants are recommended for use in CV joints of cars of any manufacturer. Their main drawback is sensitivity to moisture ingress when the seal of the boot is broken, due to which the lubricant loses its properties. Domestic manufacturers produce lubricants with molybdenum disulfide under the general name SHRUS-4.
How to diagnose a problem
It is clear that there are no problems diagnosing obvious faults. But what to do if there are no visible faults, the machine is working normally, although in fact minor, insignificant damage that can lead to expensive repairs has already appeared? There are two main effective methods for determining a malfunction:
- Listen to the car while driving. If you think you have heard unusual noises, do the following: stop, move the gearshift lever into first or forward gear (depending on the type of transmission), then turn the steering wheel as far as possible in either direction. Next, take off sharply, pressing the gas pedal fully. If during such a maneuver you hear crackling or clicking sounds from the front of the car, check the condition of the CV joints.
- Options for visual diagnosis of faults include a careful external inspection of the condition of the anthers. If, when looking at the wheel rims (this will be especially noticeable on alloy wheels, since stamped ones make it difficult to see), you see traces of thick grease on the front ones, it means that the boot is torn and urgent intervention is required. If there are no traces of lubricant on the discs, then carefully inspect the boot itself. Any defects on it mean the possibility of dust, dirt and water getting inside the hinge. Therefore, make sure that there are no scratches or cracks on the boot itself, as well as that the clamps are securely tightened (the most common cause of contamination and lubricant leakage from the boot).
When to replace
In order for this part to work long enough, sand, dirt and dust should not get into it. Contamination significantly accelerates wear and reduces the service life of the unit. But to protect against this, a boot is provided, which can become unusable relatively quickly. Therefore, timely replacement of the boot will keep the CV joint in working condition for a long time.
The wear of the CV joint is indicated by a noticeable crunch and extraneous sounds when turning the steering wheel. In this case, it is recommended to replace the unit.
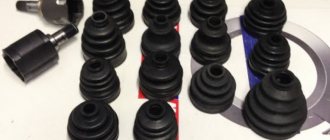
Boot replacement and repair
The boot can be changed without removing the grenade if you have special equipment. His work is demonstrated on video. ” alt=””> If you do not have such a device, to remove and replace it, you must perform the above-described procedure for removing the drive and dismantling the hinge. The procedure is necessary if there is even minor through damage on the boot.
Temporary repairs to the CV joint boot can be made without removing it from the vehicle. To do this, you need to thoroughly clean and degrease the damage, then seal it with a piece of rubber and cyanoacrylate-based glue (superglue).
An alternative repair method is to seal the holes with silicone caulk. It should be remembered that it takes a day to completely polymerize.
Note: express repair is a temporary measure. Replacing the inner joint boot may be delayed for a short time, but not completely cancelled. Typically, these types of repair methods are used to get to the point of repair.