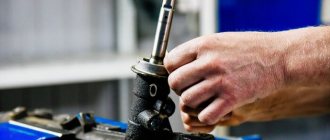
The serviceability of the steering system of any car is an important safety requirement on the road. Repair of the steering rack on Kalina must be carried out when any suspicious sounds occur. As practice shows, many car enthusiasts are calm about the fact that when turning the steering wheel there is a knocking or creaking noise, but this may indicate that the steering rack is knocking. Repairing the steering rack on Kalina is best done at a service station, but you can do it yourself.
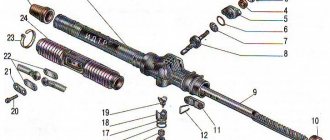
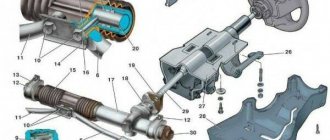
Steering mechanism: 1 – boot; 2, 20 – bolts; 3 – washer; 4 – oil seal; 5 – crankcase cover; 6, 17 – sealing rings; 7 – separator; 8 – drive gear with bearing; 9 – steering rack; 10 – left protective cap; 11 – rod support; 12 – bracket; 13 – plug; 14 – stop nut; 15 – stop spring; 16 – retaining ring; 18 – rack stop; 19 – stop liner; 21 – locking plate; 22 – cover plate; 23 – clamp; 24 – protective cover; 25 – right protective cap; 26 – steering gear housing
Disassembling the steering mechanism
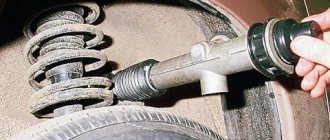
Remove the steering rod support. We insert the bit into the groove of the crankcase pipe mounting nut.
We unscrew the nut, striking the beard (right-hand thread).
. and remove the crankcase pipe.
Use a screwdriver to press out the two clamps of the bushing located inside the pipe.
. and remove the bushing.
Remove the two rubber O-rings from the bushing.
Steering rack bushing (arrows indicate bushing clamps)
.
If it is necessary to replace the nut, use pliers to remove the locking rings. . and remove the retaining ring.. Remove the pipe securing nut.
Remove the rubber plug from the rack stop adjusting nut. Using a scraper, remove the jammed metal in the locking areas of the stop adjusting nut.
Using a special 24mm wrench with an external octagonal head, unscrew the stop nut.
We take out the stop spring. Prying it with a screwdriver.
. remove the sealing ring.
By hitting the crankcase against a wooden block, we knock out the rack stop. Prying it with a screwdriver.
. remove the liner from the stop.
A rubber sealing ring is installed in the groove of the stop.
Remove the rubber ring from the crankcase that seals the hole for the steering mechanism on the front panel.
Remove the boot from the gear shaft.
Use a 6mm hex to unscrew the two screws.
. and remove the crankcase cover.
Remove the separator with the thrust bearing rollers.
Remove the sealing ring of the cover.
We remove the rack from the crankcase.
We press out the gear shaft by holding the shaft in a vice with soft metal jaw linings and pressing the crankcase upward with the mounting blade.
We remove the gear shaft with bearing from the crankcase. We pry it off with a screwdriver..
. remove the bushing retaining ring.
We take out the gear shaft bushing assembled with the support plate.
If it is necessary to replace the needle bearing with a drill d=4 mm, we drill two diametrically located holes in the crankcase so that they extend to the end of the outer ring of the needle bearing.
Through the drilled holes, using a rod of the appropriate diameter, we knock out the outer ring of the bearing from the crankcase.
Using a puller, we press the ball bearing of the gear shaft with the inner ring of the roller thrust bearing.
Use a puller to press the inner ring of the needle bearing off the shaft.
Using a screwdriver, pry and remove the gear shaft oil seal from the crankcase cover. If it is necessary to replace the outer race of the roller thrust bearing.
. Using a scraper, remove the extruded metal in four places and take out the ring. We generously lubricate the bearings, rack and pinion teeth, and the plastic rack bushing with Fiol-1 lubricant. We assemble the steering mechanism in the reverse order. We press the outer ring of the needle bearing into the crankcase using a mandrel of suitable diameter. To seal holes in the crankcase, you can use “fast steel” or “cold welding”. We press the gear shaft with the ball bearing into the crankcase using a piece of pipe of a suitable diameter or a high head, applying force to the outer ring of the bearing. You can press the gear shaft into the crankcase, resting the outer ring of the bearing on the jaws of a vice.
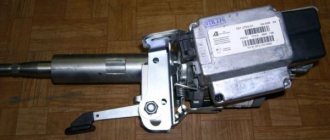
Design features
The structure of the Lada Kalina steering unit includes:
- electric amplifier;
- steering column, adjustable for reach and tilt;
- electric power steering rack with gear ratio change mechanism;
- rods with tips, as well as rotary levers.
In the mechanism housing there is a unit with mechanical gearing, where the main operating element is a helical gear, the pitch of the teeth of which varies depending on the length of the rack.
The figure shows the design of the Lada Kalina rack and pinion unit.
The pressure in the rack-and-pinion pair is carried out by means of a spring, and the plastic liner present is designed to reduce the friction force. The compression level of the spring element is adjusted using a nut. The factory gap between the steering shaft and the rack is 0.1 mm in the LADA Kalina model.
If a knock appears inside the unit, it can be eliminated by adjusting the gap with your own hands. The steering shaft is centered using two bearings, one of which is located in the column bracket, and the second is located inside the electric power steering housing. The bracket is connected both to the pedal mounting unit, or rather to its front part, and to the body. Structurally, the bracket together with the pipe forms a hinged connection from a pair of plates. This unit provides a change in the position of the steering wheel, where the width of the range of movement is limited by slots in the designated plates.
The specific position of the pipe is fixed by a lever, which is connected to a special bushing that performs an adjustment mission. It is screwed onto a coupling bolt located just in the slots of the plates. When the lever is turned, the sleeve rotates synchronously. At this moment, the fixation of the plate weakens, and the steering wheel begins to change its position. Springs located in the middle of the bracket and plates, when the fastening is loosened, pull the pipe in the upward direction.
Video text
Step-by-step instructions for repairing the Lada kalina 2 steering rack using a caprolon bushing from https://mirvtylok.ru/
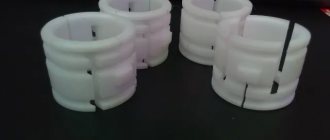
in 9 out of 10 cases, play and knocking of the steering rack on the Lada Kalina occurs due to a worn bushing. Replacing a standard bushing with a reinforced one made of caprolon will save you from expensive repairs to the steering rack.
What are the advantages of installing a caprolon steering rack bushing?
1) Eliminates knocking and play in the Lada Kalina steering rack 2) Cost savings. You are guaranteed to save 2500-7500 rubles per steering rack replacement. Multiply this figure by the number of replacements you will make over the entire life of the car. Decent savings, agree! 3) Excellent level of quality. The original bushings wear out quickly because they are made of plastic. 4) The technical characteristics of caprolon and the experience of scientific specialists who worked in conjunction with qualified Lada Kalina repair technicians made it possible to develop a high-quality product that works effectively throughout the entire life of your car. 5) Ensuring good vehicle handling, familiar comfort and absolute steering control. 6) This bushing lasts an average of 80-100 thousand kilometers
Design features and differences: 1) The original version uses ear latches. 2) Our bushings are securely fixed in the rack body due to press fits. We consider this fixation to be optimal, taking into account the properties of graphite-filled caprolon.
Every Lada Kalina car owner will sooner or later be faced with the problem of steering rack failure and repair. Of course, experts and auto mechanics recommend changing this element, but not everyone can buy this element, so repair is the way out.
Video about steering rack repair on Lada Kalina:
The video material will tell you how to repair the steering rack, give basic recommendations and assembly features.
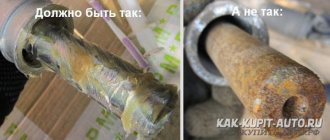
Correct fault determination
- The right edge of the rack should shine, otherwise a steering rack repair kit is needed.
- The presence of even the slightest traces of rust, which will act as an abrasive material, is not allowed.
- You should check the integrity of the bushing: if it knocks or shows signs of wear, it needs to be replaced.
- It is necessary to carefully inspect all the fasteners: if places with loose clamps are found, tighten them.
You need to be very careful with the last factor. Excessive physical force will only do harm here. If you decide to diagnose and replace it yourself, you must use lubricant and a wrench. A heavily threaded bolt or nut simply requires the use of oil. In some cases, it can be moved 1-3 divisions, but do not despair. This is enough for a visual inspection.
If no signs of physical wear or rust are detected, you can return the nut to its place with your own hands. This will require a wrench and extreme concentration. Carefully pull the element to the desired level and fix it. There is 1 practical tip associated with the mentioned element: when driving intensively, you need to tighten the steering rack nut every 6 months.
There shouldn’t be any difficulties, because information on how to tighten the part is contained in the vehicle’s operating instructions.
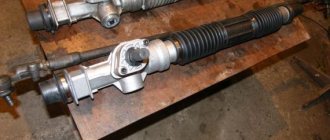
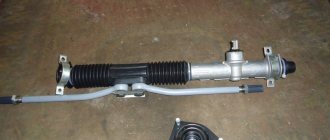
Dismantling and disassembling the rack on Lada Kalina
When all the materials for repairing the steering rack have been collected and purchased, you can proceed directly to the repair operations.
Before you begin, you need to completely clean the steering rack. This can be done manually, but it is best to use a steam mechanism under pressure, which will efficiently remove dirt and dust from all elements without damaging the parts.
Now, let's proceed to sequential operations to repair the steering rack:
- We place the brake shoes under the rear wheels and remove the handbrake.
We put the shoes under the wheels
Removing the coupling fixing bolt
We remove the cotter pins using pliers
Removing tie rod ends using a hammer and crowbar
Disconnecting the EUR connector from the on-board network
Removing the steering rack mounts
We dismantle the steering rack through the wheel arch
We remove the steering rods
Cut off the boot clamps using wire cutters
Removing the rack crankcase cover
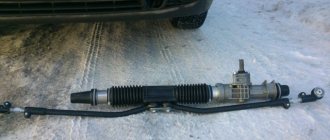
We diagnose the condition of all products. Plastic and rubber parts will have to be replaced, and it is also recommended to install a new boot and bearings.
Assembly in the correct sequence
Before assembly, it is necessary to clean all parts and lubricate the rack shaft with lithol or other similar lubricant.
Let's start the assembly:
- We change the rack bearings.
Installing new bearings
We align the marks on the crankcase and rack so that the steering wheel is level
We put a new boot on the rail
Recommendations
Many automakers do not recommend performing repair operations on the steering rack, but at the same time they produce repair kits. Thus, in the AvtoVAZ repair manual, it is clearly stated that if the VAZ 1117-1119 steering rack fails, it must be replaced with a new one.
Also, car enthusiasts and car steering repair technicians recommend that after repairing the steering rack, after 1000-1500 km, tighten the threaded connections that could have become loose due to vibration.
Car experts recommend that maintenance of this unit should be carried out every 10,000 km. This includes a visual inspection for smudges, checking the condition of the boots, as well as tightening the connections.
Replacement procedure
Note to the driver: despite the simplicity of the design and the simple operating principle of the steering, in order to prevent damage, it is recommended to carry out servicing only in service centers.
There are two repair options: replacing the steering rack bushing without removing the rack and with its complete dismantling. In each case, the technician makes an individual decision based on the results of the vehicle diagnostics. The design of the technical device also influences decision making. Some car models do not allow repairs without complete dismantling, in particular Japanese brands.
If visual diagnostics reveal damage to the body part, then in this case complete dismantling is unconditional.
The replacement mechanism is as follows:
- By using the lifting mechanism, the car is raised to a convenient height.
- The master unscrews the standard fastenings of the body part, hydraulic pipes, tie rod ends, and dismantles the rack as a whole.
- Using a stationary vice, the master removes all the components, including the steering rack support bushing.
- Conducts troubleshooting of the seat, removes old grease, and washes parts.
- Begins the assembly process in reverse order, taking into account the installation of new components.
At the end of the work, the mechanism is sent for diagnostics - a high-pressure stand to check its functionality. The car is being prepared for delivery to the customer.
Replacing the bushing without removing the steering rack is carried out using a shortened algorithm, but this method has not gained popularity and few people practice it.