Tightening the camshaft bed on a 16 valve VAZ-2112: order and torque
Many motorists have heard that it is necessary to correctly tighten the threaded connections on the 16-valve VAZ-2112 engine, but they have never done it themselves. Thus, the tightening torque is determined by the manufacturer and is indicated in the service repair manuals.
Video about installing camshafts and split gears on a 16 valve engine
The video will tell you how to properly tighten the threaded connections on the camshaft beds
Installation and replacement of VAZ-2112 camshafts 16 valves: photo, video
Replacement of camshafts on the 16-valve VAZ-2112 engine occurs when they wear out and the support journals wear out. Most often this happens when the time for a major overhaul of the power unit or cylinder head passes. This is a rather complicated procedure, but you can really do it yourself.
The video below shows the installation of camshafts and split gears on a 16-valve engine of the VAZ family
The video material will tell you how to replace camshafts on a VAZ-2112 16 valves, and give some recommendations and advice.
Camshaft replacement process
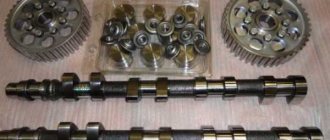
Camshafts with gears and fasteners
In order to install camshafts on the VAZ-2112 16 valves, they must first be dismantled. Like any spare part, they are installed in the reverse order from disassembly.
So, let's look at the step-by-step process of removing and installing the intake and exhaust camshaft.
Removing camshafts
- To begin with, as with any repair operations, it is necessary to remove the “minus terminal” from the battery.
- Remove the timing belt cover.
After unscrewing the mounting bolts indicated in the diagram, remove the timing cover
Now, you need to remove the valve cover. Please note that the bolt tightening order must be followed during assembly.
Unscrew the fastening nuts and remove the valve cover.
Disconnect the wires of the emergency oil pressure sensor, and then unscrew it.
Disconnect the emergency oil pressure sensor
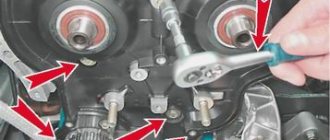
Using a socket wrench or 8mm socket, unscrew the 20 bolts securing the camshaft cover.
Scheme for dismantling and tightening the camshaft bearing housing bolts
- We dismantle the camshaft bearing housing.
- Now, there is free access to two plugs that are located on the rear side of the cylinder head. We take them out.
- We take out the intake camshaft.
- We take out the exhaust camshaft.
You need to be careful with the camshaft plugs; if you install them incorrectly, oil will leak out. If you don’t notice it in time, you’ll shorten the engine’s lifespan or end up in need of a major overhaul.
Remove the two rear cylinder head plugs
We remove the camshafts from their seats
We press the seals out of the camshafts.
Remove the seals from the camshaft. If it does not come off, carefully cut it or pry it off with a screwdriver.
Installation of camshafts
Now that everything is removed, you can proceed to installing new camshafts on the car:
Torque and sequence of tightening the camshaft bed
Camshaft cover tightening sequence
Correct tightening of the camshaft bed, as well as other parts of the cylinder head, determines the normal functioning of all components and assemblies. So, in order to tighten threaded connections, a standard tightening pattern and a torque wrench are used.
Before installing the bolts in place, they must be washed thoroughly and lubricated with silicone grease.
In order to properly tighten the bolts, you need to know the sequence. It starts from the middle part and gradually moves directly to the edges. The detailed sequence can be seen in the photo below.
Tightening diagram for each camshaft bed bolt with numbering
As for the tightening force itself, it is 8.0-10.0 Nm . After the bed is installed on the block head, the connection bolts are tightened by hand or without much force using a ratchet with a head.
We tighten all the bolts by hand, but do not tighten them
When all the bolts are in place, you need to take a torque wrench and tighten them according to the standards in the order indicated above.
Torque wrench for tightening threaded connections
In what cases is it necessary to tighten the camshaft bed?
The bolts are tightened. Marked with arrows
Tightening the camshaft bed will be necessary if it was previously dismantled for restoration and repair work. So, in what cases will you need to remove the bed, let’s look at it in more detail:
- Replacing camshafts, lifters or valve seals.
- Overhaul of the block head.
- Engine repair operations.
- Replacement of individual elements of the cylinder head.
Consequences of improper bed tightening
The consequences of improperly tightening the camshaft bed include the following:
- Oil leakage due to a gap or loose connection.
- Passing air inside the cylinder head.
- Malfunction of the engine or cylinder head.
- Ingress of foreign objects (water, dirt, dust).
All these factors can negatively affect the performance of the cylinder head and main power unit.
Instructions: Removing and installing the camshaft
Before dismantling, the camshaft is checked for axial displacement. You don’t have to hit the bed too hard and listen. If the part knocks, the malfunction is confirmed. The part is removed in the following sequence:
- loosen the clamp, separate the breather tube from the air filter;
- pull out the air filter hose;
- remove the choke cable;
- remove the gas damper drive;
- pull out the valve cover by unscrewing the eight nuts - they connect the part to the cylinder block;
- install the camshaft at the compression end of cylinder number 4;
- loosen the camshaft chain tensioner nut by resting the mounting blade on the shoe and firmly fixing the rod - if you can’t loosen it, remove the tensioning mechanism completely;
loose camshaft chain
- bend the lock washer and unscrew the gear mounting bolt, release the camshaft sprocket - before doing this, put the gearbox lever in fourth gear to avoid turning the camshaft;
- remove the chain and hang it on a wire;
- unscrew the bed clamps to the cylinder head, acting in a staggered manner;
unscrewing the camshaft bed bolts
- remove the camshaft.
The bed can be removed together with the camshaft, as on the Vases, or separately. If it is pulled out at the same time, then the thrust flange is pulled out next. It is held on by a nut numbered “10”. After removing the flange, the shaft is removed from the bed - you need to slightly raise the cam, thereby freeing it from the spring pressure.
The old camshaft must be troubleshooted. As mentioned above, if the level of damage is significant, there is no point in repairing. When removing the camshaft, other timing parts are checked simultaneously - rocker arms, springs, oil seals.
Installation of a new or repaired camshaft is carried out strictly according to the instructions. One of the main rules is to tighten the bolts in a certain order and with the required force. For example, for Zhiguli, the tightening torque is 18.3 N/m.
Further on installation:
- install the cam spring;
- lubricate the bed with clean oil;
- install the new camshaft so that the cams do not rest on the valve tappet washer with the upper part of the nose;
- tighten the bolts of the thrust flange using a “10” wrench;
- tighten the fasteners, following the same pattern - one at a time;
- put the split gear, chain, washers in place - it is recommended to connect the chain to the gear with a thread so that there is no jumping over the teeth;
- tighten the sprocket mounting bolt using a “17” wrench;
- install the lock washer;
- engage the tension mechanism by resting the pry bar against the shoe and firmly holding the camshaft rod.
Also, any self-respecting auto mechanic will replace the shaft at the same time as installing new rockers. They are also called rocker arms. This is done because the production of parts leads to premature wear of the camshaft itself.
How to replace the camshaft oil seal?
Replacing the camshaft oil seal is included in the mandatory list of works. The oil seal or cuff is a sealing ring made of elastic material that prevents oil from leaking out of the camshaft. The main reason for wear of this gasket is simple obsolescence. There are 2 oil seals installed on the camshaft - front and rear.
The malfunction of an element manifests itself in any way - a change in shape, swelling, rupture, or the appearance of cracks. Often the oil seal simply falls out of its seat. A seal malfunction is diagnosed visually - the appearance of oil traces on the timing cover, belt jumping, etc.
Replacing the front oil seal is much easier than replacing the rear oil seal. It is enough to remove the valve cover, also remove the timing belt, and secure the pulley from turning with a pry bar. The pulley from the camshaft shank and the key located behind it are also removed. Then the oil seal is picked out with a screwdriver or tweezers.
Replacing the camshaft oil seal
How to replace a camshaft chain?
If the vehicle's timing mechanism is equipped with a chain drive, the camshaft chain may need to be replaced. Despite the structural strength, this element breaks due to operational wear, poor metal quality, camshaft jamming and other related reasons. A break can also be caused by sudden braking of the car or an intensive increase in speed.
The procedure for replacing the chain will also not be particularly difficult. It is necessary to remove the metal valve cover, rotate the crankshaft until the marks match and fix the shafts. The old chain is removed without dismantling the crankshaft gear. Particular attention is paid to the tension of the leading branch. It should be carried out taking into account the coincidence of the marks on the camshaft gears and bearings.
Torque and sequence of tightening the camshaft bed
Why is it necessary to properly tighten the beds of camshafts and other parts of the cylinder head? Correct tightening determines the normal functioning of all components and assemblies. In order to properly tighten threaded connections, a standard tightening pattern and a torque wrench are used.
Before installing the bolts in place, they must be thoroughly washed and lubricated with silicone grease. To properly tighten the bolts you need to know the sequence. The sequence starts from the middle part and gradually moves to the edges. It is best to familiarize yourself with the process via video.
Consequences of improper tightening
- Oil leakage (due to the formation of a gap or a loose connection).
- Air getting inside the cylinder head.
- Malfunction of the engine or cylinder head.
- Ingress of water, dirt, dust.
No sealants are used when installing the gasket (including no lubricants - grease, cyatim)! The task is to degrease the metal. The cylinder head gasket itself must be new.
All these factors can adversely affect the operation of the cylinder head and main power unit.
Source
Prior valve cover tightening torque
Many motorists have heard that it is necessary to correctly tighten the threaded connections on the 16-valve VAZ-2112 engine, but they have never done it themselves. Thus, the tightening torque is determined by the manufacturer and is indicated in the service repair manuals.
Video about installing camshafts and split gears on a 16 valve engine
The video will tell you how to properly tighten the threaded connections on the camshaft beds
How to distinguish the intake camshaft from the exhaust camshaft of a VAZ-2112: photo
The camshafts of the 16-valve VAZ-2112 admit the working mixture and release exhaust gases. Unlike an 8-valve engine, where one camshaft serves for intake and exhaust, on a 16-valve engine there is a separate element for each phase. This improves not only engine performance, but also contributes to lower fuel consumption.
Photo of intake and exhaust camshafts
The intake and exhaust camshafts are indicated by arrows in the photo. The photo shows the engine with the valve cover removed.
Camshaft difference
The difference between the intake and exhaust camshafts is the presence of a groove for the phase sensor
In fact, there is no difference in the design of the exhaust and intake camshafts. There is only one reason why they are not interchangeable. There is a lip on the intake camshaft that is designed for a valve timing sensor.
Some car enthusiasts install sports camshafts instead of standard factory camshafts, which increase power. This is where the significant difference begins.
The intake camshaft has a larger cam size, which in turn opens the valve not by 7.6 mm, but by 13.2. This allows the engine to increase power characteristics. So the exhaust itself has slightly different characteristics - the valve opens not by 7.6, but by 10.8 mm, which significantly adds power.
Differences in sporty camshafts
conclusions
The camshafts of the 16-valve engine on the VAZ-2112 do not differ in design features, except that an additional edge is machined on the intake shaft for the camshaft (phase) sensor. If the intake and exhaust elements are swapped in places, this will lead to a violation of the valve timing, and if the engine operates in this mode for a long time, the owner will inevitably face a major overhaul of the cylinder head, at best.
Torque and sequence of tightening the camshaft bed
Camshaft cover tightening sequence
Correct tightening of the camshaft bed, as well as other parts of the cylinder head, determines the normal functioning of all components and assemblies. So, in order to tighten threaded connections, a standard tightening pattern and a torque wrench are used.
Before installing the bolts in place, they must be washed thoroughly and lubricated with silicone grease.
In order to properly tighten the bolts, you need to know the sequence. It starts from the middle part and gradually moves directly to the edges. The detailed sequence can be seen in the photo below.
Replacement Guide
The work of removing the crankshaft on a VAZ 2106 is somewhat labor-intensive, but a driver with little experience can do it. We do not need special equipment or special tools to work.
Set of tools
- set of heads;
- ratchet;
- knob;
- extension;
- a set of keys;
- rags.
Wrenches for tightening and loosening bolts
Sequencing
- To get to the crankshaft, you first need to remove the air filter and housing.
- Next, disconnect the choke cable.
- Gas damper drive.
- Clean and wash the valve covers thoroughly. Usually dust and dirt accumulate on it, otherwise they may get inside the motor.
- Now you need to unscrew all the nuts and remove the valve cover. Experts recommend replacing the gasket when removing the valve cover. When purchasing, buy a rubber-cork one, as it holds oil much better than rubber.
- By removing the cover, we gain access to the camshaft; in most cases it is very dirty.
- Now you need to loosen the camshaft sprocket fasteners. To prevent the motor from turning over, insert a screwdriver between the sprocket and the chain.
- Important! Be sure to align the mark on the crankshaft and the camshaft sprocket. You must strive to ensure that the mark on the crankshaft pulley is against the long mark, and the mark on the camshaft sprocket is against the protrusion on the camshaft bed.
- After alignment, we proceed to removing the chain tensioner.
- Unscrew the nuts with a wrench.
- Remove the tensioner.
- We remove the star, which is located on the guide pin.
- After unscrewing the bolt securing the sprocket, remove the sprocket. A hammer may be needed here.
- We tie it to a chain.
- Now you need to unscrew the nuts securing the crankshaft and remove it.
- By the way, it will be noted that if a stud with a nut is turned out, then it is screwed back in with a special stud turner.
- Next, we inspect the camshaft and replace it if necessary.
- The shaft is clamped according to the diagram. The tightening order must be observed. The tightening torque is also important. On a VAZ 2106 car, the tightening torque is 18.3 N/m.
- When assembling, be sure to check that the marks are aligned correctly. If they are out of order, they need to be set correctly.
- Finally, adjust the tension of the chain and valves.
conclusions
The torque and sequence of tightening the camshaft bed on the 16-valve VAZ-2112 engines must be correct, since this factor affects the operation of the cylinder head and the engine as a whole. Thus, incorrect implementation of the procedure can lead to more serious consequences. If the car enthusiast is not able to do this on his own, then it is necessary to contact a car service, where everything will be done quickly and efficiently.
In the VAZ 21126 engine, the joint between the cover and the cylinder head of the VAZ 2170 is sealed with sealant applied to the mating surfaces of the parts.
If the oil leak from under the cylinder head cover cannot be eliminated by tightening the cover nuts, replace the sealing layer of sealant.
You will need: a socket wrench “8”, wrenches “10”, “13”, screwdrivers with a flat and Phillips blade, wire cutters or a knife.
1. Disconnect the ignition coil wiring harness connectors...
2. ...and the injector wiring harness.
3. Squeezing the latches with your fingers, disconnect the wiring harness block for the VAZ 2171 ignition coils.
4. ...and the wiring harness block for the Priora injectors from the front bracket.
5. Unscrew the fastening bolts with a 10mm wrench and remove the front one.
7. Loosen the clamp...
8. ...remove the exhaust hose of the crankcase ventilation system of the Lada Priora from the branch pipe of the cylinder head cover.
9. Loosen the clamp...
10. ...and pull out the exhaust hose of the crankcase ventilation system from the branch pipe of the Lada Priora cylinder block.
Adjusting the tightening torque of bolts for a 16 valve car
Adjusting the tightening torque is a simple process, and after reading the material and video in this article, you can handle it yourself. It is enough to tighten it once and then you will be able to do it yourself and at the same time you will be able to help your friends if necessary. It is important to adhere to the diagram for cars with a 19-valve engine and observe the timing.
Required Tools
Torque wrench Shtengel compass
Scheme
The pattern for tightening on a 16-valve engine differs from the pattern for an 8-valve engine, so we will present both one and the other so that you can compare them.
Just don't get confused when you install. In any case, before starting work, check the instructions that came with the car. Tightening with different torques on a 16 valve unit occurs in 2 circles with different torques, and then another 2 circles with a rotation of 90 degrees. Nothing is difficult, which means you can cope on your own.
Stages
In order for self-tightening of bolts to be completed successfully and to last for a long time, a number of simple rules should be followed:
- It is better to use new bolts, since during operation they are under constant tension and lose their properties over time. There is no guarantee that the old bolt will not withstand the stress and will burst.
The length should not be more than 9.5 cm
- It is not advisable to reinstall the gasket, even if it is in reasonable condition.
- Strictly observe torque when tightening.
- The sequence of tightening the bolts should be exactly the same as in the diagram for 16-valve power plants.
- Before installing the cylinder head, carefully inspect all parts for damage and deformation. If any are found, do not ignore them, but be sure to replace them. Often, small breakdowns lead to major damage, and sometimes even to the complete destruction of systems and mechanisms.
- Do not use tools of dubious quality and manufacture. This is especially true for a torque wrench.
practical guide
1. Remove the camshaft pulleys.
2. Remove the tension and guide rollers.
3. Using a 10 mm socket wrench, unscrew the six bolts securing the rear timing belt cover.
5. Remove the cylinder head cover.
6. To avoid damage, remove the oil pressure sensor or disconnect the wire tip from it.
7. Using an 8 mm socket wrench, evenly, half a turn, unscrew the 20 bolts securing the camshaft bearing housing.
8. Remove the camshaft bearing housing.
9. Remove the exhaust camshaft 1 and the intake camshaft 2.
10. We remove two plugs for technological holes from the mounting holes in the cylinder head (near the rear ends of the camshafts).
4. Remove the keys and seals from the shafts.
5. Inspect the shafts. The journals and cams of the shaft should not show signs of heavy wear, scratches, cracks, or traces of metal envelopment.
Replacing camshafts on a VAZ 2114 with your own hands
Camshafts, like other mechanisms and components of a car, determine the quality of engine operation. This material will tell you how to determine the malfunction of the shafts, how to replace the camshafts on a VAZ 2112 16 valves, and what needs to be prepared for this.
The pulleys of the 16-valve VAZ 2112 must be replaced when they are worn out or have mechanical damage. In particular, we are talking about:
Lada 2112 with 16 cl internal combustion engine
If some kind of extraneous knock appears in the valves while the engine is running, it is usually caused by one of these damages. If you have recorded a reduced pressure of the engine fluid in the system, this may indicate an increase in the clearances in the bearings.
To do this, in order to eliminate this malfunction, it is necessary to grind and restore the pulley bearing journals. You should also enlarge the grooves through which the engine fluid flows. This is done so that the lubricating fluid, after the next grinding, lubricates the internal combustion engine elements. As for the necks, after grinding they should be polished with green GOI paste.
Step-by-step instructions for a 16 valve car
Required Tools
You need to prepare:
- new replacement parts (exhaust and intake timing pulleys);
- 8 mm socket wrench;
- sealant.
New sports shafts Socket wrench “8” Glue sealant
Stages of work
To correctly carry out the process of replacing exhaust elements, we suggest you use the instructions prepared specifically for our users. This manual is also suitable for those who want to replace exhaust camshaft seals, sensors or plugs.
- Open the hood of your 16 valve VAZ 2112. Remove the protective cover of the timing belt.
- After this, it is necessary to remove the cylinder head cover, as well as the engine fluid emergency pressure monitoring device (sensor). The sensor is removed so that it is not damaged during the work. You can also remove the sensor wire tip.
- Once the sensor is removed, you need to remove all the screws that secure the camshaft bearing housing. This is done using an “8” socket wrench. All bolts should be unscrewed evenly, not one at a time.
- After this, dismantle the bearing housing of the exhaust camshafts of the 16 valve VAZ 2112. It should be noted that the housing is dismantled with spark plug wells. They need to be pulled out of the case.
- Now regarding the plugs for technological holes. During the camshaft replacement procedure, motorists often lose the plugs. The plugs are small round shaped parts.
The plugs need to be removed from their installation locations in the cylinder head; there are two plugs in total, and they are located in the area of the rear ends of the camshafts.
Once these items are removed, place them separately. It's better not to lose the plugs.