ENGINE 11183 1.6L 8-valve JSC AvtoVAZ, the engine is known to car enthusiasts under the names: 11183; engine 21114; 2114; Kalina motor; motor Kalina, etc. VALUE Cylinder displacement, cubic meters. cm - 1.596 Rated power, l. With. (at 5200 rpm) - 82 Maximum torque, Nm (at 2700 rpm) - 120 Number of cylinders - 4 Number of valves per cylinder, pcs. — 2 Total number of valves, pcs. - 8 Cylinder diameter, mm - 82 Piston stroke, mm - 75.6 Spark plugs - A17 DVRM, BPR6ES (NGK), etc. Cylinder operation diagram - 1 - 3- 4- 2 Power system - Injector (distributed injection with electronic control) Fuel Unleaded gasoline AI-92 Fuel consumption, l./100 km. (city/highway) - 8.8/5.7 Lubrication system Combined (splash + under pressure) Type of engine oil - 5W-30, 5W-40, 10w-30 and 10W-40 Amount of engine oil, l - 3.5 Cooling system — Liquid, closed type Coolant — Based on ethylene glycol Motor life, thousand hours. (theory/practice) - 150/300 Weight, kg - 127
Car problems: 1-Reduced speed and traction for a couple of seconds. 2-On gasoline (there is still gas) it makes a little noise... 3-In the dark there is a bright ring of breakdown around the spark plug insulators.
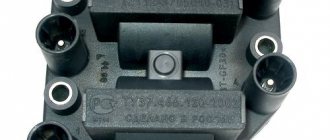
Old high-voltage wires: Tag-No. 9216 01/21/13 13:03:54 PES/SCC SAMARA RUSSIA On the other hand: PES/SCC RUSSIA SAMARA 2190 3707080 rev.00C Wire resistance. 1-5.5 kOhm 2-4.7 kOhm 3- Does not show, infinity. 4- 3.2 kOhm
I bought new high-voltage wires: high-voltage wires with 8 valves. "Milena" 2111-3707080 For all fuel-injected VAZ cars (8kL) Resistance up to 7 kOhm How to connect.
Misfires during engine operation can be caused not only by faulty high-voltage wires, but also by failure of the ignition module. To identify a malfunction of the ignition coil on the Lada Kalina, we will need a multimeter with which we will measure the resistance at its contacts. Measurements are carried out in several stages to determine all possible faults in a particular section of the circuit. I’ll tell you everything in order below:
Check if the winding is shorted to ground
This diagnostic stage is done quite simply and will not take much time. The main thing is to connect everything correctly.
- First, we set the position of the pointer of the device for measuring resistance; I think there is no need to explain this in detail.
- Then you need to connect one contact terminal of the device to the central contact on the coil, and connect the second to ground. If you explained something incomprehensibly, then you can see how it all should look visually in practice. The photo below shows everything perfectly.
The procedure for checking the short circuit
So, there are signs of a malfunction, you should check it.
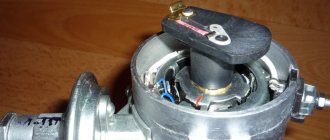
First of all, the coil must be dismantled. For this you will need:
- prepare a ten-point socket wrench;
- disconnect the terminals on the battery;
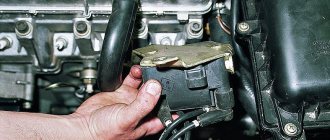
- open the protective casing covering the motor;
- press the locking device out of the plastic, disconnect the wiring from the coil terminal;
- remove the fastening bolt;
- pull out the ignition coil.
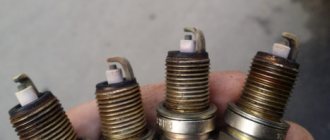
An inspection is now underway. It should not show any cracks, melts or leaks on the caps and body parts. Only slight smokedness is allowed. Electrics can be checked in several ways. Having installed a working spark plug, we check the device for the presence of a “spark” on the car body. If there is no spark from the coil, then it is quite possible that the short circuit has lost its functionality. In such a situation, you should check the gap in the spark plugs. All work should be performed with rubberized gloves to completely prevent contact of the body or tool with the car body or engine. The fact is that the coil is capable of generating voltage in the range of 20 - 40 kV. Another option is to remove the coil and install it on a good cylinder on another car to perform a drive test. If the short circuit is faulty, it will immediately appear. The third method is instrumental.
The main reasons why the ignition coil breaks are considered to be high temperatures or overheating, which contribute to the formation of cracks. There is a high probability of short circuit failure due to the accumulation of moisture or the formation of corrosion, frequent switching on of the ignition without subsequent starting of the engine, prolonged overloads when an unsuccessful attempt to start the engine.
Checking the secondary windings of the module:
- So, we take the ignition module of the Lada Kalina and turn it so that the conclusions of the high-voltage wires are facing us. Now we connect the device wires to the outputs of the 1st and 4th cylinders. And then we check the 2nd and 3rd cylinders in the same way.
All these testing procedures are best carried out with the module removed; this is much more convenient than doing everything directly under the hood of the car. Removing this part is quite simple, you only need a 5 hexagon and a couple of minutes of time.
The cause of misfires in the operation of the power unit may be not only damage to the high-voltage wires, but also to the ignition module. The article gives recommendations on how to check the ignition coil on a Lada Kalina car with an 8 and 16 valve engine.
Selected aspects of technical operation
Many inexperienced drivers, not understanding the essence of the breakdown, decide that an expensive replacement of the ignition switch or the wiring as a whole is necessary. Experienced drivers advise not to rush to conclusions. If, due to various circumstances, the ignition coil fails, the corresponding indicator lights up on the dashboard. The first thing the driver should do in such a situation is to drive the car into the garage and open the hood.
Often spark plugs fail due to a power surge or short circuit. As a result, the spark does not travel properly throughout the system. A number of other circumstances can cause a similar problem:
- the car was damaged in an accident;
- replacement of spark plugs may be required after lightning strikes the car;
- poor-quality previous repairs;
- use of non-original spare parts;
- failure to comply with technical inspection deadlines at the service center.
The ignition system can be damaged in any part of the circuit, so monitoring must be careful. It all starts with checking that the winding is properly connected to ground. It is necessary to carefully insert the contacts, focusing on the indicators of the device. Then one of the contact terminals of the device is connected to the central contact of the spark plug coil. In this case, the second contact is attached to ground.
Read more: Do-it-yourself towbar for Renault Duster - drawing and connection diagram
If an infinity symbol is visible on the multimeter screen, this indicates that there is no short circuit in this area. This should tell the car owner that the ignition circuit is in perfect order. Car owners without sufficient experience in car maintenance should be guided by the following fact. If, in addition to the infinity icon, there remains a “1” on the monitor, which was there before connection, this indicates that the section is working properly.
Replacement of spark plugs may be required if there is an open ignition in the primary circuits of the module. The device is connected to the module contacts located at the edges. In this case, the stability of the indicators on the device screen indicates that there is a problem in the Kalina ignition switch
If the fault could not be detected here, then at the next stage the car owner should pay attention to the secondary winding of the module
Take a 16-cell ignition module. and rotates so that both wire ends are facing you. A diagnostic tool is connected to the terminals of the 4th and 1st cylinders. If the faults do not manifest themselves here, then it is necessary to check the 2nd and 3rd cylinders in the same way.
How to check the serviceability of the ignition coil?
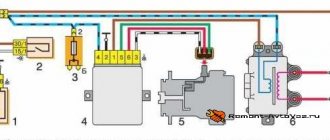
Malfunctions of the ignition module lead to unstable engine operation and the inability to start the car. The module's task is to generate high-voltage pulses and transmit them to the spark plug (SZ). The plus of the unit receives + 12V power from the on-board network, the minus is taken from the car body.
Ignition coil for Lada Kalina
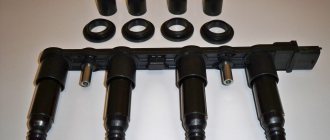
The design of the ignition module for 8 and 16 kL Lada Kalina engines includes two high-voltage transformers (coils) and two control units. One coil is connected to cylinders 1 and 4, and the second to cylinders 2 and 3. The device is connected to the SZ using high-voltage wires.
Lada Kalina replacement of spark plugs. magazine Behind the Wheel
We carry out the work on a cold engine.
On a 16 valve engine
A sharp jerk upward...
A sharp jerk upward...
A sharp jerk upward...
2302-3-2-09-02 (Copy)
...remove the plastic engine casing.
...remove the plastic engine casing.
...remove the plastic engine casing.
2302-3-2-09-03 (Copy)
By pressing the latch of the individual ignition coil wiring harness block, disconnect the block from the coil connector.
By pressing the latch of the individual ignition coil wiring harness block, disconnect the block from the coil connector.
By pressing the latch of the individual ignition coil wiring harness block, disconnect the block from the coil connector.
2302-3-2-09-04 (Copy)
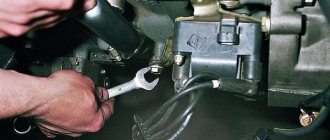
Using the E-8 head we unscrew the screw securing the ignition coil...
Using the E-8 head we unscrew the screw securing the ignition coil...
Using the E-8 head we unscrew the screw securing the ignition coil...
2302-3-2-09-05 (Copy)
...and remove the coil from the spark plug well.
...and remove the coil from the spark plug well.
...and remove the coil from the spark plug well.
2302-3-2-09-06 (Copy)
Using a high 16mm socket with an extension (or a spark plug wrench), unscrew the spark plug.
Using a high 16mm socket with an extension (or a spark plug wrench), unscrew the spark plug.
Using a high 16mm socket with an extension (or a spark plug wrench), unscrew the spark plug.
When installing the spark plug, you must screw it in by hand to avoid damaging the threads of the spark plug hole in the cylinder head.
If the spark plug does not follow the thread, strong resistance to rotation will be felt. In this case, it is necessary to completely unscrew the spark plug and, after cleaning the threads, re-tighten it.
Finally tighten the spark plug to a torque of 25–30 Nm.
Attention! Over-tightening the spark plugs can damage the threads in the spark plug holes in the cylinder head. We replace the remaining spark plugs in the same way. Replace the remaining spark plugs in the same way.
We replace the remaining spark plugs in the same way.
On an 8-valve engine
2279-4-12-01 (Copy)
Remove the wire tip from the spark plug.
Remove the wire tip from the spark plug.
Remove the wire tip from the spark plug.
Remove dirt around the spark plug.
2279-4-12-02 (Copy)
Using a high 21mm socket with an extension (or a spark plug wrench), unscrew the spark plug.
Using a high 21mm socket with an extension (or a spark plug wrench), unscrew the spark plug.
Using a high 21mm socket with an extension (or a spark plug wrench), unscrew the spark plug.
When installing the spark plug, you must screw it in by hand to avoid damaging the threads of the spark plug hole in the cylinder head.
If the spark plug does not follow the thread, strong resistance to rotation will be felt. In this case, it is necessary to completely unscrew the spark plug and, after cleaning the threads, re-tighten it.
We finally tighten the spark plug to a torque of 31–39 Nm.
Attention! Over-tightening the spark plugs can damage the threads in the spark plug holes in the cylinder head. We replace the remaining spark plugs in the same way. Replace the remaining spark plugs in the same way.
We replace the remaining spark plugs in the same way.
Error in the text? Select it with your mouse! And press: Ctrl + Enter
How to remove the ignition with your own hands?
It is better to check the functionality with the device removed. On an 8-cl engine, the ignition module is located in the front of the car.
Location of module 8 cells
On an engine with 16 cells there are 4 modules and they are located in a different place.
The device removal procedure consists of the following steps:
- First of all, you need to de-energize the car by removing the negative terminal from the battery.
- If the engine has protection, it must be removed.
- Next, press the latch and disconnect the wire block from the unit.
- Then we disconnect the four high-voltage wires and put them aside so that they do not interfere.
- Next, using a key set to “13” you need to unscrew the fastenings of the module to the motor.
- Use a hex screwdriver to unscrew the mounting bolts and remove the device from the engine.
Depending on the tester’s performance, the issue of replacing the device or repairing it is decided. Before installing the module in its original location, its mounts and the engine housing mounts should be cleaned, which will improve the transmitted voltage across the ground. After installation, it is necessary to check the functionality of the engine ignition system.
In order not to make a mistake when connecting high-voltage wires, you need to check the numbers on the block with the numbers on the wires; they must match. You should buy a new module with the same markings that were on the old one. To do this, you need to remember it when removing it. Then there will be no problems when installing a new device.
Location of the marking
Regardless of which engine is installed on the car - 16 cl or 8 cl, checking the coils is the same. If you know how to check the coils of an 8-valve engine, you can check a 16-valve engine. This knowledge will help you save on visiting a car service center.
Operation in various conditions
Many inexperienced drivers, not understanding the essence of the breakdown, decide that an expensive replacement of the ignition switch or the wiring as a whole is necessary. Experienced drivers advise not to rush to conclusions. If, due to various circumstances, the ignition coil fails, the corresponding indicator lights up on the dashboard. The first thing the driver should do in such a situation is to drive the car into the garage and open the hood.
Often spark plugs fail due to a power surge or short circuit. As a result, the spark does not travel properly throughout the system. A number of other circumstances can cause a similar problem:
- the car was damaged in an accident;
- replacement of spark plugs may be required after lightning strikes the car;
- poor-quality previous repairs;
- use of non-original spare parts;
- failure to comply with technical inspection deadlines at the service center.
Regardless of the reason, the ignition circuit needs a full analysis. Often the problem is complex. That is why, if the driver does not have enough technical experience, the first decision that comes to mind should not be accepted as the only correct one.
IKZ device
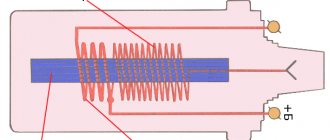
The Priora coil consists of a primary and secondary winding, between which a core is placed. To contact the spark plug, a spring is used, which is placed in a rubber tip. The IKZ also has a metal screen that protects the coil from high temperatures, because IKZ is installed in the well of the cylinder head, then the temperature conditions there are simply enormous.
The primary winding is wound from thin copper wire with a number of turns of 10,000-15,000.
The secondary winding of the coil consists of 100-150 turns of thick copper wire.
The connection between the coils is electromagnetic.
Let's sum it up
If the results of the diagnostic actions of the LADA Kalina car reveal that the ignition coil is faulty, then replacing this unit is a very simple undertaking. To implement the process, you will need a hex wrench. Before dismantling, we recommend that you remember the location of the high-voltage cables at the corresponding coil terminals. This will eliminate switching errors when installing the device.
The car jerks, there is no traction, vibration is felt, or the engine is rough; all these are symptoms of improper operation of the individual ignition coil (IIC). Other signs of a faulty ignition coil are the presence of errors 0301, 0302, 0303 and 0304, indicating misfire in one of the cylinders. Let's look at a few simple ways to check the ignition coil with your own hands.
It is worth noting that the process of checking IKZ on modern Lada cars (XRAY, Vesta, Largus, Granta, Kalina and Priora) does not have significant differences. All actions are performed in the same way.
A little about prices
We have already noted which switch and transistor are used when repairing the ignition module of a dozen. The first costs about 3 dollars, and for the second you will have to pay about 6 dollars.
Some craftsmen use a domestic analogue of the transistor - model KT848A . Of course, it costs less. But its problem is its lower quality and larger size, which somewhat complicates the repair process.