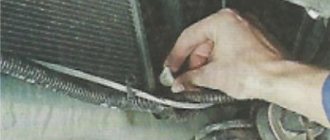
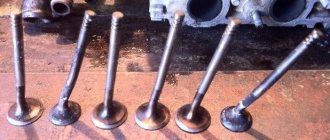
The Lada Kalina car, equipped with an injection engine, cannot be called expensive or difficult to maintain. If problems arise, for example, with the exhaust manifold, then everything can be solved on your own.
The exhaust pipe is necessary to collect and redirect exhaust gases to a special exhaust pipe of the muffler. replace the Kalina exhaust manifold at home.
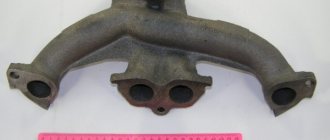
Gasket for Kalina manifold 8 valves
These are: fuel system, exhaust gas recirculation system.
After a run of 80-100 thousand km, the metal housing of the exhaust manifold begins to crack at the seams. Flange connections are torn away from their seats.
Replacing a catalyst with a spider, as a process, is divided into several stages.
This does not take into account the fact that the catalyst itself needs to be changed due to burnout of internal parts due to systematic contact with a hot flame flow. The average gas temperature reaches 600℃.
So, division into stages: collecting data on the number and location of catalysts in the car; preparation of spare parts in each specific case for modification;
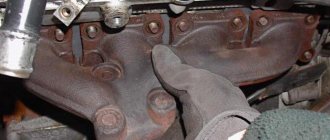
Welding a cast iron exhaust manifold
Temperature processing of a high-carbon alloy is associated with certain difficulties:
- carbon burns out when exposed to heat, the metal becomes friable;
- Cast iron has a high fluidity coefficient;
- upon rapid cooling, due to internal stress, the casting begins to crack and becomes whitish, this indicates a change in the structure of the alloy.
Welding a cast iron exhaust manifold can be done by trainees. It is better for beginners not to undertake the restoration of a car engine part, or they should first practice on junk cast iron products. Until recently, welders did not undertake repairs to cast iron. The seam turned out to have a high content of scale, and the metal cracked in the heating zone. After the advent of special copper-containing electrodes, which made it possible to reduce the temperature in the melt bath to +120°C, it became possible to create strong connections.
Hot and semi-hot methods are not fundamentally different. The crack is welded with copper-containing additives when the part is preheated. When hot, the part is heated in the oven to a temperature of +600°C, a crimson tint appears. It is noticeable when shaded. After this, welding begins. To prevent the part from cooling down quickly, it is periodically heated with a blowtorch. With the semi-hot method, the part is heated within +300°C. Produces an even seam
It is very important to maintain the temperature during cooling. If the crack depth is large, it:
- pre-cut to the full depth;
- the edges are drilled out on both sides;
- the edges are smoothed at an angle of 30°.
They make a multilayer connection. Each seam must be forged, the penetration length is no more than 3 cm. The seams are made perpendicular to ensure a reliable connection. For electric arc welding, electrodes of the TsCh-4 brand are used.
The cold method does not require preliminary preparation. The crack is fused at temperatures up to 200°C. For work, special electrodes OZCH-6, OZCH-2 are used.
The fracture strength of a cold joint is lower. For critical connections (when the outlet manifold pipe is completely broken off), it is better to take MNCh-2 electrodes. When semi-automatic gas welding, copper filler wire is used.
Replacement of the intake pipe gasket and catalytic collector
The intake pipe and catalytic collector are connected to the cylinder head through a common sealing gasket. The gasket also covers two channels of the cylinder head cooling jacket, which extend into the plane of the junction of the head with the intake pipe and catalytic collector. We carry out the work on an inspection ditch or overpass. Drain the coolant from the engine (see “Checking the level and replacing the coolant”). We remove the receiver (see “Removing the receiver”) and the fuel rail with injectors (see “Checking the injectors, removing the fuel rail and injectors”). Disconnect the engine management system wiring harness block from the oxygen concentration sensor wiring harness block (see “Removing the control oxygen concentration sensor”). Having unscrewed the three nuts securing the pipe flange of the additional muffler to the flange of the catalytic collector, we disconnect the additional muffler from the catalytic collector (see “Removing the additional muffler”).
Using a 13mm socket, unscrew the two nuts of the bracket securing the catenary collector.
. and remove the bracket from the bracket studs.
Using a 13mm wrench, unscrew the two bolts securing the catalytic converter bracket to the cylinder block.
. and remove the bracket.
Using a “13” wrench, unscrew the nut of the upper fastening of the right support bracket of the intake pipe. Remove the ground wire tip from the intake pipe stud.
Using a 13mm socket, unscrew the bolt of the lower fastening of the right support bracket of the intake pipe.
. and remove the bracket.
Remove the spacer bushing from the intake pipe stud.
Using a 19mm wrench, unscrew the nut securing the clutch housing to the cylinder block, which also secures the lower end of the left support bracket of the intake pipe.
Using a 17mm wrench, unscrew the nut of the upper fastening of the left support bracket of the intake pipe.
. and remove the bracket. On the left rear side of the engine...
. Using the “13” head, loosen the tightening of nut 1 securing the coolant pump pipe bracket, unscrew nut 2 securing the catalytic collector and nut 3 of the general fastening of the catalytic collector and intake pipe to the cylinder head (for clarity, shown on a dismantled engine).
Move the coolant pump pipe bracket aside.
Remove the heat shield from the cylinder head studs and the washer from the top stud. On the right rear side of the engine.
. Using the “13” head, unscrew the two nuts securing the heat shield and the eye.
Remove the heat shield and ring from the cylinder head studs. ..using the “13” head, unscrew the nut for fastening the catalytic collector and the nut for the general fastening of the catalytic collector and inlet pipe, located on the same studs. Remove the washers from the studs.
Using a “13” socket, unscrew two nuts 1 of the upper fastening of the intake pipe and one nut 2 of the upper fastening of the catalytic collector. Remove the washers from the studs.
Using a “13” socket, unscrew the two nuts of the common lower fastening of the catalytic collector and the intake pipe to the cylinder head. Remove the washers from the studs.
Remove the inlet pipe.
Remove the sealing gasket of the intake pipe and catalytic collector.
After each removal of the intake pipe or catalytic collector, the gasket must be replaced with a new one. Before installation, we clean the mating surfaces of the cylinder head, intake pipe and cathode from remnants of the old gasket and carbon deposits. Apply graphite lubricant to the cylinder head studs. We carry out assembly in reverse order. At the four common fastening points of the intake pipe and the catalytic converter (their joints), it is necessary to install thick washers with a large outer diameter on the studs.
Common mounting points for the intake pipe and catalytic collector (shown on a dismantled engine for clarity).
Dismantling
There is only one difficulty in this process - the inaccessibility of some fasteners. It is best to carry out this “operation” in a viewing hole or on a lift. Of course, this is not necessary, but it is much more convenient.
Work order:
- First you need to remove the negative terminal from the battery or turn off the mains switch.
- Next, it is recommended to drain all the antifreeze into a container prepared in advance.
- Next, you need to disconnect the fuel pipes. If the coolant is not drained, at this stage it will go into the cylinders.
- Now you have to find the throttle position and idle speed sensors, and then remove the wires from them.
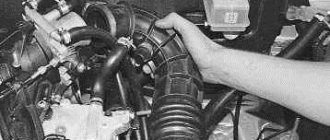
- We first remove the crankcase ventilation from the hoses, then the brake booster.
- Remove the intake manifold (receiver) together with the throttle assembly.
- Then remove the fuel rail (without disassembling) and the wires from the injector.
- There's not much left. Now you need to remove the heat reflecting screen. The exhaust pipe of the muffler is unscrewed from the manifold.
- We remove the exhaust manifold Kalina 8 valves from the BC head studs, to do this we unscrew the fastenings shown below in the figure
Required tools and materials
The list of what is needed is, in principle, standard: a standard set of tools, an extension cord with various heads, WD-40 or other similar lubricant. If you know that the problem is broken studs, then a stud extractor, taps, drill and drill bits will be added to the above list. In addition, a bucket or basin, possibly an old canister, should be at hand.
Advice! A few days before replacing the exhaust manifold, you can begin to lubricate all fasteners in the system. Can be lubricated several times a day. This will greatly simplify the task and make replacement quick.
Part 2: carburetor removal
Those who have an injector can immediately proceed to the last stage. Owners of carburetor engines, after removing the air filter, plug the holes with a dry rag - to prevent foreign objects from falling into them (in particular, loose nuts and other small things - then there will be no trouble if something falls there). The wire from the EKXX valve is disconnected, the clamps are unscrewed and both fuel hoses are removed. The suction cable is loosened and removed. The end of the spring is removed from the throttle control rod, after which it is completely removed.
Afterwards, the throttle valve itself is disconnected, the power plugs and the screw sensor are disconnected, and the carburetor heating hoses and vacuum tube are removed. Next, the crankcase ventilation hose is dismantled, the fastening nuts (connecting the carburetor to the intake manifold) are unscrewed, and the carburetor is smoothly and accurately, without jerking, pulled up from the studs.
Since we've removed the throttle valve, it wouldn't hurt to clean it.
Technical features of the insert for Lada Kalina 8V
The industry offers two types of tuning inserts, the design of each of them depends on the location of the pipes. Moreover, each design is designed for a specific power unit:
- Insert 4-1 is installed on forced engines with a speed range from 5,000 to 10,000 rpm. structurally suitable only for 16-valve engines.
- The 4-2-1 insert operates over a wider range and is considered a "low-end" insert. It is possible to increase engine power by about 3-5%. This is the model most often installed on the VAZ 1118.
Symptoms that the exhaust manifold gasket has burnt out. Full list and action plan »
Symptoms that the exhaust manifold gasket has burnt out. Complete list and action plan
If the manifold seal is not replaced in a timely manner, the safety conditions for operating the vehicle are greatly reduced.
In general, a manifold is a device designed to remove exhaust gases from a car engine. The second function of the collector is to improve the filling of the working chambers and enhance the ventilation of the working space. All operation of the exhaust device is carried out at elevated temperatures and high gas pressure.
This element is attached directly to the head ( cylinder head
) and the other side is in contact with the exhaust pipe or converter. The most important task of the exhaust manifold gasket is to prevent exhaust gases from entering the valve space. These gases, in turn, can cause fire of parts or elements of the power unit.
Symptoms of a blown exhaust manifold gasket
The following can be distinguished: exhaust gases begin to flow into the car interior or their smell is felt; the car engine begins to start poorly; Strange sounds appear in the engine compartment. If these ailments are detected, you should begin to inspect the exhaust system. The collector itself is made of high-strength austenitic steel.
In this regard, burnout and replacement of the collector is quite rare. The main reason for the breakdown of the collector itself is drops of water falling on its hot surface, which leads to the formation of cracks in it.
The weak link of this durable and reliable element is the gaskets. Wear of the manifold gasket occurs mainly due to: poor quality of the material or very long operation under increased loads.
Manifold gaskets are now made from steel-reinforced, durable asbestos. However, even such a durable material is susceptible to destruction. The process of replacing the exhaust manifold gasket is not at all difficult.
Experts even recommend replacing the gasket after some time, without waiting for it to fail.
We carry out the following procedures:
- 1. Open the hood of the car;
2. Remove the air intake. Then remove the carburetor. Under these engine elements is the exhaust manifold;
3. Remove the thermal shield. It covers the collector;
4. Unscrew two nuts on each cylinder that secure the manifold;
5. Unscrew a couple of bolts from the exhaust pipe;
6. Remove the manifold;
7. There should be an old gasket or remains of it on the cylinder head;
8. We clear all the space for a new gasket;
9. Clean everything until it shines;
10. After cleaning, apply a graphite-based lubricant to the area;
11. Now install a new gasket;
12. Reassemble everything in reverse order.
Source
Sequence of work in the 8-valve Kalina
The first step is to fill all threaded connections with liquid wrench. When exposed to high temperatures for a long time, nuts become deformed and destroyed due to corrosion, so unscrewing them is quite problematic. After tightening the nuts, the following work is carried out:
- the coolant is drained;
- lambda probe chips are removed;
- unscrew the bolts that secure the intake manifold to the cylinder head and exhaust pipe;
- the holding bracket is dismantled;
- the exhaust manifold is removed;
- the lambda probe wire is extended;
- “spider” is installed;
- the system is assembled in reverse order.
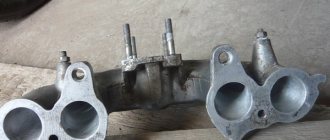
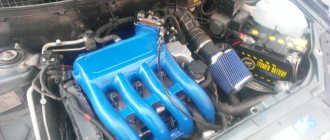
There are different spider options: 4-1 system; 4-2-1; 4-2-1 with modified sound. The most popular is 4-1. The design has four pipes converging into one, which are welded to the cylinder head plate. The 4-2-1 system is also made of four pipes, the first and second of which converge into one, as well as the third and fourth. The two pipes then form one and transmit the exhaust gases further into the system.
When installing the 4-2-1 spider, the exhaust pipe is shortened. As a result, it will be impossible to install a 4-1 design blende or a new catalyst into the car without modification. The 4-1 system is completely identical to the Kalina factory catalyst.
Installing a spider in a 16-valve car
The sixteen-valve Kalina is equipped with a complex power supply and gas distribution system, so the work carried out will be more labor-intensive. The sequence of actions is as follows:
- removing the terminals from the battery, draining the coolant;
- loosening the clamps securing the air duct pipe and the throttle assembly to the filter;
- the pipe is removed;
- the chip is disconnected from the throttle assembly and oxygen sensor;
- the hose of the crankcase ventilation system is removed;
- the adsorber purge hose is disconnected;
- the receiver mounting bracket is unscrewed;
- the nuts are unscrewed and the receiver is removed;
- unscrew the upper and lower fastening nuts, remove the heat-insulating shield and eye;
- the fastenings of the spacer to the exhaust manifold are twisted;
- the heat shield is removed;
- the intake manifold is dismantled, for which you need to unscrew nine nuts near the block head and three at the exhaust pipe;
- “spider” is mounted;
- the lambda probe wire is extended, a mechanical or electronic snag is installed;
- The elements are assembled in the reverse order.
https://www.youtube.com/watch?v=MVuhQIv3YFA
The catalyst prevents atmospheric pollution with carbon monoxide and other toxic substances. Its service life is not designed for more than 100,000 kilometers of vehicle mileage, so every owner will sooner or later be faced with the need to replace this element. You can replace the catalyst yourself or by contacting a service station.
It is important to remember that inept DIY repairs will aggravate the problem and cause additional costs in the future.
How to determine the malfunction of the Lada-Kalina muffler
To find a faulty exhaust system, you don’t have to be a car mechanic or have extensive experience in car repairs. To identify problems, you need to act in the following sequence:
- Pay attention to noises that are made while driving. If the muffler is faulty, the sound will be quite loud. Extraneous noises also indicate problems with the exhaust system.
- Raise the car with a jack or drive onto an overpass and inspect the system body. A working device should have no holes or rust. The presence of traces of corrosion indicates that, most likely, there is a problem with the housing.
- While driving, you need to monitor the color of the exhaust: the periodic appearance of black and dense smoke will indicate that there are problems with the exhaust system.
- Start the engine and press the gas pedal for several minutes. Then turn off the ignition and check the engine temperature. During this time it should not get very hot. If it has risen significantly, it means that there are problems in the performance of the mechanism.
Quite often, the muffler body is exposed to corrosion, which leads to the appearance of holes and, as a result, a loud exhaust sound.
Malfunctions of various types can occur with the exhaust system, but the most common is unreliable installation of muffler elements. As a result of poor-quality connection, the unit quickly fails. In addition, common malfunctions include:
- loss of tightness as a result of burning out of individual elements (corrugations, gaskets);
- catalyst problems;
- mechanical damage;
- exposure to corrosion, which leads to the appearance of holes.
One of the malfunctions of the Lada-Kalina exhaust system is burnout of the corrugation
Replacing the catalyst with a “spider”
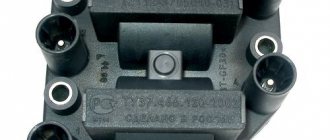
Lada Kalina cars of both the first and second generation are equipped at the factory with a collector-type catalytic converter-neutralizer. It is made in the same housing with the receiving manifold. Depending on the environmental class of the car (“Euro-2” or “Euro-3”) it has one or two oxygen sensors. When the catalyst fails, there is a need to replace it.
If the message “Check” appears on the information panel, the first thing you need to do is conduct computer diagnostics of the electronic control unit. With its help, you can determine whether the problem is really a malfunction of the car's filtration system or whether there is another breakdown. When the program confirms a malfunction of the catalyst, it is necessary to replace it - the part cannot be repaired. Most often, car enthusiasts prefer the option that involves installing a “spider” instead of a broken catalyst.
What does the muffler consist of?
The main part of the exhaust system serves to absorb noise. On the Lada Kalina car, this function is performed by a pipe, which includes the muffler itself and its resonator.
The thickening is the resonator, the end is the muffler itself
The pipe has a completely sealed body, which is manufactured using the rolling method, that is, without the use of a welding machine. Thanks to this, the muffler is durable and does not corrode. And the resonator, which is also located in the pipe, consists of several closed chambers. These chambers are connected to each other by small tubes with holes in them. Thanks to this structure, the resonator can quickly smooth out all acoustic vibrations. In the latest modifications of the Lada Kalina, the inside of the resonator is lined with sound-absorbing material.
When is it necessary to replace and remove the exhaust manifold on a VAZ-2114
Huge temperature changes are the main problem faced by the exhaust manifold and the gasket, for which it is removed. The collector itself is made of a special grade of cast iron; it can withstand high temperatures (up to 800-900 degrees) , however, these are critical values, after which the collector may warp or crack.
Exhaust manifold VAZ-2114
Its main task is to collect exhaust gases and distribute them into the exhaust pipe of the muffler.
Replacing or dismantling the VAZ-2114 exhaust manifold is necessary in the following cases:
- Mechanical damage to the collector.
- Warping and loss of tightness at the junction with the cylinder head.
- Burnout of the gasket between the head and the manifold.
- The appearance of cracks as a result of engine overheating.
- Replacing the collector with a device of a different configuration, adapted to a more severe operating mode.
In the event that we are not going to participate in high-speed races for the prize of the head of the regional traffic police, replacing or dismantling the collector may be necessary in a number of cases.
Tools and materials for dismantling
There are a number of symptoms that will indicate that you need to prepare to remove the exhaust manifold:
- increased noise level in the engine compartment , the engine produces a characteristic, loud sound in any operating mode;
- breakthrough of exhaust gases into the engine compartment and sometimes into the cabin;
- reduction in engine power due to a mismatch between the exhaust gas outlets in the cylinder head and in the manifold.
Many people decide to replace the standard manifold with a “tuning” one, made of stainless steel and having a different configuration, thereby wanting to increase engine power and reduce the resistance that the standard manifold provides to exhaust gases. As a rule, the most common reason for dismantling a unit is gasket burnout .
Exhaust manifold gasket
The manifold gasket on the VAZ-2114 is made of pressed reinforced asbestos and is designed to ensure a tight connection between the block head and the manifold flanges. Asbestos is used to correct the coefficient of thermal expansion of the aluminum alloy from which the head is cast and the cast iron from which the manifold is cast. At high speeds and under prolonged loads, the gasket may burn out. Then its replacement and dismantling of the collector are inevitable.
To dismantle the manifold, you will need a standard set of tools, a set of sockets with extensions, and WD-40 penetrating lubricant or its equivalent. In case of broken studs, a stud extractor, drill, drill bits and a set of taps will be useful. A day or two before dismantling the collector, it is worth moistening all the fasteners several times, this will significantly simplify the removal procedure .
When is it necessary to replace the catalyst on Kalina
If a malfunction is detected in the operation of a part, the computer displays the message “Check” on the information panel, which, when deciphered, shows the error “Ineffective operation of the catalyst.” This is fraught with a decrease in engine power (the car may not pick up speed above 60 km/h) and increased fuel consumption. If you ignore the problem, one day the car may simply not start.
Signs of the need to replace the catalyst on Kalina:
- the car exhaust has acquired a black color and a strong unpleasant odor;
- the car began to accelerate worse and lose speed when driving uphill;
- when the engine is running, grinding and knocking sounds are heard from the exhaust gas filter;
- The car began to consume more gasoline.
Environmental standards established in the Russian Federation do not regulate the level of permissible content of harmful gases in the exhaust. Due to this, owners of a Lada Kalina with a broken catalyst have three options:
- Replacing an old catalyst with a new one - many service stations offer this service, but it is quite expensive.
- Installation of alternative exhaust filters - a universal element that has a lower cost, or a flame arrester.
- Complete removal of the catalyst - this is equivalent to installing a so-called “spider”, which does not filter the exhaust, but removes smog directly from the engine. Because of this, the level of toxic substances in the atmosphere increases.
Each of the three operations presented is a rather complex process, so it is not recommended for people who do not have experience in solving such problems to carry out such work on their own. If you intervene without special tools and skills, you can damage the car computer sensors. It will constantly display an error in the notification bar. Unprofessional repairs will only worsen the problem, which will increase the cost of troubleshooting at the service station.
After replacing a faulty catalyst, an increase in engine power is observed, since the smog passes through the exhaust system unhindered, which reduces the load on the engine. Fuel consumption is also reduced and the car starts faster.
Product delivery options
Note! Below are the shipping methods available specifically for this product. Payment options may vary depending on the shipping method. Detailed information can be found on the “Delivery and Payment” page.
Parcel by Russian Post
Available payment methods:
- Cash on delivery (payment upon receipt)
- Using cards Sberbank, VTB, Post Bank, Tinkoff
- Yandex money
- QIWI
- ROBOKASSA
Shipping throughout Russia. Delivery time is from 5 to 12 days.
Parcel by Russian Post 1st class
Available payment methods:
- Cash on delivery (payment upon receipt)
- Using cards Sberbank, VTB, Post Bank, Tinkoff
- Yandex money
- QIWI
- ROBOKASSA
Shipping throughout Russia. Delivery time is from 2 to 5 days. More expensive than regular delivery by Russian Post, approximately 50%. Parcel weight up to 2.5 kg
Express Parcel EMS
Available payment methods:
- Cash on delivery (payment upon receipt)
- Using cards Sberbank, VTB, Post Bank, Tinkoff
- Yandex money
- QIWI
- ROBOKASSA
Shipping throughout Russia. Delivery time is from 3 to 7 days. More expensive than regular delivery by Russian Post, approximately 100%.
How to remove the receiver on a Priora
Tools that may come in handy: - 10mm socket; - key 13; - screwdriver.
To remove the intake manifold you will need:
- Due to the fact that in the next steps of the instructions there will be manipulations with electrical wiring, it is necessary to remove the negative terminal of the battery.
- The next step is to remove the plastic screen (cover) from the engine housing. This is done so that it does not interfere with your work.
- After which, it is necessary to remove power from the four ignition coils and dismantle them. To do this, pull out the contact chips. Take a 10mm socket (or a wrench of the same size) and unscrew one fastening bolt on each coil. Simply pull the coils upwards using the necessary force. Now they can be removed. There is no need to remove the spark plugs themselves; they will not interfere with removal. On the other hand, it is advisable to take advantage of the situation and check their condition (gap and spark quality).
- Our next task is to dismantle the throttle assembly. The receiver cannot be removed without removing it. To remove the throttle and avoid excess antifreeze leaking out of the cooling system pipes, you need to prepare first (unscrew the cap of the expansion tank with coolant). To remove the throttle, it is necessary to disconnect all the pipes connected to it, including those responsible for the air supply (corrugation) and cooling. In order to remove the assembly itself, you need to unscrew the two fastening nuts with a wrench or a 13mm socket. Now the assembly together with the sealing strip can be removed, and at the same time inspected and, if necessary, cleaned.
- At this point, locate and remove the crankcase ventilation hose. To do this, loosen the tightened clamp using a flat-head screwdriver and pull it towards you.
- The next step is to dismantle the dipstick structure to check the oil level. It is attached to one screw, which must be unscrewed.
- Now the most important thing is to remove the Priora 16 valve receiver. Doing this is not as difficult as it seems. First of all, we need to unscrew the nuts from the three connecting bolts at the junction of the block and the manifold. It is most convenient to work from a repair pit or using a lift, having previously dismantled the underbody protection of the car. After that, you just have to unscrew two additional nuts.
- It's time to move into the engine compartment and unscrew the two special mounting bolts that are located on the right and left of the receiver housing.
- After which the receiver can be carefully removed.
- Depending on the type and configuration of components in your engine, you may need to unscrew, rotate or remove any component that prevents the receiver from being removed (for example, power steering or a generator).
Causes of malfunctions
The key factor that causes 90% of exhaust manifold malfunctions on VAZ 2114 cars is high temperature and poor quality materials from which the parts are made. During operation, the steel repeatedly heats up and cools down, which leads to the appearance of cracks in the body. This is a common occurrence for VAZ cars older than 7-8 years.
Auto repair shops offer crack welding services using argon welding. However, for a number of reasons, this activity is useless for cars older than 7 years.
1) Just removing and installing the exhaust manifold will cost about 2.5 thousand rubles. Taking into account the work of the welder and other actions, the cost of repairs can be 4-5 thousand rubles. If you do the work yourself, buying a new part will cost less.
2) Welding, even argon welding, disrupts the structure of “tired” metal. A boiled part rarely lasts longer than a year, after which new holes appear. The older the car, the faster the problem returns, and the collector has to be removed again.
If the car is older than 8 years and there are problems with cracks in the manifold, it is better to remove the part and replace it with a new one.
Reasons for gasket burnout
There are few reasons why a cylinder head gasket burns out, but with a new engine there is only one – overheating. Even a short time of engine operation at temperatures above normal can cause this malfunction. In this case, the gasket may burn out quite a bit, and inexperienced motorists will not notice the first symptoms that appear. With further operation, the burnout increases, and the symptoms become more pronounced. Due to the fact that many car owners turn to specialists not after overheating, but after some time of operation, when the malfunction becomes a clear fact, they do not connect the burnout of the gasket with the recent overheating and demand from motorists other explanations why the cylinder head gasket burned out.
If the volume of coolant is insufficient, you may not notice a slight overheating of the head, since the liquid, circulating in the system, manages to cool in the radiator, but does not have time to remove heat in the required amount. Instruments in a car show the temperature of the coolant, not the temperature of the engine parts. Thus, when operating a car with an insufficient level of antifreeze, you can burn the gasket without realizing that the cause was overheating.
Burnouts occur due to poor-quality gaskets, but this mostly applies to engines after repair. This happens extremely rarely on new cars. Even on repair engines, the cause of such a malfunction may be factors related to the quality of the repairs performed:
- unsatisfactory condition of the mating surfaces (remains of the old gasket, shells or scratches on the surfaces are poorly cleaned, head deformation);
- incorrect tightening torque of the cylinder head bolts;
- the order of tightening the cylinder head bolts is incorrect;
- the thickness of the gasket is incorrectly selected (on engines where they come in different sizes).
Replacing the gasket
The marker of a failed gasket is considered to be soot that forms in the place where the exhaust escapes. In this case, proceed to replacing the defective seal.
What is needed for repair
To replace the exhaust manifold gasket, prepare the following materials and tools:
- screwdrivers (slotted and Phillips);
- sharp knife or spatula (remove used gasket);
- spanners included;
- anti-rust liquid (for example, WD-40);
- 5 liter wide-neck container (for draining antifreeze);
- dry rags.
ATTENTION! When replacing the manifold gasket on a VAZ 2114 (as on other factory models), it is necessary to drain the antifreeze in advance, otherwise the engine intake windows can be flooded.
Step by Step Actions
The process of replacing a seal when it fails is simple, but has nuances for different engines. In general terms, the algorithm for dismantling and subsequent installation of the VK gasket looks like this:
- Open the hood and remove the air intake with the carburetor, under which there is a manifold.
- Remove the thermal screen covering the VC (some older models do not have a screen).
- Unscrew the bolts that attach the spider to the exhaust pipe, and then the bolts connecting it to the engine block.
- Proceed to removing the exhaust manifold itself, on which sits a burnt-out gasket, which often “sticks” to the VC.
- Carefully clean the area between the cylinder head and the manifold with a spatula, removing carbon deposits and fragments of worn gasket from the second.
- Once the area is shiny, coat it with graphite lubricant and install a new gasket.
- Treat the fasteners with the same lubricant (to prevent corrosion).
Finally, return all dismantled parts to their rightful places.
Replacing the intake manifold on a Prior
Welcome! Intake manifold - someone calls this part an intake manifold and someone calls it a receiver, but if you read the terminology of these two words, these are completely different things, for example, a receiver is needed only to smooth out the pulsations of air that goes into the cylinders of a car engine, but the manifold is already needed in order to distribute this air to the necessary cylinders and the fuel-air mixture is also mixed in it, so these are two different things, but since people call them with the same words, you can assume that they are one and the same thing yes and besides, the can itself at the intake manifold can essentially be called a receiver, since it contains only air and has a fairly large volume, and if you remember the terminology, it says, the receiver is the thing in which the smoothing of air pulsations occurs (The car is moving in this case, more smoothly) and it has a size 50-70% larger than the car’s cylinders, so the receiver and intake manifold can be considered a single whole, but this no longer applies to carburetor cars.
Note! To replace the intake manifold on a car, you will need to stock up on: A set of wrenches and to all this, a socket wrench of size “8” will also come in handy; in addition to this wrench, you will also need various kinds of screwdrivers, wire cutters, or instead of them, you can also stock up on a knife (Knife By the way, it will even be more comfortable)!
Where is the intake manifold located? In all sixteen valve engines, even though this is even a sixteen valve engine that was installed on cars of the tenth family (It’s just that the 16 valve engine of the VAZ 2110 car is slightly different from the Priorov’s), the intake manifold is in the same place and they have an absolutely identical shape and design made of plastic, so for clarity, the collector in the photo is indicated by an arrow, but the car as you see is a VAZ 2110, but on the Priors it will be visually the same.
Note! To fully see the collector, you will also have to remove the engine screen, the screen is a thing that reduces the noise from the engine a little and covers it from dirt getting on it. When carrying out a lot of work, you will have to remove this screen because it covers almost the entire part of the engine and itself Moreover, you will not see the collector without removing the screen from the car; for more details on how to remove this screen, read the article: “Replacing the engine screen on cars”!
When should you replace the intake manifold? Since the collector on Priors is made of plastic, it is not so difficult to bend it or pierce it with anything, dropping it, for example, on a sharp stone from a height, besides this, the collector is no longer necessary to be replaced in any case (with the exception of replacing it with some be it sports), but the manifold also needs to be removed in the following cases, firstly, when carrying out any work due to which the manifold interferes, and secondly, the manifold has its own gaskets (the intake manifold has only five of them, one of them is located between throttle valve and manifold, and the other four at the end of the pipe are installed, how to replace them as you read the article, you will find out) when they wear out, the air begins to come out, and if the air is simply released (that is, comes out), then the car will drive worse and its consumption will increase , since you will have to press your foot harder on the gas pedal.