Welcome, friends, to the DIY car repair website. Using the example of a car with a carburetor engine, we will look at how to remove and install a VAZ 2107 fuel pump. We will also look at the types and main faults of a fuel pump.
As you know, the fuel pump is one of the main parts of the car, but like many parts, it also becomes unusable over time.
Fuel pump malfunctions:
- The engine does not start or stalls after starting.
- The engine will not start hot or cold.
- The engine does not develop speed and does not produce full power.
- Poor fuel supply to the carburetor or none at all.
All these reasons may be the following: the elastic membrane has burst or torn, the valves have become clogged or worn out, the spring under the diaphragm has broken, the rod (pusher) of the fuel pump has worn out.
All these faults are easily repaired, and repair kits for them are not difficult to find in auto stores, but it is still easier and more reliable to purchase a new VAZ 2107 fuel pump, because its price is not so high.
Types of fuel pumps for VAZ 2107:
- Citron.
- Baker.
- DAAZ.
All these three types of fuel pumps, quite common, at one time had to be installed differently, but I consider the DAAZ to be the most reliable, at least this is my opinion, but which one to install is up to you to decide.
Yes, I would like to add a little that the gas pumps for the classics are the same and fit even an old penny, even a VAZ 2106 or another model, and the instructions presented below for replacement are also identical. Also, do not forget to read the article replacing the VAZ 2107 crosspiece.
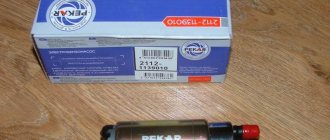
Gasoline pump for carburetor VAZ 2107
One of the mechanisms of the power supply system of any engine is the fuel pump. The startup and operation of the power unit directly depends on its performance. Mechanical fuel pumps of the diaphragm type DAAZ 2101 were installed on carburetor “sevens”. Thanks to the simple design, the mechanism is repairable. However, it often causes problems for Zhiguli owners. Therefore, it is worth dwelling on the operation and malfunctions of this unit in more detail.
Main functions
The job of the fuel pump is to move fuel from the tank to the carburetor.
The power supply system of a VAZ 2107 with a carburetor engine consists of the following elements: 1 - fuel pump; 2 — hose from the fuel pump to the carburetor; 3 - carburetor; 4 — rear tube; 5 — sensor for level indicator and fuel reserve; 6 — safety shield; 7 — tank ventilation tube; 8 — fuel tank; 9 — gaskets; 10 — fuel tank mounting clamp; 11 — front tube; 12 — fine fuel filter
The design of the unit is not ideal, so it is one of the weak points in the car. This is explained by the fact that the impact of constant loads and low quality gasoline lead to natural wear and tear of the elements. This is what causes the device to fail. If a problem occurs with the pump, the engine begins to work intermittently or stops functioning altogether.
The fuel pump has a simple design, but is one of the weak points of the car
Design and operating principle
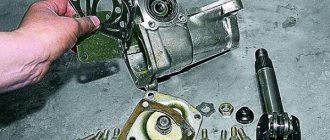
The mechanism is made of several parts connected to each other by fastening elements. There are two fittings in the upper part of the body through which fuel is supplied and pumped into the carburetor. The design includes a lever that allows you to manually pump gasoline from the tank into the fuel system, which is important after the car has been parked for a long time. The main elements of the node are:
- pusher;
- spring;
- balance;
- lid;
- cover screw;
- screw;
- mesh filter;
- membranes (working and safety);
- lower and upper plates;
- stock;
- valves (inlet and outlet);
- manual pumping lever.
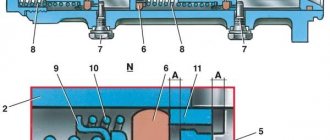
Fuel pump design: 1 - discharge pipe; 2 - filter; 3 - body; 4 - suction pipe; 5 - cover; 6 - suction valve; 7 — rod; 8 — manual fuel pumping lever; 9 - spring; 10 - cam; 11 — balancer; 12 — mechanical fuel pumping lever; 13 — bottom cover; 14 — internal spacer; 15 — external spacer; 16 - discharge valve
The principle of operation of a classic fuel pump is based on creating the pressure necessary to maintain the required fuel level in the carburetor chamber. Thanks to the diaphragm, the flow of gasoline stops or decreases when a maximum pressure value is established in the fuel line. On carburetor “sevens” the fuel pump is located under the hood on the left side of the cylinder block. It is secured to two studs through a thermal spacer and gaskets, which are also used for adjustment. The spacer is also a guiding part for the pump rod.
The device operates in the following order:
- the pump pusher is driven by a drive cam operating from the gas distribution mechanism;
- the membranes located inside the gas pump move and alternately create pressure and vacuum in the chamber;
- if the pressure decreases, the outlet valve closes and fuel flows through the inlet valve;
- when the pressure increases, the valve at the pump inlet closes, and gasoline is supplied through a hose to the carburetor.
Under the action of the pusher, which is controlled by the gas distribution mechanism, a vacuum and pressure are alternately created in the fuel pump chamber, due to which the fuel suction strokes and its supply to the carburetor are ensured.
Which fuel pump is better
When there are problems with the fuel pump, the question of choosing a new device often arises. Owners of Zhiguli cars mainly prefer products of two. If problems arise with the factory mechanism, for example, when it overheats, many change it to the second option, explaining that Pekar pumps do not have a tendency to form a vapor lock, which causes defects in the operation of the device in hot weather. In fact, this opinion is wrong, since they also have this problem, as evidenced by numerous reviews from car owners. It is also worth considering that Pekar costs 1.5–2 more than DAAZ. Therefore, a standard fuel pump is the best choice based on criteria such as reliability, price and quality. The cost of a factory pump is 500–600 rubles.
The Pekar fuel pump, along with the DAAZ, is considered one of the best for classic Zhiguli cars.
Table: parameters of different fuel pumps
| Test results | "Baker" | DAAZ | QH | OTA |
| Zero supply pressure (at a crankshaft speed of 2 thousand rpm), kgf/cm² | 0,26 | 0,28 | 0,3 | 0,36 |
| Capacity for free drainage (at a crankshaft speed of 2 thousand rpm), l/h | 80 | 76 | 92 | 74 |
| Suction period at a crankshaft speed of 2 thousand rpm, s | 4 | 13 | 9 | 6 |
| Valve tightness at a pressure of 0.3 kgf/cm² (fuel leakage within 10 minutes), cm³ | 8 | 12 | 8 | 8 |
| Place | 3 | 4 | 1–2 | 1–2 |
QH petrol pumps are manufactured in the UK, while OTA petrol pumps are manufactured in Italy. However, these devices have some features: the QH pump does not have a lever for manual pumping of fuel, and the housing is non-separable. The Italian mechanism has excellent parameters compared to others, but its price is almost 3 times higher than Russian products.
Checking the fuel pump yourself
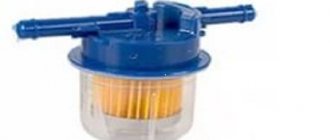
Before diagnosing the fuel pump, you need to make sure that all other elements of the fuel system are operating normally. If the carburetor mechanism, gasoline supply hoses and filters are in good condition, then you can begin to check the operation of the pump itself.
To do this, you only need to prepare two tools:
- 10 mm wrench;
- a screwdriver with a thin flat blade.
Checking the fuel pump on a VAZ 2106 occurs according to the following algorithm:
- Open the hood of the car and make sure the engine is cool.
- Locate the gasoline pump housing (on the left side of the cylinder block).
- Loosen the suction hose clamp with a screwdriver.
- Remove the hose (immediately after removal, it is necessary to close the hole with a bolt of the required diameter to avoid fuel loss).
- Disconnect the fuel supply line from the carburetor fitting. Close the drain with your finger.
- Press the lever mechanism intended for pumping gasoline several times. With each press, your finger in the hole should feel the action of the diaphragm spring. At the same time, sounds of air being sucked in will be heard.
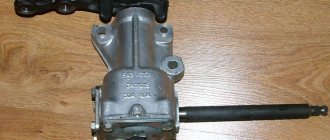
Fuel pump drive
The VAZ 2107 fuel pump operates from a pusher (rod) and an eccentric located on the shaft of auxiliary devices (“piglet”, intermediate shaft), which is driven by the timing mechanism through a gear. Auxiliary devices include distributor, oil and fuel pumps.
Operating principle
The drive works as follows:
- the intermediate shaft rotates via a timing chain;
- the eccentric acts on the rod and pushes it;
- the rod presses the fuel pump lever, ensuring its operation.
Fuel pump drive malfunctions
As the fuel supply unit wears out, problems may occur that affect the performance of the latter.
Rod wear
The main sign of a worn-out rod is that the car does not reach the required speed. If the car accelerates, but, having gained speed to a certain value, does not develop it anymore, the reason is precisely the wear of the rod. Recently, the pusher has been made from such low-quality metal that it leads to wear out literally after 500–1000 km. The edge of the rod on the eccentric side is simply flattened, which indicates the need to replace the part.
Rod wear directly affects the performance of the fuel pump
The fuel pump rod should be 82.5 mm long.
Diagnostics
Pump failure can be caused by two reasons:
- Faulty fuel pump relay or blown fuse.
- There is a fault in the power circuit.
To check the electrical circuit and relay, do the following:
- Turn the key to the ignition position, but do not start the power unit. After turning the key to the ignition position, a click of the relay should be heard and then there should be a brief activation of the pump. If you do not hear a click from the relay, it means it is faulty or there is no power to it. If the relay clicks, but the pump does not work, then the problem is in the wiring that goes from the relay to the pump;
- Locate the relay box under the glove box. The block consists of three relays and three fuses for them. The fuel pump relay is located in the center. Remove the fuse, check its integrity and replace it if necessary;
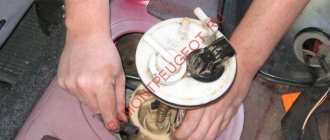
Take a multimeter and set the measurement mode to 20V. Next, touch one of the probes to the contact on the relay where the pink wire is connected. Touch ground with the other probe and turn on the ignition. The screen should display the on-board voltage from 11.5 to 12.5 V. If there is no voltage, the problem will be in the ignition switch contact group or a broken wiring. To test the relay, use a jumper to connect the terminals to which the gray and pink wires go. If the fuel pump starts working, change the relay; Make sure that the negative wire on the body is not oxidized. Often, interruptions in the operation of the pump are associated with a lack of mass. The ground wire is located near the handbrake mounting bolts; To check the pump, remove the rear seat and the fuel module cover. Disconnect the power connector on the fuel module and supply 12 V there directly from the battery. If the fuel pump works, the problem is in broken wiring; if it doesn’t work, you need to change the pump; Also, the pump may not produce the required pressure for the injection system to operate. It is not difficult to measure the pressure yourself, but you need to have several special devices. We recommend stopping by a service station and asking them to measure the pressure of the fuel pump. It should produce 2.8–3.2 kPa for a 1.5 engine and 3.7–3.9 kPa for a 1.6.
Causes of unit malfunction
- battery is low,
- wires are oxidized or terminals are loosely tightened,
- short circuit in the winding of the VAZ starter relay,
- circuit break,
- the anchor gets stuck.
- battery is low,
- wires are heavily oxidized,
- break or short circuit in the winding.
If the car is equipped with an ST-221 starter with a single-winding traction relay, the current consumption is checked. This figure should not exceed 23 A.
The starter does not turn or its mechanical data have deviated from the norm, the VAZ 21053 power relay has broken, the armature has failed - all these and some other reasons indicate the need for repair work. When checking mechanical indicators, you need to perform the following steps.
Which carburetor model to choose
For any VAZ car, starting from 2101 to 2107, only certain carburetor models are suitable
DAAZ carburetors
Carburetors DAAZ 2101, 2103, 2106. They were produced at the Dmitrov Automotive Unit Plant, which bought a license from the Italian company Weber, therefore these carburetors can be indicated under both names. The devices were not distinguished by the complexity of their design, but they could please their owners with the rapid acceleration of the car and good speed. One of the biggest problems in installing these models is their virtual absence on the market.
In addition to speed and simplicity, Weber carburetors also provided incredibly fast fuel consumption - these “monsters” consumed 10–14 liters per 100 km. fuel.
Carburetors "Ozone"
More technologically advanced models, which were already installed in VAZ 2105 and 2107 cars, were also produced at the Dmitrov Automobile Unit Plant. However, they were not only more advanced and improved, but also more environmentally friendly. This is why they received the name “Ozone”. This carburetor made it possible to reduce fuel consumption to 7–10 liters. 100 km, while maintaining the dynamic characteristics of its predecessors. The downside of the device was the complexity of its assembly and constant contamination in one of the chambers, which led to the fact that the acceleration of the car noticeably deteriorated, the speed decreased and the engine began to act up.
Solex
A little later, DAAZ 21053 carburetors appeared. They were produced under license from the French company Solex, hence the name of the models. These carburetors were not much similar to previous DAAZ models. The updated design with a fuel return system made it possible to save 400–500 ml of fuel per 100 km. These carburetors were distinguished by good power and low gasoline consumption. The disadvantage of the device was the narrow fuel and air channels, which very often became clogged.
Solex carburetors came in many variations with different auxiliary systems. In the CIS, the most popular option has become an electric idle air valve.
Custom carburetor Solex 21073
Often, inquisitive car enthusiasts resorted to replacing the carburetor on their own. One of the suitable models turned out to be Solex 21073, famous for its fairly wide jets and channels. Such a carburetor increased the car’s power, but at the same time increased fuel consumption - 9–12 liters. per 100 km.
Solex 21083
The second non-standard carburetor, which with some modifications fits the VAZ 2106 and 2107 models, is Solex 21083. After expanding the diffusers and installing jets, this device allows you to significantly increase the dynamics of the car without much fuel consumption. However, the process of upgrading a carburetor is very complex and time-consuming.
How to remove a carburetor
The carburetor is removed if a malfunction is detected in it, but there is no way to do this by partial disassembly. The carburetor is also removed to replace, adjust and clean it.
- To begin with, all kinds of hinged parts and damper drive cables are removed.
- The air filter housing is removed from the studs. To do this, you need to unscrew all the nuts that secure it to the carburetor. The clamping nut is pulled back and the choke cable sheath is pulled out from the mounting bracket.
- The outer surface of the parts is cleaned of dirt.
- The choke drive cable is loosened and the fuel supply and crankcase gas exhaust hoses are removed.
- The hose between the economizer and the pneumatic valve and the hose of the vacuum ignition distributor are disconnected.
- Then the nuts that secure the carburetor to the intake manifold are unscrewed.
- The carburetor body is removed and the intake manifold hole is plugged with a clean rag to avoid clogging.
Don't forget to check the integrity of the sealing gasket, which is located between the carburetor and the intake manifold. Replace it if necessary.
How to clean a carburetor
Before you start cleaning the carburetor, you need to carefully prepare: buy a special aerosol cleaner at a car shop, arm yourself with smooth, dry cloths, a tire inflator, remove the carburetor and disassemble it.
Jets—fuel and gas supply channels—are cleaned with compressed air or a liquid cleaner under pressure. Mechanical cleaning with any fleecy or metal objects is prohibited.
When cleaning the jets with compressed air (you can use a tire pump for this), the body of the idle jets, the main metering system (air and fuel), then the valves and channels of the pump sprayer are blown out.
In case of severe contamination, the jets are placed in acetone so that the deposits soften or completely dissolve. Then they should be blown out.
| Hole diameter, mm | First camera | Second camera |
| Main fuel jet | 1,35 | 1,25 |
| Air jet | 1,70 | 1,90 |
| Idle fuel jet | 0,45 | 0,60 |
| Idle air jet | 1,80 | 0,70 |
| Accelerator pump nozzle | 0,50 | — |
| Accelerator pump bypass jet | 0,40 | — |
| Fuel nozzle of enrichment device | — | 1,50 |
| Emulsion nozzle of the enrichment device | — | 1,70 |
| Air jet of enrichment device | 0,70 | — |
Flushing the float system To get to the carburetor float system, you must:
- Remove the air filter and fuel hose clamps.
- Disconnect the cable that controls the starting device.
- Remove the electrical connector on the solenoid valve.
- Then unscrew the fastening bolts and, without turning over, remove the carburetor cover.
It is best to clean the float compartment with a rubber bulb, carefully drawing out any remaining fuel from the chamber. You should not use fluffy rags - they can accidentally clog the jets.
To complete the cleaning, you can wipe the bottom of the float chamber with a stiff brush.
To check how well you have cleaned the float chamber, you need to unscrew the air jets and blow out the emulsion wells. If dirt appears in them, washing should be repeated and checked in the same way.
Flushing the throttle valve
It is produced using a cleaner, which can be purchased at a specialized auto store.
- The throttle valve itself is washed, as well as all accessible elements, channels, valves, etc. Particular attention should be paid to the forced crankcase ventilation channel, since it becomes clogged more often and more severely than other parts.
- After this, the idle speed sensor is unscrewed and the internal elements are washed.
- The procedure is repeated again.
Video: how to clean the throttle valve on a VAZ
Front bumper
On the VAZ 2107 model, both bumpers are supported by 4 brackets. Side fastenings are used for lateral connections to the car fenders.
Attention! To avoid damage (scratches, dents) on the fenders, replacing the front bumper should be carried out carefully.
Removal process
When dismantling the façade buffer, you must step by step perform the following sequence of actions:
- Secure the car so that it cannot move anywhere during repairs, or jack it up.
- The wheels must be turned in such a way that it is convenient to work when unscrewing the nuts on the side securing the buffer to the bracket.
- From inside the front wing, use wrench No. 13 to unscrew the bolt securing the buffer to the body.
- On both sides of the wheel arches, use a chrome wrench No. 22 to unscrew the nut holding the buffer to the body on the brackets. If you turn the nut, you need to hold it on the reverse side with a similar wrench.
- When finished, remove the bolt.
- To reduce friction on the rubber seals and prevent their wear, lubricate the brackets with a solution of soap or shampoo.
- Holding the bumper carefully with both hands, pull it out of the housing sockets with a “pull towards yourself” motion. The lubricated support tubes will slide out of the installation site with ease.
Procedure for dismantling
To disassemble the buffer, use a No. 13 wrench to unscrew the nut and bolt of the upper and lower fastenings of the tube connector and remove it from the bumper.
Unscrew the bracket bolts
After this, use wrench No. 3 to unscrew the 3 nuts holding the chrome trim.
Removing the decorative trim
To complete the disassembly, use a number 13 wrench to unscrew the nut of the side bracket and disconnect it from the main part.
Installation
Installation of the bumper is carried out according to the same scheme, but the actions are carried out in the reverse order, that is:
- The car is fixed;
- The disassembled bumper is being assembled;
- Everything is inserted into place and after turning the wheel or removing it, use a No. 22 wrench to screw in the bracket bolts on both sides;
- When everything is screwed down, you need to install the decor overlay in place.
Read, it may come in handy: Front and rear glass - replacement and tinting
Carburetor adjustment
After cleaning and repairing the carburetor, it should be adjusted.
How to set the fuel level
- First you need to adjust the float, which primarily affects fuel consumption.
- Unscrew the screws securing the cover and, for convenience, place it vertically. Make sure that the needle lightly touches the float.
- Check that the gap between the cover with the gasket installed on it and the bottom of the float is 6.2 ± 0.25 mm. If there is a discrepancy, correct it by moving the float tongue.
- After this, check the movement of the float. Its value should be 8±0.25 mm.
Video: how to adjust the fuel level in a VAZ carburetor
Adjusting the starter
- To do this, the carburetor must be installed on the engine, but not covered with an air filter. After this, pull out the choke as much as possible.
- Then you need to warm up the engine and use a screwdriver to open the air damper a third. The throttle linkage must be adjusted to 3200–3400 rpm.
- Then lower the throttle and reduce the speed to 2800–3000 per minute.
Do not overlook the hole for the plug - it must be clamped so that rarefied air is formed under the diaphragm of the starting device.
Idle adjustment
Performed with a warm engine. Only the quality screw is engaged.
- Using the quality screw, we accelerate the engine speed to the maximum level.
- After this, use the quantity screw to increase the rotation speed by 100–150 revolutions and, without stopping the engine, reduce the speed by the same number, but using the quality screw.
This operation completes the engine adjustment and ensures high-quality and stable operation with the minimum permissible amount of carbon monoxide.
Using the quality screw, you can lean or enrich the fuel mixture - it is responsible for the supply of gasoline, and tightening it leans the fuel mixture, and unscrewing it, on the contrary, enriches it.
Measure the fuel pressure in the rail
As mentioned above, in order to measure the pressure of the fuel pump in the rail, you need to screw the pressure gauge sequentially into the fuel supply. Measurement is carried out in different modes, depending on the symptoms of the malfunction:
- The car won't start. We take measurements when the ignition is turned on. Using the diagnostic scanner, you can turn on the fuel pump through actuators. Working pressure from 3 to 4 atm.
- The craving is gone. First you need to measure the fuel pressure at the ignition, if it gives a normal reading, measure it at idle. The pump should produce 2.5 - 4.2 atm, depending on the type of engine. 2.5 - RTD on the ramp, 4.2 - RTD in the tank.
- There are cases when the owner complains of loss of traction for a short time or in the heat. In this case, you need to check on the go. We attach the pressure gauge, check the tightness of the contact with the fitting so that there is no leakage of gasoline. We attach the device to the windshield, maybe under the wiper, and off we go. If the fuel pressure drops while driving, you need to replace the fuel pump, filter, and bleed the lines.
- How to check a fuel pump in the wall. This procedure is necessary to eliminate a clogged filter or fuel pressure regulator lines. The pressure value on the injector into the wall should be from 6 atm.
With these simple steps you can measure the gas pressure on any car. The main thing is to follow safety precautions when working with flammable liquids.
Installation
How to install a new fuel pump? The VAZ-2107 injector, like its carburetor predecessor, has its own design features, so installing a new element will be somewhat different from dismantling it. So, let's get to work. First you need to install a new gasket. Its thickness should be about 0.7-0.8 millimeters. After this, we install the thermal insulation - approximately 0.3 millimeters thick. This way we will achieve a minimum pusher exit gap, which will be no more than 1.3 millimeters and no less than 0.8 millimeters. If the obtained indicator is lower than the specified norm, then we replace the sealing gasket with a heat-insulating gasket with a thickness of 0.3 millimeters.
After the position of the pusher is normal, the fuel pump is strengthened and tightened with nuts. Then everything follows the reverse principle - the fuel lines are connected and the engine starts. We start the engine to check the quality of fuel injection. This completes our replacement of the fuel pump. The VAZ-2107 can now drive over any long distance without breakdowns. By the way, ideally the engine should run without interruptions (at least 1-2 minutes), and there should be no fuel leakage from the pump.