How to replace coolant on a Grant?
- Cooling system pipe compressed on Lada Granta - 3 answers
- Liquid boils in the tank on Lada 2114 - 2 answers
- High pressure in the cooling system of Lada Granta - 2 answers
- The fan on the VAZ Granta often turns on - 2 answers
- Radiator fan does not turn on in Lada Granta - 1 answer
You will need a container of 8 liters and the ability to place the car on an overpass or inspection hole. Replacing the Lada Granta coolant is done as follows:
1) Remove the battery terminals and engine protection.
2) Place a container under the radiator drain hole.
3) Open the plug and drain all the liquid.
4) Move the container under the cylinder block and drain the liquid from there by unscrewing the drain plug with a 13 mm wrench .
5) When the coolant stops draining, tighten the plugs.
6) Unscrew the expansion plug. tank and install the neck.
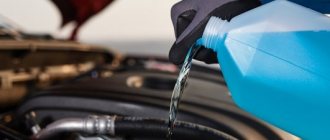
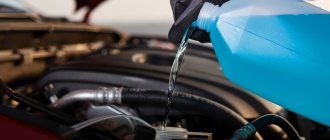
7) Fill with new fluid to the maximum mark .
Start the engine and run at high speed until the fans turn on.
9) Check the coolant level in the tank, add if necessary.
A high-quality choice of coolant and its timely replacement can significantly extend the life of a car engine, as well as qualitatively improve the performance of a car heater. In accordance with the coolant replacement regulations from the manufacturer, it must be changed after 75 thousand kilometers or five years, whichever comes first. AvtoVAZ uses high-quality red antifreeze G12+ Lux under the Sintec brand on all modern Lada models. However, if when replacing you were unable to find antifreeze from this manufacturer, you can use other antifreezes of the same G12 classification.
In our material we will look at the replacement process with and without flushing the engine cooling system. It is only necessary to flush the cooling system if the coolant in the reservoir has sediment or its color is significantly different from what it was originally. Plus, indirect signs of the need to flush the car’s cooling system will be the smell of scale emanating from the expansion tank of the cooling system. If in your case you just need to carry out a routine replacement, skip the steps of flushing the system and immediately fill in with fresh antifreeze.
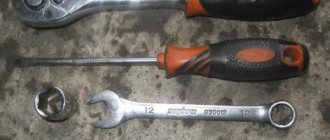
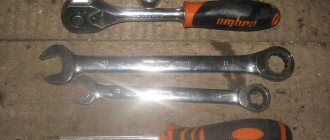
To work on replacing the coolant on the Lada Granta, you will need a socket or ring wrench set to “13”.
1. At the beginning of the coolant replacement process, when using a flushing agent, pour it into the old antifreeze and let the engine idle for about five to seven minutes, depending on the instructions on the detergent packaging.
2. Before draining old fluid from the cooling system, place a 6-7 liter container under the engine; if you have a crankcase protection or a dirt boot installed, remove it. Next, unscrew the plastic drain plug located in the corner of the cooling radiator. Be careful and careful, the coolant is hot and can cause burns. The location of the plastic coolant drain plug is shown in the photo.
After the liquid has flowed from the drain hole of the cooling radiator, you can open the expansion tank cap to allow air into the cooling system and speed up the process of draining the liquid.
3. After draining all the liquid from the radiator, you will need to drain the remainder from the cooling jacket of the cylinder block; to do this, use the “13” head to unscrew the drain bolt on the cylinder block, marked in the photo.
Thanks for subscribing!
4. If the cooling system is heavily contaminated, it is necessary, without tightening the drain plugs of the radiator and cylinder block, to fill the cooling expansion tank with ordinary fresh tap water until clean water flows from the drain hole on the cylinder block. After this, tighten the plug on the cylinder block and repeat the procedure until water comes out of the drain hole on the radiator of the cooling system. This procedure will help to carry out initial flushing of the engine cooling system from old antifreeze remaining in the system.
2279-4-9a-01
If the engine is hot, you need to let it cool and then relieve excess pressure in the cooling system by unscrewing the expansion tank cap.
If the engine is hot, you need to let it cool and then relieve excess pressure in the cooling system by unscrewing the expansion tank cap.
If the engine is hot, you need to let it cool and then relieve excess pressure in the cooling system by unscrewing the expansion tank cap.
To access the drain holes from below, you must remove the middle mudguard of the engine compartment.
Reference information for passing the lada granta/kalina (articles and filling volumes)
AvtoVAZ recommends that Lada Granta or Lada Kalina 2 undergo maintenance every 12 months or 15,000 km, whichever comes first. If you order some spare parts and consumables (oil, filters, etc.) yourself, then you will need article numbers for original consumables and analogues for each specific service.
Name Catalog number or name Quantity or volumes Replacement instructions
API class SL, SM or SN.Original LADA engine oil:
- 88888L05400100 — ULTRA 5W-40, 1 l (synthetic technologies)
- 88888L05400400 — ULTRA 5W-40, 4 l (synthetic technologies)
- 88888L15400100 — PROFESSIONAL 5W-40, 1 l (semi-synthetic)
- 88888L15400400 — PROFESSIONAL 5W-40, 4 l (semi-synthetic)
Factory recommendations: ROSNEFT Premium or ROSNEFT Maximum 5W-40 or 10W-40. Or Lukoil Genesis RN 5W-40 Engine lubrication system:
- with manual transmission - 3.2 l
- With automatic transmission - 4.4 l
LADA 21080-1012005-00, 21080-1012005-08 or 21080-1012005-09
- Lada Ultra GL-4/5 75W90 synth. - 88888L75900100 and 88888L75900400
- Lukoil TM-4 75W90 GL-4 p/synth. — 19531 and 19532
- ZIC GFT 75W90 synth. - 132629 and 162629
- Rosneft Kinetic 75W90 GL-4/G p/synth. — 5106 and 5107
- Genuine EJ-1 ATF for automatic transmission
- Manual transmission 2180 - 3.1 l
- Manual transmission 2181 - 2.2 l
- Automatic transmission (Jatco) - 4.1-4.4 l
- AMT 2182 - 2.25
Eat
- LADA G-11 - 88888400001082 and 88888400005082
- LADA G-12 - 88888200001082 and 88888100005082 (red)
- Antifreeze G-48;
- Cool Steam Standard;
- Cool Steam Premium;
- TS-Felix;
- Felix Carbox;
- SINTEC (for example, "Antifreeze
- SINTEC" TU 2422-047-
- 51140047-2007);
- Long Life;
- G-Energy Antefreexe.
LADA DOT-4 - 88888100000582 and 88888100001082
LADA 11180-8122021 or 8450002895/11180-8122021-08 (for Lada Granta FL)
- A17DVRM JSC "Robert Bosch Saratov"
- LR15YC-1 BRISK
- WR7DCX Bosch
- AU17DVRM JSC "Robert Bosch Saratov"
- DR15YC-1 BRISK
- FR7DCU Bosch
- Belt LADA 21080-1006040-10, 21080-1006040-11
- Belt tensioner roller LADA 21080-1006120-00, 21080-1006120-01
- LADA 21126-1006040-00 (Gates - K015631XS)
- Belt tensioner roller LADA 21126100623800(Coram - C835, Pilenga - PT-P 1571, Torque - KR-5015, INA - 531084110)
- Support roller (bypass) LADA 21126100613500 (Torque - KR-5016, INA - 532060410, SNR - GE37200)
Kit for 16kl engine:
- Gates - K015631XS
- Contitech - CT1137K1
- DAYCO - KTB700
- INA - 530053610
LADA 21100-3501080, 21100-3501089
LADA 2110-3501070 (13 inches) and 2112-3501070 (14 inches)
Drum: LADA 21080-3502090-01 Disc: LADA 11196350208900
| Replacement of antifreeze in Lada Granta cars, according to the manufacturer’s recommendation, should be carried out after 75,000 km, or after five years from the start of using the car. In the decision-making process, it is worth focusing on the indicator that comes first. A prerequisite is periodic monitoring of the condition of the coolant. If the color of the antifreeze changes to an orange tint, replacement is also required. |
Smooooooooooooooooooooooooooooooooooooooooooooooooooo
Dirt guards of the engine compartment of a car with a manual transmission and their fastening elements (view from below the car): 1 - three screws for the “8” turnkey fastening of the middle shield to the right shield;
2 — right shield; 3 - middle shield; 4 — four self-tapping screws “8” for fastening the middle shield to the lower cross member of the radiator frame; 5 — two self-tapping screws “8” for fastening the middle shield to the left shield; 6 — left shield; 7 — two “10” screws for fastening the middle shield to the body side members. Mud guards of the engine compartment of a car with a manual transmission and their fastening elements (view from below the car): 1 — three “8” screws for fastening the middle shield to the right shield; 2 — right shield; 3 - middle shield; 4 — four self-tapping screws “8” for fastening the middle shield to the lower cross member of the radiator frame; 5 — two self-tapping screws “8” for fastening the middle shield to the left shield; 6 — left shield; 7 - two “10” bolts for fastening the middle shield to the body side members
Dirt guards of the engine compartment of a car with a manual transmission and their fastening elements (view from below the car): 1 - three screws for the “8” turnkey fastening of the middle shield to the right shield; 2 — right shield; 3 - middle shield; 4 — four self-tapping screws “8” for fastening the middle shield to the lower cross member of the radiator frame; 5 — two self-tapping screws “8” for fastening the middle shield to the left shield; 6 — left shield; 7 - two “10” bolts for fastening the middle shield to the body side members
After unscrewing all the indicated bolts and screws, remove the middle mudguard of the engine compartment.
We place a wide container with a volume of at least 6 liters under the drain hole made in the lower part of the right radiator tank. To reduce the intensity of liquid drainage at the initial moment, the cap of the expansion tank should be tightly screwed on.
Clutch and brake sensors
Based on the signals from the clutch pedal position sensor and the brake light switch, the controller distinguishes between pressed and unpressed pedal positions. When the clutch pedal is pressed, the controller disables engine load regulation. Both sensors are located on the pedal assembly.
See "Replacing and Inspecting the Clutch Pedal Sensor" and "Replacing and Inspecting the Brake Pedal Sensor."
Some vehicle versions use an electronic throttle valve drive (E-gas). Let us remind you that in order to understand what errors are recorded in the ECU, you need to decipher them.
New Lada: Lada Granta sensors location
Keywords: Lada Granta sensors | Lada Kalina sensors | Lada Priora sensors | Lada Granta engine | Lada Kalina engine | Lada Priora engine | Lada Vesta sensors | Lada Largus sensors | 4x4 sensors | lada xray sensors | lada xray engine | Lada Vesta engine | Lada Largus engine | 4x4 engine | ECM Lada Vesta | ECM Lada XRAY | ECM Lada Largus | ECM Lada Granta | ECM Lada Kalina | ECM Lada Priora | ECM 4x4 | Niva sensors | Niva engine | esud niva | universal article
Share on social networks:
Found an error? Select it and press Ctrl Enter..
2279-4-9b-03 (Copy)
The connection is sealed with a rubber ring.
The connection is sealed with a rubber ring.
The connection is sealed with a rubber ring.
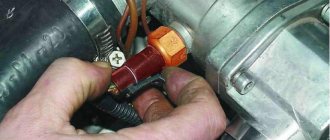
To drain the coolant from the cooling jacket of an 8-valve engine equipped with a traction drive gearbox, place a container under the drain hole located on the front side of the cylinder block below the ignition coil.
Replacing antifreeze or antifreeze on Lada cars
December 19, 2022 Lada.Online 63 215
AVTOVAZ installs the same type of power units on its models, so the process of replacing antifreeze on Lada cars (Granta, Priora, Kalina, Largus, Niva, Vesta or XRAY) looks similar. The engine cooling system contains about 7.8 liters of coolant (antifreeze, antifreeze). According to the manufacturer's recommendations, the coolant should be replaced every 75,000 km. or 5 years, whichever comes first.
You will need: a socket wrench “13”, a screwdriver, a clean rag, an empty container of at least 8 liters and new antifreeze. It is more convenient to drain antifreeze when the car is installed in an inspection hole.
Before draining the antifreeze, wait until the engine has cooled down. Remove the expansion tank cap. Place an empty container under the engine and remove the drain plug on the cylinder block. On some engines (for example, VAZ-11183, VAZ-21116 and VAZ-11186), to access the plug you will need to remove the ignition coil along with the bracket. Wait until the antifreeze has completely drained.
Rearrange the container and unscrew the radiator drain plug (in diagram No. 15). Wait until the coolant has completely drained from the cooling system. Replace the O-ring and screw the plug into the radiator. Tighten the plug on the cylinder block.
We pour antifreeze into the cooling system through the expansion tank until the liquid level reaches 3 cm below the “MAX” mark (mixing antifreeze of different brands is not allowed). Close the expansion tank cap and warm up the engine until the fan turns on. Stop the engine and, if necessary, add antifreeze to the “MAX” mark.
If you need to replace antifreeze, but there is no overpass and you don’t want to remove the engine protection, use the traditional method. Place a cut plastic bottle under the thermostat hoses in the engine compartment as a funnel. The coolant running out of the hoses will fall into an empty container standing near the car.
Replacing antifreeze is also shown in the video:
Sometimes there is an air lock in the cooling system that needs to be expelled.
Keywords: cooling system Lada Kalina | cooling system for Lada Priora | cooling system for Lada Granta | cooling system for Lada Vesta | cooling system for Lada Largus | 4x4 cooling system | cooling system lada xray | Niva cooling system | universal article
Share on social networks:
Found an error? Select it and press Ctrl Enter..
Guests cannot leave comments in the news, please log in.
2279-4-9a-02
On a vehicle with a 16-valve engine equipped with a cable-driven gearbox, access to the drain hole in the cylinder block is prevented by the starter.
In addition, the leaking liquid will inevitably get inside the starter. On a vehicle with a 16-valve engine equipped with a cable-driven gearbox, access to the drain hole in the cylinder block is prevented by the starter. In addition, the leaking liquid will inevitably get inside the starter.
On a vehicle with a 16-valve engine equipped with a cable-driven gearbox, access to the drain hole in the cylinder block is prevented by the starter. In addition, the leaking liquid will inevitably get inside the starter.
Therefore, the starter needs to be removed. Disconnect the wire terminal from the negative terminal of the battery. By pressing the latch of the wire block, disconnect the block from the traction relay connector. Remove the protective cap from the nut securing the tip of the wire connected to the positive cable of the battery.
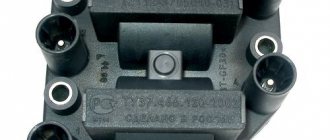
Coolant temperature sensor for Lada Granta
If a failure or incorrect operation of the coolant temperature sensor occurs, there will be difficulties in starting the engine in the cold season
You have to warm up the engine by maintaining speed with the accelerator pedal.
When overheating occurs, power decreases significantly and detonation occurs.
Removal and inspection
Drain the coolant. You don’t have to drain all the liquid, but drain about 3 liters.
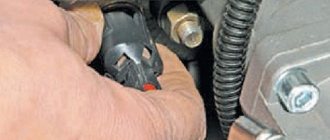
Release the clamp of the wiring harness block and disconnect the block from the sensor.
We connect the “negative” engine voltage probe.
Turning on the ignition, use a voltmeter to measure the voltage at terminal 1 of the wiring harness block (the terminal designations are marked on the wiring harness block).
The voltage at the output must be at least 12 V.
If the voltage does not reach the block or it is less than 12 V, it means that the battery is discharged, the power circuit is faulty, or the ECU is faulty.
When the voltage measurement is complete, turn off the ignition.
Use a 19 mm spanner to unscrew the temperature sensor
Remove the sensor from the thermostat housing.
The connection between the sensor and the thermostat is sealed with a copper washer.
We connect an ohmmeter to the sensor terminals.
To connect a multimeter, pieces of polyvinyl chloride tube can be placed on the sensor terminals.
Insert the probes of the device into them; this must be done carefully, since the sensor leads are very thin.
We fill the container with boiling water, immerse the working part of the sensor in water and record the readings of the device.
As the water cools, we measure the resistance of the sensor at different temperatures.
If conditions permit, readings can be taken at a lower temperature.
The resistance of a working sensor is approximately as shown in the table:
| Cooling temperature liquid(°c) | Resistance, Ohm |
| 100 | 175 |
| 90 | 240 |
| 40 | 1460 |
| 10 | 5670 |
| 9420 |
We replace the faulty sensor.
Installation
Install the sensor in the reverse order of removal.
Fill the engine cooling system with liquid.
We start the engine and make sure that there are no coolant leaks from under the sensor.
If necessary, tighten the sensor into the thermostat housing.
If the leak cannot be eliminated in this way, you should reinstall the sensor by applying a heat-resistant sealant to its threaded part or replace the copper washer.
2279-4-9a-02d
We unscrew the plug as shown above and drain the coolant from the cylinder block.
We unscrew the plug as shown above and drain the coolant from the cylinder block.
We unscrew the plug as shown above and drain the coolant from the cylinder block.
We tighten the drain plugs of the radiator and cylinder block. The connection between the plug and the cylinder block uses a conical thread that does not require additional sealing. Tighten the drain plug of the cylinder block to a torque of 25–30 Nm. Pour liquid into the engine cooling system through the expansion tank until it is full. Let's start the engine. With the engine running, vigorously compress all the hoses of the cooling system several times in turn - this will help the fluid fill the system and displace air from it. As the coolant level in the expansion tank drops, bring it to normal and screw on the tank cap. When the engine warms up, the outlet (lower) radiator hose should be cold for some time, and then quickly heat up, which will indicate the beginning of fluid circulation in a large circle. After waiting for the cooling system fan to turn on, stop the engine. After the engine has cooled, check the coolant level again and, if necessary, replenish the system.
[14 Lada Granta maintenance operations that will help you save]
[How to save money on scheduled maintenance of Lada Granta] [Maintenance of Lada Granta at 2.5 thousand km] [Maintenance of Lada Granta at 15,000 and 105,000 km] [Maintenance of Lada Granta at 30,000 and 60,000 km ] [Maintenance of Lada Granta at 45 thousand km] [Maintenance of Lada Granta at 75 thousand km] [Maintenance of Lada Granta at 90 thousand km] [Carrying out maintenance yourself - general recommendations] [Safety rules for doing it yourself carrying out maintenance] [Tools required for maintenance of Lada Granta] [Lamps used in the Lada Granta car]
Replace coolant Lada Granta
Grant engine temperature sensor. install it yourself
Every owner of a Lada Granta car has encountered its main drawback - the absence of an engine temperature sensor on the panel.
The task of the AvtoVAZ management was to make Grant accessible, the engineers did it “excellently”, saving even on this device. The emphasis was on cheapness, so we tried. Soon, however, everything was corrected - on models of a higher price and advanced configuration of the Lada Granta liftback 21911, 21912, 21917, an engine temperature sensor has already appeared and helps monitor the condition of the internal combustion engine.
However, what should owners of earlier models do? The overheating indicator lamp installed on cars is not informative enough.
In winter, it is impossible to determine whether the engine is warm enough to start driving, and in summer, the overheating warning light may come on too late.
The thermostat is the weak point of Lada Granta cars, and it would be much more effective to determine its malfunction at a very early stage by assessing the behavior of the TD sensor needle, but...
It was these problems that prompted some motorists to look for answers to the question: “How to install an engine temperature sensor on a Grant?” You can, of course, contact dealers. For a fee, specialists will equip everything you need. But there's no need to rush.
First, you should purchase an installation kit for the coolant temperature sensor (engine). If you don’t want to go to a car store far, or don’t want to, you can easily order the necessary kit in an online store with home delivery. It includes:
- temperature indicator,
- plastic case for it,
- the sensor itself;
- fastening clamps.
Once you have the kit in your hands, it's time to head to the car. To see the place where the Grant engine temperature sensor will be attached, the negative terminal is removed from the car battery, and behind it the air filter is disconnected and removed.
This will open an overview of the pipe that leads from the thermostat. Coolant circulates through it during operation.
It is necessary to carefully cut the pipe and insert the temperature sensor inside along with the adapter (buy at a car store), then securely tighten it with clamps.
The wires are dealt with as follows: the first is the ground wire, it is attached to the engine (body), the second is pulled directly into the cabin.
An indicator with an arrow for the temperature sensor can be installed on the dashboard near the windshield next to the instrument panel. Visually this is very convenient, because... It is located close to eye level, and a quick glance will be enough to control the temperature level.
But what should you do if you may need to fix the navigator in approximately this place? The second option for mounting the sensor indicator is even more aesthetically pleasing.
Many motorists install the device in a cup holder next to the gearbox, but the panel itself will need to be slightly modified.
Of course, in this case you will have to look for a place for a glass of coffee, but this will be a huge plus: the sensor indicator in your cabin looks very harmonious. Now you can fully control the engine temperature and monitor how the thermostat behaves.
There is an easier way to solve the problem of the missing coolant temperature indicator. You just need to buy a bluetooth adapter elem 327.
Choices
When choosing, do not neglect the color of the liquid. The color is intended to indicate certain properties of the antifreeze, so replace it only with an option with an identical color.
Recommended brands of antifreeze include the following products:
- “AGA 003Z” (temperature minus 40 degrees), has a red color, costs approximately 1 thousand rubles. for a 10 liter container.
- “Professional Premium” belongs to the “G-12” category, and the cost of a similar “tank” reaches 700 rubles.
- “SINTEC LUX G-12” is also characterized by a red tint and costs from 1 thousand rubles. for a volume of 10 liters.
- “FELIX Carbox-40”, a canister of the same volume with red liquid will cost the owner from 950 rubles.
- "NIAGARA", substance "G12"; for a volume of 10 liters you will need to pay at least 800 rubles.
- “Arctic Circle”, a substance with similar parameters; A 10-liter container costs at least 700 rubles.
Why does antifreeze change color?
- G 11 is painted blue, green;
- G 12 red, including all accompanying shades (orange...lilac);
- G 13 purple or pink.
- G 11 is painted blue, green;
- G 12 red, including all accompanying shades (orange...lilac);
- G 13 purple or pink.
Let's look at why antifreeze changes color. During operation, additives are produced and a change in coolant color becomes an indicator. For some brands, the indicator is discoloration rather than a change in shade.
Let's look at why antifreeze changes color. During operation, additives are produced and a change in coolant color becomes an indicator. For some brands, the indicator is discoloration rather than a change in shade.
Lada Granta coolant volume
Articles Loading...
The factory recommends changing the coolant every 75,000 mileage, and my mileage is already approaching 100,000, so I decided to do this operation. I bought Sintec antifreeze (2 packs), water (2 packs), and flushing agent (Felix RUR 95).
Armed with a search, I started looking for any records and couldn’t find a damn thing (((The problem with replacement was the following: unscrew the drain plug (it’s simply not realistic to get there from above). I tried to create a topic on this problem, but there were no sensible answers.
In the end, I gave up on everything and decided to ask the Bosch service how much this procedure would cost. I quote the verbatim dialogue: — Hello, how much does it cost to replace the coolant in a grant 8kl. with air conditioning?— Hello. Work on replacing the coolant on a Lada Granta 8 valve - 552 rubles.
Phone number for appointment... We will be glad to see you at Bosch First - does it include washing? - the cost of washing work is 10,000 rubles - i.e. replacement is 552 rubles, and washing is 10,000 rubles?
- absolutely right...
After this dialogue, I realized that I’m not going there anymore). I went to the “garage” service, all the work with washing cost 600 rubles (400,200). To drain the coolant from the cylinder block, we had to unscrew the starter (cable box), and to drain the coolant from the radiator, we removed the lower pipe from the radiator on the driver’s side (we didn’t even get to the drain plug from the bottom, the condenser is in the way).
For diesel and gasoline engines the parameters will be the same!
When purchasing, you need to know the shade - the Color and Type of antifreeze allowed for the year of manufacture of your Granta. Select the manufacturer at your discretion. Do not forget - each type of liquid has its own service life.
For VAZ Granta (1st generation) 2022, with any type of engine, it is suitable for carboxylate class antifreeze, type G12 with shades of red. The approximate period of the next replacement will be 5 years.
If possible, check the selected fluid against the vehicle manufacturer's specifications and service intervals.
Each type of liquid has its own color. There are rare cases when the type is tinted with a different color. The color of red antifreeze can be from purple to light pink (green and yellow have the same principles).
It is possible to mix liquids from different manufacturers if their types meet the mixing conditions.
Engine oil Oil filter Transmission oil Coolant Yes Fuel filter Yes Hydraulic brake drive system Yes Ozone-safe freon in the air conditioning system Yes Cabin filter 1 Yes Engine air filter LADA 21120-1109080-02, 21120-1109080-03, 21120-1109080-04, 21120-1109080-061 Yes Spark plugs 4 Alternator belt 1 Yes Timing belt, tension and guide rollers 1 set Front brake pads 1 setYesFront brake discs1 setYesRear brake pads1 setYesRear brake discs1 setNew Lada: How to check the mass air flow sensor on the Lada Kalina
Cleaning the Cooling System
Experts recommend cleaning the system after each replacement. When you change antifreeze to antifreeze, or vice versa, switch from antifreeze to antifreeze, be sure to clean the system. What you may need for this:
- Plastic funnel and hose.
- A packet of regular citric acid.
- Distilled water (15 liters for Priora).
- A brush, sized to fit into the neck of a 5-liter bottle.
Please note that if the coolant is not cloudy, then you can only get by with distilled water. Otherwise, be sure to add citric acid
A good working fluid begins to lose color over time, that is, it becomes discolored, and a contaminated fluid always becomes cloudy.
Cleaning of the LADA Priora cooling system should be carried out after removing the air lock. Let water flow through the system through the open pipe. Using a brush, you can clean the expansion barrel separately. After this procedure, damage to the tank body is clearly visible. After cleaning the system is complete, you can add antifreeze.
How often should this be done?
There is a general recommendation regarding how often antifreeze should be changed. It is recommended to change the refrigerant at least once every 2 years, or after 30 - 45 thousand km of vehicle mileage. The frequency of replacing “Antifreeze” must be observed taking into account the following indicators: the condition of the car, its mileage, the brand, manufacturer and composition of the coolant itself, as well as the solution used previously. Products with silicate-based additives need to be changed every 2-3 years. Hybrid fluids lose their properties after 3-5 years, and carboxylate antifreezes can “work” without replacement for 5 or more years.