In cars of domestic manufacturers, engine cooling occurs using a cooling system; in the VAZ-2114, this task is performed by antifreeze. Only with the right choice of antifreeze can you ensure efficient operation of the cooling system:
- Factory antifreeze fluid is worse; due to the smaller amount of additives, the thermal protection of the vehicle suffers significantly. Antifreeze was developed specifically to cool vehicle parts and components, so it is exceptionally useful.
- Factory fluid has one big drawback - it quickly spoils the pipes, which in turn leads to fluid leakage and radiator defects.
Having convinced himself of how important it is to use high-quality antifreeze, the driver of the VAZ-2114 begins to replace the old fluid with a new one. In this case, after a couple of weeks an antifreeze leak is detected, what’s the matter? The owner of the car did not take into account that along with the antifreeze, the pipes through which leaks occur must also be replaced.
Instructions for replacing the cooling system pipes of the VAZ-2114
In cars of domestic manufacturers, engine cooling occurs using a cooling system; in the VAZ-2114, this task is performed by antifreeze. Only with the right choice of antifreeze can you ensure efficient operation of the cooling system:
- Factory antifreeze fluid is worse; due to the smaller amount of additives, the thermal protection of the vehicle suffers significantly. Antifreeze was developed specifically to cool vehicle parts and components, so it is exceptionally useful.
- Factory fluid has one big drawback - it quickly spoils the pipes, which in turn leads to fluid leakage and radiator defects.
Having convinced himself of how important it is to use high-quality antifreeze, the driver of the VAZ-2114 begins to replace the old fluid with a new one. In this case, after a couple of weeks an antifreeze leak is detected, what’s the matter? The owner of the car did not take into account that along with the antifreeze, the pipes through which leaks occur must also be replaced.
Experience shows that old hoses are absolutely unusable; antifreeze corrodes them very quickly. Therefore, it’s time to learn how to replace pipes, and finally close the question of the correct operation of the cooling system. Service station specialists will tell you how to implement your plans.
Changing the coolant strictly according to the maintenance regulations
It is important to change the coolant frequently to prevent engine damage, because Over time, it loses its properties and is subject to heating.
To carry out work on changing antifreeze or antifreeze, you need to know the important components:
- Know the period during which you can use cooling liquid, antifreeze for 2 years, antifreeze for 5 years.
- Monitor the mileage for fluid changes, usually from 20,000 to 40,000.
- Check the condition of the fluid, paying attention to the color; if the color has changed after use, the fluid must be replaced.
Of course, the best choice would be antifreeze as a coolant, because... It has a longer shelf life, unlike antifreeze, and the system wears out less. But the price indicator for antifreeze is much cheaper.
When flushing the cooling system, you must:
- Drain all coolant from the system, tighten the plugs tightly and fill with distilled water to the maximum mark.
- Start the engine and warm up until operating temperature is reached.
- Let it run at about 3000 rpm. Be sure to monitor the movement of the engine temperature scale to avoid overheating.
- Then turn it off and leave it for 7 minutes, after which we pour the water out of the system. In case of water contamination, repeat the procedure until the effect of clean water is achieved.
How to correctly replace pipes in a VAZ-2114
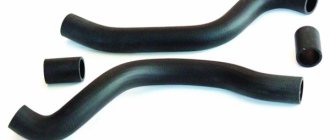
The first question that experts hear from car enthusiasts is which pipes should be purchased for the VAZ-2114? Products made from silicone are considered the most durable and at the same time ideally compatible with the cooling mechanism of the VAZ-2114. The diagram below shows the location of the pipes we are interested in:
- The short ones are mounted on the couplings of the thermostat and the pump pumping water.
- Next comes the conductive hose.
- The pipe located in the lower part is responsible for removing antifreeze from the radiator unit.
What set of tools will be needed to replace the VAZ-2114 pipes
- New hoses.
- Keys of different sizes.
- Screwdrivers of different formats.
- Silicone-based lubricant.
Now let’s talk about how the well-known antifreeze differs from antifreeze. The latter is produced by a domestic manufacturer, antifreeze is produced abroad, so the composition may differ.
Therefore, ask the seller about foreign-made coolant.
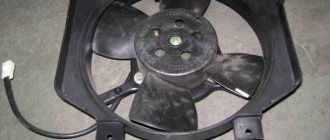
Replacing the VAZ-2114 heater fan
In the cabin under the steering wheel, using a 10mm wrench, unscrew the nut securing the heater to the body and remove the fan motor ground wire terminal (in black insulation) from the stud, and then disconnect the power supply positive wire connector.
Remove the cabin air filter, located under the windshield in the middle. Using a Phillips screwdriver, unscrew the 5 screws that fasten the air supply side grilles. We remove the grates. We unscrew the 4 screws securing the protective casing, which we then remove. Unscrew the 2 screws securing the fan to the base of the heater.
We pull the electric motor power wires out of the passenger compartment through the rubber seal. We remove the fan from its housing (air supply box). Remove the seal from the fan casing. We use a flat screwdriver to pry up the latch of the casing, which we separate into 2 parts. Having released the 2 mounting brackets, remove the motor cover and remove the electric motor along with the impeller.
Installation of a new fan is carried out in reverse order.
Instructions for replacing the cooling system pipes of the VAZ-2114
Step-by-step replacement of cooling system pipes in a VAZ-2114 car looks like this:
- Remove the battery cable that comes out of the negative socket.
- Carefully drain the old coolant, but wait until the engine has cooled completely before doing so. Otherwise, there is a risk of getting burns from the coolant.
- Remove the following components: set aside the upholstery that provides sound insulation, the fan, the trim going to the windshield frame, the facing material.
- Now your goal is to get to the air collector; to do this, unscrew the brackets in the form of springs and the screws responsible for fixing them. A screwdriver is ideal for spring clips; for screws, you need a wrench.
- To loosen the clamps, remove the front housing, and then remove the old hoses from the fittings.
- All that remains is to install new silicone hoses in a specially designated place; it is preferable that the parts are manufactured abroad - they will last longer.
- Reinstall the other components by following the reverse order of this step-by-step instruction.
Replacing the heater valve VAZ-2114
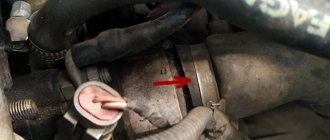
We drive onto a pit or overpass. We put the car on the handbrake and first gear. Drain the coolant into the prepared container. To do this, first, with the expansion tank cap closed, unscrew the drain plug on the engine cylinder block (if the tank cap is sealed and tightly screwed, then antifreeze will hardly flow). Then, instead of the drain plug, we screw in a hose (from a mixer works well) and open the reservoir cap - the coolant flows neatly into the container with minimal losses and without getting dirty on the engine.
We loosen the clamps of the pipes going to the valve from the engine. From the engine side, use a metal brush to clean the threads of the 2 bolts securing the faucet to the engine compartment bulkhead. Then we conscientiously treat these threads with WD-40 or brake fluid. This is a mandatory condition, failure to comply with which can lead to serious difficulties when unscrewing the nuts. We leave the dirt and rust on the threads to “acidify” and do not tighten the nuts yet.
We remove the pipes. Let's go to the salon. We dismantle the side trim of the torpedo in the middle at the feet on the passenger side. Loosen the clamps of the pipes at the tap. We prepare a rag to collect a small amount of antifreeze that may leak onto the carpet when removing the pipes. Disconnect the pipes. We return under the car. Using a 10mm wrench (socket or socket), unscrew the nuts of the faucet mounting bolts.
In the cabin, pull the faucet towards you. Then we remove the control cable clamp from it, and then disconnect the cable itself. We install the new tap in the reverse order.
Subtleties of filling new antifreeze
Before you start filling in new coolant, you need to drain the old one, and also thoroughly clean the entire cooling system of contaminants. To do this, it is better to use a special cleaning agent that can be purchased at a car enthusiast store. Make sure that all taps and plugs of the VAZ-2114 are open. You can determine whether the system has been flushed or not based on the color of the antifreeze flowing out.
The plugs and tap are closed only when the product becomes transparent. If the manufacturer describes in the instructions the specifics of using the cleaning mass, follow these rules for effective cleaning. As for the level of antifreeze filling, some drivers prefer to fill to the limit mark, others deliberately do not top up, and later, after a successful test, add more fluid.
After the antifreeze has been replaced, all that remains is to close the expander and start the car engine. The motor should idle until the furnace fan starts running.
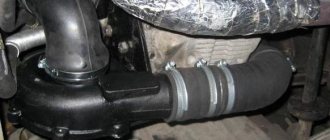
Removing air from the cooling system
Often during repairs, air enters the cooling system, which forms an air lock and interferes with the normal operation of the entire system. In order to remove such a traffic jam, there are several ways. Simplest:
- warm up the engine to operating temperature and turn it off;
- unscrew the coolant pipe clamp on the throttle body;
- remove the heating pipe of the throttle assembly, bleed the air and after the coolant begins to flow out, put it back on the fitting and tighten the clamp.
ATTENTION: the leaking antifreeze has a temperature of more than 90 degrees Celsius.
Replacing cooling system pipes
The cooling system of the VAZ-2114 car uses 4 rubber pipes:
- upper supply pipe - supplies cooled liquid from the radiator to the engine;
- lower outlet pipe - removes the heated liquid below from the engine to the radiator;
- two short pipes that connect the water pump and thermostat to the system.
If the pipes fail, they must be replaced. In this case, it is best to purchase silicone pipes.
To remove old and install new silicone (rubber) pipes, you need a set of wrenches, several screwdrivers and silicone lubricant.
Repairs associated with replacing pipes must be carried out in the following order:
- 1. Disconnect and remove the battery;
- 2. Drain all coolant mixture;
- 3. Remove the fan, soundproofing upholstery, trim and frame trim from the windshield;
- 4. Clear access to the air collector by removing its fastening elements;
- 5. Remove the front housing and release the clamps that hold the pipes;
- 6. Remove the pipes from the fittings and install new ones (silicone or rubber) in their place. Secure the new pipes with clamps. Before installation, it is recommended to lubricate the rubber pipes with silicone grease. It is also advisable to lubricate the clamp screws with silicone grease. Subsequently, this will allow you to easily unscrew them;
- 7. Install all the removed parts in their places, flush the system and fill it with new coolant mixture.
Flushing the system and replacing the coolant
Repairs related to replacing the coolant on a VAZ-2114 car are carried out if:
- The color of the mixture in the expansion tank has changed. This usually happens after 20 - 40 thousand kilometers;
- repairs were carried out that required a complete drainage of the mixture.
In general, coolant replacement is carried out in the following order:
- 1. Completely drain the cooling solution. To do this, you need to open all the plugs and taps, and also remove the radiator and expansion tank caps. Drain the mixture only after the engine has cooled down (In a hot engine, the temperature of the solution can be more than 100 degrees Celsius).
- 2. Rinse the cooling system with distilled or clean water. Begin the washing procedure after all the old mixture has drained. It is recommended to flush the engine block and radiator with warm water. Otherwise, it is recommended to fill in cold water, warm up the engine, and then drain the water. The color of the water determines how dirty the system is and repeats the flushing process until the flowing water becomes clean. Only after this they begin to replace the mixture.
- 3. Pour a new cooling solution into the system, having previously closed all plugs and taps. Pour liquid into the tank in a thin stream until the maximum mark is reached. Air pockets are not allowed. Then the expansion tank and radiator caps are closed. In order to prevent the rubber pipes from drying out, they must be lubricated with silicone grease.
- 4. Start the engine and let it idle until the heater radiator fan turns on. After this, you can turn off the engine and, after cooling, check the fluid level in the tank. If the fluid level has not changed, then everything is normal and the work is completed. If the liquid level in the tank has decreased, you need to make sure by visual inspection that there are no leaks. If they are not there, then add fluid, start the engine again and repeat the test.
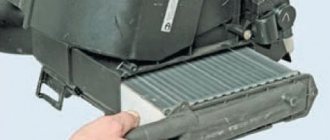
How to remove a stove radiator
The process of dismantling the heater radiator on VAZ-2114 cars can be carried out in two main ways. The first involves removing the entire control panel, as well as other elements surrounding the part being replaced. We recommend carrying out repairs in this way only if you have the appropriate experience and are completely confident that after completion of the work there will be no “extra” components left. No such confidence? Then it is better to contact a car service or carry out repairs in a simpler way, which we will describe below.
It does not require dismantling the torpedo, but to perform repairs in this way you will definitely need an assistant. Work is carried out in the following order:
- remove the console and glove compartment;
- unscrew the bolts and screws that hold the front panel so that it moves freely in different directions;
- remove the cables for controlling the operating modes of the stove, which are located on the driver’s and passenger’s sides;
- remove the radiator cap;
- dismantle the rubber radiator pipes. It is advisable to first place a basin or other container under the device so as not to spill antifreeze on the floor;
- We hire an assistant. His task will be to carefully move the torpedo to the side, which will allow the radiator to be removed. In this case, you need to be extremely careful not to break anything or tear out the front panel of the car by the roots.
Radiator replacement
- Initially, the plug from the expansion tank is unscrewed, and the radiator plug and cylinder are also removed.
- The cooling mixture is poured into a clean container.
- The radiator ventilation system is disconnected from the power supply.
- We disconnect the rubber tubes from the radiator system and expansion tank.
- All bolts are disconnected from the surface of the casing.
- Carefully holding the radiator, we take out the casing along with the fan.
- At the end of the work, the radiator is completely free and can be removed.
Before you begin, remember that when removing and subsequently installing the radiator, the engine must be in a cold state.
After replacing the radiator or repair work, it is installed in place and secured in the same way, but in reverse order. After installation, be sure to start the engine and check the result.
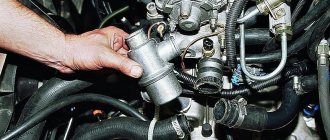
Thermostat repair
The thermostat sensor also serves to maintain the set temperature norm. It blocks the movement of the cooling mixture into the radiator until the engine heats up to the desired temperature of approximately 90 degrees. Liquid begins to flow through the thermostat when Celsius reaches 95 degrees. Using a thermostat, the engine takes minimal time to warm up. The thermostat is located between the engine and the cooling radiator.
Common problems:
- The valve is closed - the engine, when not warmed up, holds speed very poorly and may stall.
- With the valve open, you can drive during frosts, or turn on the heater to maximum mode, otherwise the engine will overheat.
When carrying out repair work on the thermostat, it is allowed to lightly tap the housing with a screwdriver to move the valve.
If it is necessary to completely disassemble the thermostat, it is important to tightly close the pipes to avoid antifreeze leakage, only then disassemble the thermostat. At the end of the repair, it is better to replace the antifreeze.
Scheme and design of the cooling system
The cooling system of the VAZ 2114 is liquid, with forced circulation. Antifreeze or antifreeze is poured into the system as a coolant. In the most extreme case, you can fill it with water, but you can’t drive it for a long time - in winter you can defrost the engine, and during the rest of the season, when the engine is used for a long time on water, the cooling jacket in the block and cylinder head is corroded, and rust accumulates in the radiator.
The VAZ 2114 engine cooling system (SOD) consists of the following elements:
- Radiator. It is the main cooling part in the system and performs the function of transferring heat to the liquid into the surrounding airspace;
- Water pump (pump). The pump creates forced movement of antifreeze in the system, thereby cooling the entire SOD, including the internal combustion engine (ICE). The pump rotates from the timing belt;
- Branch pipes (hoses). Antifreeze circulates through them;
- Thermostat. It regulates the passage of coolant through all pipes or only in a small circle and maintains the required operating temperature of the internal combustion engine;
- Electric fan. The fan is located on the plane of the radiator and, due to the air flow created, cools its surface when turned on. The electric motor turns on only when the temperature set by the sensor is reached (103°C);
- Expansion tank. Liquid is poured into the tank, and when the fan is activated, antifreeze flows into it through the return hose, thereby releasing excess pressure into the SOD;
- Expansion tank plugs. There are valves in the plug that relieve excess air pressure created in the system when antifreeze circulates.
The design of the engine cooling system on the VAZ model 2114 is simple and practically no different from the design of any other fuel-injected internal combustion engine of a passenger car. After starting the engine, the water pump is driven by the rotating crankshaft through the timing belt. The pump creates coolant circulation in the system, and the antifreeze passes through a small circle (pump, upper pipe, cylinder block). When the internal combustion engine is heated to operating temperature, the thermostat valve opens and the coolant flows through the lower pipe into the internal combustion engine in a large circle.
Radiator
The VAZ radiator is aluminum, consists of a double-row core and two plastic tanks on the sides. Coolant is poured into it through the expansion tank; there is a drain plug at the bottom.
Pipes
The set of cooling system pipes includes:
- Upper and lower pipes (main);
- Metal tube of water pump;
- Filler hose from the expansion tank to the radiator;
- Return hose from tank to radiator;
- Two hoses for heating the throttle valve.
Check the integrity of the pipes (very often they sell defective ones in car dealerships)
Replacing the stove tap
It often happens that a part such as a faucet breaks (it is worth noting that on the 2114 it is not very reliable). When replacing it, you should simultaneously replace the pipes, even if they are in good working order (the location of the pipes of the VAZ 2114 stove was described above).
All faucet replacements are performed in the following order:
- place the car in the pit and secure it;
- unscrew the screw plug and drain the coolant;
- using a screwdriver, loosen the clamps on the pipes located in the engine compartment, and then remove them;
- find the tap in the passenger compartment on the passenger side (located under the panel), loosen the clamps of the pipes suitable for it, and then remove them;
- Using a 10mm wrench, unscrew a pair of nuts screwed onto the studs and securing the valve body;
- from the interior side, pull out the tap and disconnect the control cable from it;
- install a new (similar) faucet in its original place;
- perform assembly in the same sequence, but in reverse order.
Before disconnecting the pipes (especially those located in the passenger compartment), you should place a cloth under them in case of coolant leakage.
Many car enthusiasts who carry out such a replacement are sometimes interested in how to properly connect the pipes to the VAZ 2114 stove? After all, by mistake or forgetfulness, you can connect them incorrectly, which will disrupt the normal circulation of coolant.