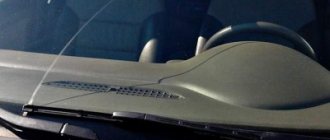
Car headlights are covered on the outside with transparent caps, which once served as light deflectors. Now they provide only decorative and protective functions for complex optics located inside the headlight. It is important that they always remain transparent and do not spoil the appearance of the car, hence the sometimes need for their mechanical processing.
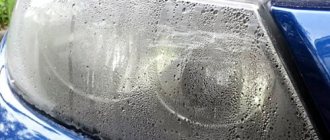
Why do the headlights in a car become dim?
The location of the headlights on the body is such that they absorb everything that gets into the polluted air that blows around the car at high speed.
The cap is exposed to several aggressive factors at once:
- abrasive dust raised by vehicles ahead and oncoming;
- numerous aggressive chemicals in road dirt;
- ultraviolet component of sunlight;
- internal light in the same range emitted by the headlight, it is weaker than sunlight, but is not completely limited to the visible part of the spectrum;
- high temperature of the emitting element, halogen incandescent lamps, xenon or LED sources.
In addition, the outer surface of the headlights suffers when washed; there is always a certain amount of abrasive substances in the water.
And some drivers persistently finish off the lighting fixtures, like the entire body, having the habit of simply wiping off dirt with a rag or sponge with little or no water.
Reasons for reflector damage
First of all, damage to the mirror layer occurs due to physical wear of the reflector. Its service life is not infinite. Even if you take good care of your car, it is impossible to avoid temperature changes in winter. Therefore, the possibility of encountering this problem cannot be excluded.
Often the cause of damage to the reflector is a leak in the seal. Small particles of dust and moisture get inside, which lead to loss of shine of the reflector. As a result, the quality of the light flux gradually decreases.
Loss of reflective properties can also be caused by installing non-standard lamps of higher wattage. The temperature inside the headlight reaches a critical value, after which a burnt-out spot forms on the surface of the reflector.
Whatever the reason, the reflector must either be replaced or restored. The cost of restoring one reflector in a car repair shop is at least 1 thousand rubles, which is not acceptable for every car enthusiast. Therefore, we suggest considering several simple ways to restore a headlight reflector with your own hands.
Why is polishing needed?
Over time, for all the reasons listed above, the outer side of the cap becomes covered with a network of microcracks. They are not visible to the naked eye, but the picture of general turbidity is clearly visible. In addition, the chemical composition of the surface layer changes.
On the subject: What paste to polish a car at home
Transparency can only be restored mechanically, that is, by removing the damaged thin film from cracks and substances that do not transmit light well using fine grinding and polishing.
Self-recovery methods
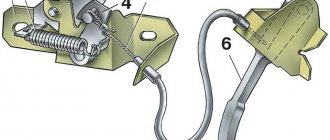
To get to the reflector, the headlight removed from the car must be disassembled. The first option involves repeatedly passing the hot air of a hair dryer over the seam. The second option involves leaving the headlight in an oven preheated to 100°C for 20 minutes. After opening, all parts are cleaned of sealant residues, washed without using alcohol-containing liquids and dried.
The sealant holding the headlight components together begins to deteriorate when exposed to temperatures above 75°C.
Using metallic tape
Let's start with how to restore the reflector on a headlight using tape foil. All you need is metallized tape, purchased at a hardware store for about 30 rubles. Its adhesive base copes well with high and low temperatures, and the aluminum film is very wear-resistant.
In order to obtain a smooth surface with a minimum of seams after gluing the tape on the reflector, first, pieces of the most suitable shape are formed from several strips. Then remove the protective film and carefully stick it on. The whole procedure takes about half an hour.
Immediately before gluing, the surface must be degreased.
Advantages of the method: durability, low cost, ease of implementation.
Disadvantages: when gluing, irregularities and seams remain, which impair the properties of the reflector.
Using metal foil
Aluminum foil is highly reflective, which allows it to be used in the restoration of headlight reflectors. You will also need some epoxy resin. To maintain a perfectly smooth surface of the foil, the entire pattern is made from plain paper. Then the parts are duplicated from aluminum sheet, a thin layer of resin is applied to the reflector and glued, removing excess resin.
Advantages: withstands any temperature changes.
Disadvantages: being between the metal foil and the plastic base, epoxy glue lacks air and takes a very long time to dry. It is almost impossible to remove dried glue. Therefore, such a reflector is not suitable for repeated restoration. With the advent of tape foil, this method is practically not used.
Using chrome paint
Headlight reflector repair using chrome paint is the most popular. No need to cut and glue anything. Paint is sprayed onto the degreased surface of the reflector from a can of white chrome until a uniform, uniform layer is obtained. After painting, the headlight is dried according to the instructions on the can.
Benefits: Provides a smooth surface. You can even spray paint onto metal tape, thus increasing the reflective effect.
Disadvantages: does not tolerate high temperatures. You should try to find heat-resistant chrome paint.
Tools and materials
For any polishing, headlights are no exception, the following consumables, devices and equipment can be used:
- polishing pastes of varying degrees of hardness and grain size;
- sandpaper by numbers, from fairly coarse (from the point of view of polishing, not wiping holes) to the finest;
- electric polishing machine;
- attachments for it, or for a drill in its absence;
- sponges for manual and mechanical work;
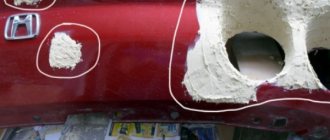
- masking tape for gluing adjacent areas of the body;
- a cleaning solution based on car shampoo with a good surface-active effect.
Theoretically, polishing can be done manually, but the process takes too much time. Therefore, a regular variable speed polisher or similar electric drill will be a good compromise between the manual method and a professional orbital polisher.
Application process
Glass running lights that have lost their transparency are often processed only on the outside. Glass, as one of the hardest materials, is practically not subject to clouding due to a burnt-out light bulb in the unit or a short circuit. The external varnish coating of the headlights is made from a spray can.
In the case of plastic blocks, there is a possibility that the outer surface is damaged by scratches, and the inner surface begins to peel off due to frequent overheating. In this case, the optics are dismantled from the car, internal and external restoration and polishing are carried out.
Grinding, coating the plastic of rear lights, dimensions, head lighting in steps:
- Dismantle the headlights, remove the lamps and blocks from the housing.
- Separate the plastic part by preheating it with a hairdryer.
- Wash the headlight.
- Sand the outer and inner surfaces.
- Wash and dry the block.
- Degrease the surface.
- Treat the outer and inner surfaces with an activator.
Headlight protection methods
If the ceramic varnish layer has already been erased from the surface, it should be restored. An alternative to this could be coating the glass with a special protective armor film, varnish of various compositions, or using factory ceramic technology. The latter is difficult to do at home.
The varnish is also not easy to apply evenly, and it does not last long. Therefore, the best solution would be to use film, which is cheap, can be applied quickly after some training and requires only preliminary washing and degreasing.
Before applying the sticker, the film must be slightly heated with a hairdryer, after which it will accurately follow the surface of the headlight of any shape.
Set Contents
more details
Heated mug from the cigarette lighter
At the bottom of the mug (I don’t know why) there is a carving. This mug can be screwed into something, perhaps protecting it from falling while the car is moving. There is a layer of foam material at the bottom to prevent anything from being “burned” during heating.
The cable is short enough for use outside the car, which means that it was originally intended for “peaceful” purposes inside the car
Two lids/funnels per mug
Liquid in two bottles (coated glass).
Before starting the actual experiment, I decided to “test” the mug (just out of curiosity). As I understand it, it can be used not only for restoring headlights
Mug testing
I connected it to 12.5V and decided to see “what it can do.” Not Xiaomi, of course, and not smart (I would say just stupid or a dumb mug and that’s it
The power is almost as advertised.
I poured a third of a mug of water, the initial room temperature
in 5 minutes
in 10 minutes
after... in short, after 15 minutes it became clear that if the mug was not covered on top, the water would not boil. Covered it with cardboard and almost immediately a white boil began.
When you remove the cardboard, the temperature instantly drops down.
The seller has instructions for using the kit, however
in Basurman
Instructions: 1, the dedicated supporting the electromagnetic atomization tool to open, the syrup to join 30-60ml, cover the lid after the steam tube inserted; 2, plug in the power to start heating, about 5-6 minutes that steam emerge, this time can be used dark tube test whether the nozzle vent, if you can begin to atomize; 3, with masks begin to atomization, in order from the bottom up on the surface of the lamp one by one to complete the atomization coating process, pay attention to the nozzle must be upward, can not bend down to prevent steam to become water droplets ; 4, the atomization process control in two or three minutes to complete, uniform thickness uniform light surface can be, do not spray repeatedly, too thick into a water effect also increases the drying time; 5, after the completion of the fog coating 10 minutes to dry and do not sticky dust, but can not scratch, let it be cured after a few hours to use natural; 6, the fog coating time period before noon, because the evening headlight when there are several hours of hardening time, afternoon or evening operation due to leave the light time is too short, the surface hardness of the lampshade, open the heat after the heat expansion Different degrees of shrinkage, the effect of natural poor. Precautions: 1. Please use the cup before dry cleaning, the cup can be washed 2. Only use the specified 12V power supply 3. Do not dry 4. Liquid into the cup about 30ml 5. Do not close to heat, not violent impact 6. Do not touch the child, so as not to burn
Rated voltage: 12V Input power: 60W Capacity: 500ML Capacity: 30ML Google translation (corrected)
1, Pour 30-60 ml of product into a mug, close with a lid with a steam outlet tube; 2, Turn on the power to start heating. After 5-6 minutes steam should appear. You can use a dark tube to check. If evaporation occurs, you can begin work 3. Make a mask around the headlight (paint protection) and spray the product from bottom to top over the surface, pay attention to the fact that the nozzle should be directed upward so that the steam does not turn into droplets, which, when flowing down, can ruin the result; 4, The spraying process is necessary for two or three minutes, resulting in a uniform uniform smooth surface. Too thick a layer may cause streaks and increase drying time; 5, After finishing coating, please take 10 minutes to dry and prevent dust from sticking. For the surface to become scratch-resistant, several hours of natural drying are necessary; 6, It is advisable to carry out work in the first half of the day, so that there is enough time for hardening. In the evening, due to a drop in temperature, deformation of the unhardened surface may occur, with the appearance of small chips and other surface defects. Precautions: 1. Please use dry cleaning of the cup before use (the cup can be washed) 2. Only use the specified 12V power supply 3. Do not dry (applied layer) 4. The volume of liquid used, pour approximately about 30ml 5. Do not close the hole through which evaporation occurs. 6. Don’t let your child touch it to avoid getting burned.
Other means
Glass housings can be cleaned of plaque through steam restoration of headlights. The ribbed surface inside is quickly cleaned of yellowness and dust. The outer surface is polished and varnished.
You can restore the original shine of the optics by chemically restoring the headlight. Meguir's set will do. The kit includes:
- headlight cleaner;
- degreaser;
- varnish cloth.
There is no need to grind the optics: the cleaner will remove all dirt, and the polyurethane varnish will quickly fill microcracks.
Using special wipes
Wipes for restoring headlights can only be used as an aid. They will quickly restore only slightly tarnished glass or plastic. Before use, it is also necessary to treat the surface with fine-grained sandpaper (from 1800 grit). Cleansing takes no more than a minute.
The manufacturer recommends washing and drying the headlight before using the wipes. Experienced drivers prefer to additionally sand the surface with sandpaper of more than 2000 grit, or pre-polish with toothpaste.
It is necessary to wipe the cleaned and dry headlight with a special cloth without rubbing the varnish. Apply the product with gloves. The DOVLight coating lasts on the headlight for up to 7 months.
Manufacturers
The Delta Kits company produces single varnishing kits. The set includes:
- two-component varnish;
- degreaser:
- polishing paper in calibration 320,500,800,1200,1500,3000 grit.
- felt lint-free napkin.
With one set you can polish your optics yourself and apply Delta Kits varnish. Its main advantage is the protection of plastic from UV, maintaining the transparency of the restored headlight for up to 22 months.
The manufacturer Dovlight produces kits for restoring car optics, two-part and aerosol varnishes, headlight cleaners, and anti-rain. Polyurethane varnishes are characterized by a small percentage of solids, dry quickly, hardening occurs in 20 minutes, complete drying in 24 hours. Restores initial light penetration by 98%. Well-known manufacturers:
- Diamond Vision;
- Meguir's;
- Philips Headlight;
- Presto.
The degree of wear of the block affects the choice of reducing agent. Depending on the number of scratches and chips, the restoration option will depend: napkins without sanding, light sanding, polishing or serious restoration.