The Priora rolled off the production line for the first time in March 2007 and is still in production. They wanted to discontinue the model, but at the last moment they decided not to do so. Throughout its history, Priora has undergone one restyling and a lot of technical improvements. The only thing that the development engineers of the Lada Priora did not get to is the front suspension. Let's look at its design, typical faults and repair methods.
Standard front suspension design
The VAZ-2110 was used as a prototype for the Lada Priora. The suspension system as a whole remained without major changes. The engineers simply installed different types of springs and different shock absorbers.
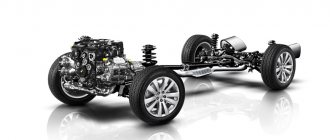
The front suspension of the VAZ Priora is an independent type, telescopic. It is based on shock absorber struts and barrel springs. The Priora suspension is also distinguished by the presence of lower arms equipped with braces. There are also anti-roll bars.
Racks – hydraulic, shock-absorbing. Their lower part is attached to the steering knuckle with two bolts. The top bolt has a special feature. With its help you can adjust the wheel alignment. A spring is mounted on the rack, as well as a special polyurethane compression stroke buffer. There is also an upper strut support along with a bearing. This part is attached to the body using nuts. Thanks to the elastic material, this support significantly reduces vibrations and allows the stand to swing at the moment of operation.
A bearing is mounted into this support. It allows the shock absorber strut to turn simultaneously with the steered wheels. The steering knuckle and the front suspension arm (Priora Hatchback is also equipped) are connected to each other through a ball joint. Braking as well as traction force is transmitted through longitudinal braces, which are secured through a silent block to the lever and the front support of the cross members.
There are washers at the junction of the supports, braces and levers. They are designed to adjust the angle of inclination of the rotation axes. The steering knuckle has a sealed bearing inside. A hub is installed inside the element. Next, the bearing is securely tightened with a nut and has no adjustments.
Features of dismantling work
Disassembling the rear and front suspension elements of the Lada Priora is necessary mainly to lubricate the moving parts. It will also be needed in situations where repair or replacement of worn components is required.
Rear suspension removal
Structurally, the chassis here is simpler, which means it is easier to disassemble (repair). The process consists of several standard procedures.
- The car is installed on a platform with an inspection hole. Even better if you can take it up in an elevator.
- Now you need to open the trunk and remove the upholstery from the seat belt retractors. Behind them are the suspension struts. They should only be unscrewed, there is no need to unscrew them completely.
- Next you need to remove the wheels. If the vehicle is on a lift, the wheel bolts should be loosened while the vehicle is still on the ground before lifting the vehicle.
- Also remove the handbrake cables for easier removal. Unscrew the retaining clips that secure the cables to the brackets and body arms. Next, the brake drums are removed. Remove the ends of the cable through the parking brake lever. At the same time, you will need to unscrew the brake flanges at the rear.
- Now you can remove the brake pipes. The disassembled control lever is designed to operate the pressure distribution regulator. To disassemble it, simply remove the washer, then disconnect the bracket and remove the drive.
- After the work has been done, you can begin to remove the suspension struts. It is necessary to remove the supports, unscrew the fasteners and remove the washer from the body bracket. Place suitable stops under the front wheel axle and suspend the rear one, after which you can remove the suspension strut assembly.
- To disassemble the rear beam, you need to unscrew the fastenings of the bracket with which it is attached to the body from below.
Thus, the rear suspension is dismantled. Then you can disassemble the shock absorbers to replace individual elements or repair them.
Special stops may be required to remove springs
You can buy them at any car dealership. Removing springs without such devices can lead to various injuries, and removing them is otherwise problematic. Since the spring is compressed and strong enough, if you are not careful it will fly off, causing damage.
Removing the front suspension
From a technical point of view, it is a little more complicated than the rear one. Structurally, the spring suspension consists of 41 parts. Its main part is the shock absorber strut, which is attached to the steering knuckle using 2 bolt connections. The mounting bolts are equipped with an eccentric washer.
When the steering mechanism operates, the vertical bolt on top also rotates, allowing it to rotate. At the same time, the position is a weak point. It takes the brunt of vibration reduction.
Noise or knocking
A knock in the front suspension (Priora station wagon also suffers from this), as well as a characteristic noise, is one of the signs of a malfunction. All owners of domestic cars of this family have repeatedly encountered this. Chassis maintenance specialists claim that in this case, strut malfunctions are possible. Also, during operation, the bolts that secure the stabilizer bar to the car body loosen.
Another noise may be associated with wear of the bar itself or the cushions. In the case of struts, to get rid of the nasty knocking, you only need to replace the worn shock absorbers. If the fastener is loose, it should be tightened. If the cushions fail, they should be replaced. It is not expensive. Now there are any spare parts for Priora on sale.
The knocking noise can also be caused by a loose fastening on which the upper support is installed to the body. Experts recommend tightening the support nuts. Another cause of noise is a worn rubber element in the strut support. You need to purchase a new part and install it. Then the characteristic noise will disappear.
If the silent blocks on the levers, braces or struts wear out, the suspension will also knock. These parts need to be replaced. Other faults include worn ball joints, broken or deformed springs, worn compression buffers, and unbalanced wheels.
Required Tools
In order to successfully replace the front shock absorber strut on a Prioress, you must first prepare the tools from the table below.
Table - Tools required to replace the front strut
| Name | Note |
| Pliers | |
| Jack | For hanging the front of the car |
| Socket wrench | "At 13", "at 17", "at 19" |
| Support | To protect and prevent the vehicle from falling off the jack |
| Extractor | To remove the tie rod end |
| Call button | "At 17", "At 19", "At 22" |
| Balloon key | Remove and install the wheel |
| Hexagon | |
| Penetrating lubricant | It is recommended to lubricate all fasteners a couple of hours before replacing the shock absorber |
| Hammer | Medium size |
| Stops | To keep the car from moving |
| Spring extractor | To compress a spring |
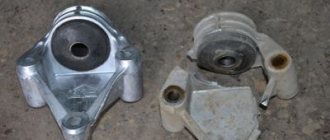
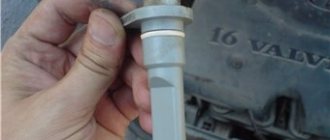
Fluid leak from shock absorbers
Owners of Priora cars often encounter this problem. The front suspension is leaking. This happens due to a worn or failed rod seal. Also, scuffs may form on the element during operation and the chrome layer may be damaged. A leak occurs due to damage or shrinkage of the sealing rings on the housing. The solution to these problems is to replace the element in the assembly.
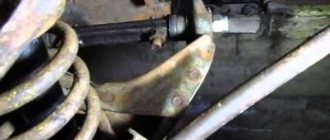
Suspension arms or beam - check fastenings and silent blocks
One of the common causes of knocking in the rear suspension is the beam. If your car has such a suspension design, it is worth determining the exact location of the knock. To do this, you need to put the car in a pit, ask someone to rock the car, and in the pit, grab hold of various places on the beam with your hand. Most often we are talking about the knocking of the silent blocks of the rear beam. The suspension arms may also knock, and here the diagnosis will be somewhat more complicated:
- you need to install the car in the pit, putting it on speed, and not on the handbrake, then climb into the pit, taking with you a pry bar, a large screwdriver, and a set of keys;
- using a mount, check the functionality of the bushings and silent blocks; if they move easily in their seats and noticeably play, they need to be replaced;
- check the integrity of the suspension arms, their bending can lead to knocking and uneven running of the car, and cracks indicate the need for quick replacement;
- the fastenings of the levers can be loose, for this you need to use keys and tighten all visible connections, this will help eliminate this item from the causes;
- When the suspension elements are deformed, the levers themselves can knock on body parts and other elements of the rear suspension space while driving, so you can rock the car and find out.
Selection of racks
The front suspension (Lada Priora station wagon included) is no less important than the engine or transmission. The suspension dampens vibrations that are transmitted to the body from the road through the wheels. The chassis must provide stability to the vehicle when driving at high speeds.
If the suspension is too soft, the car will drive fine in a straight line, but there will be significant roll when entering a turn. In the case when it is very rigid, there will be no roll when turning, but there is no smooth ride.
Removal and installation of shock absorber and spring Lada Priora Lada Priora
Here is how the rear suspension elements of the Lada Prior are located on the car (the left side is shown, the right side is similar): 1 - rear suspension shock absorber; 2 — rear suspension beam; 3 — rubber-metal hinge.
You will need: keys at “6”, “19”, wrench at “17”, socket at “19”.
1. Lift the trunk lid...
2... and remove the upper shock absorber mounting nut with a 22" wrench while holding the shock rod stationary with a 6" wrench."
3. Raise the rear of the Lada Priora car, unscrew the nut of the lower shock absorber support and remove the bolt.
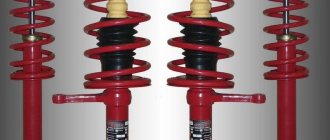
Chassis SS20
These spare parts for domestic and foreign cars are produced under the “System Technologies” brand. These racks have become so popular due to their high quality. For Priora, the manufacturer offers 4 product options that differ in hardness. Which stands are better? They need to be selected according to your driving style. The softest ones are the “Standard” series racks. Rear shock absorbers from the same series are also offered.
A reinforced version is offered to increase the load capacity. Next are the “Comfort” racks. According to reviews from many car owners, this is the best option. They are stiffer than the Standard, but the suspension works equally well on bad and good roads.
The “Highway” kit is suitable for those who like stiff suspension and high speed. With these racks you can drive on bad roads, but it will be uncomfortable. “Sport” is the toughest option from this manufacturer for Priora cars. A front suspension of this type is not very suitable for the city, but for sports competitions it is just right.
Engines and transmissions
In 2001, a new facelift model of the VAZ 2110 was introduced. The car had slightly more rounded edges and a modernized front bumper. Until 2004, the offer included 1.5-liter gasoline engines with a power of 77 or 92 hp. With. Since 2004, larger 1.6-liter 80- and 89-horsepower engines have been installed under the hood. Power was transmitted to the front wheels through a 5-speed manual transmission 2110.
A year after its debut, the sports version 21106 GTI appeared. The transmission here is based on a 2-liter 150-horsepower engine from Opel, which allowed acceleration to just over 200 km/h. Car enthusiasts are also familiar with the Lada 110 Premier, the difference of which was that the body was increased by 19 cm. It can often be found in the form of a taxi. Under the hood is a 1.8-liter gasoline engine producing 98 hp. With. In 2009, production of the Lada 110 was completed, and the Priora became the model's successor. The VAZ 2110 was offered in sedan (2110), station wagon (2111), five-door hatchback (2112) and coupe (21123) body styles.
The main “disease” of all VAZ 2110 engines is the cooling system. Oxides and deposits often collect here and become clogged in the engine casing and radiator. Due to a malfunction of the sensor, the electric fan periodically fails. The tens clutch also usually fails quickly during aggressive driving.
Every owner of a Ten is faced with the need to replace a piston - the one on the Priora is perfect here. It will significantly improve the technical characteristics, but such an exchange is best carried out after 120,000 km.
Salon VAZ-2110
If we compare the VAZ 2110 and Priora, Russian manufacturers have been upgrading the latter’s 1596 cc engine for many years. The four-cylinder sixteen-valve engine produces 72 kW/98 hp. With. at 5600 rpm and a maximum torque of 145 Nm at 4000 rpm, which, according to available data, allows the Priora to reach a top speed of 183 km/h, and provides acceleration to 100 km/h in 11.5 s.
Which stands are better?
It is difficult to answer this question. Although manufacturers have quality certificates, very often spare parts for the chassis cannot provide the declared comfort of movement and the specified service life. Reviews also do not allow us to understand which is better. It all depends on the preferences of the car owner. Today, Priora is equipped with air suspension.
You can make this system yourself or contact a service station. This solution shows itself very well in terms of comfort and reliability.
What it is
Front pillars are a device located at the front of the car on the sides, fixed in the glasses. They are responsible for the comfort of vehicle movement, stability, smooth ride and turning. Without them, the car would shake while driving, even on smooth roads, and the risk of horizontal car roll would increase significantly.
The front struts consist of:
- springs;
- shock absorber;
- ball joint and others.
The rear and front struts with shock absorbers have the same design and differ little from each other. There is an oil type device on the front pillars.
Description of design
The front suspension is independent, MacPherson type with telescopic hydraulic shock absorbers, helical barrel springs, wishbones with braces and a stabilizer bar. The basis of the suspension is a telescopic shock absorber strut, which allows the front wheels to move up and down when driving over uneven surfaces and at the same time dampen body vibrations.
Front suspension : 1 — steering knuckle; 2 - eccentric bolt; 3 — shock absorber strut; 4 — lever; 5 — stabilizer bar; 6 — mounting bracket for the stabilizer bar cushion; 7 — stabilizer bar strut; 8 — cross member of the front suspension; 9 — ball joint; 10 - stretching
A bracket for attaching the strut to the steering knuckle is welded to the lower part of the strut body, and a spring support cup is welded to the middle part.
The lower part of the strut is secured with two bolts and nuts to the steering knuckle. The top bolt that goes through the hole in the strut bracket has an eccentric collar and an eccentric washer. By turning this bolt, the camber angle of the front wheel is adjusted. The telescopic strut is equipped with a helical barrel spring, a polyurethane foam compression stroke buffer, and an upper strut support assembly with a bearing. Shock absorber strut parts : 1 - telescopic strut;
2 - spring; 3 — rod nut; 4 — rebound limiter of the upper support; 5 — upper support; 6 — bearing; 7 — upper spring cup; 8 — spring gasket; 9 — compression stroke limiter of the upper support; 10 — compression progress buffer; 11 — protective cover. The upper support is secured with three self-locking nuts to the body mudguard cup.
Due to its elasticity, the support allows the strut to swing during suspension movements and dampens high-frequency vibrations of the body. Its design differs significantly from the design of the supports used on cars of the VAZ-2108 and VAZ-2110 families. Now, instead of a pressed-in thrust bearing, a steel bushing is installed, vulcanized to the rubber mass of the support, which eliminates backlash and extraneous sounds. Front suspension elements : 1 — ball joint;
2 - hub; 3 — hub bearing nut; 4 — protective cap; 5 — hub bearing; 6 — steering knuckle; 7 - nut; 8 — front wheel brake disc; 9 — brake mechanism shield; 10 — eccentric (adjusting) bolt; 11 — rotary lever; 12 — front suspension spring; 13 — shock absorber rod; 14 — upper spring cup; 15 — upper support of the shock absorber strut; 16 — shock absorber rod nut; 17 — bearing of the upper support of the shock absorber strut; 18 — spring gasket; 19 — front suspension compression buffer; 20 — protective casing; 21 — rack body; 22 — bracket for mounting the anti-roll bar cushion; 23 — front suspension stretch; 24 — front wheel drive shaft; 25 — anti-roll bar; 26 — stabilizer bar; 27 - front suspension arm The thrust ball bearing used in the car has a larger diameter and a different design and is located between the upper support and the spring. Under the weight of the front of the car, the bearing is in a compressed position, which eliminated all gaps and knocks. The contact area of the balls with the raceways has increased significantly, and consequently, the durability of the bearing has increased. When the wheels turn, the strut housing rotates along with the spring, but in the new design the shock absorber rod remains stationary and the connection between the rod and the shock absorber guide bushing wears out less. A telescopic hydraulic shock absorber is installed in the strut housing. The lower part of the steering knuckle is connected to the suspension arm through a ball joint. The support is attached to the steering knuckle with two bolts (the holes in the steering knuckle are not through). When unscrewing these bolts, be careful: with significant force they often break, so before disassembling, tap their heads in the axial direction. The ball joint pin is secured to the lower arm with a self-locking nut. The support is covered with a rubber-metal cover. Braking and traction forces when the car is moving are perceived by longitudinal braces connected through silent blocks to levers and brackets welded to the cross member of the front suspension. At the connection points (at both ends of the brace) washers are installed to adjust the longitudinal inclination of the wheel turning axis. The front suspension cross member is attached to the body with six bolts. The steering knuckle is equipped with a double-row angular contact ball bearing of a closed type, which is secured in the knuckle with two retaining rings. The wheel hub is installed in the inner rings of the bearing with interference fit. The inner rings of the bearing are tightened (through the hub) by a nut on the shank of the outer wheel drive joint housing. In operation, the bearing is not adjustable and does not require replenishment of lubricant. The wheel hub nuts are the same, with right-hand threads. The anti-roll bar is a spring steel bar. In its middle part there is a bend above the pipe of the additional muffler of the exhaust gas system. Both ends of the stabilizer bar are connected to the lower suspension arms through struts with rubber and rubber-metal hinges. The rod in its middle part is attached to the body with brackets through rubber pads. Checking and adjusting wheel alignment angles should be carried out in accordance with the maintenance regulations, as well as after repairing the body or suspension. When the vehicle is in running order, the wheel alignment angles must be within the following limits: – the longitudinal inclination angle of the turning axis is 0°42'±30'; – camber angle 0°30'±30'; – camber angle 0°10'±30'.
Replacing the front struts on a Priora car will be carried out in the following order:
Lock the car with the handbrake; Jack up the front end and place supports; Using a wheel wrench, moving clockwise, gradually loosen the wheel bolts, and then pull it towards you; Disconnect the brake hoses from the device; Remove the steering tip with a puller; Apply lubricant to the bottom of the device being removed.
Attention! After this step, it is advisable to wait about 10-15 minutes for the lubricant to work well; Unscrew the bolts (you may have to remove the threads); Remove the bottom part of the device from the mount; Unscrew the nuts securing it to the body, remove the shock absorber; Secure the spring with plastic ties (this makes them easier to store); Place the hexagon at the top of the rod (there is a seat). This will keep it from spinning during the next step; The rod nut must be unscrewed, after which you can completely remove the shock absorber; Take out the compression limiter and then the bump stop; Finally, remove the spring, cup, damper, boot.
Installation is carried out in reverse order. Don't forget to check the front strut support bearing - it will most likely need to be replaced.
Brake calipers - an exclusive problem
Only in some car models with disc brakes in the rear, the brake calipers become loose or simply play. This is problem number one for all budget cars with rear disc brakes. It is the budget nature of fasteners that often causes parts to fail. It is very interesting that calipers can be an invisible cause of knocking, that is, very difficult to diagnose. You will have to perform the following procedures:
first, you can try to pull the caliper with your hands while the wheel is installed; perhaps the parts of the mechanism are hitting the disc, everything should be tightly screwed; Next, you should remove the wheel and carry out manual diagnostics of all possible fastenings of this unit; you should tug the mechanism with your hands to understand the absence of play; the next step should be to disassemble the caliper to determine the loose parts, but doing this without experience is not recommended, as many problems can be found; when disassembling, you should pay special attention to the quality of tightening of each module and each bolt, this is what can tell you where the knocking problem lies; when reassembling, pay attention to the pads; it is quite possible that they are worn out or deformed, and simply knock in the places where they are installed during operation.
Tips for newbies on replacement
- Before you begin replacing a part, be sure to check that all components are present.
- Follow the step-by-step instructions, remember which parts were removed from where, and in what order.
- When tightening the bolts and fastening the parts, there should be no differences from the original: no gaps, tight and even.
- It is better to replace the old ones with hydraulic structures; they can be disassembled, it is easier to replace some parts than to dismantle the entire structure later.
- Don't neglect to use WD-40 before starting work. This will preserve the thread and save effort.
- If you have doubts about whether it will work, it is better to ask an experienced car mechanic to observe and be present.
Problems when paying with bank cards
Sometimes difficulties may arise when paying with Visa/MasterCard bank cards. The most common of them:
- There is a restriction on the card for paying for online purchases
- A plastic card is not intended for making payments online.
- The plastic card is not activated for making payments online.
- There are not enough funds on the plastic card.
In order to solve these problems, you need to call or write to the technical support of the bank where you are served. Bank specialists will help you resolve them and make payments.
That's basically it. The entire process of paying for a book in PDF format on car repair on our website takes 1-2 minutes.
If you still have any questions, you can ask them using the feedback form, or write us an email at