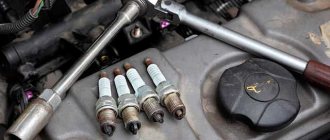
Glow plugs are a consumable item. High-quality spark plugs have a working life of about 100 thousand km. vehicle mileage, but replacing glow plugs when operating a diesel engine in difficult conditions is a planned procedure, which is recommended to be carried out every 20-30 thousand kilometers traveled. The efficiency of a cold start of a diesel engine and the stability of the unit until the engine reaches operating temperatures directly depend on their serviceability.
We also recommend reading the article on how to clean the diesel particulate filter yourself. From this article you will learn about ways to clean the filter element with and without removal.
What you need to know before starting work
An urgent need to replace glow plugs with your own hands may arise in the cold season, since the candles increase the temperature inside the cylinder for effective self-ignition of the mixture of diesel fuel and compressed air when the internal combustion engine warms up. If more than one spark plug fails, the diesel engine will no longer start in winter. Glow plugs also affect the efficiency of fuel atomization in the cylinders.
To replace it yourself, you need to have a minimum set of available tools: a wrench, a socket wrench and a screwdriver. A complete set includes gloves, wrenches and socket wrenches (which have extensions and ratchet locks), a reamer and pliers. You will also need some graphite and high temperature grease.
It is worth adding that glow plugs are quite fragile
During the replacement process, they can be broken as a result of careless handling of the keys. Breakage of the spark plug inside the spark plug well will lead to the need to drill out the remaining contact rod using a drill and drill
Additional tools may also be required to repair damaged threads.
Some sources recommend changing the glow plugs of a diesel engine when the engine is warm. This is explained by the fact that the threads in the cylinder block may be more fragile compared to the spark plug body. Due to thermal expansion, spark plugs should come out easier on a heated diesel engine. Other manuals recommend replacing with a cold engine. Before starting work, be sure to read the instructions regarding replacing glow plugs on a specific diesel engine.
Self-replacement
Selection, checking and replacement of diesel engine glow plugs. Spark plugs for diesel engines
Please note that when replacing, it is advisable to immediately replace all spark plugs with new ones, regardless of their visual condition. Glow plugs are selected according to their suitability for installation on a particular type of diesel engine
Removing protection
Glow plugs are often located at the top of the cylinder head (usually near the diesel injectors). They may not be visible if the motor is covered on top with a plastic cover or protective casing. This protection must be removed to provide access.
Disconnecting the battery terminals
Since glow plugs are an electric heating element, you will need to disconnect the negative terminal from the battery. Then the small nuts are unscrewed, which secure the tips of the high-voltage wires to the contact rods of the glow plugs. The wire connects to the top of the spark plug. This nut must be unscrewed with a wrench, and the wire itself can be moved slightly so that it does not interfere with further removal of the glow plugs.
Unscrewing glow plugs
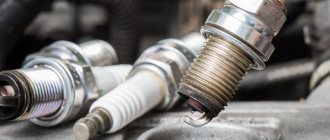
The next step is to unscrew the spark plugs using a ratchet wrench. It is necessary to unscrew it very carefully so as not to damage the threads in the cylinder head. There is also a risk of breaking the spark plug itself, which may result in additional difficulties with subsequent drilling of the rod and restoration of the thread.
Cleaning contacts
Next, it is necessary to clean the contacts on each high-voltage wire of the glow plug from contamination. This is necessary for the new spark plugs to be fully operational after they are installed on a diesel engine. If the contact is “stuck”, then it can be removed without much difficulty using a flat-head screwdriver.
After dismantling, a visual inspection of the removed glow plugs is carried out. If even only one of them shows extensions of the rod, the rod is swollen or deformed, melted, cracks or other defects are noticeable, then all spark plugs are replaced with new ones. Also a reason for replacement is the presence of abundant carbon deposits in the place where the tip is connected to the spark plug body, or any noticeable damage to the tip.
Removing dirt from spark plug holes
Separately, it is worth noting the procedure for cleaning the holes for installing candles from carbon deposits. To do this, you will need a special reamer, the length of which will allow you to effectively clean the spark plug wells. Before screwing in, the reamer must be lubricated. The specified reamer must be screwed into each hole. For the procedure, it is better to use a standard scan rather than a universal one. If this is possible, it is additionally necessary to remove deposits from the channels using compressed air.
Installing new glow plugs
After cleaning, new and/or pre-tested glow plugs are installed on the diesel engine. It is necessary to tighten the spark plugs until slight resistance appears. The tightening torque is adjusted with a torque wrench and is 15 Nm. Over-tightening may lead to the fact that during the next replacement there will be a risk of the spark plug breaking in the well when attempting to dismantle it.
When the installation of new elements on all cylinders is completed, the cleaned tips of the spark plug wires are put back into place and secured with a nut and wrench. It is necessary to make sure that the wire tips are tightly secured, and that the spark plug contacts are completely closed.
Then you can connect the negative terminal to the battery. The next step is to check the installed spark plugs. You should check it in the normal manner: turn the ignition key, start the diesel engine, and then evaluate the operation of the internal combustion engine in warm-up mode. If the engine starts confidently, runs smoothly and without failures, then the glow plugs are fully operational. Otherwise, it is necessary to re-diagnosis the diesel internal combustion engine to find a potential malfunction.
Removing old parts
It is important to follow the following steps:
How to remove spark plugs
It is necessary to pull the wire terminal from the power unit. The wire is grabbed as close to the connector as possible. The procedure is performed extremely carefully. The task is to remove the terminal. Under no circumstances should you pull the wire when removing it from the plug. This way you can cause serious damage to him.
A socket wrench is placed on the part being removed. Use a ratchet to unscrew the part from the body.
All these actions are performed slowly and very carefully.
When checking here, it is worth making sure whether the plugs need to be replaced. This is easy to find out: one part from the whole set is removed and carefully studied. Its gap and the condition of the contacts are inspected. If contact burnout is detected, you will have to urgently purchase new plugs. Burnt-out plugs are removed one at a time, one by one
It is important to detect their positions
The correct operation of spark sources is carried out in a certain algorithm. And if the wires are connected incorrectly, the engine will function with serious interruptions. And eventually it may fail.
When replacing more than one part, pay special attention to the wires. They can be marked with a marker or small pieces of electrical tape.
Both the spark plug and each wire are designated in this way even before the replacement procedure. This way you will prevent negative consequences and incorrect connection of these components.
If such a connector cannot be removed with bare hands, then a special puller will help solve this dilemma.
Example:
Puller
This operation is performed very carefully. The thread must not be damaged.
Stage two. Extraction
The part to be replaced is removed. This action uses a special wrench with an attachment. It rotates counterclockwise. Huge efforts are not required here. You should not pull the candle out of its position. This will only ruin the thread. These manipulations are also performed extremely carefully. If there are difficulties, you can rotate clockwise and then counterclockwise again.
Stage three. Cleaning
This is where the spark plug hole is cleaned. Cleaning is mandatory even before installing new spark plugs. Use technical alcohol and the same rag again. And only after the dirt has been completely eliminated from the threads can you proceed to further actions.
The electrodes are carefully inspected for carbon deposits. In certain cases, spark plugs may not operate stably due to dirt accumulations between the electrodes.
If the side of the spark plug that is placed inside the engine is covered with oil, it means that the piston and oil rings are worn out. In this situation, resort to the services of specialists from the service. If these parts are in normal condition, then their color is brownish.
Replacement work
When to change spark plugs correctly
On almost all diesel engines, glow plugs are located in the upper part of the cylinder head. The replacement process is almost identical on all cars; in this example, the work will be performed on a Volkswagen Transporter:
- removal of protection. On vehicles that have a protective cover on top of the cylinder head, it must be removed to gain access;
- disconnecting the battery terminals. The next step is to disconnect the terminals from the battery. Next, unscrew the nuts that secure the ends of the high-voltage wires;
- unscrewing the glow plugs. Using a glow plug puller, they are unscrewed, and you need to be extremely careful so as not to damage the threads in the cylinder head;
- cleaning contacts of high-voltage wires. Now you should clean the contacts on the wires, this is done so that the new spark plugs receive electricity normally and increase their service life;
- removing dirt from spark plug holes. The next important step is to clean the mounting holes from carbon deposits. This procedure is performed with a special reamer (the main thing is that it is of the required length). With its help, spark plug wells are cleaned; before screwing in, a special lubricant should be applied;
- installing new spark plugs. After all the cleaning work has been completed, you can proceed directly to installing new spark plugs. They must be tightened using a torque wrench and the tightening torque should be 15 Nm. If you overtighten, there is a risk of the spark plug breaking during the next dismantling.
- assembly is carried out in reverse order.
Automatic transmission cleaning methods
Proper automatic transmission maintenance involves cleaning the existing cavities of the box from accumulated dirt. A similar procedure is performed by passing a small amount of oil through the system and then draining it. Ideally, the car owner should dismantle the valve body, open it, manually clean all internal elements, wash the automatic transmission filter, then blow it with air, wipe it with gasoline, run oil through the system, and only then reassemble the box in the reverse order.
In rare cases, to clean automatic transmissions, special auto chemicals and flushing additives are added to old oil, which, while in the lubricant, soften deposits, quickly removing dirt.
All that remains for the car owner to do is to perform a timely oil change.
This method of washing an automatic transmission can be used to prevent serious contamination. If the transmission is already difficult to shift into upshifts and downshifts, you need to open it and clean it manually.
Varieties
Lada Largus we replace spark plugs in a 16-valve engine. Largus spark plugs
There are the following types of candle products:
- closed type, in which the spiral can be open or placed inside a protective casing;
- open type.
In the first version, the heating element is placed in a candle body filled with a special powder that conducts heat. They separate products with a spiral made of metal or ceramic.
The main advantage of ceramic products is the achievement of maximum heating temperature in a very short period. This ensures better starting of the car engine without warming up, reduces the amount of toxic exhaust gases, and increases the service life of the spark plug elements and the engine. The service life of the candle is increased because the heating element placed in the casing does not oxidize, plus it is protected from mechanical influences.
Open-type glow products are located in the combustion chamber; for their effective operation, the fuel mixture must flow onto the hot part of the rod.
According to the time it takes to reach operating temperature, the glow plugs are divided as follows:
- conventional, the product warms up in less than 1 minute;
- fast-acting, the desired temperature is reached within 10 seconds;
- self-regulating, they warm up in 5 seconds.
In the latter option, the heating speed is achieved due to the presence of two spark plug spirals. Such products are very effective in operation and have a long service life, which allows them to displace the first two types of candles from the shelves of the car market.
Design features of various types of candles
These structures can be made of either closed ceramics or open metal. The heating element is made in the form of a spiral.
Metal pin structures have spirals: heating and adjustment. Thanks to the first, rapid heating occurs, the second serves to protect the structure from overheating.
The composition of ceramic parts is more complex:
- Metal body.
- Heating tube.
- Connecting bolt and nut.
- Adjustment spiral.
- Ceramic filling.
- Central electrode.
- Threaded part.
Ceramic parts are preferred due to their ability to produce heat quickly and provide very high temperatures.
Under the influence of electric current, the coil heats up. The high temperature in the motor prevents the element from heating above 850°C; heating lasts for a short time: from 4 seconds to 2 minutes. The duration of heating is monitored by an electronic control unit, which monitors the temperature of the coolant through special sensors.
Ford Transit glow plug replacement.
Glow plugs are part of the engine pre-starting device and are needed to facilitate starting a diesel engine after a long period of inactivity, especially when the air temperature is low (less than +5°C). At this temperature, diesel fuel evaporates reluctantly and does not form the mixture with air necessary for engine operation.
Glow plugs heat the injected fuel, it evaporates and mixes with air. Due to high compression, the fuel-air mixture ignites. The engine starts.
Gradually, glow plugs fail and therefore require replacement.
On some engines, the spark plugs are located in plain sight and are easy to access for replacement. On others they are hidden in such a way that you need to work hard to get to them.
Ford Transit belongs to the second type, so be patient and get started.
Unsnap the 5 fasteners and remove the top cover of the air filter housing. We take out the air filter.
Appearance.
Air filter housing mounting points.
Unscrew 3 bolts. When unscrewing bolts 1 and 3, the extension bushings may rotate. You need to hold them with a 15 key.
We take out 2 plastic bushings from the rubber shock absorbers. Remove the air filter housing.
Air filter housing fasteners
All specified connectors must be removed.
The next step is to disconnect the 4 connectors and unscrew the nut on the adapter bracket for powering the glow plugs. We take out the harness from the attachment points (the pistons are simple “hedgehogs”) and put it aside so that it does not interfere.
We move the tourniquet to the side so that it does not interfere.
A tourniquet is attached to such hedgehogs.
We unscrew the bolts securing the oil dipstick and move it to the side (it turns easily).
Remove the adapter bracket for powering the spark plugs.
Unfasten the oil filter bracket.
Glow plug power adapter.
Now unscrew the intake manifold mounting bolts. I tried to describe their location, but it turned out to be such nonsense. Look at the photos.
Unscrewed it. Now let's shoot.
View with manifold removed 1.
View with manifold removed 2.
After removing the manifold, we have access to the glow plugs.
But before you start working on spark plugs, you need to close all the holes that appeared after removing the manifold (I don’t mean the mounting holes). This must be done to ensure that no debris gets there.
The collector has been removed.
We close all the holes.
Using a 7mm socket, unscrew the nuts securing the current-carrying busbar to the spark plugs. We remove the tire.
We remove any accumulated debris in the places where the candles are installed (in the niches where they are screwed in).
Access to candles is open.
Glow plugs and power bus.
Final stage.
We unscrew the old spark plugs and screw in new ones in their place.
We wipe and clean the installation areas of the intake manifold. We also clean the O-rings on the manifold itself. If the car has significant mileage, these rings become stiff and need to be replaced.
What I mean is that if you are planning to change the glow plugs, and the car is being used for a long time, it is best to purchase a set of intake manifold gaskets along with the spark plugs.
We put the collector in place and stretch it evenly.
As usual, we assemble everything in reverse order.
At the same time, the air filter was changed.
So, when replacing glow plugs on a Ford Transit, there is nothing particularly difficult.
This work can be done by anyone who knows which side to take the wrench from.
Good luck!
If you are interested in this article and have something to say (good or not) please leave your comments below.
I would be very grateful for your participation in the discussion of the article.
Purpose [edit | edit code]
During normal operation of a diesel engine, the fuel in the cylinders is ignited by self-ignition at the moment it is injected by injectors into air pre-compressed by the piston, heated to 700-900 ° C; Accordingly, conventional spark spark plugs, as in a gasoline engine, are not and are not required in its design.
Glow plugs are essentially part of the engine pre-start device and are needed, by and large, only to facilitate the start of a diesel engine after a long period of inactivity (“cold”) by improving the conditions for the formation of the working mixture, especially if the air temperature is low (below +5°C). At this temperature, diesel fuel evaporates reluctantly and does not form the mixture with air necessary for engine operation.
Some diesel engines with direct injection of fuel into the combustion chamber (without prechambers) do not have glow plugs at all, mainly these are relatively large and low-speed tractor engines or engines that drive industrial equipment. Some diesel engines, instead of glow plugs, use a pre-heater in the form of a heating grid built into the intake manifold (grid heater)
- as an example, we can name the 5.9-liter Cummins diesel engines installed on the Dodge Ram. Some tractors have only one glow plug, located in the intake manifold and working in tandem with an additional nozzle (when starting, diesel fuel is continuously injected in a small amount); Thus, before starting, not cold air, but hot air is supplied to the combustion chambers along with the combustion products of diesel fuel. This device is called an electric torch heater.
Where is the glow plug relay located, how to check and change it
Since this relay is an electrical device, the process of checking it is significantly simplified. For this you will need a multimeter. First you need to find this relay. It can be made in the form of a separate block or box that is attached to the car body. The attachment point to the body is called the “ground”.
Through this connection, power is supplied from the negative terminal. All other ends are positive. The relay receives additional information on special terminals from the engine control unit. The block processes information from temperature sensors and creates the necessary impulse at the relay input, which causes it to close and open. This indicates that an additional set of wires is connected to the relay.
The easiest way to find this relay is by the wires coming out of the spark plugs. Next, switch the multimeter to measure voltage and measure it with the ignition on at the relay output. To do this, one of the probes is pressed against the terminals leading to the glow plugs, and the other to the car body. The output voltage must be at least 12 volts. As a last resort, measure the voltage at the battery terminals, and if it turns out to be 12 or more, and 11 at the relay, then it is considered faulty. Another way to check is to measure the resistance between the relay terminals. This is done individually for each type of device, since standard resistance values may vary.
There is another - indirect way of verification. To do this, unscrew the spark plugs, connect the wires with the relay to them and turn on the ignition. If the spark plugs start to heat up, then the relay is considered to be working. Otherwise, either the spark plugs or the relay itself are faulty.
To change the relay, you must first remove the wires from it leading from the electronic control unit and to the glow plugs. Then its fastening is unscrewed. After this, the ground connection point of the new relay with the body is thoroughly cleaned, and a new device is installed in place of the old one.
Before removing the plugs, you must remember their installation location, otherwise there is a risk of assembling the device incorrectly, which can ruin the operation of both the relay and the glow plugs. To avoid having to go under the hood again, it is also recommended to replace the spark plugs.
This completes the check and replacement of the glow plug relay. As you can see, this is not a complicated procedure and can be done on your own. We wish you good luck on the roads!
Checking with a multimeter (tester)
The tester for checking diesel glow plugs is used in three modes:
- Measurement of resistance readings;
- Dialing method (if supported);
- Measurement of current consumption readings.
All methods can be applied without removing the product from the engine. But in this way we will only answer the question - “is the spark plug working or not.” It will not be possible to find out what condition it is in and the reasons for its breakdown.
Chain ringing
To check using the dialing method you need to:
- Disconnect the supply wire from the glow plug;
- Set the regulator on the tester to the desired position;
- Press the negative probe to the engine block, the positive probe to the electrode.
- The presence of sound indicates that the spiral is intact.
If you are using an analog tester, then you need to follow the arrow; its deviation indicates the integrity of the circuit.
This can also be done on a removed spark plug, only instead of a block, the probe must be attached to the body of the product.
The first and third methods are more informative, but they have their own characteristics that are important to know
Resistance measurement
Here it is important to understand the principle of the relationship between the ECU unit and the resistance of the spiral, which in a new glow plug should be in the range of 0.7-1.8 Ohms. The ECU is guided by the current consumed by the heating elements (A), which changes depending on their warming up
The amount of current is inversely proportional to the amount of resistance
The ECU focuses on the current consumed by the heating elements (A), which changes depending on their warming up. The amount of current is inversely proportional to the amount of resistance.
Those. Glow plugs are turned off when their resistance increases as a result of heating, and the current passing through the coil decreases. When a certain current value is reached, the ECU receives a signal that the spark plugs are warm and need to be turned off.
If the resistance, as a result of a malfunction of the heating elements, is too high (more than rated), then the current strength decreases earlier than necessary.
At this moment, the ECU receives a signal (premature in our case) that the glow plugs are warmed up and need to be turned off, which is what happens. At the same time, the air temperature in the cylinders remains insufficient for reliable engine starting.
Current consumption measurement
The most informative method, which involves starting a still cold engine. Those. There is no need to remove the glow plugs.
By measuring current consumption, you can quickly identify a faulty heating element. In this case, the reliability of the result obtained will approach 100%.
But here it is important to understand what types of glow plugs are installed in the engine and what their standard current consumption is. For example, if we take rod products, they can be single-pole and double-pole
For example, if we take rod products, they can be single-pole or double-pole.
The first ones are connected according to the classical scheme - ground on the body, one terminal coming off. Consume from 5 to 18 A.
The latter are determined by the presence of two terminals and can consume up to 50A.
To measure the current consumption, it is necessary to connect the tester in series in the “ammeter” mode into the electrical circuit that supplies the glow plug.
For this:
- Disconnect the power cable from the product;
- We switch the multimeter to ammeter mode;
- We connect one probe to the power wire, the second to the central terminal of the glow plug.
- An assistant will be needed. We start the car (the engine must be cold) and take readings from the device.
In the first seconds, the resistance on the electrode will be minimal, since the engine is still cold, and accordingly the tester will show the maximum current.
As the spark plug warms up, its resistance will increase and the current will drop. This will be displayed on the device. The reduction should take place without sudden changes, gradually. And then, at some stage, the current must stabilize.
It is better to write down the results of checking each spark plug so that they can be compared later. They should be as identical as possible.
If the behavior of a certain glow plug differs from others, then most likely only its middle or tip warms up. The absence of current will indicate an open circuit.
Here you will have to unscrew the product and recheck it, but visually observing the heating process. Typically this is already done using a directly connected battery (see below).
Replacing glow plugs on a diesel Renault Megane II yourself, step-by-step instructions
The process of replacing ignition elements usually takes place in several stages.
Follow these instructions if you change the spark plugs yourself:
Stage 1. Open the engine, remove the cover
To do this, look at the picture and unscrew all the parts: two clamps, marked in red in a circle, a 10-point bolt and an 8-point bolt, marked in red in a square.
We move the cover made of plastic from the engine to our side.
It should look like this:
Stage 2. Determine where the glow plugs are located
The picture shows where they are located:
Stage 3. Free the spark plugs from the wires
To do this, use a tubular wrench size 8 or 10.
It is better to unscrew the wires on a heated engine, because the block consists of a porous material, and the spark plug is made of dense material; the expansion coefficient should be higher to make it easier to unscrew the elements.
Stage 4. Replacing spark plugs
We put new spark plugs in the grooves, connect the wires to them, and close the lid.
Everything is in the same order as it was unscrewed.
Long but reliable
The most reliable but also the most time-consuming is the battery test. Each spark plug is ringed individually, the degree of its glow is determined quite accurately, but they all must be removed from their places, and in some models this requires partial dismantling if some parts impede access. Therefore, such a check is usually combined with replacing spark plugs.
- For testing equipment, you will need a half-meter insulated wire;
- The candle is turned upward with its heating element and placed on the positive output of the battery;
- The prepared wire connects the mass of the battery and the side part of the spark plug body;
- The working state is manifested by rapid heating, and then by the glow of the spiral. If the process is slow, or only the tip of the heating element is hot, the spark plug must be replaced.
Typical causes of malfunctions
A common and popular malfunction is burnout of the spiral. This problem can be detected by the fact that the control element does not heat up. If you close the spark plug terminals with a metal conductor, you can see sparking.
In this case, it is necessary to replace the glow plugs on diesel cars.
Often, a malfunction such as burnout can occur due to high filament currents or too high gas temperatures, which is caused by a large amount of carbon deposits on the cylinder walls. The spiral is destroyed especially quickly due to corrosion.
Breaks in the heating coil are the consequences of problems in the power system. This is due to untimely injection, too low injection pressure, as well as other faults. In this case, inspection and repair of diesel engines is already necessary.
Metal heater
The metal heating element consists of two spirals. One is heating, the second is adjusting. The first function is to warm up the tip as quickly as possible. The second protects the part from severe overheating. This is possible because as the temperature increases, the resistance on the adjusting spiral increases.
The free space between the heating tube and the two spirals is filled with an insulator. It also performs several tasks - it protects the coil from various mechanical damage and effectively transfers heat. A candle with a metal part can heat up to 1000°.
INDEPENDENT CHECKING AND REPLACING GLOW PLUGS
PREPARATION
Before replacing or repairing anything, you need to check the serviceability of the part. In order to carry out initial diagnostics and replace glow plugs on a diesel engine, you will need the following devices:
Also, to successfully replace glow plugs in your car, it doesn’t hurt to have manuals with images of the devices you will have to deal with.
Modern spark plugs installed on most cars are quite fragile products.
Therefore, they must be handled with extreme caution. One wrong move is enough to break them
Unfortunately, despite all the care, spark plugs often break when replaced. In most cases, this happens inside the nest. Therefore, you need to make sure in advance that you have a drill or a drill at hand
With their help, you can remove the remaining rod from the hole.
STEP-BY-STEP INSTRUCTIONS FOR REPLACING GLOW PLUGS
To replace spark plugs on your car, simply follow the algorithm below.
Allow the engine to cool. Otherwise, you risk getting burned. Open the hood and remove the cover. Disconnect the wire connected to the negative terminal. Remove the intake manifold. Visually inspect the engine. Find the place where the glow plugs are installed. Concentrate on the injectors. Usually the elements you need and want to replace are located there. Unscrew the fixing nuts. Remove the cable ends. Clean the prechamber holes. Clean the spark plug channels (this must be done using a reamer). Subsequently, lubricant is applied to the grooves. Ideally, a device that supplies a stream of compressed air is best suited for removing carbon deposits. Glow plugs are replaced using a special key
With its help, you need to unscrew the elements, while being extremely careful. Candles break very easily at the base.
After the glow plugs are removed, immediately before their possible replacement, it is necessary to carry out an inspection and check
In this case, you need to use the device. Most automotive experts agree that even if you find just one faulty spark plug, it is better to replace the entire set.
Use a torque wrench to replace parts. Put on the tips from the spark plug wires and tighten the nuts. Don't forget to check the fit and make sure the contacts are completely closed. Connect the negative cable to the battery.
At the end of the replacement procedure, you will need to reinstall the intake manifold. To check the newly installed parts, simply start the engine. If the motor runs stably, then everything is in order.
Attention! Only after you have checked the functionality of the new parts can you install the protective casing in place. Replacing incandescent elements is within the power of every driver
All you need to do is prepare a set of tools and follow the instructions. For an experienced driver, the whole process can take no more than 20-40 minutes
Replacing incandescent elements is within the power of every driver. All you need to do is prepare a set of tools and follow the instructions. For an experienced driver, the whole process can take no more than 20-40 minutes.
Replacing glow plugs on a diesel engine is a standard procedure, thanks to which the car is successfully started in the cold season, and also increases the long-term life of the device. This article will discuss how the replacement process is performed, the principle of operation, etc.
Diagnostics of glow plugs
The principle of operation of spark plugs is quite simple and consists in heating the air to temperatures of about a thousand degrees - at such values in the combustion chamber of a diesel engine, self-ignition of the air-fuel mixture occurs. In this case, you have to control the coolant temperature, which should not exceed 80°C. Regardless of the type of construction (pin or ceramic), any SV consists of a housing to which an incandescent filament consisting of two thermistors is attached. One of the resistors is characterized by a constant resistance, the other has a dynamically changing resistance, regulated through the use of the so-called temperature coefficient. This feature allows you to correlate the temperature of the spark plug with the degree of engine warm-up, which makes its use more profitable in terms of energy savings. Unfortunately, the malfunction of at least one spark plug makes starting the diesel power unit impossible
That’s why it’s so important to monitor their condition, especially during cold snaps. Although the frequency of planned replacement is quite large (the scheduled periods are indicated in the user manual), it is necessary to diagnose their condition much more often
Currently, there are two main methods for checking the condition of glow plugs:
- the first requires the participation of two people. One of them unscrews the injectors, the second sits behind the wheel and turns on the mass. Anyone standing near the engine compartment should carefully examine the injector holes. If the spark plugs are in good working order, they should have a red tint. The main advantage of this method is its high information content, and the disadvantage is the complexity of removing the injectors. In addition, on some models it may be difficult to access the holes, so this method is not always applicable;
- the second method is less labor-intensive, but its use requires a multimeter or a conventional lamp tester. The device switches to short-circuit mode, one of the terminals is short-circuited to the motor housing, the other is applied to the tip of the CH. If the light comes on (or the beep sounds), the spark plug is working. Otherwise, it can be argued that it is broken.
Note that on modern cars, a malfunction of one of the CVs is indicated by a light indicator located on the dashboard. In such cases, diagnosing candles does not make sense.
Which spark plugs are worth buying?
NGK and DENSO spark plugs are very popular among car enthusiasts all over the world. Both manufacturers use high-quality materials, do not allow defects when assembling the product, and carefully think through the design. As a result, the following candles:
- provide stable ignition at any temperature;
- have good heat resistance;
- resistant to erosion;
- have an increased service life.
The benefits of such candles are especially noticeable in winter. The car starts in any conditions. You can find candles on the market cheaper than NGK and DENSO, but it’s not worth taking risks and saving. High quality always has its justified price.
You can always purchase products from NGK, DENSO, as well as other manufacturers in the SamAuto store. If you have any questions, our consultants will definitely be able to answer them.
Ford Transit glow plug replacement.
Glow plugs are part of the engine pre-starting device and are needed to facilitate starting a diesel engine after a long period of inactivity, especially when the air temperature is low (less than +5°C). At this temperature, diesel fuel evaporates reluctantly and does not form the mixture with air necessary for engine operation.
Glow plugs heat the injected fuel, it evaporates and mixes with air. Due to high compression, the fuel-air mixture ignites. The engine starts.
Gradually, glow plugs fail and therefore require replacement.
On some engines, the spark plugs are located in plain sight and are easy to access for replacement. On others they are hidden in such a way that you need to work hard to get to them.
Ford Transit belongs to the second type, so be patient and get started.
Unsnap the 5 fasteners and remove the top cover of the air filter housing. We take out the air filter.
Appearance.
Air filter housing mounting points.
Unscrew 3 bolts. When unscrewing bolts 1 and 3, the extension bushings may rotate. You need to hold them with a 15 key.
We take out 2 plastic bushings from the rubber shock absorbers. Remove the air filter housing.
Air filter housing fasteners
All specified connectors must be removed.
The next step is to disconnect the 4 connectors and unscrew the nut on the adapter bracket for powering the glow plugs. We take out the harness from the attachment points (the pistons are simple “hedgehogs”) and put it aside so that it does not interfere.
We move the tourniquet to the side so that it does not interfere.
A tourniquet is attached to such hedgehogs.
We unscrew the bolts securing the oil dipstick and move it to the side (it turns easily).
Remove the adapter bracket for powering the spark plugs.
Unfasten the oil filter bracket.
Glow plug power adapter.
Now unscrew the intake manifold mounting bolts. I tried to describe their location, but it turned out to be such nonsense. Look at the photos.
Unscrewed it. Now let's shoot.
View with manifold removed 1.
View with manifold removed 2.
After removing the manifold, we have access to the glow plugs.
But before you start working on spark plugs, you need to close all the holes that appeared after removing the manifold (I don’t mean the mounting holes). This must be done to ensure that no debris gets there.
The collector has been removed.
We close all the holes.
Using a 7mm socket, unscrew the nuts securing the current-carrying busbar to the spark plugs. We remove the tire.
We remove any accumulated debris in the places where the candles are installed (in the niches where they are screwed in).
Access to candles is open.
Glow plugs and power bus.
Final stage.
We unscrew the old spark plugs and screw in new ones in their place.
We wipe and clean the installation areas of the intake manifold. We also clean the O-rings on the manifold itself. If the car has significant mileage, these rings become stiff and need to be replaced.
What I mean is that if you are planning to change the glow plugs, and the car is being used for a long time, it is best to purchase a set of intake manifold gaskets along with the spark plugs.
We put the collector in place and stretch it evenly.
As usual, we assemble everything in reverse order.
At the same time, the air filter was changed.
So, when replacing glow plugs on a Ford Transit, there is nothing particularly difficult.
This work can be done by anyone who knows which side to take the wrench from.
Good luck!
If you are interested in this article and have something to say (good or not) please leave your comments below.
I would be very grateful for your participation in the discussion of the article.
When to change spark plugs: main signs
The car itself signals that the spark plugs need to be replaced or at least need to be checked. The symptoms are:
- The engine begins to “trouble” during operation. Especially at idle. In addition, a drop in traction and power may be observed;
- Fuel consumption increases;
- Increases the amount of carbon monoxide (CO) in the exhaust. The exhaust itself turns black;
- Detonation appears;
- Starting the engine is difficult. The starter may turn, but the engine will not start.
These symptoms can appear individually or in combination. However, they do not always indicate that new candles need to be installed. The service life of these parts ranges from 15 to 30 and even 50 thousand kilometers (depending on the manufacturer and type of spark plug).
For this reason, if the spark plug mileage is less than 10-15 thousand kilometers, then, most likely, you can only get by with cleaning and adjusting the gap. For preventive purposes, these procedures are recommended to be carried out twice a year: before summer and before winter. Of course, if the annual mileage does not exceed 10-15 thousand kilometers
It is also important to understand that the life of spark plugs is greatly influenced by the quality of fuel and driving style.
Selecting glow plugs for the Renault Megane 2 diesel engine, is it possible to select analogs?
When choosing ignition elements, you should adhere to the following recommendations:
- The choice of ignition elements should lean towards original, serial products suitable for certain engine parameters.
The code designation of glow plugs for a diesel engine for Renault Megane 2 is: “Renault 8200490950”. - Low-quality analogues can negatively affect engine performance and lead to further repairs of the fuel system.
Similar incandescent elements are recommended under the numbers: “Bosch 0 250 202 022”, “Beru 8200464077”. - For a diesel engine, the electrodes are designed to operate at high pressure and extreme heating.
They have a different design and voltage rating. The main requirement is that the minimum voltage be 11 volts. Such spark plugs will go to 1.5 and 2.0 engines. - special diagnostic equipment called “Renault - Clip”
. The technician should know that the error will be marked on the equipment as “df025”.
You can choose glow plugs for the Renault Megane 2 diesel engine yourself - or seek help from highly qualified specialists.
WHY DO THEY BURN?
The service life of spark plugs largely depends on operating conditions, as well as a number of parameters that need to be taken into account. The period of use is most influenced by the company that manufactured the device.
High-quality incandescent elements can last 100 thousand kilometers without problems. Of course, a lot depends on your driving style. On a racing car, replacement will have to be done much more often, but this is extreme.
Naturally, there are so many experts, so many opinions, but if we take into account the research of the most authoritative experts in their field, then it all comes down to the number of heating and cooling cycles. During startup, the tip of the spark plug can heat up to 1350 degrees; naturally, during long-term use, not a single part can withstand this indefinitely
Attention! Quite often, the cause of premature burnout of filament elements and their subsequent replacement is a malfunction of the injector
Types of glow plugs in diesel engines
Science is constantly evolving. In the last hundred years alone, the top speed of cars has increased from 50 to 380 miles per hour and even more. Progress moves forward, leaving unsuccessful concepts in the distant past.
Automobile manufacturers are trying in every possible way to outdo their competitors. Against the background of this struggle, engineers and designers will come up with more and more advanced models of glow plugs. Each of their new developments has higher performance and requires less frequent replacement.
Currently, the following types of spark plugs are installed in cars:
- rod - the heating element in the design is a metal spiral with high thermal resistance;
- ceramic - ceramic powder acts as a heater.
It is now generally accepted among leading automotive engineers that ceramic glow plugs are more promising. The fact is that they are able to provide a high heating rate
. It is not surprising that manufacturers are increasingly implementing replacements in their engines.
Attention! In order to find out which spark plugs are installed in your car, you will have to remove them. Another important argument in favor of replacing filament rods
The fact is that they comply with Euro 5 and Euro 6 standards. The designers managed to achieve a similar result by introducing a heating function before and after start-up. As a result, fuel burns completely even in a cold engine.
Another important argument in favor of replacing filament rod elements. The fact is that they comply with Euro 5 and Euro 6 standards. The designers managed to achieve a similar result by introducing a heating function before and after start-up. As a result, the fuel burns completely even in a cold engine.
The replacement of rod elements with ceramic ones is also justified by the fact that they have an intermediate incandescence mode. This option provides improved regeneration of the filter responsible for soot retention.
The principle of operation of candles with a monospiral and double
The operation of a glow plug is similar to the operation of an electric heater. An electric current passes through the coil and heats it to operating temperature. Starting a diesel engine largely depends on the model and age of the car. In older models, the glow plug starts firing every time it is started. In modern cars, at above-zero temperatures, additional heating is not required.
The heating elements are controlled by a special unit. When you turn the ignition key, they are connected to the battery, and the corresponding light on the instrument panel lights up. When it goes out, the combustion chamber is warmed up and the engine is ready to start. True, as experience shows, this relay cannot be completely trusted.
Candles come in open and closed types. Open ones are used on older cars. Closed-type heating elements consist of a housing and a spiral, which is protected by a casing. Inside there is ceramic powder with good heat dissipation. The spiral is made of refractory material: nickel, iron-cobalt or iron-chromium-aluminum alloys. The heating time and power consumption depend on the quality of the material used, the shape of the core and the adjustable spiral. Closed type candles are called pin candles, they come in two types:
- with a metal spiral;
- ceramic.
In turn, they can be mono-helix or double-helix. For mono-coil heating elements, one coil is used. With its help, both incandescence and self-regulation are provided. Thanks to the spiral, the desired temperature is achieved and the maximum is limited. In addition, the spiral increases the service life of the heating elements. This design is used in most engines and meets the requirements for speed and reliability of heating. With the development of technology, heating elements with a monospiral are being replaced by those with a double spiral, which have better heating temperature control.
If you provide the adjustment and necessary options when creating a spiral, then the design with a double spiral makes it possible to obtain the desired temperature of the working part of the core throughout the entire period of engine starting.
Resistive material is used to make spirals.
Useful tips
- Before the onset of the cold season, the glow elements should be checked regardless of whether the diesel engine starts well or poorly.
- Checking on a diesel engine by assessing the spark is recommended only for older cars. You should not test heating solutions in this way on a “fresh” model, which is equipped with a complex electronic engine control system.
- If a malfunction is detected, it is optimal to replace the entire set, rather than one or two failed elements.
- Try to purchase products from well-known manufacturers, since cheap solutions have a noticeably shorter service life and often demonstrate low efficiency of the heating element.
Finally, we would like to add that in order to reliably start a diesel engine in winter, it is necessary to correctly select, charge and maintain a diesel battery, refill high-quality diesel fuel according to the season, and use anti-gels if necessary. Also, in the case of diesel engines, it is advisable to install a diesel fuel pre-heater or a Webasto-type engine pre-heating system.