The constant velocity joint is one of the most important parts in a car, which due to constant movement is subject to many risks. In addition to natural wear and tear, the CV joint is regularly exposed to external influences - from the influence of nature to the crooked hands of unfortunate mechanics or tuning “specialists”. We have collected in one material everything that can happen to this spare part.
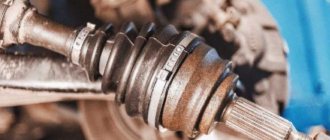
Torn boot
Probably the most common malfunction of one of the CV joint parts, which leads to breakdown of the entire mechanism, is damage to the boot. The latter comes in two types: rubber and thermoplastic. Rubber is noticeably cheaper, so it is mainly used in the low-cost segment. Thermoplastic anthers are noticeably more expensive, but they are much more durable and also withstand mechanical damage much better. Some car owners are suspicious of thermoplastic due to its rigidity, which is a misconception.
The three main enemies of the CV joint boot are external physical impact, frost and natural rubbing.
With frost, everything is clear: here you only need a high-quality composition of the anther material, which is not cheap. So if you buy a cheap component, you shouldn’t rely on its physical properties.
External damage most often occurs in all-wheel drive vehicles that often go off-road. Ideally, after each such trip, at least a visual inspection should be carried out.
Rubbing most often occurs when the CV joint turns and the ribs of the boot begin to touch each other. That is why, when replacing the boot, it is necessary to lubricate the inside with a special lubricant so that it does not rub dry.
There are such design features of the machines themselves (for example, domestic ones) when the CV joint is always in a bent state and the boot touches its internal metal parts. In addition, it happens that the boot is located near strong heating systems, such as the exhaust manifold, as a result of which it slowly melts.
A torn boot will not immediately manifest itself as a breakdown. If the lubricant is of high quality, it will lubricate all rubbing parts for quite a long time. So, if the damage is not revealed during diagnostics, then you can sometimes wait a month or even more for breakdowns and buzzing of the CV joint, since the lubricant in the mechanism itself lasts for quite a long time, but abrasive particles get into it, which accelerate wear.
In the event of loss of lubrication, the rubbing mechanisms begin to overheat, as a result of which the CV joint cage rotates and the front-wheel drive vehicle is left with virtually one drive wheel.
Causes of failure
Development on the CV joint cage
The reasons may be as follows:
- A manufacturing defect that was not identified before installation. There are often cases when counterfeit products are installed on new cars. This also includes the very low quality of the metal used to make the assembly.
- Insufficient amount of graphite lubricant or its absence. Poor quality of the anthers, as a result of which it ruptures and dust, dirt, sand, water and other debris gets onto the rubbing surfaces.
- How you drive and where you drive is also important. Aggressive driving coupled with poor-quality road surfaces means rapid wear of the grenades and prompt replacement.
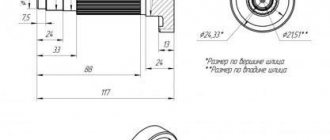
Production of rolling balls
Most often, this is either a consequence of damage to the boot and the problems described above, or simply aging of the metal due to high mileage. It is manifested by the appearance of extraneous sounds from the suspension, clicks in turns, microvibrations and jerky starts. It can only be eliminated by replacing the mechanism. It is worth noting that a faulty CV joint can lead to damage to the mating components, so you should not put off replacing it for long.
Is it possible to diagnose grenade malfunctions yourself?
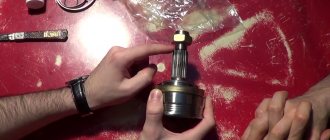
Since the grenade is a simple hinge, it can easily fail. The principle of its operation is very similar to the operation of a bearing - two surfaces, between which balls made of durable metal are located. The difference is that grooves are cut out on the surfaces, due to which you can change the position of the drive axle shaft relative to the driven one. If you take a used CV joint, you can rotate the two axle shafts with your hands without much effort and see how the unit works. You won’t be able to turn them on the new one, since there are no gaps and you need to make a lot of effort to turn them.
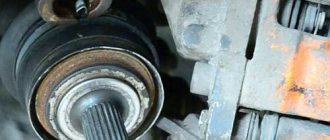
Development on the spline part
This damage is typical for CV joints with an intermediate shaft (extension). Actually, in the articulation mechanism, abrasion or breaking of the splines occurs. This happens due to either a design defect or the same aging of the metal. Over time, the articulation mechanism begins to rust, wear appears and, as a result, play, which leads to vibrations. The most annoying thing is that the CV joint itself may be completely serviceable, but the entire assembly will have to be replaced.
Checking the serviceability of the CV joint
Malfunctions of the internal and external CV joints manifest themselves in different ways. To check the external hinge, you need to turn the steering wheel as far as possible and slowly drive around the site. With this position of the steering wheel, maximum bending is formed between the axle shafts. In this case, a faulty outer CV joint will produce a crunching sound, depending on the speed of movement.
Diagnostics of the serviceability of the CV joint. Video:
Achieving maximum curvature of the internal joint is more difficult. To do this you need to do the following operations:
- hang the wheels by lifting the car with a jack or lift;
- start the engine;
- turn on the transmission.
In this position, the faulty internal hinge will make a distinct crunching sound.
How to check the CV joint on a VAZ 2109 and 2114, 2110
A standard test and determination “by ear” does not always make it possible to accurately determine the serviceability of the hinges. Before buying expensive parts, you need to find out and make sure that the problem lies precisely in them. To do this, perform the following operations:
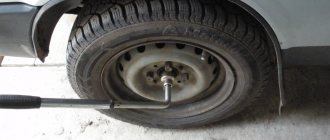
- Place the car on the pit and hang the wheels;
- inspect the condition of the anthers;
- check the play between the axle shafts.
On Kalina, the front wheel drive can be checked similarly to the VAZ 2109
How to check the serviceability of the CV joint on a Ford Focus 2
The algorithm for checking Ford hinges is no different from the one given above.
How to check the CV joint on a Renault Logan
The breakdown of parts is indicated by a characteristic crunch (sound) and play of the axle shafts.
Development of a tripoid in a needle bearing
Tripod CV joints come in two types: regular and with an external race. The main reason for failure of both types is wear. In a simple version, at certain angles the tripoid begins to slide rather than spin. With an external roller, the bearing rotates at any angle of rotation, operates more smoothly and wears out noticeably longer.
On some models, the tripoid housing is located in the gearbox. In this case, it is made of higher quality metals and carries more load. If your car has a choice between a ball and tripod CV joint, then it’s definitely worth paying extra for the latter.
Repair recommendations
If defects are detected in the transmission, they should be eliminated as quickly as possible. It is possible to accurately diagnose the condition of the hinges only after dismantling them, disassembling them and washing the parts. You can see how to do this for a car in the video.
Due to the design features, it will not be possible to repair damaged metal parts. Drivers can only replace protective boots and clamps.
After washing off the old lubricant, carefully inspect the contact surfaces of the housings, balls, and separator. There should be no pockmarks, cracks or chips on them. If they are, the CV joint assembly must be replaced. In case of minor damage, the hinges on the drive wheels can be swapped. In this case, unworked surfaces will be loaded. This measure is temporary and is needed to extend the life of the components until scheduled replacement. After assembly, the hinge must be filled with fresh grease and sealed with a boot.
The constant velocity joint is one of the main components of a car transmission. All its elements are made from quality materials. Typically, a CV joint has a long service life, but it can wear out prematurely. Timely diagnostics will allow you to detect the defect in time and prevent the formation of an emergency situation.
Wear of the support bearing
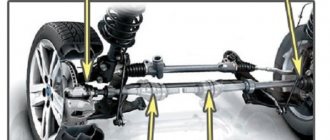
Since the drives for the left and right sides are of different lengths (depending on the design and placement of the engine and gearbox), an intermediate shaft is used on one side, on which an additional support bearing is placed.
This is an ordinary closed type bearing, which sooner or later simply wears out. The main problem is that the “support”, as a rule, is of non-standard sizes and often changes - again, assembled together with the CV joint, even if it is intact.
Inner CV joint VAZ 2110 - step-by-step do-it-yourself replacement instructions
Before you begin work on replacing the internal CV joint of the VAZ 2110 yourself, you need to prepare everything.
To do this, you need to secure the car, turn on 4th gear, and tighten the handbrake. Secure the rear wheels with wheel chocks. If they are not available, use bars of a similar shape. Remove the protective cap, unscrew the hub nut using an “arm” (extension) - a pipe or a pry bar. After the hub nut is removed, unscrew the wheel mounting bolts.
Let's move on to step-by-step instructions:
- Using a jack, hang up the wheel on which the CV joint is supposed to be replaced.
- Unscrew the bolts to remove the thrust washer of the hub nut.
- Remove the 2 bolts that secure the lower ball joint of the steering knuckle.
- If the CV joint is being replaced on the right, turn the steering wheel as far as possible to the left, and if on the left, then to the right.
- Pull out the steering knuckle and strut. Remove the splined end of the outer CV joint from the hub. Using a pry bar, remove the inner joint from the gearbox.
- Fix the drive shaft in a vice, remove the clamps from the outer and inner CV joints. Turn the anthers inside out. If they are torn or cut somewhere, you can simply cut them off with a knife.
- Remove the VAZ 2110 CV joint from the shaft. You can use a hammer and a wooden or bronze adapter.
- Assembly is performed in reverse order. At the same time, install a new hub nut. Upon completion of the tightening, you need to touch its edge to avoid unwinding.
- When installing the inner CV joint, a plastic plug is placed on the end of the shaft.
- Before installing the VAZ 2110 CV joint, you need to make sure that a sufficient amount of lubricant is applied. Place a retaining ring on the inner CV joint.
- After the drive is placed in the box, place it in the side gear so that it is completely locked. This can be done by lightly tapping the surface of the wooden adapter with a hammer along the entire perimeter of the shaft axis.
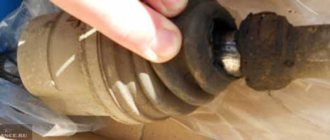
Cut or broken spline part
The worst-looking damage is when the CV joint simply collapses along the metal. The first reason for such destruction is the purchase of a low-quality CV joint, the production of which was defective or low-quality raw materials were used. The second reason is making changes to the design of the car, usually a lift (increasing the ground clearance) of SUVs. In this condition, the CV joint becomes in a non-standard position, turns at non-standard angles, and sometimes touches other parts of the car.
Not often, but there is another problem - overtightening of the hub nut, which leads to destruction. It is usually determined in the first meters of movement after leaving the lift or when moving through pits. An obvious mistake by the installer.
Destruction of the ABS system ring
Another additional part is sometimes installed on the CV joint - a toothed ring of the ABS system, from which a special sensor reads the rotation speed. Due to age, this ring rusts, becomes damaged or even bursts, after which the entire ABS system goes into emergency mode or is completely deactivated. It all depends on the specific design of the CV joint - sometimes the ring can be changed separately, and sometimes you will also have to buy the entire assembly.
Is it possible to do without replacement?
Having seen the cost of repairing or completely replacing the CV joint, inexperienced motorists think that they can drive anyway: just think, something crunches down there, a big deal. And it's actually a big deal.
Some car enthusiasts think that the strength and durability of parts makes them completely invulnerable, which is absolutely not the case. Replacing the grenade is the only possible option that will allow you to drive comfortably.
It is necessary to change the CV joint after identifying the slightest problems in its operation. Have you noticed any wear on the boot? Does your wheel crunch when turning? Don't over-tighten, otherwise the machine will just fall into place one day. Why do we need a car that can only remain in the garage as a dead weight? That's right, an experienced driver is not interested in such a car. Moreover, replacing the external CV joint is quite feasible on your own.