In order for the VAZ-2112 car to work normally, it is important to constantly monitor its technical condition. If during the inspection a worn part is found, replacement with a new one will be required.
Quite often, the VAZ-2112 begins to work not at full capacity due to worn-out valve stem seals. In this case, it is necessary to quickly replace the element that has become unusable so that the car starts up normally.
It is worth noting that this process is not easy, but if a car enthusiast understands the intricacies of automobile repair, then he will be able to independently repair the VAZ-2112. If you replace the valve stem seals step by step, taking into account the recommendations of experienced mechanics, you will not harm the internal systems. Of course, you can visit a workshop for this event and seek help from professionals. The replacement of valve stem seals by professionals will be carried out efficiently, but the price for the service may not satisfy the client.
How to replace valve stem seals on a VAZ-2112
To replace a worn element yourself, you need to carry out this activity in stages:
- The wires that are connected to the car battery are disconnected.
- The spark plugs are removed.
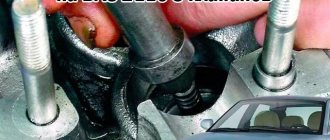
- The piston of the first cylinder is clamped with a special tool. This manipulation will not allow you to change the location of the phases responsible for gas distribution when the belt is removed from the camshaft. If the phases are disrupted, the machine’s motor will not be able to function normally in the future. The piston must be installed strictly according to the special mark provided on the camshaft. The same manipulation must be performed with the fourth piston of the car. If upon inspection it is noticed that the installation does not correspond to the marks, this will indicate that the gas distribution phases are disrupted.
To eliminate the malfunction, do the following: loosen and remove the camshaft drive belt; make rotary movements of the crankshaft until the marks are in the desired position. To make it easier to turn the crankshaft, it is recommended to put the car in 4th gear and install the drive belt in its permanent place. It is imperative to check that all the marks provided on the pulley and cylinder head match exactly.
- Next, you need to remove the cylinder head cover using a 12mm wrench if the piston is placed in the correct position. To do this, do the following:
- disconnect all wires that fit to the terminals;
- remove high-voltage wires from a special holder to the outer casing;
- unscrew the mounting bolts that connect the cylinder head cover and the ignition coil;
- Carefully remove the entire coil.
- After the coil is removed, you should find those connectors with the help of which the engine is ventilated. The drive cable associated with the throttle valve must be removed from the main holder and carefully moved to the side.
- The bolts that secure the power steering hose are unscrewed, and it is also moved to the side.
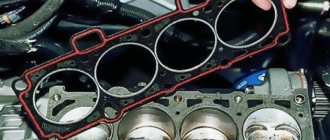
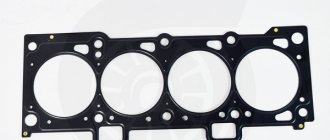
- The six fasteners securing the cylinder head cover are unscrewed and the cover containing the gasket is removed. If, after inspection, signs of wear are visible on the gasket, this element should be replaced with a new one.
- Remove the fixing bolts of the valves and rocker arms; there should be thirteen of them in total.
- Using a special device, the springs are compressed in order to remove the valve spring and crackers in duplicate.
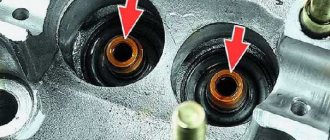
- The oil scraper cap, which is located in the valve sleeve, is pressed and the worn part is removed using a special tool or pliers.
After the worn element is replaced with a new one, all parts are assembled in the reverse order that was used during disassembly. Then you can not forget anything in the system of the VAZ-2112 car.
Signs of wear on oil seals
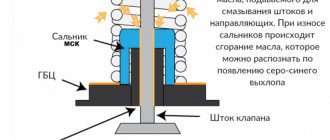
The main factor in replacing these caps is their wear, which occurs over time . After a long period of work, they already become unusable, especially if poor quality caps were installed on the car. Among the main signs of cap wear are the following:
- the appearance of bluish smoke when the engine starts or prolonged braking occurs;
- oiling of spark plugs, which occurs constantly;
- very high oil consumption.
To replace oil seals, it is not necessary to remove the head from the block.
Basic moments
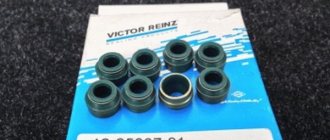
For any repair or any installation on a car, you need to know the main points or secrets. It is the knowledge of these nuances that distinguishes a specialist from an amateur. When installing new oil seals, using the tips presented below will come in handy. So:
- Before installing new caps, it is recommended to remove the springs from them, as the caps can be damaged;
- The inner surface of the valve stem seal must be lubricated with engine oil.
In the above article there are many photos through which you can get the necessary information. All of the above recommendations are carried out with your own hands, but strictly as the instructions advise. The article will help you save a lot of money, because the price for services of this kind today is quite high.
Routine work to eliminate increased oil consumption
The Volzhsky Automobile Plant has developed guidelines for engine repairs. They contain a sequence of actions, so the oil seals must be replaced with the engine head removed. No one questions the correctness of the guidelines, but unless absolutely necessary, disassembling the engine should not be done to such an extent.
Practical experience shows that it is quite possible to do without dismantling the head. When performing work, you need to fix the valve motionless in the upper position, and the craftsmen use a trick by propping it up with a tin rod. A cylinder of this soft metal used as solder is suitable; its diameter should be 8-10 mm. Tin does not scratch combustion chamber parts and does not crumble.
Preparatory operations
- Let's consider performing these actions using the example of a conventional VAZ 2111 engine, the head of which has 8 valves.
- First of all, you need to disconnect the battery; it is advisable to completely remove it from the car and put it aside.
- Next, we dismantle all attachments that limit access to the work site: air filter, fuel pump, distributor or ignition distributor.
- Loosen the timing belt and remove it.
- Unscrew the pulley mounting bolt and carefully pull it off the shaft.
Advice: You should be careful not to lose the key; it is advisable to remove it and put it aside with the already dismantled parts. Experienced craftsmen, as a rule, lay out the elements by laying a cloth on the table in the order of their dismantling. This avoids confusion.
Disassembling the gas distribution mechanism
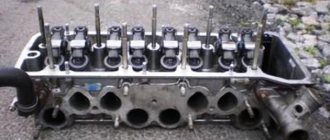
Using a “10” , unscrew the bolts securing the head cover and lift it. Do not use excessive force to avoid damage to the gasket. To dismantle the camshaft, clearly visible in the photo, you need to sequentially unscrew the bolts securing the front and rear bearings; it is advisable to number the fasteners and washers and put them in their original places during assembly.
Now we have access to the valve installation locations and need to disassemble the return mechanism. To do this, you will need a special device called a desiccant. This lever device allows you to compress the spring and release the crackers holding the plate. The immobility of the valve is ensured by an aluminum rod inserted through the spark plug hole.
Using a special lever for disassembly
Tip: Some craftsmen use this technique: select a tube of the required diameter and rest it on a plate, and then apply a sharp blow to its upper end. Moving the plate releases the crackers, which remain in the tube. However, it should be remembered that performing such an action requires a certain skill, and an incorrectly placed blow can lead to bending of the rod.
The procedure for dismantling worn parts and replacing them
When doing work with your own hands, you should be careful and careful to avoid losing parts and not to exert much effort to avoid breakages.
In order to remove a worn oil seal, you will need a special mandrel.
- We put it on the cap and with one blow push the sleeve all the way
- We take out the device along with the cap.
The location of the valve in a deep well makes it difficult to use other methods of dismantling the seal. When using pliers or pliers, never swing or twist the part being removed, as this may damage the valve stem and guides. Before installing a new oil seal, it is better to remove the spring from it, which will allow it to be installed without damage. Before performing this operation, you should dip the part in oil.
Assembly is carried out in the reverse order of dismantling.
- We put the spring and plate on the rod using a device, compress the return mechanism and use tweezers to put the crackers in place.
- Carefully remove the load, constantly monitoring the position of the fasteners. We perform such actions for all 8 or 16 valves sequentially.
- After completing the assembly of the mechanism, remove the rod and rearrange it under the next valve.
The crackers need to be hammered on the upper end of the rod through a drift made of copper or bronze. This will prevent fasteners from falling out of their sockets when starting the engine and damaging the valves. When performing all actions, you should carefully ensure that no foreign objects or dirt get into the combustion chambers, which can lead to scratches on the cylinder bore.
conclusions
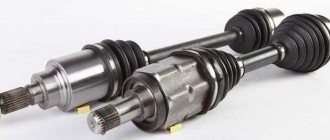
As practice shows, you can actually do it yourself by replacing the valve stem seals on a 16-valve VAZ-2112 without removing the cylinder head . Of course, the procedure will take a sufficient amount of time and effort. So, usually inexperienced car enthusiasts go to a car service center and pay 4,500 rubles. for a replacement, but those who are braver save this amount of money.
Dear friends, today we will tell you in detail and with photographs how to independently replace valve stem seals on VAZ-2112, 2111 and 2112 equipped with a 16-valve engine. The beauty of our story is that in order to replace the oil caps we will not remove the head from the engine, and this is a significant saving of time and labor costs, there is no need to drain the antifreeze, unscrew the manifold, etc.
At the same time, we will do this without using an expensive valve depressurizer, which allows us to do this, but will use a regular valve depressurizer for the VAZ-2110, which can be bought on the car market for 200 rubles. Even before starting work, I recommend purchasing this desiccant, if you have little experience in desiccaning and drying, then take a stock of heels of crackers, we will also need an anaerobic (do not use silicone) sealant, unlike conventional silicone, when in contact with oil, it does not clog the channels but dissolves in it, and also buy a key for tensioning the timing pulley for 50 rubles, since the belt will have to be removed and then set according to the marks. By the way, it wouldn’t hurt to replace the timing belt and rollers at the same time, ideally. If you are ready to do it yourself - no problem, if you lack determination - I can recommend contacting the guys in Minsk to replace the timing belt, they will definitely do it well and inexpensively.
Disconnect sensors, hoses, cables
Well, if you’re ready to do everything yourself, then let’s get started. First, remove the plastic cover from the engine and gain access to the “intake manifold”