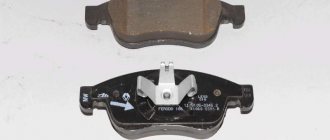
The domestic VAZ 2110 sedan has a transverse engine and is driven by the front wheels. The drive of the front wheels of the VAZ 2110 is arranged as follows: on the left and right, drive shafts are attached to the gearbox using internal constant velocity joints (CV joints), which, in turn, drive the wheels of the car through external CV joints inserted into the hubs.
The left shaft is short, the right one is longer. The outer CV joint has a housing in which a cage with an internal race and 6 balls is located. Thanks to the radial longitudinal grooves in its cage, the rotation angle of the external hinge reaches 42°. The internal CV joint has a similar structure, the only difference being that the grooves in its cage are not radius, but straight.
In addition, there is a retaining ring on its shank, which is inserted into the gearbox. Drive malfunctions are mainly associated with transmission oil leaks, rupture of dirt covers, or wear of metal parts. You can repair the main drive components yourself.
Tuning and repair of VAZ 2110
In this article we will look at how to remove and reinstall the front wheel drives of a VAZ 2110.
This type of repair is more convenient to carry out in an inspection hole or overpass.
- Transmission oil needs to be drained
- Now you should remove the mudguard from the engine.
- Unscrew the bearing nut from the front hub.
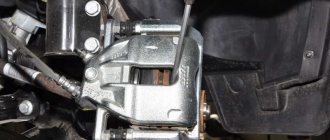
- Unscrew the bolts on the ball joint (2 pcs.)
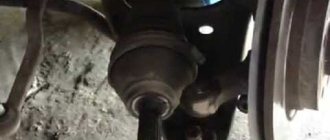
5. Move the steering knuckle and the strut slightly to the side and remove the drive from the hub.
6. Place the drive on the stretcher.
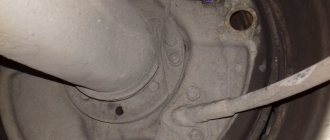
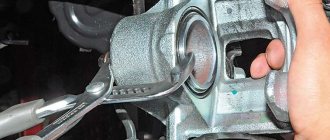
7. Use a mounting spatula to rest against the clutch housing and pull the inner joint housing out of the gearbox. Be careful not to damage the protective ring on the inner hinge.
8. We remove the right drive.
9. Use a knife or screwdriver to pry up the retaining ring on the splined end of the inner hinge housing and remove it.
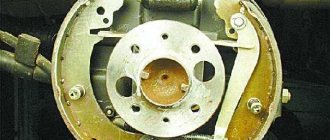
10. To dismantle the second drive or to remove the gearbox, you will need to insert a plug into the hole. The plug should fit in shape, similar to the shank on the inner joint body. Such a plug can be made of wood.
11. Dismantling the left drive is similar to the right one. For convenience, the mounting blade rests on the bolt for fastening the wheel.
12. In the same way, we pull out the internal hinge housing and remove the left drive of the VAZ 2110.
It will be better if you install a new snap ring on the inner joint shank.
13. To install the drive in place, insert the inner joint housing into the gearbox and lightly tap the end of the outer joint with a copper hammer.
14. Now we insert the drive into the hub.
15. That's all, replacing the front wheel drive of the VAZ 2110 is completed.
Video “Removing the gearbox”
This video shows the step-by-step process of removing the transmission.
Most owners of 2108-21099 are aware of the problem with engaging and sometimes knocking out 2nd gear. And I was no exception))) Since the cost of work at the service station did not particularly suit me, I decided to go through the checkpoint myself. As it turned out later, there is nothing complicated about this. Without problems with the Murzilka, you can safely climb into the gearbox!)) Having studied a lot of articles on the Internet, having studied all the intricacies, I got to work at the moment while the car was being painted (naturally, only the bare body was painted), and everything else was in the garage and needed a little renovation. I took the box to the car wash. They washed it thoroughly for me there. The next day I disassembled the box, laid out each piece on pieces of paper and signed the next removal number)))) Oh, how tedious it was. The first problem arose with the nuts on the shafts, which only my father could unscrew. The second problem arose with the bolts securing the metal plate that holds the bearings of the primary and secondary shafts, under a Phillips screwdriver. Well, no matter how much they didn’t want to unscrew, I already broke 2 of my favorite large screwdrivers until I bought an impact screwdriver)))) The impact screwdriver became a new favorite, the screwdriver is SUPER))) Having unscrewed the plate, I found a collapsed plastic separator of the secondary shaft bearing (((
And naturally, the ball bearings were replaced with bearings with a metal cage, and the roller bearings were simply new
With grief, we pick out the retaining rings of the bearings with round pliers and remove the crankcase... I discovered a broken spring in the gear shift mechanism, which reduces the play of the lever and helps to disengage the gear.
I ran through all the auto stores and the search was unsuccessful ((((And of course, everyone offered to buy the complete mechanism for 1,700 rubles, diligently insisting that I had no choice, that I would still have to buy it. I even went to our production specifically for the spring GOC, in an attempt to find something similar, but alas... But to spite all the store sellers, I naturally found help on GOOGLE (I always turn to it) and found an interesting idea to install a spring from the radiator cap of a VAZ Classic. The old cap with 6ki father))) And of course she fit like her own.
Removing the front wheel drives of a VAZ-2110 car
We remove the drives to replace them or when dismantling the gearbox. Repair or replacement of the drive is required if there are knocking noises when cornering or increased vibration that occurs when the joints wear out. Wear of the hinges is caused by sand and dirt getting into the internal parts of the CV joint, when the rubber boots rupture.
We carry out the work on an inspection ditch or a lift.
To do this, remove the engine splash guard:
Using a 10mm socket, unscrew the five nuts for the front fastening of the mudguard to the body.
Use a 10mm wrench to unscrew the screws on the front plastic shield.
Using a 10mm wrench, unscrew the screws for the rear fastening of the plastic shield
Using a 10mm wrench, unscrew the two bolts securing the mudguard to the side members
To do this, drain the oil from the gearbox, use a 17 key to unscrew the plug and drain the oil into a container (volume - 4 l).
After draining the oil, screw the plug back in
We unscrew the front hub bearing nut, to do this we remove the hub cap
Use a narrow chisel to straighten the dented collar of the nut.
We lock the rear wheels with the handbrake, engage first gear and place shoes under the wheels.
Use a 30mm socket to loosen the hub bearing nut.
Loosen the wheel mounting bolts.
We hang up the front of the car and remove the wheel.
Unscrew the two ball joint mounting bolts
What tool will be needed to remove
It is better to remove the box in a garage with a pit or on an overpass. If it is not possible to use a pit, then you will need a jack and stands to fix the car at a certain height. It will be quite difficult to do without an assistant, so it is better to agree with a person in advance.
It is better to prepare all the tools in advance. In addition to wrenches, you will also use spanners. The rotating head will make removing the gearbox easier and simpler. It is also necessary to secure the car in a certain way so that there is access to the protection casing from below.
Methods for diagnosing CV joints
Grenade structure: 1 - body with outer clip; 2 - separator; 3 - inner race; 4 — balls (6 pcs.); 5 — drive shaft; 6 — retaining ring; 7 — corrugated cover; 8 — cover clamps
How to determine which grenade is damaged and needs to be replaced? There are several diagnostic methods.
- First, let's try to determine the crunch of the external grenade. The car is stationary. We pull the axle at the hinges one by one and listen. A knocking sound appears, which means there is play in the CV joint, which indicates that the grenade is damaged.
- Now let the car drive on a flat area. To install, what kind of grenade crunches, how to proceed, you need to turn the steering wheel all the way to the right, then do the same to the left. There was a crunch when you turned to the right, which means the right outer grenade is faulty, a crunch when turning left means the left outer grenade.
- If the internal grenade malfunctions, the question arises: which one, how to determine the failure? To do this, we choose a road surface with bumps and holes so that the wheel drops as low as possible, and drive the car straight. We listen to the sounds, alternately driving either the left or the right front wheel into the hole, and by ear we determine which grenade is crunching.
- Raise the car on a lift. Engage first gear so that the wheels can rotate while suspended. If the grenade malfunctions, you will hear a hinge crunch.
We found out what, how and in what place a grenade “clicks”. All that remains is to start replacing the damaged CV joint. This can be done at a car repair shop or you can carry out the repair yourself if you have the appropriate experience. There are three basic rules, when followed, the car’s drive will last a long time.
The CV joint wears out quickly under significant loads and dirt. Take care of your car.
Video about removing and replacing the gearbox on a VAZ-2112
I have already removed the gearbox twice, I can say that I am now a professional in this matter))).
Loosen the bolt on the gear selector shaft. So as not to configure. Bolt with a cone. He'll come in himself. Loosen the two bolts securing the ball joint to the steering knuckle. The left “sword” does not need to be removed. It is easy to move the gearbox on it. If there is no hole, put the gearbox back over the top using a device similar to sawhorses used for sawing logs. Only instead of a log there is a tube with a rope wound around it. Lifting is done by unscrewing the pipe, the second one is pushed into place. Another variant. The gearbox is placed on two or three tires (the front of the car is raised as much as possible), pushed under the gearbox under the hood, and the front of the car is lowered. Then they push it onto the engine. Thanks to all. And don't strain your lower back!