The need to replace the CV joint (grenade) arises after knocking and crunching noises appear in the front part of the car in the wheel area, especially when cornering and when driving over uneven surfaces. The breakdown is unpleasant and most motorists immediately go to a service station to replace the faulty CV joint.
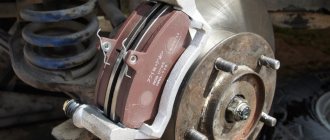
However, as practice shows, replacing a VAZ 2108 CV joint is not as difficult as it seems at first glance; the work is quite dirty, but its complexity is not comparable to replacing brake pads, which most car owners change with their own hands. It will take you no more than 2 hours to do everything. To make sure that the cause of the crunching is precisely the “grenade,” perform several simple tests. Grasp the CV joint with your hand and try to loosen it; if you feel significant play, an urgent replacement of the CV joint is necessary.
I recommend watching the current video!
What is a grenade?
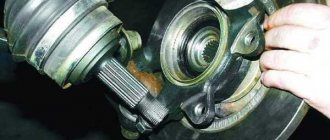
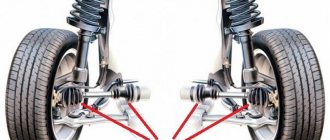
A grenade is the colloquial name for a constant velocity joint, which allows motion to be transmitted from the vehicle's gearbox to the wheels. Pay attention to the design of the car's drive. From the gearbox, consisting of shafts and a differential, there are two rods, at the ends of which there are moving elements (CV joints). They allow movement to be transmitted to wheels that are lower than the differential axis.
It is with the help of movable hinges that it is possible to realize the rotation of the front wheels. Essentially, this is a kind of crosspiece that is installed on the cardan shafts. But the grenade is much stronger and more durable. Why a grenade? Yes, it’s just that this element is very similar to this projectile and nothing more. Consists of three parts - outer and inner cages, balls between them. A special lubricant is pressed inside.
How to determine if a hinge is faulty? Diagnostics
CV joint diagnostics
At any service station, before repairs, they carry out diagnostics of the unit that is going to be repaired. Let's do it ourselves:
- Are there any strange sounds while driving your favorite car? One possibility could be a faulty CV joint.
- Most often, a CV joint in need of repair manifests itself during turns (not necessarily sharp ones). When turning the car, a sound comes from the hood, similar to metal jamming, the sound of metal breaking, metal grinding on metal.
- If such sounds appear even when driving straight, then the CV joint definitely needs to be changed!
Advice! Do not ignore sounds that occur when operating the vehicle. In some cases, this can cost the lives of the driver and passengers.
- After sounds similar to a malfunctioning grenade appear, it is necessary to diagnose the front chassis of the car in a pit or overpass, or, as a last resort, just in the garage.
- To do this, you need to lift the car using a jack. Raise the side from which the sound was heard. Don't forget to put wheel chocks under the rear wheels of the car.
- When the wheel can rotate freely, you should rotate it around its axis and listen for sound. If the sound does not appear, then you should turn the wheel in the direction of the turn at which it occurred.
- When a sound appears, it will become clear that the VAZ 2112 CV joint is faulty and requires replacement as soon as possible.
- If the sound still does not appear, then check the other side (the other wheel) in the same way. By the way, if the sound appears, check it anyway - you may have to change both grenades.
After diagnosing the constant velocity joints, you can begin replacing them.
What will you need?
Here is a short list of what is needed to replace a grenade on a VAZ 2112:
- Partner
- A set of sockets or spanners (you will still have to find a 30 socket)
- Rust remover (WD-40 or equivalent)
WD-40 - no repair can be done without it
- Long collar
- Pre-purchased CV joint (average price) and lubricant for it (usually included)
- Hammer
- Pliers
- Flat screwdriver
- Vise
- Petrol
- Brush (a regular paint brush will do)
- Rags
- Copper or bronze tip
- Metal brush
In some cases, you may additionally need the following:
- Oil container
- Plug in the gearbox
- Watering can
Replacement frequency
It is hardly possible to name the exact mileage after which it is necessary to replace 2114 grenades. In many ways, the service life of the elements depends on the following factors:
- Manufacturer. Domestic and European grenades last much longer than the Chinese ones that have flooded the market in recent years.
- Metal quality. The main thing is that the metal is hardened, otherwise wear out will occur very quickly.
- Driver's driving style. If you are accustomed to an aggressive style, then you cannot envy the grenades, as well as the entire car. The resource of elements decreases.
How to increase service life?
Sufficiently high-quality grenades can last 30-60 thousand km. In some cases, the resource increases by 2-3 times. To do this, you need to follow these rules:
- Do not load the elements - sharp acceleration and braking increase wear.
- Monitor the condition of the anthers - if they tear, dust and water will get onto the hinge. This will lead to the destruction of the metal.
If you change the boots in a timely manner and apply new lubricant, the grenades can last much longer. And it is worth paying attention to the fact that the elements installed at the manufacturer are much higher quality than those sold in stores.
Therefore, if you are lucky enough to become the first and only owner of a nine, only monitor the condition of the anthers and replace them in a timely manner.
Tools for repairs
The procedure for replacing VAZ grenades is quite simple, but you will have to suffer a little, since knocking the old element off the drive is problematic. You need these tools:
- Set of sockets and keys. In particular, you will need a socket wrench or a “30” socket.
- Jack (it is best to use a hydraulic one paired with a support).
- Hammer.
- Chisel. Before replacing the grenade on the VAZ-2109, it must be removed; to do this, you will need to loosen the nut.
- Capacity 4-5 liters.
- Puller for retaining rings.
- Vise.
You will also need a new repair kit. It consists of a grenade, a locking ring, lubricant, a nut, a boot and two clamps.
How to independently replace the internal grenade on VAZ cars
CV joint (constant velocity joint) is a mechanism that allows you to transmit torque between misaligned shafts. The device is actively used on front-wheel drive vehicles. On each shaft coming out of the gearbox there are two of them - internal and external. Repair is impossible; if the unit breaks down, it is replaced as an assembly.
In what cases is it necessary to replace the inner CV joint?
Replacing the internal CV joint on front-wheel drive VAZ vehicles is required if the following symptoms are present:
- Crunching and knocking noises when driving and accelerating in a straight line;
- Vibration and shock when changing gears;
- Significant play when testing by hand;
- If the “grenade” fails completely, the vehicle cannot move further.
The main reason for the malfunction of the VAZ grenade is the entry of water and dirt through the hole in the torn boot. The second possible cause of failure is a sharp press on the gas with the wheels fully turned, although in this case you risk killing the external rather than the internal grenade.
Be sure to read
In addition to the above, replacing the internal CV joint on VAZ-2110 and other models may be necessary if the quality of the previously installed joint is poor.
Replacing the inner CV joint with your own hands
The procedure for replacing a “grenade” is the same for the entire front-wheel drive VAZ line, starting with 2108 and ending with VAZ-2115, “Kalina”, “Priora”, “Grant”. Before removing the inner CV joint, the oil is drained from the gearbox. Then proceed according to the following algorithm:
- Unlock and unscrew the hub nut. To make the work easier, a piece of pipe about 1 meter long should be put on the key.
- The desired side of the car is hung on a jack or lift.
- Remove the wheel.
- Remove the washer located under the hub nut installation site.
- Disconnect the steering tip.
- The CV joint is removed from the hub.
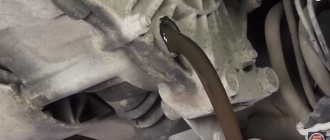
- Using a pry bar, remove the drive and internal joint from the gearbox.
Note: when removing both drives at the same time, a suitable mandrel should be installed in their place.
How to change the “grenade” with the drive removed? To do this, clamp the shaft in a vice, loosen the clamps and remove the boot. After this, the hinge is knocked off the splines with hammer blows.
The new CV joint should be hammered by applying light blows to its end with a hammer. For this it is better to use a wooden mallet. The “grenade” is first filled with a special lubricant.
Before installing a new constant velocity joint, it is necessary to clean its seat from old grease and install a new boot. Assembly is carried out in reverse order.
The repair is considered complete after successful sea trials. In this case, there should be no extraneous sounds from the drive side in all modes of vehicle movement.
Boot replacement and repair
The boot can be changed without removing the grenade if you have special equipment. His work is demonstrated on video.
If you do not have such a device, to remove and replace it, you must perform the above procedure for removing the drive and dismantling the hinge. The procedure is necessary if there is even minor through damage on the boot.
Temporary repairs to the CV joint boot can be made without removing it from the vehicle. To do this, you need to thoroughly clean and degrease the damage, then seal it with a piece of rubber and cyanoacrylate-based glue (superglue).
Note: express repair is a temporary measure. Replacing the inner joint boot may be delayed for a short time, but not completely cancelled. Typically, these types of repair methods are used to get to the point of repair.
CV joint repair
As mentioned above, the hinge cannot be repaired. Conventionally, one of the repair measures includes washing the “grenade” after driving with a damaged boot.
Washing is carried out at the same time when the damaged boot on the pomegranate is replaced. The hinge is carefully knocked off the shaft, inspected for damage and thoroughly washed to remove any dirt and grease in gasoline or kerosene.
After washing, the assembly is filled with lubricant and mounted in place, having previously installed the boot. The procedure makes sense only if there are no obvious signs of a joint malfunction.
A crunchy or knocking part definitely needs to be replaced, since wear forms on the working surfaces of the inner race, and it is no longer possible to stop the destruction. Continued operation of the vehicle may be dangerous for the driver and other road users.
We are starting renovations
So, the first thing you need to do is dismantle the old grenade. By the way, before changing the boot on the VAZ-2109 grenade, the same manipulations are performed. The thing is that it can only be replaced after the removal has been carried out.
Without this, installing a new boot simply won’t work. You will need to perform the following manipulations:
- On the side to be repaired, loosen the wheel fastening.
- Using a drift, you need to straighten the edges of the nut.
- Place chocks under the rear wheels to prevent the car from rolling away.
- Use a 30mm wrench to remove the nut.
- Raise the side of the car that is being repaired with a jack, remove the wheel, and place the car on a support.
- Completely unscrew the nut from the grenade. Please note that the washer is used when installing a new grenade - do not lose it!
- Drain the gearbox oil.
- Remove the two bolts that secure the ball joint to the suspension arm. Check the condition of the hinge - if it is deplorable, you will have to change it.
- You will most likely have to pull the pin out of the steering knuckle. The tip may interfere with the removal of the grenade.
- Now that everything is ready, you can pull the hub along with the strut to release the CV joint.
Why do you need a CV joint?
Kit for replacing external grenade VAZ 2110
CV joint is a shortened name for the angular velocity joint, designed to transmit torque or torque directly to the wheel. But, whatever one may say, sooner or later there comes a time when a grenade needs to be replaced, because it is a mechanism. As a rule, the price of high-quality CV joints for vases, especially external ones, is not low, but it is better to buy expensive ones right away, so that you will remember about replacing them again after a long time. The wheel drive, to be precise, is not only an external grenade. It consists of an inner and outer grenade connected to each other by a drive shaft.
VAZ 2110 external grenade torn
If the inner CV joint is very susceptible to sand and dust and you should constantly monitor its boot (see How to replace the boot), which should not remain in a torn state for a long time, then the situation with the outer grenade is not so bad.
Note. This does not mean that the external grenade requires less attention. It’s just that both CV joints are structurally different from each other.
So:
- Replacement of both CV joints is usually carried out after certain symptoms appear. The most common is a noise or knocking noise that comes from the side of the bridge when the car is moving. The knocking noise is especially noticeable when cornering. And at such a moment, even among the people it is customary to say: “a grenade crunched on the car.”
- You can finally check the version of a failed grenade as follows: drive into the sand and turn the steering wheel to the side. After this, you will need to start moving with slipping. And if at this moment a crunch is clearly heard, it means that the grenade no longer works.
- The external grenade, as well as the internal one, should be replaced immediately. The fact is that if you do not change the CV joint for a long time, the drive mechanism may jam and the car will not be able to start moving. And this can happen anywhere. For example, on a highway where a motorist stops to refuel or rest. You will have to call a tow truck or change the grenade on the spot, which is very inconvenient.
- The CV joint can be regular or tripoidal. The design of the second grenade is fundamentally different from the first, but it’s still the same, and many people install it on the drive of their car.
How to remove a grenade from the drive?
The internal grenade is removed from the gearbox by light tapping. But one condition must be observed - if you remove two inner grenades from the box at once, do it one by one. First, take out one, replace it with a plug, then the second. Otherwise, the differential may simply fall apart. And for repairs you will need to completely disassemble the gearbox.
Now let's talk in more detail about how to change the external grenade on a VAZ-2109. This is not a very difficult matter, but it will require skill. The first thing you need to do is cut off the old boot - you won’t need it anymore, so you can remove it in this “barbaric” way. The clamps, of course, also need to be removed.
After this, clamp the shaft tightly in a vice so that the grenade is at the bottom. Position it so that it sits flat on the shaft - you can knock it down faster. Apply several sharp blows through the wooden spacer. The grenade should come off the shaft without any problems. You cannot strike with metal objects, as you can destroy the integrity of the element. When replacing grenades on a VAZ-2114, it is necessary to remove the drives completely, this will significantly simplify the repair.
Replacement
After all the preparations, you can begin the process of replacing grenades with a VAZ 2112.
Removing the axle shaft
So:
- Perhaps this is the most interesting thing in the process of replacing a grenade.
- Place the car on a level platform, inspection hole. Install wheel chocks.
- First, remove the hubcap from the wheel, if you have one installed.
- Now you need the help of a partner. He should take a driving position and press the brake pedal hard.
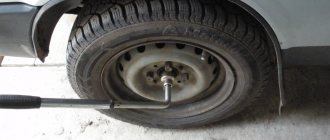
- In this case, you should take a 30 socket (in some cases 27 or 32) and a large wrench. The head is put on the hub nut, which secures the grenade to the hub (located in the middle of the wheel) and unscrew it with a large wrench.
Unscrew the nut with a large lever!
Advice! It will take quite a lot of effort to complete the last step described. Therefore, the longer the driver you take, the easier it will be to unscrew the nut.
- Then you can unscrew the wheel bolts and remove the wheel.
- Spray the splined surface of the hinge with rust remover. Most often, an additional remedy is needed - you can’t just knock it out.
- When the wheel is removed, it is necessary to free the hub from the ball joint. To do this, take a suitable head and unscrew the two bolts securing the ball joint to the wheel hub.
- When the hub is freed from the ball joint, you can try to remove the splined surface of the grenade from the hub. Remove the entire hub nut and metal washer.
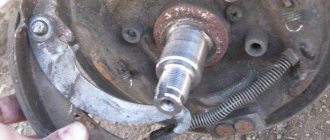
- Now you need to take a copper (bronze) adapter and a hammer, and with their help we knock the splines out of engagement. If necessary, add more WD.
- When the splines are disengaged, move the strut to the side and remove the axle shaft from the hub.
Instructions for replacing the outer CV joint of a VAZ 2112
Advice! During operation, make sure that the internal grenade does not jump out of the gearbox housing - this is an unnecessary loss of oil.
Next, we will consider the most profitable option for replacing a grenade on a VAZ 2112 - replacement without removing the axle shaft from the car.
Grenade replacement
Two methods will be considered:
- Remove the boot from the grenade. To do this, use pliers to cut through the fastening clamp and, using a screwdriver, remove the boot from one side. Turn it out so that it does not interfere with further work.
Complete removal of the CV joint boot of the VAZ 2112
- Now again you will need the help of a partner. He needs to hold the axle shaft tightly so that it does not jump out of the gearbox. It is recommended to rest the axle shaft against something (usually a lever or anti-roll bar).
- The outer grenade must be turned with the slots up. This gives access to the grenade's internal bearing.
- It is necessary to place a copper adapter on the inner bearing and knock down the grenade with a hammer. When knocking down, the axle shaft must be rotated so that the bearing moves evenly and does not jam.
- After the outer CV joint has been removed, you can begin installing a new one.
Note! Above is the IDEAL option for removing the CV joint. And then we will talk about how it happens MOST OFTEN.
- After removing the grenade from the hub, the axle shaft is removed and pulled out of the gearbox housing. Place a container under the flow of oil from the box so that you do not have to drain the oil. Ideally, a special plastic plug is inserted into the gearbox hole.
- The axle shaft is clamped in a vice for ease of further work.
- The boot is removed from the grenade, but remains attached to the axle shaft. It turns inside out so it doesn't get in the way. If you plan to replace the boot, then it is either cut off immediately or removed after removing the grenade.
- We remove the grenade in the same way as above. We hit the bearing with a pointer and a hammer, and it comes off the axle shaft.
The grenade is removed as shown in the photo
- If we change a grenade, then we change it. If, for example, we are only replacing a torn boot, then we do the following.
- The boot is removed and a new one is put on the axle shaft.
- The grenade is thoroughly washed with a brush in gasoline and then wiped. Then you need to fill it with special lubricant for CV joints.
- If you install a new grenade, then do not forget to fill it with enough grease and distribute it evenly there by turning the bearing.
Advice! Before installing the grenade on the axle shaft, pay attention to the condition of the retaining rings. Replace them if necessary.
- A new or repaired grenade is installed on the axle shaft much easier than it is removed. One sharp blow with a hammer through the attachment and the grenade is in place. Experienced mechanics can even put a grenade on by hand.
- Next, you need to put the boot on the seat in the grenade and secure it with clamps. There are special clamps for grenades (do not use plastic ones). Metal clamps are installed using pliers and a screwdriver.
Advice! Clean the spline joint, both on the grenade and in the hub, with a metal brush and lubricate.
Now the VAZ 2112 axle shaft with a changed external constant velocity joint is ready for installation on the car!
Installing the axle shaft on the car
So:
- The axle shaft is inserted into the gearbox housing. Its other end is inserted into the hub until it stops.
Bend the strut and put the hub on the grenade splines
- Next you need to reattach the ball joint.
- Don't forget to put the metal washer back on and tighten the nut that secures the grenade to the hub.
- Reinstall the car wheel and lower the car from the jack onto the wheels.
- Again, the partner must press the brakes as hard as possible. You take the wrench and socket and tighten the nut with good force!
- Next you need to tighten the nut. This is done with a hammer and a blunt chisel type attachment. This is done to prevent the nut from unscrewing.
That's basically the whole replacement. If something is not clear in the text, remember that you can always watch a visual video that will show it all live.
Installing new hinges
And the final stage remains - installing new hinges on the drive. You already know almost everything about how to change a grenade on a VAZ-2109. All that remains is to install a new element.
First, wash the shaft, get rid of dust and lubricant residues, then put on a new boot. Next, perform the following manipulations:
- Install a new retaining ring.
- Carefully, trying not to damage it, place the grenade on the shaft. To make it sit down, you need to apply several sharp blows through the wood spacer.
- Apply lubricant under the boot and on the inside of the hinge. By the way, the kit comes with a small amount, it is recommended to add a little more.
- Secure the boot with two clamps.
Once you have assembled the entire drive, you can begin installing it on the car. The work is done in reverse order. First put the inner CV joint in place, then the outer one.
Tighten the nut and secure it with a chisel. To prevent corrosion, you can apply a small amount of Litol to the nut and close it with a cap. Now you know how to change a grenade on a VAZ-2109 yourself. The procedure will not take much time, but you can save a lot of money. Workshops will charge about the same amount for repairs as a set of hinges costs (about 1,000 rubles).
Features of replacing the internal unit
If the internal CV joint 2108 is being replaced, then complete removal of the drive is required. To do this, first disconnect the outer joint (described above), but do not need to remove it from the shaft.
Then we take the pry bar and drive its flat end between the outer frame of the hinge and the box body. Using the pry bar as a lever, overcoming the force of the locking ring, we remove the joint limit switch from the gearbox.
It is worth noting here that it is not recommended to remove both drive shafts at once, so as to avoid displacement of the gears in the box; the joints should be replaced one at a time.
Related link:
Homemade pre-heater for a VAZ car engine
Next, replacement work is carried out, identical to operations with an external CV joint. After this, the drive is put in place.
In this case, you still need to correctly insert the CV joint into the VAZ-2108 box. The hinge must be seated in the gearbox as far as it will go; however, blows to the end of the assembled unit must not be struck, so as not to damage the new boot.
To insert a CV joint, you can first insert it into the hub, and then insert it into the box. And to overcome the force of the locking ring, we make pushing movements with the hub, that is, in essence, we hammer the end of the inner CV joint with the strut. Such impact movements will not cause any harm to the hinges, and the anthers will remain intact. But you can simply hammer the shaft assembly using a spacer and a hammer.
Before assembling the car, you should make sure that the internal hinge has entered the gearbox all the way and is fixed with a locking ring (it should fit into the groove inside the box), otherwise the CV joint may simply fall out during operation of the car.
And then we put all the removed elements on the car. The operation to replace CV joints on a VAZ-2108 can be considered completed.