Causes and breakdowns
In reality, the resource of the CV joint turns out to be significantly less, which is caused by operating conditions, poor quality of roads, driving habits and other factors.
People usually call a CV joint a “grenade,” which is due to the external similarity of the element to this explosive device.
Here's what you should know about grenade malfunctions:
- Practice shows that the most common cause of CV joint failure is dirt, dust, and sand that enter the mechanism through a damaged boot;
- Sometimes the problem of a non-functioning grenade can be solved by replacing the boot. This is possible if the CV joint itself has not yet worn out due to exposure to contamination;
- If the damaged boot is not detected in time, the grenade will be completely worn out within literally 200 kilometers;
- If the CV joint fails, a strong crunching sound appears when cornering and accelerating. Such a symptom indicates the need to urgently replace the CV joint;
- The cost of new grenades is quite affordable; they are available at any auto parts store. But you should purchase those that meet the technical requirements of the VAZ 2109;
- If you have at least a little experience in repairing cars yourself, it is quite possible to replace a grenade with your own hands.
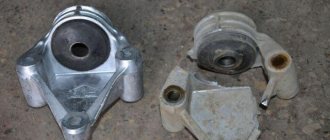
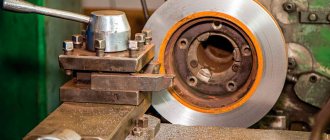
Old and new element
Replacement frequency
It is hardly possible to name the exact mileage after which it is necessary to replace the 2114 grenade. In many ways, the service life of the elements depends on the following factors:
- Director. Domestic and European grenades last much longer than the Chinese ones that have flooded the market in recent years.
- Metal quality. The main thing is that the metal is hardened, otherwise production will happen very quickly.
- Driver's driving style. If you are used to an aggressive style, then you won’t envy the grenades, much less the whole car. The resource of elements decreases.
Types of CV joints
Before you begin repairs, you need to find out exactly how the unit is designed.
The pair of drives on the VAZ 2109 is equipped with a total of 4 CV joints.
CV joint type
Peculiarities
There are 2 of them. They transmit torque to the axle shaft from the gearbox
There are also two of them. Installed on the ends of the axle shafts and transmit torque directly to the wheels
Outer
This arrangement of grenades allows the wheels to rotate during turns and constant operation of the suspension system. To put it simply, the outer CV joints are responsible for transmitting torque when cornering, and the inner ones are responsible for the vertical movement of the wheels. These are collisions with bumps, holes, roll in turns, etc.
Interior
VAZ 2109 grenade replacement
The “Grenade” (as it was popularly called) was called a constant velocity joint (or, as it is correctly called, a constant velocity joint). It is designed for mechanical transmission of torque from the gearbox drive shaft to the wheels and ensures uniform rotation (without jerking) of the wheels when turning at angles exceeding 70 degrees. The breakdown of this important organ, most often caused by dirt getting under the boot (rubber protection), is serious and must be fixed as soon as possible, because it is the most important element in the front-wheel drive.
To find out whether this mechanism requires repair, you need to find a sufficiently large area, turn the steering wheel in any desired direction until it stops, and move off very sharply. If during a maneuver you hear a characteristic crunch in the front of the car, it means that the grenade requires immediate repair. The side that requires repair corresponds to the side to which you turned the steering wheel during the maneuver.
The choice of the repair side (if both are worn out) is yours, but it is recommended to replace the grenade first on one side and then on the other. However, if you are replacing more than one, you can do the work on both sides.
- First of all, remove the boot from the hub nut on the wheel and loosen the nut. It's worth noting that you will need plenty of force, so it is recommended to use all possible leverage.
- Loosen the wheel bolts slightly, jack up the car, place a stump with a diameter of at least 30 cm under the body and remove the wheel. Then you can finally unscrew the hub nut and throw it away, because it can always be replaced with a new one.
- Now you need to remove the brake caliper so that it is not in the way, which is held on by two 19 bolts. There is no need to unscrew the brake hose; it will be enough to hang the caliper on it in the engine compartment.
- Using a 17mm wrench, also unscrew the two bolts that hold the lower ball joint and move the lower arm down so that it is out of the way.
- Place a small wooden block against the hub and, with sharp blows of a hammer, knock out the CV joint inward.
- Remove the clamp from the boot, then remove the boot itself, clamp the drive shaft with a gas wrench and knock out the outer grenade with a hammer. If it is necessary to replace the internal CV joint, then drain the transmission oil from the gearbox in advance and, using a chisel and hammer, remove the internal grenade.
- Next, first of all, a boot is installed on the drive shaft, then the outer grenade is lubricated at the junction with the drive shaft, a clamp is secured to the boot and a retaining ring is installed. The drive shaft must be hammered onto the grenade with a hammer made of soft metal or with some kind of lining (the same block).
- The remaining lubricant is squeezed out inside the boot, which then must be placed directly on the grenade.
- Now all that remains is to carefully drive the drive shaft with the grenade into the gearbox and drive the grenade itself into the wheel hub using shims.
- Insert the ball joints into place, or, best of all, replace them with new ones while you still have the opportunity. After this operation, tighten the two ball joint bolts.
- Attach the caliper to the hub. The pads can also be replaced if they are worn out.
- We install a new hub nut and tighten it until it stops, after which we install the wheel, tighten it, remove the car from the jack and, using an additional lever, tighten the hub nut as tightly as possible. Don't forget to also wear a duster.
As you noticed, there is nothing complicated in this process! Good luck on the roads!
Replacement
If problems arise with grenades, you should determine which ones have problems. Next we will look at how to change the drive and how to remove it. Additionally, we recommend watching the repair manual video.
The procedure for replacing inner and outer CV joints differs from each other, therefore each stage should be considered separately.
Let's start with the internal.
Inner CV joint
Rubber boots are a vulnerable element of the grenade design. It is not uncommon that by replacing the boot, washing the grenade with gasoline and applying new lubricant, it is possible to solve the problem. If the wear of the CV joint is insignificant, such measures can replace a full repair.
But if you discover the breakdown late, you will have to completely replace the inner CV joints.
- Apply the handbrake and install chocks under the wheels.
- Unscrew the hub nut using a wrench and a socket. Carefully remove the punching elements from the nut with a punch. This way you will be able to preserve the carving on the garnet. The nut itself will need to be replaced with a new one during reassembly.
- The main thing here is to unscrew the nut, lowering the wheels to the ground. Otherwise, you risk breaking the differential and other gearbox components.
- Raise the car using a jack on the desired side, first loosening the wheel nuts. Remove the wheel.
- Drain the gearbox oil. This can be done earlier, at your convenience.
- Release the steering knuckle from the ball joint at the bottom. To do this, unscrew a pair of mounting bolts.
- Since you have already removed the hub nut and unscrewed the ball joint from the steering knuckle, proceed to removing the splined part of the grenade. To do this, pull the brake disc and strut assembly towards you. She has a decent ride. Just remember to turn the steering wheel all the way so that the tip of the steering wheel extends as far as possible.
- Pry the inner grenade with a pry bar, which will allow you to remove the drive.
- Having taken out the CV joint, look at the condition of the oil seal in the gearbox. If you find traces of leaks, be sure to replace the element.
How to install a new CV joint on a VAZ.
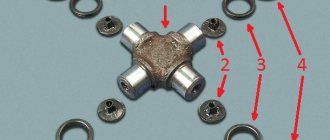
Be sure to follow this sequence for installing new parts:
- Small clamp.
- Grenade boot.
- Large clamp.
- Retaining ring.
- The CV joint itself.
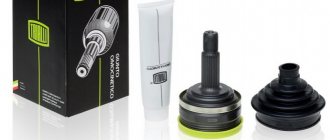
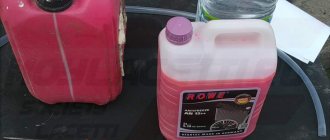
First, we clean the drive shaft from dust, dirt and old grease. Most CV joints come with lubricant, a boot, two clamps and sometimes a new hub nut. If suddenly there is no lubricant in the kit, it is better to use graphite lubricant, and if it is not available, then simple lithol. First of all, we put on a small collar. Then the boot (it should go behind the limiting washer) and a large clamp. Then we put a retaining ring on the drive shaft. Now open the tube of lubricant and completely squeeze it into the grenade. Now it's time to put the CV joint on the drive. Because of the locking ring, it will be difficult to insert the drive into the grenade, so we take a hammer and lightly, trying not to damage the thread, press the grenade into place. Now you need to put the boot on the CV joint and tighten the clamps. Assembly occurs in reverse disassembly sequence, but there is one nuance! Do not overtighten the hub nut! This may cause the bearing to hum. The hub nut must be tightened with a force of 225.0–250.0 N*m. Of course, few people have a torque wrench. So, tighten the nut tightly, but not with all your might. In theory, a force of a maximum of 25 kg will need to be applied to a meter-long knob. But, the extension pipe will spring back under such force, so how can you describe it exactly? But obviously there is no need to jump with weight.
I hope I helped you. If you have any questions, ask them in the comments.
Possible causes of crunching
An experienced driver can by ear determine the location of a car malfunction. This quality comes with age. However, it is very difficult to confuse the crunch of a grenade with another sound. Let's figure out what a CV joint is. On the outside it is made in the form of a bowl, and on the inside the body has semicircular grooves. There are six of them.
In the internal space there is a spherical fist (clip) with 6 grooves and a splined connection for the axle shaft. Rotation occurs through the force that the cage transmits to the body through the balls located in the separator. The balls, moving along the grooves, change the angle between the axes.
- low-quality or defective products, including counterfeit ones, have been identified;
- low-quality lubricants are used or they are absent;
- boot damage;
- driving on bad roads or aggressive driving style.
Each part has its own production resource. And over time, play appears in the hinges. The rolling of the balls, now more free, produces a sound reminiscent of crunching. It may appear when turning, sharp acceleration, or overcoming obstacles.
There are 2 grenades installed on the drive wheels (internal and external): the first transmits rotation from the gearbox, the second - from the axle shaft to the wheel hub. Therefore, if an extraneous sound occurs, you need to determine which CV joint is making the sound (located on the left or right, inside or outside).
Signs of failure of the outer grenade (CV joint).
There are two options here:
- signs that your grenade has already broken
- signs that the grenade will soon come out and break .
How to understand that a grenade will soon break.
Of course, the first sign of a malfunction of the external grenade is a crackling sound . If you hear a crackling noise while driving with the steering wheel turned, it is definitely a CV joint. The greater the angle of rotation of the wheel and the harder you press on the gas, the louder the clicks. Another sign that does not always appear is vibration on the steering wheel at speeds greater than 80 km/h. The vibration is only slightly similar to the vibration from an unbalanced wheel. It usually manifests itself as a slight twitching of the steering wheel.
How to understand that the outer CV joint has broken.
If the CV joint breaks, the car will stop moving. In any gear engaged, press the gas, the speed increases, but the car does not move.
How to understand that it is the outer CV joint that has broken, and not the internal one or the clutch in general (the first signs of failure are similar to the signs of a clutch failure)? First of all, start the car and put it in any gear. Next, open the hood and look in turn at each of the shafts going from the box to the wheels (one short, the other long). If any shaft is spinning, it means that the CV joint has broken on this side.
I recommend not just visually looking at the shaft, but touching it with some long, hard object, such as a stick. The main thing is that there is nothing on it that could wrap around the shaft . When you touch the shaft with a stick, if it is spinning, you will feel a slight vibration. This is usually done in the dark, because it is difficult to understand whether a cylindrical object is spinning, especially in the dark.
Methods for diagnosing CV joints
Grenade structure: 1 - body with outer clip; 2 - separator; 3 - inner race; 4 — balls (6 pcs.); 5 — drive shaft; 6 — retaining ring; 7 — corrugated cover; 8 — cover clamps
How to determine which grenade is damaged and needs to be replaced? There are several diagnostic methods.
- First, let's try to determine the crunch of the external grenade. The car is stationary. We pull the axle at the hinges one by one and listen. A knocking sound appears, which means there is play in the CV joint, which indicates that the grenade is damaged.
- Now let the car drive on a flat area. To install, what kind of grenade crunches, how to proceed, you need to turn the steering wheel all the way to the right, then do the same to the left. There was a crunch when you turned to the right, which means the right outer grenade is faulty, a crunch when turning left means the left outer grenade.
- If the internal grenade malfunctions, the question arises: which one, how to determine the failure? To do this, we choose a road surface with bumps and holes so that the wheel drops as low as possible, and drive the car straight. We listen to the sounds, alternately driving either the left or the right front wheel into the hole, and by ear we determine which grenade is crunching.
- Raise the car on a lift. Engage first gear so that the wheels can rotate while suspended. If the grenade malfunctions, you will hear a hinge crunch.
We found out what, how and in what place a grenade “clicks”. All that remains is to start replacing the damaged CV joint. This can be done at a car repair shop or you can carry out the repair yourself if you have the appropriate experience. There are three basic rules, when followed, the car’s drive will last a long time.
- Avoid jumping off.
- Do not accelerate by turning the steering wheel.
- Inspect the anthers periodically.
The CV joint wears out quickly under significant loads and dirt. Take care of your car.
Front-wheel drive cars have in their design such elements as constant velocity joints, or, in short, CV joints. On the VAZ-2109, replacing these elements is quite simple, but you will need a little experience and special tools. Without this, repairs are unlikely to be possible. It is also advisable to purchase new elements in advance - depending on what financial capabilities you have, you can buy complete drives or separate CV joints (they are also called grenades for their external resemblance to this weapon).
Replacing the CV joint and boot on a VAZ-2109 - what is needed for this and how the replacement is carried out
Hello, dear car enthusiasts! Greetings to all car enthusiasts, happy owners of the VAZ “Nine”! With the start of VAZ's production of eighth and ninth series vehicles, a change in priorities occurred on the domestic passenger car market.
The rear-wheel drive “classics” now have worthy competitors, whose chances of getting higher positions in the sales rankings increase every day.
A more modern design, an economical and dynamic engine and, of course, front-wheel drive, became the distinctive features that allowed the new models to become the object of dreams of thousands of car enthusiasts.
The new car required car service technicians and their owners to gain knowledge and completely new skills in repairing components that were not found on previous models. One of the most mysterious parts that is often a dead end is the VAZ 2109 CV joint.
CV joint 2109 – the basis of front-wheel drive
Thanks to the fact that the front wheels became the drive wheels, the “Nine” gained excellent maneuverability and significantly reduced fuel consumption. For all good things, sooner or later you have to pay.
The ability for the front wheels to be driven was given by a special device - CV joint 2109. Constant velocity joint - this is how the mysterious set of letters is deciphered.
Internal CV joints of the VAZ 2109 transmit rotation from the gearbox to the axles, at opposite ends of which external CV joints are installed. They are the ones who spin the wheel and allow it to turn.
The importance of CV joints cannot be underestimated
In this regard, it is important to constantly take care of their condition
Constant operation of a car requires, in relation to CV joints, the implementation of several simple rules, namely:
- periodically inspect the condition of the CV joint boots and internal lubrication;
- immediately replace the VAZ 2109 CV joint boot if it is damaged;
- If such signs as impacts or “crunching” of the CV joint appear, the CV joint must be immediately replaced with a VAZ 2109.
What is needed to independently replace the CV joint on a VAZ 2109?
In order for the repair work to go smoothly, you need to be properly prepared. It should be noted right away that it is only at first glance that replacing the VAZ 2109 CV joint boot or the hinge itself (both external and internal) seems like a difficult undertaking.
Having carried out the procedure of replacing the CV joint or boot once, any car enthusiast will be able to repeat everything, as they say, with his eyes closed.
Preparation for CV joint repair includes the following steps:
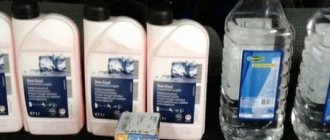
- purchasing a new CV joint, boot, lubricant, clamps and other accessories, which, as a rule, are included in one repair kit;
- the car is installed on an overpass or inspection hole, but in addition, a jack and “goats” should be prepared for the safety of the repair work being carried out;
- You should have a set of standard tools on hand, including: socket wrenches with extended handles or attachments, a hammer, brass or wooden spacers.
You need to start by putting the car on the parking brake and fixing the rear wheels with stops. After the hub nuts and wheel bolts are loosened, the front of the car is raised and placed on racks so that the wheels are suspended.
The wheel must be removed, as well as unscrew the hub nut and remove the lock washer. The preparation ends by unscrewing the two bolts securing the lower ball joint to the steering knuckle.
How is the outer CV joint of a VAZ 2109 replaced?
Before we begin describing the repair process, we note that regardless of whether it is necessary to replace one CV joint or both, and also how many boots need to be replaced, the shaft with two CV joints must be removed.
First, let's look at how to do this. Having turned the hub using the steering wheel, using gentle blows through the spacer, knock out the axle shaft of the outer CV joint from the splined joint of the hub.
Then, using a pry bar, you can remove the inner CV joint. All. The shaft with CV joints is ready for repair. If CV joints are removed from both sides at once, it is strongly recommended to insert old hinges into the gearbox mounting sockets so that the gears do not move.
For convenience, the shaft is clamped in a vice. Now you can remove or cut off the old boots and lightly hit the CV joint body with a hammer to remove it.
A similar algorithm of actions will always be used if it is necessary to replace the CV joint boot or the hinge itself.
If one CV joint is being repaired (changed), you should never be too lazy to disassemble, wash and re-lubricate the second one. It is better to change the anthers at the same time.
The shaft is installed in the reverse order.
Signs of CV joint malfunctions
Most often, the outer CV joint of the VAZ-2109 is replaced, since its resource is approximately three times less than that of the internal one. But the repair algorithm is generally similar.
Even to install new boots, you will need to completely dismantle the drive - it’s much more convenient to work this way. To determine if grenades are damaged, you need to do the following:
- Turn the steering wheel to the left all the way.
- Drive away and listen for any extraneous sounds.
- Turn the steering wheel to the right all the way, then drive off again and listen to the sounds.
If a characteristic crunch appears, you need to change the grenade. It is useless to repair it - these elements cannot be restored. If both CV joints are faulty - internal and external, then it will be easier to install a new drive assembly. At least there won't be any problems knocking down old grenades.
Replacement of outer and inner CV joints
The VAZ 2109, unlike its predecessors, has front-wheel drive. In its design, to transmit torque from the gearbox to the wheels, instead of a rear axle gearbox, the so-called CV joint (colloquially “Grenade”) is used. Since this mechanism is constantly in motion, its components quickly heat up. Therefore, to remove the temperature in the “grenade”, a special lubricant is used. And to ensure that dust does not fall on the part and the lubricant does not quickly become clogged, special boots are used - casings that protect the “grenade” from contamination.
By design, the car has two CV joints and two boots - external and internal. The external ones are installed on the hub, and the internal ones - in the gearbox mechanism. In general, this part is designed for quite a long service life, but, like all parts and mechanisms of a car, it may require repair or replacement. Read on to learn how to make the replacement yourself.
Symptoms and causes of failure
In order to determine without diagnostics whether the “grenade” is broken or not, you just need to listen to the car. If while driving, especially when turning, you hear a characteristic noise or knocking noise from the front wheel, then your “grenade” needs replacement. And it needs to be done as soon as possible, otherwise the consequences could be catastrophic.
In order to make sure that the “diagnosis” is correct, you can check the play on the drive shaft. Try to rock it a little with your hand, and the play will be immediately noticeable. When checking the boot, everything is much simpler. Turn the front wheel in any direction until it stops and inspect it for cracks or leaks. If they are, then both boots must be replaced.
Interior
Replacing the internal CV joint of a VAZ 2109 is carried out if the following parts and tools are available:
- Vise;
- A set of keys;
- Hammer;
- Jack.
Before replacing, all fasteners, and the CV joint itself, must be lubricated with a special lubricant. Next, carefully put the new part back onto the drive. To do this, use a hammer and a wooden block so as not to damage the part.
Next comes the installation of the boot. It must be installed at a distance of approximately 20 mm from the “grenade”. After installation, secure with clamps.
External
Replacing the outer CV joint of a VAZ 2109 is mainly done without removing the drive. To do this, the front wheels need to be jacked up and the front of the car placed on special supports. The wheels must be suspended so that the drive can rotate freely.
Next, unscrew the screws securing the wheel, remove it, and turn the steering wheel all the way in any direction. Disconnect the pivot pin from the splined end of the grenade. Unscrew the nuts securing the boot and remove it. Carefully knock out the inner CV joint from the gearbox, followed by the outer one. The drive must remain in place and locked.
Now, the CV joint can be replaced, or preventive maintenance can be done by washing it with gasoline. If damage is visible on it, then replacement is simply necessary. While replacing the internal grenade, insert a temporary plug into the gearbox hole, but do not secure it. After the replacement is completed, remove the internal “grenade” and install the external one in its place. Reassemble completely and insert the CV joint back.
After everything is in place, put the wheel back, and before driving, check the operation of the steering wheel. If the steering wheel turns normally, all the way, and is not accompanied by a crunching sound, then you have done everything correctly.
Drive diagnostics
But a crunch can also appear when other suspension elements - balls, rod ends, bearings - are destroyed. Therefore, before replacing the CV joint on a VAZ-2109 with your own hands, do a complete diagnosis of the suspension and chassis. It is quite possible that it is not only grenades that will need to be repaired. In general, the diagnosis looks like this:
- Place the car on a viewing hole, overpass, or lift. It needs to be secured securely so that it does not roll off.
- Using a mounting spatula, check the drive play - if it is large, you can hear the balls knocking when moving, you will need to change the element.
- At the same time, check the condition of the ball joint - their reliability is not very high, and the roads leave much to be desired.
- Visually inspect the condition of the anthers on all grenades - they determine how long the drives will last.
Drive grenades, removal and installation of CV joints VAZ 2108-2109-21099
VAZ / 2108, 2109, 21099 / repair / transmission / front wheel drive / Grenades, CV joint replacement
Grenades, CV joint replacement.
Steps for removing and installing the VAZ 2108 drive, instructions for disassembling and assembling CV joints on the VAZ 2109 with your own hands.
Replacement of anthers and drive gaskets. Section for repairing the Lada 21099 transmission, clutch, and wheel drives. Repair of the differential fret 2108, secondary and primary shaft fret 2109. If during operation when turning you hear knocking in the wheel drive, check the CV joints. Rock the drive shaft by hand. If there is play or the dirt covers are torn, the CV joint must be replaced. There is practically no point in disassembling the hinge: if the cover is torn, the dirt that has got into the hinge has already rendered the CV joint parts unusable. Hinge parts cannot be replaced individually.
| vazclub.com |
Repair tool
To independently remove CV joints on a nine or any other car, you need to have the following tool on hand:
- A socket wrench for “30” or a socket with a strong wrench.
- Hammer and chisel.
- Balloon wrench.
- Set of spanners and sockets.
- Penetrating lubricant such as WD-40.
- Capacity of at least 5 liters.
- Marker or metal scriber.
- Jack, support and wheel chocks.
You may also need a grinder, drill, drill bits, and other attributes. The work can be complicated if the drives have never been removed - the threaded connections become dirty, which complicates disassembly.
Preparatory work
Before replacing the CV joint boot or the grenade itself, you need to perform several preparatory steps. Without this, withdrawal is impossible. Please note that you cannot remove both inner joints at the same time - this will lead to destruction of the differential mechanism.
If the bevel gears fall off, you will have to remove the gearbox and completely disassemble it. Preparation includes the following steps:
- Complete or partial drainage of oil from the gearbox. When removing the internal CV joints, oil will spill out; to prevent this from happening, it is necessary to drain at least 2/3 of the total volume.
- Unlocking the front wheel hub nut (or both, if two drives need to be repaired).
- Loosening the hub nut and wheel bolts. The hub must be unscrewed using a 30mm wrench with a large lever.
- Removing the wheel after installing the side to be repaired on the jack and support.
Having completed the preparatory work, you can begin directly replacing the VAZ-2109 CV joint.
DIY car repair and maintenance
Step-by-step plan for replacing CV joints (grenade)
So, the grenade (both internal and external) on front-wheel drive models of domestic “cars” (God forgive me) starting from the VAZ 2108 and ending with at least 2115 is the same (well, maybe from different manufacturers and different service life of the final ). The same principle applies to Priora, Kalina and Grant.
Greetings, dear visitors! I want to devote this article to replacing the external grenade. If you follow the sometimes unclear terminology (which I don’t always like) - replacing the constant velocity joint, i.e. CV joint. I try to write my articles in everyday language, in which people ask for information.
How to remove the drive
In order to remove the drive assembly, you need to perform the following steps:
- Completely unscrew the nut on the outer joint to free the hub.
- Remove the nuts from the bolts that secure the strut to the hub steering knuckle. This will allow you to move the hub to free the joint. But it will be much more efficient not to unscrew the nuts on the strut, but to disconnect the ball joint.
- If you unscrewed the ball joint, you need to remove the tie rod end pin from the hole in the strut knuckle. This is done using a special puller.
- Now you need to pull the outer joint out of the hole in the hub. How to do this depends on the situation. You can use a thin drift, but without fanaticism, so as not to damage the mechanisms. You should also not hit the CV joint axle with a hammer - this will cause the edges to flatten and make it impossible to remove the element.
- After you pull out the outer joint, you can proceed to the inner one - to remove it from the hole in the gearbox, just apply a few light blows with a small chisel. You can also use a mounting spatula.
That's all, now the drive has been completely removed, you also need to learn how to remove the CV joint on a VAZ-2109.
How to remove a vaz shruz
Having determined that it is the external grenade that is broken, we begin to remove it.
How to unscrew the hub nut on a VAZ?
First of all, unscrew the hub nut. To do this, take a 30mm head and a lever, the larger the better. We put bricks under the wheels to prevent the car from rolling (simply putting it in gear is not an option, the wheel will spin) and begin to unscrew the hub nut.
In this matter, the more you weigh, the better, since I very often lacked my weight and leverage of about one and a half meters. I got out of the situation in the following way: I stood completely on the lever, as close to the edge as possible, thereby giving maximum tension to the nut, and hit the lever with a hammer. Usually this method helped me unscrew even the most soured wheel nuts.
One more nuance: if the outer walls of the head come into contact with the walls of the hub, it is better to lubricate the head with mining or lithol, or, in extreme cases, with silicone grease. Thanks to this trick, the head will not bite in the hub.
How to remove a grenade?
The hub nut is unscrewed, now we remove the wheel, unscrew the two bolts that hold the ball joint, disconnect the suspension arm and the hub, move it to the side of the car while lightly tapping the grenade, remove it from the hub. At this point there are two options:
- The grenade is already broken.
- Replacing the grenade due to its crunching sound.
In the first case, you simply remove the outer part of the CV joint from the shaft, then the retaining ring from the drive shaft and knock off the cage with a hammer.
In the second case, removing the CV joint becomes more difficult. You need to deflect the grenade relative to the shaft at the maximum angle so that the bearing balls and their cage are visible.
Now use a hammer to break the jumpers of the cage between the bearing balls and take out the balls one by one. When you take out the last ball, you can remove the body of the grenade, and then its inner part sitting on the shaft, after first removing the locking ring from the shaft.
Of course, you can simply try to knock the grenade off the shaft, but due to the locking ring this will be problematic.
That's it, the CV joint is completely removed. Now let's start installing the new part.
Replacing CV joints
The most important thing now is to knock down the old hinge (or both, if you are also changing the internal one). To do this, you will need to firmly clamp the drive itself in a vice so that the hinge to be removed is directed downward. Apply sharp and strong blows with a hammer to knock down the hinge. If you are only replacing the anthers, try to carry out all work carefully so as not to damage the elements.
But if troubles arise when replacing a VAZ-2109 CV joint and the old joint does not want to come loose, you will need to take extreme measures. Using a grinder, you need to cut the outer casing to free the entire inner part. After this, you will have access to the retaining ring on the drive, removing which you can completely disassemble the element.
Installing new hinges is done in the reverse order. First, install the anthers, then the locking ring and put on the grenade. Gently hit it through the wooden spacer so that it locks onto the ring. The drive is installed without any special features.
Installing new hinges
And the final stage remains - installing new hinges on the drive. You already know almost everything about how to change a grenade on a VAZ-2109. All that remains is to install a new element.
First, wash the shaft, get rid of dust and lubricant residues, then put on a new boot. Next, perform the following manipulations:
- Install a new retaining ring.
- Carefully, trying not to damage it, place the grenade on the shaft. To make it sit down, you need to apply several sharp blows through the wood spacer.
- Apply lubricant under the boot and on the inside of the hinge. By the way, the kit comes with a small amount, it is recommended to add a little more.
- Secure the boot with two clamps.
Once you have assembled the entire drive, you can begin installing it on the car. The work is done in reverse order. First put the inner CV joint in place, then the outer one.
Tighten the nut and secure it with a chisel. To prevent corrosion, you can apply a small amount of Litol to the nut and close it with a cap. Now you know how to change a grenade on a VAZ-2109 yourself. The procedure will not take much time, but you can save a lot of money. Workshops will charge about the same amount for repairs as a set of hinges costs (about 1,000 rubles).