We independently change the timing belt on a VAZ 2109 - 21099
The gas distribution mechanism (GRM) of an internal combustion engine coordinates the operation of valves and pistons and is driven by a special belt or chain. Replacing the VAZ 2109 and VAZ 21099 timing belt is done every 30-40 thousand km, which will minimize the likelihood of it breaking during operation. Many owners turn to specialized service stations, but due to the maintainability and simplicity of the design of these models, the replacement can be done independently.
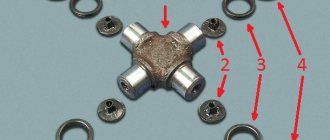
Replacing the tension roller is done as follows:
1. Remove the faulty roller, then install a new roller in its place and tighten using a special wrench according to the instructions described above.
2. Adjustment of the timing belt tension using a tension roller is carried out according to the instruction manual.
Replacing the VAZ 2110 timing belt has been successfully completed, start the engine and make sure that everything is in order. There is nothing complicated about how to replace a timing belt, so there is no need to pay for something that you can easily do yourself, so you can save money while gaining valuable experience.
Preparatory work
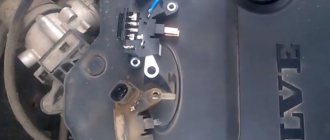
Replacing the timing belt requires some prep work to get to it. To do this, lift the hood and remove the air filter pipe by unscrewing the fastenings of the retaining clamp with a wrench. Next, the belt protective cover is removed, for which you need to unscrew the three bolts that hold it in place. This is done with a regular open-end wrench. In the opened space, the timing belt will be visible, which needs to be replaced.
The front right wheel and the protection under it are first removed to get to the crankshaft pulley, which drives the gas distribution mechanism via a belt. In the cab, put the lever in the fourth gear position and ask the assistant to press the brake pedal. We install the head 19 on a long wrench so that it is convenient to get to the crankshaft pulley, which we unscrew, which will require some effort. After the bolt is broken, you can put the gear in neutral and not hold the brake pedal.
Important feature! To replace the timing belt on a VAZ 2109 8-valve injection engine or a similar VAZ 21099 model, when removing the crankshaft pulley, you need to hold the flywheel, which is best done with a screwdriver. Otherwise, it will rotate along with the pulley. In carburetor engines this problem does not exist; the pulley is held independently.
From the top of the open hood, the nut that holds the tension of the generator belt is loosened; this is best done using a special cardan on which to place the head of the key. The generator pulley is moved so that the belt can be removed without interference. After this, remove the crankshaft pulley so that the gear is visible.
Aligning marks
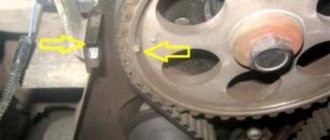
In order for the engine to work after replacement, it is necessary to set the timing marks. If the belt tensioner roller is noisy, it is better to replace it. Although it is better to do this in any case, so that no problems arise during the life of the belt. But if this is not possible, use a 17 wrench to loosen the nut holding it in order to loosen the tension for subsequent removal of the belt. We find a mark on the main camshaft sprocket and align it with the mark on the cover. To align the marks, unscrew the bolt holding the camshaft sprocket, align the timing belt marks, and then tighten it again.
After this, we align the marks on the crankshaft. To do this, we find a groove on the housing in the area of the oil pump and a point on the crankshaft gear. We put the pulley on the gear and turn it by hand until the marks match. This is easy to do; just hand strength is enough to turn the pulley.
Sometimes the marks on the crankshaft are not visible, then after aligning the marks on the camshaft, you need to make sure that the mark on the flywheel and the notch on the casing match. To do this, you first need to remove a special plug, after which these marks will be visible. If they do not match, after replacing the timing belt the engine will not start, and if it starts, it will run unstably and intermittently. Therefore, this stage is important for successful repair and subsequent operation of the car.
Before you buy Remote washer VAZ 21080100613010, read the important information!
We sell spare parts from official dealers and distributors of the VAZ brand.
Using the part number (21080100613010) and the VIN number of the car, you can clearly determine whether this spare part fits your car or not. If you are not sure about the applicability of a part, you can first consult with our manager.
tel.
tel.
Our manager can also select, if possible, an analogue of the spare part VAZ 21080100613010 and answer other questions, for example, about delivery times.
Pickup
For clients living in the cities: Lyubertsy, Zhukovsky, Zheleznodorozhny, Pavlino, Lytkarino, Oktyabrsky, Ramenskoye, Tomilino, Kraskovo.
And also the districts of Moscow: Novaya Nekrasovka, Kozhukhovo, Nekrasovka, Vykhino, Zhulebino, Kotelniki, Novokosino, South-Eastern Administrative District.
It will be convenient for pickup at one of our stores located at:
Moscow, Tashkentskaya street, 28с1
Moscow region, Malakhovka village, Bykovskoe highway 37/14
For residents of Omsk and the region, the store is located at
Omsk, st. Dekabristov, house 155
Delivery to regions
Carried out by DPD, more than 300 pick-up points in Moscow and the region, 1800 throughout Russia, as well as targeted delivery to your door.
Belt installation
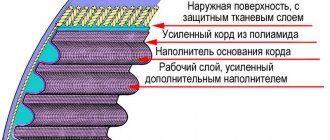
If the marks on the camshaft and crankshaft coincide, you need to install a new timing belt. If there are markings or inscriptions on the belt, they must be oriented clockwise, and the arrows must also be oriented if they are on the belt. Before this, the old belt is removed; if it is intact, by examining it, you can make sure that it is cracked and its operation is dangerous.
First, the belt is installed on the crankshaft gear, and then, with light force, on the camshaft sprocket. When installed, it should go around the drive sprocket and tension roller, making a zigzag.
Reassembly
Then everything is assembled in reverse order. First, install the crankshaft pulley. To tighten the bolt, set the fourth speed again and depress the brake pedal, after which the bolt is tightened with a head with great force using a collar. The generator belt is installed in place, the pulleys are moved apart using a pipe, a collar or a small pry bar. This is necessary for good tension of the generator belt, after which the nut is tightened using a wrench with a universal joint. The pulling procedure is repeated several times. This belt should be stretched very tightly and practically not bend under the force of your hand.
Video: Replacing the timing belt VAZ 21099, 2109
After this, the timing belt protection is put in place, for which you will need to install it in the seat and tighten the three bolts again. The air intake is put in place and secured with a clamp. The metal and plastic protection is installed in place and the removed wheel is secured, the car is removed from the jack. After this, you can start the engine. It will start without problems, its operation should be stable, without fluctuations or extraneous sounds. This will only be possible when all the marks match and the belt is tensioned with sufficient force.
Experience shows that replacing the timing belt on VAZ 21099 and 2109 can be done independently, without turning to professionals at a service station, especially if it is a planned replacement and the belt remained intact before replacement. You don’t need any special tools for this, just a set of socket heads and open-end wrenches and a regular flat-head screwdriver are enough to do it yourself.
If, due to an oversight or due to a defect, the timing belt breaks, then after replacing it the engine may still not start, since it will require repairs and cannot be done without professionals.
Source
Original solution
In most cases, adjusting the timing belt involves adjusting the spacer washer installed under the NTZ roller. Experienced craftsmen and motorists advise inspecting this very washer, checking to see if it is placed backwards.
Indeed, the amateurism of service station workers in some cases is simply infuriating. Mechanics who have been practicing even for several years may simply not notice the adhesive on the spacer washer, pointing to the correct side. Yes, it is applied with acrylic varnish and may not be noticeable, but if you look closely, you can see it.
Distance washers
What is the function of the spacer washer? The main reason for the belt slipping, as was written above, is not the misalignment of the crankshaft, but the initial unevenness of the working surface. Knowing this, AvtoVAZ designers and mechanics initially came up with the idea of leveling the seat with a spacer washer. And they put it on acrylic glue.
All this is understandable, but why couldn’t AvtoVAZ solve the problem with the internal combustion engine in some other way? It turns out that our inherent laziness and unwillingness to work to the end are also evident here.
According to the standard, all engines assembled at AvtoVAZ must be tested on the assembly line. If a problem with the belt slipping is discovered, the power plants are sent for modification to special workshops, where Uncle Vasya and Uncle Kolya simply install spacer washers to save time. Simple and ingenious, and the manufacturer no longer cares what happens to the engine after a long run when the belt is replaced. The main thing is to provide a factory warranty, and an obviously defective engine can be presented as completely working. These are the pies.
Therefore, if auto mechanics are struggling and puzzling over the problem of a belt slipping, and cannot come up with anything, it is quite possible that the engine is simply from the category of defective ones and modified by Uncle Vasya.
The problem is also solved simply: the washer, firstly, is placed on the correct side, and, secondly, it is sharpened on a sharpener or grown on one side. If you do everything correctly, the belt will move clearly and evenly along the middle of the flywheels the first time, and will not jump off anywhere.
How to tighten or replace the timing belt on a VAZ 2109 yourself
Step-by-step instructions for tensioning and replacing the timing belt on a VAZ 2109, 2108, 21099 with your own hands using a minimal set of tools. To get to the timing belt, you need to remove the protective cover. To do this, use a 10mm wrench to unscrew the two bolts on the side.
To replace the belt, turn the crankshaft counterclockwise so that the mark on the camshaft pulley moves down from the rear cover antenna by two teeth.
Remove the generator drive belt, the right wheel and the right mudguard of the engine compartment. Using a 19mm socket, turn the crankshaft clockwise using the pulley bolt.
until the mark on the camshaft sprocket aligns with the mounting lug on the rear timing cover.
After removing the rubber plug at the top of the clutch housing,
make sure that the mark on the flywheel is located opposite the slot in the clutch housing cover (the coolant supply hose to the radiator has been removed for clarity).
This is how the mark should be located on the engine flywheel (with the gearbox and cylinder head removed).
We fix the crankshaft from turning by inserting a screwdriver through the hole in the clutch housing between the flywheel teeth. Unscrew the bolt securing the generator drive pulley. Remove the generator drive pulley.
Using a 17mm wrench, loosen the nut securing the tension roller.
We turn the tension roller to a position in which the belt will be loosened as much as possible and remove the timing belt.
When replacing the tension roller, unscrew the nut securing it and remove the roller from the stud.
A spacer washer is installed under the roller.
Install the timing belt in reverse order. We put the belt on the crankshaft pulley. Then we put the rear branch on the coolant pump pulley and place it behind the tension roller. We put the belt on the camshaft pulley.
How to tighten the timing belt on a VAZ 2109
With normal belt tension, its front branch should be twisted 90 degrees with the thumb and forefinger of the hand with little effort. Excessive tension will reduce the life of the belt, as well as the coolant pump bearings and tension pulley.
Using a 17mm wrench, loosen the nut securing the tension roller.
By inserting a screwdriver between two screws or rods installed in the hole of the tension roller, turn the roller counterclockwise, tensioning the belt. Tighten the tension roller mounting nut.
Next, you need to make two full turns of the camshaft so that the belt is tensioned along its entire length.
This can be done either by holding the crankshaft with a 19 key,
and using the front right wheel, you first need to jack it up and put it in 5th gear.
Delivery:
— We work only on the territory of Ukraine. The goods are not sent to Russia and Belarus.
— Delivery of goods to the regions is carried out using courier services: Nova Poshta, Ukrposhta. Responsibility for forwarding services lies with service representatives. For exact information about terms, costs and other questions, please contact the service representatives directly. We provide indicative information only.
— Order completion times can vary from 1 to a maximum of 5 working days, depending on the availability of goods in the store.
— The parcel stays at the Nova Poshta office for 5 days, regardless of the type of payment for the goods from the buyer, after which the automatic return of the parcel will be issued and the cost of shipping will be calculated to the sender.
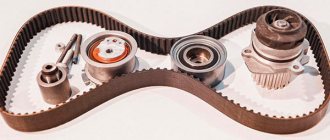
Replacing the pump
Unscrew the nut on the tension roller 17 and remove it along with the belt. Then unscrew the camshaft pulley bolt and remove the last one.
We unscrew everything that secures the protective metal shield, namely one ten-point nut and a bolt securing the cover, three bolts securing the pump.
Remove the protective cover and pump. Antifreeze remaining in the block may leak out if you have not drained it. Carefully, it's sweet.
We clean all the parts from oil and belt residues, as well as the pump seat from the old gasket and sealant.
Lubricate the gasket of the new pump with sealant and put it in place. We install the metal protection and tighten all the bolts and nuts securing it.
We tighten the pump bolts evenly in a circle, then check whether the pump is spinning.
Recently a client brought in an original pump, which turned out to have slightly larger petals and after installation it began to bite. I had to modify it with a grinder and take measurements several times. These are the spare parts we have.
We check if the key is lost on the camshaft and install the pulley. We tighten its bolt to seventeen.
Begin
Everything we need.
We unscrew the three ten bolts securing the protective timing cover and remove it.
Next, loosen the nut thirteen that secure the generator and unscrew the tension bolt ten.
We take the generator to the engine and remove the belt.
Remove the engine protection and drain the antifreeze. We set the camshaft mark by turning the crankshaft clockwise. The ebb on the pulley should be opposite the bend of the protective cover fastening.
Unscrew the crankshaft pulley mounting bolt. We put the assistant in the cabin and force him to engage fifth gear and press the brake. And at this time we easily and naturally unscrew the bolt using a 19 meter head and a pipe of one and a half meters. It must be screwed properly, and some craftsmen lubricate it with sealant and then wait for kind words addressed to them.
On the left side we see the crankshaft position sensor. We will need it to subsequently check the correct installation of the timing belt. We remove the crankshaft pulley and see that the marks match.
Unscrew the nut on the tension roller 17 and remove it along with the belt. Then unscrew the camshaft pulley bolt and remove the last one. Be careful not to lose the key. We unscrew everything that secures the protective metal shield, namely one ten-point nut and a bolt securing the cover, three bolts securing the pump.
Installing a new timing belt
We check that all marks match.
We first place the belt on the crankshaft and pump. Then we tighten the right descending branch of the belt and put it on the camshaft pulley and tension roller. We check all the marks again and tighten the belt with a roller. The tension is considered sufficient if, with the force of two fingers, you can twist the longest branch of the belt by a maximum of 90 degrees. It’s easier to take the right branch of the belt with two fingers and twist it, if more than 90 is not very bad, but less is very bad. An overtightened belt will wear out quickly and will also reduce the life of the pump.
We place the bottom protective plastic cover. And on the crankshaft pulley we mark the twentieth tooth after skipping two teeth. We count counterclockwise.
This mark corresponds to the top dead center of the first cylinder. We put the pulley in place and the mark should be against the crankshaft position sensor. More precisely, against the small iron core of the sensor. Sometimes it gets into the gap between the teeth, this is considered acceptable. We tighten the pulley in the same way as we unscrewed it, with the help of a partner.
We turn the crankshaft two turns and check the marks; this is where our mark on the pulley comes in handy.
If everything is in trouble, we collect everything that we took apart. As they say in smart books, install the parts in the reverse order of removal. Don't forget to add antifreeze.
We start the car, accept congratulations from family and friends and head off to adventure.
Adapter washer for timing roller VAZ 2108-2110 7mm (from old to new)
— If your order is sent with prepayment, its packaging will begin after the money is credited to our account/card.
— The indicated prices are selling prices for the goods and do not include shipping, delivery, additional packaging from the carrier (muffler, windshield, subframe, etc.).
— The cost of delivery/shipping is paid by the buyer in all cases.
— If the order amount is less than 150 UAH, cash on delivery delivery (payment upon receipt of the goods) is not possible. In this case, you need to pay for the order before shipping (this can be done to our current account, which is opened in Privat Bank through bank branches, through Privat24 applications and in any other convenient way).
— Cash on delivery also provides for an advance payment in the amount of 80 UAH. (For this we should thank the people who do not pick up parcels from delivery service offices. And now honest people are experiencing the inconvenience. To our deepest regret and sympathy.)
— You can pay with VISA and MasterCard cards on our website through the LiqPay and WayForPay services.
— Only Ukrainian Hryvnia is accepted for payment.
— Your insurance when paying by card is the results of our work - these are our long-term reviews, which are moderated by the Prom and Bigl.ua sites and cannot be corrected by us. Over the past four years, our customers have rated us "excellent" in 99% of reviews.
— For our regular customers who have placed 3 or more orders, orders can be sent without prepayment and without restrictions on the minimum order amount.
— In cases where we received an order from you, which you immediately paid for and we have no additional questions for you regarding delivery, your order can be sent without a clarification call to your phone.
— The management of the auto store reserves the right to change the terms of payment/delivery or not to fulfill your order at all to prevent conflict situations.
— In case of refusal to receive parcels already sent from the store’s warehouse, subsequent orders are sent on the basis of full prepayment.
— Refunds for any reason are made within 3 business banking days.
— Some items are shipped ONLY upon prepayment.
— Refunds, the reason for which is not related to the work of the store (buyer’s mistake, changed his mind, already bought, etc.) are made with a commission of 5%.