Removal and installation of Niva Chevrolet brake drum
The brake drum is removed to replace it if the working surface is damaged or worn, as well as to monitor the condition of the brake mechanisms and to replace brake pads and working cylinders.
Perform the work on a vehicle with the rear wheels hanging (on a lift or a vehicle supported by a jack).
The parking brake lever must be lowered all the way down (the car is released).
You will need: 12mm wrenches, a screwdriver, two mounting blades.
Engage 1st gear and install thrust blocks under the front wheels.
Check: the parking brake lever must be lowered all the way down (the car is released).
Remove the rear wheel.
For ease of use, remove the decorative cap. When replacing the drum, the cap does not need to be removed.
Moisten the gap between the drum and the axle flange with some easily penetrating liquid (kerosene, WD-40, etc.).
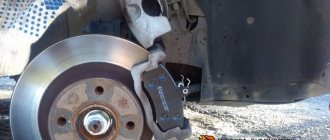
Remove the two bolts (one is visible in the photo) securing the brake drum to the axle shaft.
Remove the drum from the axle shaft with light blows of a hammer.
If the drum cannot be removed by hand, knock it down with a hammer, using a wooden block, or.
Compress by screwing the bolts evenly into the two threaded holes of the drum
Remove the brake drum.
When installing the old drum, use a file to remove the collar on the working surface of the drum that has formed as a result of wear.
Install the drum in the reverse order of removal.
First, clean the axle shaft seat from corrosion, lubricate it with graphite grease or LSC-15 grease, and bring the pads together using two mounting blades.
Please note that as the pistons are pressed into the cylinders, the brake fluid level in the master cylinder reservoir rises.
If necessary, pump out the liquid.
Check that the wheel rotates easily. Light brushing of the drum against the pads is allowed.
With the car stationary on the ground, press the brake pedal 2-3 times to move the brake pads to the drum.
Eliminate vibration with additional fasteners
Vibration in the body is the main “disease” of the Niva; it often occurs due to improper alignment of the transfer case. Most often, vibration occurs on VAZ 21213/21214 cars, since the transfer case is mounted only on two supports on the sides of the body; on the Chevrolet Niva, the transfer case is already installed on three supports.
- driveshafts are poorly secured;
- wheels are not balanced;
- there is play in the cardan crosspieces (vibration is especially affected by play in the rear driveshaft crosspieces);
- The vibration comes from the engine itself.
Vibration when starting off on a Niva can also occur for the following reasons:
- the mounting supports of the transfer case have become loose;
- The rubber on the RK supports themselves broke.
Installing the third support of the transfer case on VAZ 21213/21214 vehicles allows you to reduce the level of vibration of the transfer case; with this support it is easier to center the transfer case. The part can be purchased at auto stores or made yourself. The finished product comes with three long studs (for model 2121); to install the third support on this machine, you will need to unscrew the short studs from the transfer case housing and install new studs from the kit. We carry out repairs as follows:
- dismantle the front passenger seat in the cabin;
- remove the floor tunnel lining;
- in the cabin we move aside the carpet covering the body amplifier (in front of the handbrake lever);
- remove the transfer case (alternatively, you can simply hang it up, but removing the third support makes it easier to install);
- We attach the bracket of the new support to the body of the RC;
- we install the transfer case in place, center it in the optimal position, and fasten the side supports;
- we combine the third support with the body, drill two holes in the bottom;
- Using washers, bolts and nuts (from the kit) we attach the support to the bottom of the body.
Also interesting: DIY Niva 21213 transfer case repair: video instructions
In order to install the subframe, the transfer case must be removed. It is more convenient to carry out such work in a pit; we carry out repairs as follows:
- leave the car in neutral gear;
- disconnect the propeller shaft from the transfer case, it is advisable to mark the driveshaft flange and the drive shaft so that during installation, align the driveshaft according to the marks - this way, the occurrence of unnecessary vibrations is eliminated;
- dismantle the muffler mounting bracket;
- remove the gearbox traverse;
- jack up the transfer case, remove the side fastenings of the transfer case;
- We treat the places where the subframe fits to the body with Movil;
- place the subframe on the gearbox studs;
- we mark the attachment points of the subframe on the side members, drill holes, attach bolts to the body;
- we tighten all fastenings, except for the transfer case supports themselves;
- we perform alignment of the steering wheel;
- Finally tighten the transfer case supports.
It should be noted that installing an additional support or subframe on the steering wheel does not always lead to the desired effect; in some cases, vibration only increases.
How to remove rear brake drums? — “Chevrolet Niva” community on DRIVE2
Remove the brake drum.
The difference between the maximum and minimum diameter measurements should not be more than 0.2 mm. If there are deep scratches or increased ellipse, bore the drum using the central hole and pressing the inner surface of the drum flange against the fixture.
In order to maintain the required rigidity of the drums, they cannot be bored more than 0.8 mm per side. Before installing the brake drum, its mating surfaces, base holes and wheel hub flange mating surfaces should be thoroughly cleaned of dirt, corrosion or nicks, and lightly lubricated with a refractory and moisture-resistant lubricant.
The brake drum must be pressed tightly onto the hub flange until it stops using only your hands. Moreover, after installation, the drum should not move freely on the hub.
The automatic clearance adjustment device is located in the working cylinder. Thrust rings 9 Niva Chevrolet Removing the brake drum into the cylinder with tension ensuring a shear force of the ring along the cylinder mirror of at least N 35 kg, which exceeds the force on the piston from the tension springs of 2 and 8 cm.
When, due to wear of the linings, the gap of 1.25-1.65 mm is completely removed, the shoulder on the thrust screw is 10 cm.
When the braking stops, the pistons are moved by the force of the tension springs until the cracks stop against the shoulder of the thrust ring. Thus, the optimal gap between the pads and the drum is automatically maintained.
Perform the work on a car with the rear wheels hanging on a lift or a car mounted on supports using a jack. Check that the wheel rotates easily.
How to remove the rear brake drum of a Niva Chevrolet
Light brushing of the drum against the pads is allowed. With the car parked on the ground, press the brake pedal 2-3 times to move the shoes to the drum.
Time Not indicated The brake drum is removed to replace it if the working surface is damaged or worn, Niva Chevrolet removing the brake drum is also to monitor the condition of the brake mechanisms and to replace the brake pads and working cylinders.
The parking brake lever must be lowered all the way down and the vehicle is released. You will need: You can determine which side it has turned sour by pulling on the middle and seeing where it comes out and where it is coming out.
How to remove a brake drum on a Chevrolet Niva
If there is a new one, then simply drink it closer to the drum. When installing the old drum, use a file to remove the collar on the working surface of the drum that has formed as a result of wear.
Install the drum in the reverse order of removal. First, clean the axle shaft seat from corrosion, lubricate it with graphite grease or LSC grease, and bring the pads together using two mounting blades.
If the above two methods did not help, then you can try to compress it by wrapping and evenly tightening the two bolts into the threaded holes.
At this point, the repair work to remove the brake drum on the Niva Chevrolet has been completed.
External CV joint Niva, manufacturer's choice
I experimented a lot on this topic. And if a worthy alternative has been found for internal factory CV joints, there is practically none for external ones. Only factory ball joint. The most important thing, as usual in Russia, is that it was truly a factory part. Contents: CV joint, boot, two “latch” type clamps, retaining ring, nut. The only difference is the presence of a reference disc on the CV joints for cars with an ABS system (anti-lock braking system). When installing, I recommend washing the CV joint from the factory seal and filling it with a better quality lubricant. I’ll immediately explain why I think this must be done. Several times I opened the drive, on new machines, at subzero temperatures. Molybdenum grease was in the form of frozen lumps. In this situation, there is no need to talk about the lubricating properties and the rolling of the machine. As a result, increased wear of expensive parts and increased fuel consumption. The services serving the fields in the north of our homeland completely confirmed my assumptions.
Communities › Chevrolet Niva › Blog › How to remove rear brake drums?
Hello everyone, today I wanted to replace the rear brake pads. But I couldn't remove the drum. How to remove them correctly?
Comments 39
Thanks for the advice on hanging and heating the drum. On my own behalf, I would like to add that there is a slight play on the heels, so the wheel spins back and forth and then almost jumps off on its own. Thanks again, I spent half a day today tapping along the perimeter through the wood of the cup, still a little free
Better sum it up: 1. VD-40, 15 minutes, VD-40, 15 minutes. 2. Try the trick with hanging and accelerating and braking. It's not that tight. (If you miss everything, then about 0.5 mm moves on the studs.) 3. Knock through the mounting tool + a piece of wood, but this is more convenient with two people, because there are not enough hands. Put a piece of wood on the drum, put the assembly on top and hit it - this way it turns out more evenly than with a piece of wood.
Using this method, everything worked out :)).
You press the end of the mounting against the edge of the head and hit the mounting with a hammer. At the station they knocked down drums with peeling pads like this
Having learned from the “bitter” experience of the previous 10, having driven the tires from the passenger compartment, the very first thing I did was remove the drums. I coated the seats with graphite. Such questions no longer arise! ! ! and also loosened all the nuts on the brake pipes, including the ABS unit, one by one. made it possible to lubricate the brake nut contact. To remove the drums, try taking vinegar essence into a syringe and carefully saturate the contact area between the drum and the axle shaft through a needle. the concentrated essence will eat up the corrosion. see here www.autoprospect.ru/chevr…anizmy-zadnikh-koles.html
Trying to knock down a stuck drum with a sledgehammer and a metal spacer leads to deformation of the aluminum edge and even chipping. On the old woman 2121, this method left my drums as if they had been gnawed. Gray as advised and lightly tap on a wooden block in a circle. First of all, tap the area where the axle shaft is stuck and then tap along the edge along the wheel protection from under the car. When you put it in place, apply graphite lubricant to the mating drum - axle shaft. Once again it will be easier.
Removing and installing a Chevrolet Niva brake drum
The brake drum is removed to replace it if the working surface is damaged or worn, as well as to monitor the condition of the brake mechanisms and to replace brake pads and working cylinders.
USEFUL ADVICE Perform the work on a vehicle with the rear wheels hanging (on a lift or a vehicle supported by a jack). The parking brake lever must be lowered all the way down (the car is released).
You will need: 12mm wrenches, a screwdriver, two mounting blades.
1. Engage 1st gear and install thrust blocks under the front wheels.
2. Check: the parking brake lever must be lowered all the way down (the car is released).
3. Remove the rear wheel.
4. For ease of use, remove the decorative cap. However, when replacing the drum, the cap does not need to be removed.
5. Moisten the gap between the drum and the axle flange with some easily penetrating liquid (kerosene, WD-40, etc.).
6. Remove two bolts (one is visible in the photo) securing the brake drum to the axle shaft.
7. Remove the drum from the axle shaft with light blows of a hammer.
8. If the drum cannot be removed by hand, knock it down with a hammer, using a wooden block, or.
9. . compress by tightening the bolts evenly into the two threaded holes of the drum.
10. Remove the brake drum.
11. When installing the old drum, use a file to remove the collar on the working surface of the drum, formed as a result of wear.
12. Install the drum in the reverse order of removal. First, clean the axle shaft seat from corrosion, lubricate it with graphite grease or LSC-15 grease, and bring the pads together using two mounting blades.
WARNING Please note that pressing the pistons into the cylinders increases the level of brake fluid in the master cylinder reservoir. If necessary, pump out the liquid.
13. Check that the wheel rotates easily. Light brushing of the drum against the pads is allowed. With the car parked on the ground, press the brake pedal 2-3 times to move the shoes to the drum.
Replacing Niva front discs
Changing disks during repairs is as easy as shelling pears.
Required tools:
- Jack. Raise the car and be able to remove the wheels.
- Gloves. Protect your hands from any harmful substances.
- Key. To remove a wheel from a vehicle and loosen the brake caliper.
- Screwdriver. For removing the brake lining and accessing the brake disc.
- Brake cleaner. To protect the new brake disc and remove dirt.
When purchasing new wheels for installation in a car, you may notice that they are covered with a layer of paraffin. Before installation, you need to degrease the discs using a cleaner.
Replacement is required when the minimum wear thickness is reached or when any anomalies are detected (scratches, bends, cracks, breaks). Each mechanism has a predetermined minimum thickness limit below which it must be replaced. This minimum wear limit is indicated on the description sheet. If the side of the brake mechanism is equal to or less than the specified minimum limit, then replacement is necessary.
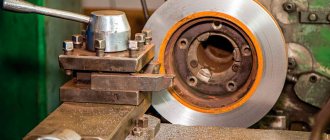
When installing a flange on a disc contour, it is difficult to accurately measure the residual thickness. To effectively measure brake thickness, you need to measure the thickness at three different heights: first near the outer flange, second at the center, and third near the inner edge. To replace the mechanisms, you will first need to remove them, that is, raise the car with a jack.
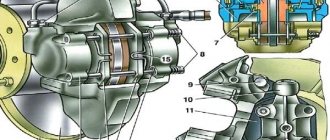
Replacement occurs as follows:
- The wheel is removed.
- The bolt at the lower brake flap is turned out.
- Using a screwdriver, bend the screw stoppers.
- Remove the bolts from the guide block.
- The shield and caliper are removed.
- The support is suspended on a wire or rope.
- The protective cap of the hub is removed.
- The hub is held, the nut is unscrewed and removed.
- The disk is removed.
- A new disk and removed parts are installed.
How to remove the rear brake drum of a Niva Chevrolet
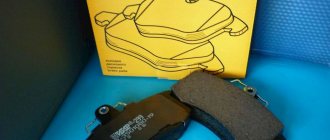
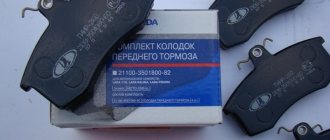
What front pads can be installed on a car?
According to the AVTOVAZ catalog data for the VAZ 2123, the front pads are assigned the number 2123-3501090. The average price of original pads is 550 rubles.
Due to the low quality of most original products, we will consider analogues:
- SANGSIN SP1168 — 480 RUR;
- TRW GDB265M - 620 RUR;
- BOSCH 0986466601 — 650 RUR;
- FERODO FDB195 - 950 RUR;
- ATE 13046080062 — 1450 rub.
Based on the proposed substitutes, we conclude: for a small additional payment it is better to take a high-quality analogue from a world-famous manufacturer. Improved braking performance and safety may come at the cost of reduced brake rotor life.
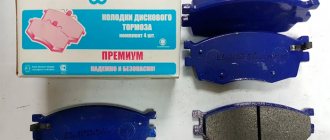
What rear pads can be installed on a Chevrolet Niva
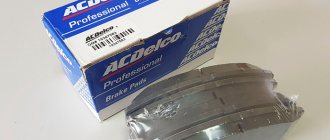
The rear brake system of the car is drum. The factory part number is 2101-3502090-01, which means that the brake pads on the rear axle are suitable for any VAZ of the classic family. The average cost of original pads is 650 rubles.
As a worthy and higher quality analogue, it is better to choose one of:
- LPR 00730 - 780 RUR;
- BOSCH 0986487893 — 1100 RUR;
- BREMBO S41501 - 1300 RUR;
- ATE 03013702322 — 1550 RUR;
- TRW GS8222 — 1850 rub.
Step-by-step instructions for replacing pads
To replace the pads you will need:
- “balloon”;
- small and large flat screwdriver;
- pliers;
- pipe wrench.
Install the jack and hang the wheel, having first removed the wheel mounting bolts. After removing the wheel, you need to place it under the car as insurance.
- Remove the lower caliper pin by pulling the cotter pin using pliers.
- Using a thin screwdriver, the finger is pulled out.
- Then the pressure bar and two springs are removed.
- Using a screwdriver, the caliper is pryed up and pulled up, freeing up space for replacing the pads.
- The old pads are removed, after which the caliper cylinders need to be recessed inward. To do this, use a pipe wrench to carefully recess the cylinders without touching the cuffs.
- Installing new pads is done in reverse order.
A few words about the problem of the front calipers
All Chevrolet Niva owners note that the front brakes rattle and rattle. This problem can be solved in several ways:
- installation of new caliper guides;
- installation of high-quality pads;
- treat the caliper mechanism and “guide” with copper grease;
- Apply three drops of sealant where the caliper cylinders touch the pad, which ultimately helps in the entire service life of the pads.
If the above methods did not help, and the brakes still ring and knock, then the last resort is to install calipers from GAZ Sobol.
Niva Chevrolet replacement of rear brake pads, cylinders and drums. Video and photo instructions
We have a Chevrolet Niva car, produced in 2005, mileage 137 thousand km, for scheduled repairs, on which it is necessary to replace the rear brake pads, drums and cylinders. We will show you how you can do this yourself, without resorting to the help of specialists.
It looks like the pad on the rear left wheel has been torn off, there is a grinding noise when braking, and when reverse gear is engaged, the wheel jams and then breaks. Therefore, it was decided to immediately lift and change the pads, drums and cylinders on both sides. After this, we'll bleed the brakes with a vacuum.
Using a 12mm socket, unscrew the drum mounts:
Then screw in two bolts:
It really didn’t work out for us, all the threads remained on the bolts, it was very soured, so a hammer comes to the rescue, since we will eventually have to change the drum anyway. This situation arises when, when replacing fasteners, they are not coated with copper grease; I believe that there is no need to save on this!
Replacing pads on the rear axle
To replace the rear pads, you will need to carry out the same preparatory work, after which the first thing you need to do is loosen the handbrake. Subsequence:
- We remove the spring near the lever from which two cables go.
- Using two “13” keys, you need to unscrew the bracket nuts, after which the cables weaken and do not affect the pads.
You can start directly replacing the pads
- You need to remove the drum from the axle shaft using a “12” key by unscrewing two bolts. The drum often sticks, so you need to tap it with a hammer around the entire perimeter.
- The working cylinder must be pushed inward on both sides using a flat screwdriver.
- You need to pry the tension springs by pulling them out.
- The block must be moved to the side opposite to the other block by the lower part, after which the two blocks are removed from the shield.
Original auto parts
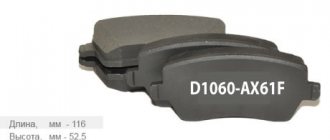
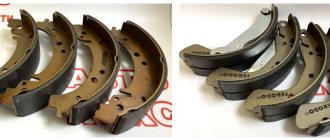
The part itself consists of a metal base and a ceramic or synthetic lining. Due to increased friction, components must be fire resistant and wear resistant. There are both disc and drum variations of the systems. The pads in both cases differ in shape and method of fastening. As a rule, the drum version is rarely used, and only on the rear wheels. The LADA Sport kit will cost you about 650 rubles. It already has all four parts, you don’t have to buy anything else. They have a width of 8 millimeters and a length of 11 cm. A quiet and high-quality replacement option. Don't forget to check that the article numbers match one of the ones below:
- 2108-3501080;
- 21080350180083;
- 2108-3501800-83.
https://www.youtube.com/watch?v=ytaboutru
AvtoVAZ itself offers a similar solution. VAZ-2108 brake pads are suitable for most VAZ car models and cost about 480 rubles. In particular, they can be installed on VAZ 211213, VAZ 2121. The set consists of two front and two rear pads.
Check that the items and dimensions on the box are correct. If the barcodes are poorly printed, the box does not match the image in the catalog - most likely, this is a fake.
How to remove the rear brake drum of a Niva Chevrolet
How to remove the rear brake drum of a Niva Chevrolet
According to the AVTOVAZ catalog data for the VAZ 2123, the front pads are assigned the number 2123-3501090. The average price of original pads is 550 rubles.
Due to the low quality of most original products, we will consider analogues:
- SANGSIN SP1168 — 480 RUR;
- TRW GDB265M - 620 RUR;
- BOSCH 0986466601 — 650 RUR;
- FERODO FDB195 - 950 RUR;
- ATE 13046080062 — 1450 rub.
Based on the proposed substitutes, we conclude: for a small additional payment it is better to take a high-quality analogue from a world-famous manufacturer. Improved braking performance and safety may come at the cost of reduced brake rotor life.
Service and operation
Manuals → Chevrolet → Niva (Chevrolet Niva)
Transfer case control
The key to long-term operation of the transmission is the correct choice of its operating mode. Each owner of a Niva Chevrolet car can first become familiar with the operating rules using a specially developed manual. First of all, you need to understand the operating modes of the transfer case and their activation. On Chevrolet Niva cars, the downshift/upshift, as well as the locking, are activated by one lever, which has five positions.
- Central position – neutral is on.
- Back and to the right - high gear with the differential unlocked.
- Back and to the left - high gear with a locked differential.
- Forward and to the right - low gear with the differential unlocked.
- Forward and left - low gear with a locked differential.