What is its structure?
The main component of the crosspiece is a bearing, which is secured with bolts and allows it to rotate. The cross itself is a cross-shaped joint that controls the alignment of the axes of all rotating parts of the vehicle. It connects the plugs together. They are attached to each end of the cross. The movement of the hinge is carried out thanks to special needle bearings located on its spikes. These bearings are located in holes on the forks, and are secured on top with retaining rings (so that they cannot move).
Thus, the crosspiece of the VAZ 2107 is a very flexible connection between the car engine and the axle, which serves to move the connected parts and transmit torque to the wheel.
How to check the universal joint of a VAZ 2107.
To understand what can knock on a part, you need to know how it works. The photo below shows its components: 1 - the cross itself. 2 - plastic plugs. 3 - sealing rubber rings. 4 — caps with a bearing inside.
Crosspiece and its components
The first sign of failure of the crosspiece is knocking noises when starting from a stop and when changing gears in the area of the bridge. To accurately determine the malfunction, we climb into an inspection hole or hang the car on a lift (here, who has what capabilities). Now we hold the rear axle shank with one hand, and with the other we try to rotate the driveshaft alternately in different directions. A faulty crosspiece will make a knocking noise, and you will also feel play. Even if there is seemingly small play, it is worth replacing the faulty part as soon as possible, since it can pull the suspension bearing, elastic coupling and other parts with it.
Preparing for work
When buying a new crosspiece for a VAZ 2107, you don’t need to try to save money. Everyone knows that “the miser pays twice,” so it’s better to buy an original part right away than to change a couple of crosses in six months.
The body of the crosspiece is made of heat-treated steel. This is necessary to ensure the special hardness of the studs. Thus, the quality of the material plays a big role in the service life of the part. How long can a car run without replacing crosspieces? It is believed that approximately 500 thousand km!
The retaining rings and bearing also need replacement. Please note that the rubber of the bearing itself must be sufficiently elastic.
Replacing the VAZ 2107 driveshaft crosspiece.
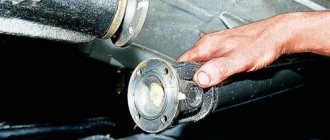
Without removing the driveshaft, the crosspiece cannot be replaced. To remove the cardan, unscrew two bolts 13 for securing the outboard bearing.
After which, just in case, we make marks on the connection of the cardan with the shank of the rear axle and after that, unscrew the four nuts securing the cardan to the shank.
If they do not unscrew, then cut them off with a grinder or chisel. Now you can remove the cardan by pulling it towards the bridge.
The first thing we do on the removed cardan is to put marks on all its parts so that after assembly there is no beating or vibration.
We put marks on the shaft
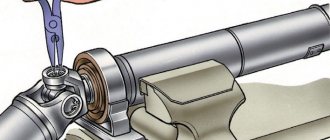
How to remove the crosspiece from the VAZ 2107 cardan.
Now the moment has come for which the cardan was removed. Now, in order to remove the cross from the cardan of the VAZ 2107, 2106 and other cars of the classic family, we pull out the locking rings.
We take a mandrel of a suitable size, the extension from the tool kit also works well, and drive in the cross until it stops.
We knock down the cap that has come out and drive the cross into the resulting hole in the opposite direction and knock down the second cap. Now, at a certain angle, the cross is removed and the two halves of the shaft are separated.
We perform the same actions with the remaining two caps. That's it, now you know how to remove the cross from the cardan of the VAZ 2107! Let's install a new one!
How to replace the crosspiece on the VAZ 2107 cardan.
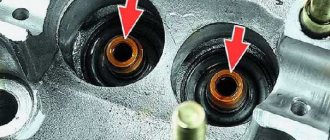
Before replacing the crosspiece on the VAZ 2107 cardan, you need to remove the caps from it and check for the presence of lubricant in them. If it is not there, lubricate it with lithol or lubricant for joints. Also clean the mounting holes of the crosspiece caps.
Before installing the crosspiece, lubricate the holes into which the caps are inserted with engine oil, polish, or, as a last resort, lithol. This is done so that the caps are pressed in with less force.
Carefully inserting a crosspiece without caps into one of the shaft halves, press it to the side from which we will insert the cap, push it on so that nothing spills out and begin to hammer in the cap. We install the locking ring on the side of the clogged wheel. We hammer the cap on the other side and install the retaining ring.
We perform the same actions with the other half of the shaft, not forgetting to first align the marks! The work is done, the VAZ 2107 driveshaft crosspiece has been replaced! You can install the cardan in place.
Which crosspiece to choose
When choosing a crosspiece, pay attention to the presence of a grease nipple on it. By lubricating, you will extend its service life.
Selecting the cardan shaft cross
It wouldn’t hurt to conduct a small test of the part even in a store. To do this you will need a small piece of glass or a small mirror. We take the part under test out of the packaging and place it on the glass. Holding the opposite ends, try to shake the part, then do the same with the others. Then we turn the cross over and repeat the operation. If a knock is heard during the procedure, then there are serious doubts about the quality of the cross.
For me, the best option for installation is the Tolyati cross.
If you are changing the universal joint crosspiece, then it makes sense to change the second one too, so that you can deal with it soon. And also replace the outboard bearing.
Preliminary diagnostics of an automobile unit
Experts recommend that before replacing the cardan, you carry out independent diagnostics of all kinds of faults, conducting it in the following sequence:
- it is more convenient to check for faults if the car is placed on a special pit for vehicle inspection or on an overpass;
- after installing the machine, be sure to put a stop under both front wheels;
- The handbrake must also be applied.
Next, you should make sure that the retaining rings in the so-called glasses have not fallen out of their places. If such an element is not detected, it must be installed, since without it the “glass” may simply fall out of its seat. After this, you can begin to check for faults in the cross, starting with checking for play. To check, you will need a regular screwdriver, which is installed between the crosspiece and the driveshaft in order to be able to rotate the driveshaft both clockwise and counterclockwise.
If even a slight play is noticed during this event, the automotive unit will need to be replaced.
Suspension bearing
Replacing the propeller shaft on a VAZ 2107
After installing and aligning the chute, the suspension bearings and propeller sections are mounted; the hanging bearings are finally secured after the shaft has been aligned.
For engines that do not have a foundation frame, so-called suspension bearings are suspended from the crankcase (Fig. Fixation of the cover in the horizontal plane is achieved by edges in the block that exactly coincide with the corresponding protrusions on the cover or double-sided yoke locks (Fig.
The screw sections are connected by a coupling that has a trunnion in the middle part, which fits into the suspension bearing.
The components of the conveyor are a chute, a screw, a cover, drive and end posts, hanging bearings, loading and unloading pipes and a drive. The auger chute, welded from sheet steel, is assembled from separate sections connected to each other by flanges. The screw is also assembled from separate sections connected to each other through a suspension bearing journal.
The main components of the conveyor: chute; screw; drive and end stands with bearings; suspension bearings; loading and unloading pipes and a drive consisting of an electric motor, a cylindrical gearbox and couplings.
X 175 instead of I 36 X SYO with a metal saving element, and the fastening of the outboard bearing housing is provided only on the lower flange of the balancer body.
The main components of the conveyor are: a chute made of sheet iron, which houses an auger shaft rotating in suspended bearings and a drive. The gutter along its entire length is covered with a metal cover to which bearings are attached.
When assembling the propeller, make sure that the permissible misalignment of the intermediate shaft of the assembled propeller, determined by the gap between the outboard bearing housing and the bolt securing the flanges of the propeller sections, is at least 3 mm; The rotation of the mounted screw must be smooth without local jamming or resistance to rotation.
The auger is a closed chute 1 in which an endless screw 2 rotates, motionless on a shaft mounted on suspended bearings.
| Transport pipe 236. |
The indicated values of the filling factor f can be increased by 1 5 - 2 times for short screw conveyors that do not have intermediate hanging bearings that interfere with transportation.
A screw conveyor (Fig. 73) consists of a chute with a semicircular bottom, inside of which a screw is mounted on bearings and is held from bending by hanging bearings. When the shaft rotates, the material moves along the axis of the chute.
| Permissible drum runout depending on the outer diameter of the drum and the type of drive. |
Before proceeding with the installation of a conveyor that arrived disassembled, it is necessary to carefully check the technical condition of the drive, the chute pipe, axles and outboard bearing shells.
When checking, you should make sure that there are no dents in the gutter pipe, or bending of the shaft with screw blades, and pay attention to the degree of fit of the scraped surfaces and liners. Identified defects must be eliminated before installation work.
At the same time, it is necessary to check the condition of the foundation. After this, you should tighten the main string - a guideline - and clarify the vertical marks of the machine supports.
Before proceeding with the installation of a conveyor that arrived disassembled, it is necessary to carefully check the technical condition of the drive, the chute pipe, axles and outboard bearing shells.
When checking, you should make sure that there are no dents in the gutter pipe, or bending of the shaft with screw blades, and pay attention to the degree of fit of the scraped surfaces and liners. Identified defects must be eliminated before installation work.
At the same time, it is necessary to check the condition of the foundation. After this, you should tighten the main string - a reference point and clarify the vertical marks of the supports and the machine.
Cardan transmission design
The most important thing is the shaft, which consists of two parts connected by a cross. The front part contains an elastic coupling through which the gearbox is connected to the shaft. The base of the coupling is rubber, which allows the shaft to move sideways. When driving over bumps, when the engine and gearbox “play” on the cushions, there will be no destruction at the joints. And this is important for the reliability of the mechanism.
The driveshaft itself is made of durable metal, hollow. Since it is not made from a single piece of metal, its weight is quite light, which affects the amount of torque. The lighter the driveshaft, the less effort the engine puts into moving it. Consequently, much less useful power is wasted.
Device on the car
Alignment of the driveshaft is mandatory, since if it is not aligned, extraneous knocks and vibrations will be observed. Alignment is carried out using special equipment by attaching weights of various masses to the surface of the shaft. Similar vibrations can occur when an outboard bearing fails. It is attached to the body, holding the front part of the shaft.
Particular attention must be paid to the crosspieces, which are the most vulnerable element of the cardan design. These are two axes located at right angles to each other, shaped like a plus sign. There are two cups on each axis; inside them are lubricated needle bearings. Try not to scatter them; collecting the parts will be problematic.