GTZ NIVA
Removing and installing the Niva brake master cylinder (instructions)
Remove the spare wheel support bracket for the VAZ 2131.
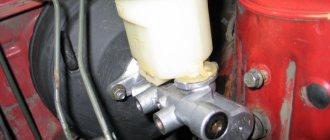
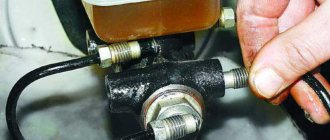
Using pliers, loosen the clamps securing the flexible hoses to the fittings of the master brake cylinder.
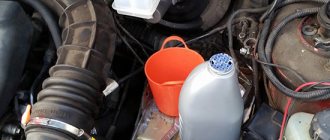
Carefully holding the fittings, remove the hoses. Drain the brake fluid from the reservoir into a substitute container. To replace the brake master cylinder fitting...
pry it off with a screwdriver...
and remove it from the brake master cylinder socket.
Use a screwdriver to pry up the rubber connecting sleeve...
and take it out. To remove a vehicle's brake master cylinder...
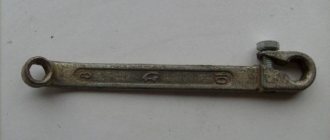
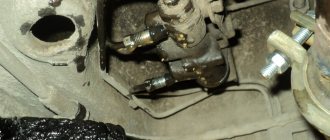
Using a special “10” wrench covering the five sides of the nut, unscrew the fittings of the four Niva 2121 brake pipes.
We remove the pipes from the brake cylinder Niva 2131.
Using a 17mm spanner, unscrew the two nuts securing the master brake cylinder to the vacuum booster...
and remove the main brake cylinder of the VAZ 2121. Install the main brake cylinder of the VAZ 2121 in the reverse order. We bleed the hydraulic drive system.
Repair of GTZ NIVA
Problem: the Main Brake Cylinder on the NIVA leaked directly into the Vacuum Booster.
I took out the main brake assembly with vacuum from a Peugeot 405 from old bins, and also bought two cylinder connectors for the front calipers and two front brake hoses from Shevik.
cylinder connector VAZ-2123
front brake hose VAZ-2123
GTZ and VUT from Peugeot 405 (front view)
GTZ and VUT from Peugeot 405 (rear view)
I started disassembling the old system. As it turned out, the old owner was wise here too. I threw out absolutely everything old, leaving only the pedal and the front cylinders, and began to assemble everything in a new way: 1. Put the cylinder connectors on the front calipers;
installed cylinder connector on brake cylinder
installed cylinder connector on brake cylinder
2. At first I took the hoses to the turners - they cut threads on the outside at the ends where the tube is screwed in, turned out two thin nuts and two thin washers - to attach one end of the hose to the body;
here we modify the brake hoses
3. Installed the hoses, connecting them at one end with the cylinder connectors, and securing the other end with the modified end to the body in the normal place; 4.Laid new copper pipes from the tee to the hoses. Then it came to the Chief with the vacuum cleaner. Having estimated approximately where it would stand, I began to split hairs: 1. Making an adapter bracket, because the vacuum itself is much larger than Nivovsky, we had to carry it some distance
plate for vacuum booster
plate to body
We weld the plates together with an angle of 25x25mm and a length of 120mm at 4 corners; 2. Manufacturing of an intermediate drive rod from the pedal to the vacuum itself with the possibility of adjusting its length;
transitional drive rod from pedal to amplifier with adjustable length
3. Because The main brake reservoir in Peugeot is not installed as it should be, we had to make adapters to connect the hoses from the fluid reservoir and lengthen the hoses themselves. Once all of this was done, the adapter bracket was painted and dried, and assembly began. Everything fell into place, as I had planned. All that remained was to run the pipelines from the main cylinder to the tees. It was then that I decided to check the vacuum cylinder that had been lying in the garage for about ten years - I plugged the outlet holes of the cylinder and tried to bleed it. To my surprise, everything turned out to be more than 100% working. Next, I ran the pipelines to the tees, only on the tee that placed one plug on the rear brakes. After all, now the brakes are like those of a normal car - rear/front.
plug on tee for rear brakes
We started bleeding the system - not an easy task, because there were still two bleeding fittings left on the front cylinders. But we still succeeded. I took it for a test drive and was more than pleased. The brakes are 100% clearer. Even when skidding, the car goes smoothly - without skidding, all wheels brake as they should, and not each on its own. The result exceeded my expectations. And under the hood it all looks like this.
everything is in place and looks like this
Video on GTZ repair - replacing cuffs
https://vazclub.com/niva/2121-2131/remont/tormoznaya-sistema/tormoznie-mehanizmi/snyatie-glavnogo-tormoznogo-tsilindra.html, https://www.drive2.ru/l/1680889/
next article:
Replacing brake discs and pads NIVA
Contents of the article: Replacing Niva brake discs and pads (step-by-step instructions) Video on replacing brakes
Rating 0.00 [0 Vote(s)]
New master brake cylinder for VAZ 21214
Today is not only a men's holiday, but also a men's shopping day))) In the morning I bought a little spare parts for Nyvka. I bought a lot of things, including a timing kit and a lot of parts for the front suspension, but I’ll tell you about a more interesting purchase...
I liked the idea of installing a modified VUT and GTZ from Niva 21214M, instead of the standard vacuum unit and main brake. They say the pedal becomes lighter and the brakes are more productive and the pedal's informativeness improves. Without thinking for a long time, having written out the part numbers necessary for the alteration, I went to the market on a wholesale day, where all the necessary goodies were safely found, namely:
Vacuum brake booster VAZ 21214M - 21214-3510006 Master brake cylinder VAZ 21214M (without ABS) - 21214-3505010 Mounting bracket VUT VAZ 21214M - 21214-3510406 Bracket cup for pusher seal VUT VAZ 212 14M - 21214-3510420 Pusher boot VUT VAZ 2108 - 2108 -3510418
There are also difficulties, for example, such as: finding a bracket with a glass included, many sell brackets without glasses, but there are no glasses separately, but I was lucky and I found it right away as a set. It is also difficult to explain or describe the VUT pusher boot from the 8, but this was also possible.
It is necessary to buy a master brake cylinder for cars without ABS, since on cars equipped with ABS the GTZ has two outlets for the brake hoses, but we need 4 outlets. In my case, I bought the GTZ already assembled with the VUT in one set. You also need a VUT bracket of the new VAZ 21214M model, since the VUT mounting holes on the old bracket will not coincide with the new VUT 214M, but the craftsmen re-drill the old bracket or turn it 90 degrees, but I didn’t experiment, but bought a new bracket, it not that expensive.
Installation is planned a little later, there is still a lot of work to do with the machine, the main thing is to find and purchase everything.
Installation of VUT from Niva 21214M to Niva 21213
A short report about the installation. Before capitalizing the engine, I had minor problems with the operation of the brakes, namely, it skipped VUT and XX, so it was not stable.
At first I thought about just buying a new VUT and that’s it, but either for joy or for bad luck, I learned about the possibility of a small upgrade of the brakes, in the form of a VUT (vacuum brake booster) and a GTZ (brake master cylinder) from 21214M.
Installing it reduces the force on the brake pedal and increases braking efficiency. In an empty car, or with a full interior, there are enough people and an old one, but when there is a full interior of people and also a trailer with potatoes on the tail, when you are driving from the dacha in the fall, it becomes very difficult to brake. So Makar came up with another idea to slightly modify the car for his needs.
What will be the joy after installing VUT and GTZ 21214M?
The use of a new brake cylinder and vacuum booster will reduce the effort on the pedal (by 30%, according to engineers), shorten its stroke (by 15%) and make the brakes more informative.
The VUT itself is a modern 9-inch backlash-free (that is, UNADJUSTABLE!
), manufactured under license from Lucas and on its equipment, GTZ with increased productivity.
This is due to the increased dimensions of the VUT, which became 9" in diameter versus the old 8", plus the diameter of the GTZ was increased (22.22 mm instead of 20.64 mm) and its working stroke was reduced.
The VUT and GTZ themselves trace their roots back to the Lada Kalina family of cars, but you can’t stick a pure Kalinovsky VUT into a Niva; the Kalinovsky rod that goes to the brake pedal is much shorter than the Niva.
visual comparison of VUT Kalina and Niva21214M
Having scoured the Internet, I realized that for a trouble-free installation I would need to buy VUT, GTZ and a VUT bracket for Niva 21214M.
When does the need arise?
The brakes need bleeding if there is interference with the system design, namely:
- Tubes and hoses are being replaced.
- The brake fluid is changed.
- New calipers are installed on the front wheels.
- New cylinders are mounted on the rear axle.
- The master cylinder is being replaced.
In other words, bleeding is necessary if there has been a leak in the system. Before bleeding the brakes on the Niva, you should prepare the car for this procedure. First you need to loosen all the bleeder fittings. To do this, you need to use a special key at “8”. It is best to carry out all work on an overpass or inspection pit.
Alternative way
This method is suitable when it is not possible to use the help of a partner. To do this, you will need to create excess pressure in the system using a simple bladder or spare tire. You'll have to be Kulibin a little to make an adapter between the chamber fittings and on the expansion tank cap (you need to use a spare cap).
The essence of the procedure is the same as in the first option. You should unscrew the bleeder fittings one by one to get rid of excess air. Experts recommend carefully monitoring the fluid level in the tank and, if necessary, adding it to the required volume.
Lada 4×4 3D › Logbook › Brake rebuild part 1 - sorting out the front calipers in the field
Previously, I created a topic on brakes, on which I never received any practical advice - www.drive2.ru/l/454464990473094080/ Today, the day came when I gathered my thoughts and decided to completely go through the brakes. This part concerns the front brakes, namely rebuilding the calipers, replacing rubber and metal tubes. I will write step by step, maybe someone will find it useful))
So, we jump-start the car, put stands, and remove the wheel. Pull out the clamp for the upper caliper clamp and remove the caliper. We need to press the pistons out of the caliper body. I do it this way: I rest the caliper against the brake disc with the outer pistons so that nothing prevents the central piston from coming out. Literally 3 pumps of the brake pedal and the piston came out.
Using a 14mm wrench, unscrew the brake hose bolts and remove the caliper. (In my case, I did not clamp or dampen the brake pipes, as they had to be completely replaced) It’s easy to press out the two outer pistons like this:
A couple of light blows of the hammer on the hexagon and the outer pistons came out.
For easy extraction, it is better to immediately tear the rubber cuffs
An examination of the pistons and cylinders showed that there was nothing fatal or terrible; there were no scuffs or traces of rust.
We wash the caliper and remove the rubber bands from the repair kit. Following the advice, I took the BRT to D2. Soak the rubber bands in brake fluid
We install the internal sealing rings, put the upper cuffs on the piston
Lubricate the pistons with brake fluid and insert them into the cylinders. Insert by hand, no tools or pry bars required
Standard method
The essence of this method is that the work is performed by two people at once. One sits in the driver’s seat and, on command, presses the brake pedal, while the other performs the necessary manipulations.
Here's how to properly bleed the brakes on a Niva:
- Start working with the rear right cylinder. Fill the expansion tank with liquid. Place a tube onto the fitting and lower the other end into a jar with a small amount of brake fluid.
- Give the command to your partner to press the brake pedal 5-7 times (of course, you also need to release it).
- When pressing the last time, it is necessary to fix the pedal in its extreme position near the floor.
- Unscrew the fitting a little and bleed air from the system. It will come out along with a small amount of liquid.
- Repeat the procedures described above until air stops flowing.
Then you need to switch to the second rear cylinder. The last to be pumped are the calipers of the right and left front wheels, respectively. The main thing is to strictly follow the sequence and add liquid to the tank in a timely manner.
Lada 4×4 3D › Logbook › Replacing the caliper cylinder
Last Sunday I changed the rear left brake cylinder, it was rusty and simply didn’t work.
In general, I also wanted to change the cylinder in the right front caliper, but decided not to do it. And as it turned out, he did the right thing. The reason for the need is below. If anyone is aware of the design of the Niva brakes, then there are two fittings on the front caliper cylinder. As you can see, there is only one here, and the other one is filled with some kind of shit. When bleeding the brakes last time, it turned out that it was rattling, and since there is no second fitting, it is better to remove the old part and replace it.
But before replacing, you need to jack up the right front wheel. And here a failure awaits us, the old Soviet jack does not fit into exactly one jack of the right front wheel. Well, okay, I took another jack, since I have them, and jacked it up under the threshold. We take off the wheel, spray it with a bucket and wait.
Well, everything seems to be soaked. We try to turn it, it doesn’t turn. We spray some more and wait. It won’t spin, okay, take the key and carefully remove the hammer, twist it and begin to lose the brakes quickly. By the way, how to close the brake hoses so as not to leak? Screw on the nut? In the end, I solved the problem by screwing the hoses onto a new cylinder, but in the end I came to really like the brakes.
Next I remove the caliper. It's quite simple, you just need to remove one pin, cotter pin and springs. And then you can’t sift through it all. I twist it in my hands and realize that everything has soured so well. Don't forget to take either a core or a drift. Otherwise you will not be able to remove the cylinder. It is additionally held in the bracket by a fixator, which must be recessed.
We put it on the floor, take a hammer and hit it. After a while, we begin to regret the lack of a vice and a workbench. But still we knock the cylinder out of the bracket. What is called: - Done! Broke!
Well, then it was easier: I cleaned the bracket a little, scraped off the dirt from the old cylinder and took out the retainer with the spring. I changed the cylinders so that the slurry does not leak. I worked the new cylinder with a file according to the instructions, installed the cleaned retainer and drove the new one into place with a rubber hammer.
Then I just put the caliper back. Next I screwed on the hoses, of course the first time I screwed them into a cross