A smooth or sharp drop in the brake pedal, or its floating and vibration when braking, usually indicate Master brake cylinder malfunction. Most often, the reason for its malfunction is the loss of tightness of the rubber sealing cuffs or improper operation of the bypass valves.
To distinguish its malfunctions from other malfunctions of the brake system and find out how to check whether the master cylinder is working, read the article.
How to understand that the GTZ is bypassing brake fluid?
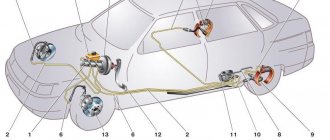
Vehicles use a system with two separate hydraulic circuits. You can read in detail about its task and work separately. The general principle is that when the brake pedal is pressed, the vacuum booster rod acts on the first piston of the GTZ, which, by compressing the brake fluid supplied from the reservoir, creates excess pressure in circuit 1 directly, and in circuit 2 indirectly by moving the second piston.
If the piston seals are severely worn, the GTZ bypasses: the liquid passes between the walls of the housing of the first, second or both pistons in the opposite direction and returns to the expansion tank. As a result, necessary to act on the brake cylinders is not created
There are two simple ways to check the operation of the brake master cylinder for bypass of brake fluid:
Method number 1 (performed with an assistant)
- Unscrew the cap of the expansion tank in the engine compartment.
- Have an assistant press the brake pedal while observing the condition of the fluid.
- If, when pressed, the level decreases and remains until the pedal is released, the cylinder is in good condition.
- If the fluid level begins to increase when the pedal is pressed or bubbles appear and gurgling is heard, the GTZ is bypassing.
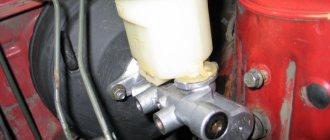
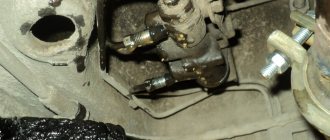
Designation of GTZ terminals
Method number 2 (you can do it yourself)
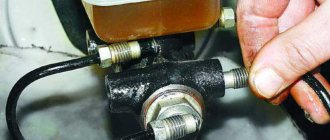
- Disconnect the brake pipes from the GTZ terminals.
- Plug the fittings with bolts with suitable threads.
- Depress the brake pedal.
- If, after pressing the pedal, it sags a little, but does not go further and resistance is felt, the cylinder is properly maintaining high pressure.
- If, when pressed, the pedal smoothly sinks to the end, this indicates a slight bypass, and if it quickly fails, the wear of the turbocharger is critical.
On cars where the braking system is equipped with pressure sensors, problems with the turbocharger can be indicated by glowing indicators on the dashboard and errors in the ECU memory. For example, P0557 - low signal level of the brake pressure sensor or C1301 - the pressure does not correspond to the position of the brake pedal limit switch.
Error 01435 and its interpretation on the VW Golf dashboard
Most manufacturers use their own problem numbering. In particular, for VAG cars, the following codes indicate problems with the GTZ:
- 01435 – problems with pressure sensor 1;
- 00813 – problems with pressure sensor 2;
- 02847 – front left wheel pressure sensor;
- 02848 – front right wheel pressure sensor;
- 18108 – incorrect signal from the brake pressure sensor.
These errors can occur both in case of problems with the gas turbine unit that cause a drop in pressure, and in the event of failure of the sensors themselves.
It is possible to determine 100% that the master brake cylinder is bypassing only by measuring the pressure at each outlet of the turbocharger.
Pneumatics
hydraulic (for example, in Toyota Corolla or Rav 4);
pneumatic (trucks, tractors and other heavy vehicles).
In the first case, oil acts as the “working fluid”, in the second – gas.
How to check the air brake system? It is important here to ensure tightness, paying close attention to the connections. You can detect a compressed air leak by ear or with a soap solution.
Corrected by replacing or tightening damaged elements.
When checking you must:
drive pressure 0.6 MPa;
turn on compressed air consumers;
When the level drops below 0.05 MPa for half an hour in the free position of the controls (or 15 minutes when operating).
The parking brake is checked in the off state, the leak is determined by ear. If it is, the root of the problem is in the cylinder seals.
The spring chambers are checked if there is compressed air in the drive circuits of the handbrake and the brakes of the rear cart.
Signs of a faulty master cylinder
Among the symptoms indicating a malfunction of the master brake cylinder, the main signs can be identified:
Checking the GTZ in 5 minutes without removing it from the car: video
- pulling the car to the side when braking;
- overheating of the pads on one wheel;
- squeaks when pressing the brake pedal;
- pedal travel is too soft or hard;
- shortened pedal travel;
- brake pedal failures;
- holding the wheels with blocks after releasing the pedal;
- fluid leaks on the GTZ housing.
Most signs of a brake system malfunction appear when the brake pedal is pressed and are similar to other problems with the brake system. In particular, the failure of the pedal may indicate congestion or depressurization of the lines. Therefore, before checking the serviceability of the master brake cylinder, it is necessary to at least check the level of brake fluid in the reservoir, as well as the condition of the pads, discs and hoses .
How to Diagnose a Malfunctioning Master Cylinder
| Symptom of malfunction | Why is this happening? | Alternative reasons |
| Slow braking |
|
|
| Great force when pressing the pedal |
|
|
| Short brake pedal travel | ||
| The pedal gets stuck while driving |
| |
| Pedal failure near the end of the stroke |
|
|
| The pads continue to hold the discs |
|
|
| The pads and disc/drum on one wheel get hot |
| |
| The car pulls to the side when braking | ||
| Squeaking/creaking noise when braking |
|
|
| Slow return or stuck pedal when released |
|
|
Purpose of the GTZ in a car
Braking begins by pressing the pedal. For now, there is no need to consider all sorts of smart driver assistance systems that work great even without his participation.
The maximum that will support the foot of a person who wants to slow down the car is a vacuum brake booster (VBS), located between the pedal assembly and the first hydraulic device in the chain ending with the brake pads.
The combined action of muscular force and the atmosphere through the VUT membrane should increase the pressure in the entire hydraulic system. If the valves and pumps of the ABS system do not interfere, then this pressure is the same at any point.
Fluids are incompressible, which is why they are used in passenger car brakes. Before this, no less incompressible solids were used in the form of rods and cables to drive the pads of the first machines.
The pressure is directly created by the piston of the main brake cylinder (MBC). Due to incompressibility, it increases very quickly; every driver felt the pedal harden under his foot after selecting its free stroke.
Relieving pressure after releasing the pedal and replenishing the lines with liquid when required are also functions of the GTZ.
Checking the brake master cylinder
A full check of the gas turbine engine for operability is carried out using a special high-pressure pressure gauge (0–250 atm). Using connecting fittings of the appropriate diameter, they are connected to the outlets of the master cylinder instead of tubes. A working turbocharger should create a pressure of up to 180–200 atm when the pedal is pressed. (bar). If the measurement results are lower, the cylinder is worn out and requires replacement or repair.
Brake Pressure Measuring Kit
The cost of a set of pressure gauges with adapters is about 15,000 rubles, so not every service station has it. Without a pressure gauge, you need to check the gas turbine engine using indirect signs. For diagnostics you may need the following materials and tools:
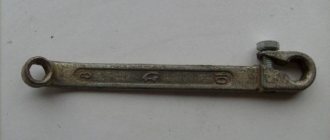
- brake union wrench (split or clamp), usually 10, 11, 12 or 13;
- a bottle of brake fluid (if there are leaks, the level is below normal);
- bolts with threads similar to the threads of the GTZ tube fittings.
For a full check, you will also need an assistant who will press the brake pedal during the diagnostic process.
How to understand that the brake cylinder is not working: technique
- Inspect the wheel brakes and lines . Make sure that the problem is on the GTZ side and that the actuators are in order.
- Inspect the brake master cylinder . Insufficient fluid level in the expansion tank and the presence of brake fluid leaks on the GTZ or VUT housing are an obvious sign of depressurization. If there is not enough fluid, but no signs of leakage are visible, add fuel fluid and check the operation of the brakes. Perhaps the GTZ is working properly and the culprit is a leak somewhere in the line.
- If there are GTZ leaks, look where they occur .
To search, you need to clean the cylinder body of the fluid (for example, with gasoline, solvent or alcohol), ask an assistant to pump the pedal, and in the meantime, look where the fluid leaks appear. Determining a GTZ malfunction using the example of a Hyundai Accent: video - Start the engine and pass the VUT hose . If, after squeezing the hose, the engine speed changes, the problem is not in the GTZ, but in the vacuum booster.
- Start the engine (on old cars without VUT you can not start it) and press the brake pedal firmly . If it stays in one position, the GTZ is normal and maintains pressure properly, and if it sags smoothly, the cylinder is probably releasing the fuel fluid into the tank.
- Look at the behavior of the liquid in the tank during operation . On a working turbocharger, when you press the pedal there should be no extraneous sounds, and the fluid level should drop slightly. If it remains unchanged, gurgling is heard, bubbles are visible - the piston cannot create the required pressure and the cylinder releases the fuel fluid back into the tank, which means it is not working. When you press the pedal, the level should drop and remain at that level until released. If it increases when the pedal is pressed, the GTZ does not hold pressure and bypasses fluid.
- Plug the outlets of the turbocharger and check whether it holds pressure . To do this, you need to unscrew the brake pipes from the cylinder, and in their place screw in bolts with similar threads. After this, add fluid to the reservoir to the normal level and press the pedal. If the foot feels resistance and the pedal does not move further, the cylinder is properly holding pressure. If the pedal is pressed smoothly or fails altogether, the piston bypasses fluid, the turbocharger is faulty.
If after carrying out the manipulations it becomes clear that the brake cylinder is not working properly, you need to remove the turbocharger and disassemble it for troubleshooting, which will allow you to determine the true cause of the malfunction.
How to check a removed brake master cylinder
To dismantle and diagnose the GTZ you will need:
- split or clamp wrench for brake pipes;
- a large (from 10 cubic meters) syringe for pumping out fuel fluid and an empty container for draining brake fluid;
- a key for disconnecting the turbocharger from the VUT (most often at 13, 14 or 17) and keys for disassembling the turbocharger;
To disassemble the brake master cylinder for diagnostics, you need to:
Disassembling the brake cylinder to determine the breakdown: video
- Pump out or drain the brake fluid from the expansion tank.
- Disconnect the brake pipes from the GTZ outlets.
- Unscrew the brake cylinder from the VUT.
- Remove the GTZ from the car.
- Unscrew the bolt plug (if any) in the front part of the GTZ and/or remove the stopper in the rear part (from the VUT side).
- Inspect the inside of the VUT for leaks; if there are traces of fuel fluid there, the cylinder is clearly faulty.
- Remove the pistons from the turbocharger, having previously disconnected their retainers - bolts or pins.
- Wipe the pistons with a dry cloth, inspect them for wear, and assess the condition of the seals.
- Wipe the inside of the cylinder body, inspect its mirror for burrs, holes, traces of corrosion and other defects.
- Measure the gaps between the pistons and the cylinder walls, compare them with factory tolerances.
- Inspect bypass windows, openings and outlets for blockages.
Based on the results of inspection of the GTZ parts, conclusions can be drawn about further repairs. If there are signs of wear on the rubber sealing cuffs, you can limit yourself to a small repair kit. If there is wear on the pistons, you need to buy a repair kit consisting of pistons and rubber bands. If the GTZ body itself has burrs, cavities, traces of corrosion and other defects inside, the assembly will have to be replaced.
After diagnosing the GTZ and rebuilding or replacing it, after installing it on the car, you should add brake fluid to the reservoir to the maximum mark and bleed the brakes.
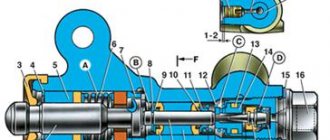
Device
The GTZ includes:
- a housing with fittings supplying fluid from the supply tank and discharging it to the lines of the working cylinders;
- pistons of the primary and secondary circuits;
- sealing rubber cuffs located in the piston grooves;
- return springs that compress when the pistons move;
- a boot covering the entry point of the rod from the VUT or pedal into the recess on the back side of the first piston;
- a screw plug that closes the cylinder from the end, by unscrewing which you can assemble or disassemble the cylinder.
Compensation holes are located in the upper part of the cylinder body; they can overlap when the pistons move, separating the high-pressure cavity and the supply tank with a supply of liquid.
On the subject: What is a brake caliper and how does it work (types, device, repair)
The tank itself is usually attached directly to the cylinder through sealing collars, although it can be moved to another location under the hood, and the connection is made through low-pressure hoses.
FAQ
When the engine is running, the pedal slowly sinks to the floor with constant force, is it necessary to change the turbocharger?
Smooth subsidence of the pedal is a frequent sign of leaking GTZ seals. In this case, it is possible to repair the part by installing new cuffs from the repair kit.
Brake fluid leaves the reservoir, but then appears, is it the GTZ?
Changes in the level of brake fluid in the reservoir are not necessarily a sign of a breakdown of the turbocharger. The fuel fluid can also either go down or rise due to airing, boiling due to overheating of the pads, or jamming of the actuator cylinders.
Does it make sense to install a repair kit or is it better to replace the GTZ?
It makes sense to install a repair kit when only the rubber parts are worn out. If the piston is severely worn or the housing is damaged, it is better to replace the entire turbocharger.
Self-pumping using the example of a VAZ-2110
On the Lada “Ten” everything is done in the same way as on the VAZ 2108-21099 models, since the design of the brake system is the same. Therefore, let’s look at how to bleed the brakes on models 2110-2112 yourself, without help.
To do this, you will need to use one additional element - an aerator, which you can buy or make, and a rubber hose with ends on both sides for connection to the nipple.
A homemade aerator is a lid from a “classic” brake reservoir (without a built-in sensor), into which a nipple from a tubeless wheel is installed.
The essence of pumping yourself is very simple and it is done like this:
- The car is immobilized. A bleeding hose is put on the fitting of the brake mechanism that is being pumped;
- The aerator is screwed onto the brake reservoir, and one end of the hose is connected to it. The second one is put on the nipple of an inflated car wheel (for example, a spare tire);
- Unscrew the fitting half a turn. In this case, the air pressure from the spare tire will begin to squeeze out the liquid. All that remains is to monitor when liquid flows through the tube without air bubbles, and tighten the fitting;
This way all mechanisms are pumped. The air pressure of one wheel is enough to completely bleed the system;
But there is one nuance in this - the pressure supplied to the tank should not be very high (no more than 1 atm). Otherwise, there is a risk of the lid falling off or the tank being damaged.
Bleeding the brakes using the described methods is also applicable for more modern VAZ models - 2114-2115, Priora, Kalina. And all because the design of the brakes is completely identical.
Symptoms of problems
The general technical condition of the car (including the brake system) can be checked using a personal diagnostic adapter - a car scanner. These types of devices are widespread and have a wide price range. We would like to draw your attention to the budget model of Korean production Scan Tool Pro Black Edition.
At a cost of about 2 thousand rubles. This scanner is capable of fully diagnosing your car (engine, gearbox, transmission, abs, srs and much more), which will pay for itself in 1-2 trips to the service station. The adapter is quite easy to use, has Russian-language software and is compatible with most cars produced in 1993. The device will also be useful when buying a used car, as it can show its real mileage and VIN.
The fluid brake system consists of many parts that can become unusable: pipes, wheel cylinders, calipers, drums and pads. Typical signs of a faulty master cylinder:
- After pressing the pedal, the car stops slowly. The reason is that the cuffs of one or two pistons have lost their tightness - they have cracked or “floated”.
- To slow down, you need to press the brake pedal hard. The phenomenon occurs due to swelling of the rubber of the piston seals.
- The brake pedal travel is too short. The fluid inside the cylinder has nowhere to go because the compensation hole is clogged. Another option is that the passage is blocked by a swollen rubber seal.
- A common symptom is pedal failure, the brakes coming on at the end of the stroke. This indicates complete wear of the cuffs; as a result, liquid penetrates behind the piston and rushes into the expansion tank - the cylinder “bypasses.”
- The pads do not release the brake discs and drums and get very hot when driving. Options: one of the pistons is jammed or the bypass hole is clogged.
The listed symptoms of a GTZ malfunction are similar to malfunctions of other elements. Pedal failure also occurs when a large amount of air enters the tubes or loss of fluid in one of the working cylinders. Sluggish deceleration and increased force on the pedal are often caused by a breakdown of the vacuum booster - a cracked membrane or a lack of tightness at the joints of the hose that takes off engine vacuum.
There are signs that clearly indicate the performance of the main hydraulic cylinder and the malfunction of other elements:
- during braking, the car pulls to the side - the problem lies in a certain circuit or wheel;
- jamming of the brake mechanisms of one wheel;
- creaking and squeaking when braking;
- heating the discs and pads on one wheel.
If you eliminate these symptoms, it will become easier to check the brake master cylinder in a garage. This also includes obvious brake fluid leaks and the knocking sound of worn calipers.
Diagnostics and repair
From the signs listed above, it is easy to understand that in most cases there is only one source of problems - rubber products that have become unusable. The cuffs crack and swell, as a result they leak liquid and close the discharge holes. Hence the recommendation: all “rubber bands” of the brake system should be changed at intervals of approximately 100 thousand km, without waiting for critical wear.
Reference. Many auto mechanics express the opinion that after replacing the cuffs, the main hydraulic cylinder will not last long. The statement is true if the car owner purchased cheap, low-quality spare parts or installed new o-rings in the cylinder, where internal wear has formed in the walls.
Before checking the GTZ for operability, make sure there are no other faults:
- Inspect the wheel assemblies from the inside for leakage of brake fluid from the working cylinders.
- Check the integrity of the expansion tank and the fluid level in it.
- Start the engine and at idle speed, press the vacuum take-off pipe to the amplifier. If the engine speed has increased noticeably, there is an air leak and the master cylinder is most likely working.
A clear symptom indicating a breakdown of the main hydraulic cylinder is drops of brake fluid on the body . If you discover a leak, feel free to dismantle the unit and disassemble it to look for the cause. Another common problem - fluid flowing through the seals - is diagnosed as follows:
- Open the cover of the expansion tank and place an assistant in the driver's seat.
- Listening to sounds in the tank, give the command to an assistant to press the pedal.
- If the pedal moves easily and gurgling is heard in the reservoir, liquid is entering there. The reason is that worn cuffs are unable to create pressure in the circuits; liquid seeps through the leaks and enters the container.
Also, problems with the GTZ are indicated by jamming or too little pedal travel.
Sit behind the wheel, press it several times, and start the engine while holding the pedal with your foot. If it sinks to the floor or does not budge, disassemble the hydraulic cylinder. To replace or repair the master brake cylinder, you need to remove the unit from the vehicle. Work is carried out in the following order:
- Suck out the liquid from the tank with a syringe. If the cuffs are leaking, press the pedal several times and suck out the excess fluid.
- Remove the expansion tank.
- It is not necessary to drain all brake circuits. Substituting a small container, unscrew the nut of the first tube and carefully move it to the side, plugging it with a wooden stick.
- Repeat the operation with the second tube, unscrew the fastening of the GTZ flange and remove the unit.
Further actions depend on the design of the master cylinder. If the element is completely disassembled, change the rubber seals. Otherwise, you will have to replace the pistons assemblies. Pre-wash the body and all openings with alcohol; do not use gasoline. After assembly, add fluid and bleed the brake system to remove air.
Source
Useful tips
When problems arise with brakes, drivers often ask questions on forums, describing the nature of the problem.
Let us highlight the main problems and recommendations for solving them:
- when the semi-trailer does not respond to the brake signal or brakes late, most likely there is a leak from the air duct or receiver, the compressor is not working;
- The PP begins to “throw” from side to side - the drums or pads are worn out, diagnostics of the pneumatic system is needed, because it is possible that one of the brake chambers is “breathing” air;
- A non-self-propelled vehicle skids when braking - the release valve needs to be checked.
The main rule to avoid problems with the brake system of a semi-trailer is to undergo regulatory maintenance every year at specialized services. Moreover, this works both for European-type trailed equipment and for auxiliary vehicles produced in the Russian Federation or Belarus. I would like to note the Fruehauf semi-trailer, since the manufacturer focuses on the safety of non-self-propelled vehicles and is highly stable when driving on the road.
Preventive actions
A properly functioning braking system is the key to safe operation of vehicles.
It is important not only to replace the pads in a timely manner, but also to monitor the brake fluid consumption or check the integrity of the air brake pipelines
Checking the tractor chassis
Comprehensive diagnostics should be regularly carried out at service stations where computer stands are installed. Specialists will lubricate the rubbing surfaces with anti-corrosion compounds, which also prevent overheating, and will quickly bleed the brakes. Experienced drivers independently perform a visual inspection before the trip, checking the reliability of fasteners and the tension of the compressor drive belts. Failure is easier to prevent than to eliminate the consequences of an emergency.
In conclusion, we remind you - check the elements of the braking system as often and carefully as possible, because these measures prevent situations associated with failure while driving. On a long descent, periodically check the serviceability of the brake pedal.