Owners of carburetor cars often encounter such a problem as carburetor overflow. The phenomenon occurs not only on models from AvtoVAZ, but also on carburetor foreign cars. Overflow is a significant re-enrichment of the mixture of fuel and air that enters the combustion chambers. The mixture is over-rich for one reason or another related to the carburetor. Sometimes, even with the naked eye, you can see how gasoline flows in a powerful stream from the diffuser nozzle. There is a persistent smell under the hood. Let's look at all the reasons that lead to carburetor overflow and learn how to eliminate them.
Signs
If the principles of preparing the fuel mixture in the carburetor towards enrichment are violated, then problems with starting the engine are observed. A hot engine starts especially hard. If the engine does start, the speed is unstable (often increased in idle mode). It is impossible to adjust or somehow stabilize the speed using conventional methods.
If the fuel mixture is too rich, black smoke will come out of the exhaust pipe - the mixture burns directly in the exhaust pipe. When you press the accelerator pedal, failures are possible - the rich mixture burns very poorly. There will be a thick layer of black carbon on the spark plugs.
POPPING IN THE CARBURETOR WHEN AUDI 80 B2 GAS SHARP, Why is there a popping sound in the carburetor?
It is quite obvious that the appearance of popping noises in the carburetor is an alarming symptom that requires immediate identification and elimination of the existing problem. Let us add that shots or pops can quickly damage the carburetor itself, so further operation of the car is not recommended. In addition, pops and shots in the muffler are accompanied by increased fuel consumption, and this, as you understand, leads to unnecessary expenses. At the same time, the engine starts, although with difficulty, but during its operation the carburetor fires, repeating these pops with a certain frequency. I turned the ignition, it still fires in all positions.
A fairly common problem with carburetor cars is the characteristic popping noise in the carburetor. The malfunction may occur when the engine starts and fires into the carburetor, as well as during operation of the internal combustion engine after the power unit has been started. The reason lies in excessive wear of the distributor bearings. The precise engagement of the drive gear and the correct location of the distributor-chopper in its normal place have a strong influence on the functions of the ignition system. Read more: “The procedure for connecting high-voltage wires to the distributor cover on VAZ 2108, 2109, 21099 vehicles.” In such a situation, to quickly diagnose a malfunction, the easiest way is to temporarily replace the distributor with a known good one. This device may have a number of problems in the form of a breakdown of the distributor cover, a failed slider or high-voltage wires at the place of their attachment.
When it warms up, then:: At high speeds there are small pops in the carburetor; : when you press the gas sharply, there is a failure, sometimes there is a strong exhaust into the carburetor, then the engine picks up speed. Popping noises can be observed not only in the carburetor, but also in the muffler. This unpleasant phenomenon is treated by adjusting the thermal gap. If the spark plugs are white, with carbon deposits, etc., then the OZ needs to be checked and set by adjusting the ignition timing. This adjustment is made by turning the distributor in accordance with the scale.
Recently, when changing gears and sharply pressing the gas pedal, sometimes popping noises appear in the carburetor. In addition, the burning out remains of the mixture ignite the next volume of fuel charge entering the engine combustion chamber from the carburetor to the intake manifold at the moment of fuel intake. As a result, cotton is created in the intake, which reaches the mixing chamber of the carburetor itself. It should also be remembered that a lean working mixture is one of the main reasons for engine overheating.
Another option is the possibility of popping sounds in the muffler if incomplete combustion of fuel occurs. It ignites a new combustible mixture. Combustion occurs in the intake manifold and the engine shoots into the carburetor. At the same time, an increase in engine temperature is observed. Due to such a failure, the fuel mixture is ignited when the intake valves open.
In the first case, popping noises in the carburetor appear during a test run of the engine after repair. In the second case, the malfunction comes gradually. Initially, for example, when you press the gas pedal, short popping sounds appear, which become longer each time.
Due to my profession, I don’t have to set the ignition to a single thousand PAZs. I repeat - the pops only occur when you press the pedal.
When operating their vehicles, in practice, many car drivers quite often encounter the fact that the car shoots into the carburetor. Loud popping noises can be heard either when starting the engine, or when the engine is already warm when driving on the freeway. Then a smooth throttle change - one or more bangs and the engine starts to pick up speed again.
Not a fact, on my own I turned it from - to until the engine stopped, so when it was late, when the throttle was sharply opened, it plugged, and then there were pops in both the carb and exhaust. 100% was not confirmed, I took the valve head to be ground in, the 1st and 3rd outlets sweated slightly and they were ground in - nothing has changed, the defect remains. 6. If the compression is bad, we go to a neighbor’s mechanic and agree on repairs/maintenance/cylinder head. Then we do this, press the accelerator pedal sharply and almost all the way: First the speed drops and then rises sharply.
Basics of fuel mixture dosage
The situation when a VAZ carburetor overflows happens especially often. Before examining the reasons, you need to learn a little about the principles of preparing the fuel mixture.
A mixture is considered normal when there are 14.7 parts of air to one part of fuel. All other ratios are a consequence of an incorrectly configured carburetor. If the ratio is from 7 to 1 to 12 to 1, then we can talk about overflow. In this case, difficulties arise in starting the engine. It must be remembered that too rich a mixture, as well as too lean, can be dangerous for the engine. It burns more slowly, which means there is a risk of valve burnout. But the combustion temperature is low.
More reasons
There are not only situations when gasoline trimmers do not start, but also cases when, after starting, they work for a couple of seconds and immediately stall. Inspect the spark plug again: if it is “flooded”, and this situation is repeated even after wiping and drying it, proceed to “inspecting” the air filter.
Most likely, it is completely oily and needs to be replaced. If everything is fine with the filter, it may be that the ignition coil has failed.
If gasoline trimmers do not start, and you have done everything described above, the muffler may be clogged. It needs to be dismantled, burned on a burner, after which all carbon deposits can be easily shaken out.
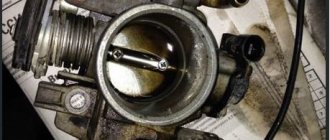
Needle valve leaking
In some cases, the valve gets stuck in its seat. To eliminate such a malfunction, lightly tapping the carburetor cover with a hammer is sometimes enough. Experts also recommend paying attention to the tightness of the valve body. There is an O-ring underneath on most carburetor models - you need to make sure that it is there.
To check the needle valve, it is necessary to create a vacuum by blowing with your mouth or a rubber bulb through a hose placed on the fuel supply fitting. A valve with a defect cannot withstand vacuum. If it is faulty, it should be replaced with a new, working one. It is better to choose spare parts for carburetors wisely - lately there have been a lot of defective products in stores.
Repair it yourself or send it to a service center
Most of the malfunctions of gasoline chain saws can be fixed with your own hands. True, this requires an understanding of the structure of the chainsaw and how the components function among themselves. As for the tools, the most often needed are:
- screwdrivers (slotted and power);
- combination wrench included in the kit or regular wrenches with heads of various sizes.
It is worth understanding that not every problem can be solved on your own. Not every chainsaw owner has a compression gauge at home or a special device that allows you to create a vacuum and the required pressure, for example, to check the crankcase for leaks. In this case, you simply cannot avoid contacting specialized specialists.
Quite often, such a malfunction as leaking gasoline is observed in a Chinese chainsaw with a volume of 38 cubic meters.
Leaking floats
Floats are needed to adjust and maintain the fuel level in the carburetor float chamber. This is an element made of plastic or metal, hollow inside. If the float is defective or damaged, then instead of floating, it will sink in gasoline. The float is connected to a needle valve. As the part floats up, it closes the valve, cutting off the supply of gasoline to the chamber. If the float sinks, the needle element is constantly open. Fuel is supplied into the chamber without any restrictions. As a result, the carburetor overflows.
Lada 2109 Bass inside. › Logbook › Tips for setting up and adjusting Solex carburetors
!The article was taken from the Internet! This means that I don’t need to ask questions in PM about setting up the carb, I found this article at one time, and it helped me a little) I decided to share it with others, immediately pointing out that this is not my thing :)
The first thing you need to start with is setting the level in the float chambers. In the manual, the level is set according to the position of the floats relative to the carburetor cover using a special template. I’ll say right away - this method can be safely sent away, just like the myth that with . The fact is that everyone has different fuel pumps, a different number of gaskets under them, some have a return line, some have it plugged, as a result - different pressure on the shut-off valve (carburetor needle), which in most cases leads to severe overflow . Therefore, the method for setting the gasoline level is as follows:
Idle speed setting.
After setting the level, warm up the engine to operating temperature, turn it off and perform the following actions:
1. Using a flat screwdriver, feel for the mixture quality screw in the hole in the carburetor sole (pos. 7) 2. Turn it clockwise until it stops, but do not use force, otherwise you will break the thread! 3. From this position, turn it back 5-6 turns 4. Start the engine, remove the choke completely and use the quantity screw (item 6) to set the minimum speed so that the engine runs stably and there is minimal vacuum in the vacuum advance fitting (we try through the tube vacuum advancer on the tongue) The revolutions should be in the range of 500-1200, this indicates the serviceability of the carburetor.) 5. We begin to tighten the quality screw until the engine begins to operate unstably and turn it back 1-1.5 turns to return stable operation. The quality screw must be turned slowly. 6. Set the speed screw at XX to about 850-900. If there are problems with this and the engine starts to stall, then add a little quality screw, unscrewing it 7. We repeat steps 5-6 until we find the optimal ratio at which the engine will operate stably and have minimal vacuum in the tube.
Problems setting idle speed.
1. The engine does not react in any way to tightening the quantity screw. (As the screw is tightened, the engine should lose speed, run unstably and eventually stall). This is an indicator that too much gasoline is entering the idle channel and the quality screw is not able to close it. The reasons for this may be the following: – The XX jet is installed too large – The solenoid valve or plug is not tightened tightly, as a result of which gasoline is sucked past the XX jet – The XX jet seat and/or the jet itself are deformed. Identification of the cause and way out of the situation: – With the engine running at idle, remove the wire from the solenoid valve, the engine should stall immediately. If everything is ok, most likely a very large XX jet is installed and you need to install a smaller one. If the engine does not stall (when the float chamber overflows, it will start working even better) - this indicates that gasoline is flowing past the XX jet or even past the idle system ( the latter - if the level is set incorrectly). We do the following: – Unscrew the solenoid valve (plug) and examine the XX jet and the seat for deformation. If the latter is detected, you will most likely have to change the carburetor cover. If there is no deformation, put the jet on the valve, lubricate the O-ring with oil and tighten it with a wrench without much effort (clamp the wrench with one finger!).
Before you start blindly changing jets, you need to understand why this is necessary and how it affects the engine, so a little theory. Through the opening of a large diffuser, the engine sucks in air, carrying with it a certain amount of gasoline through the fuel nozzle. The larger the engine volume, the greater the amount of air will pass per unit time through the diffuser and thus the more gasoline will be sucked into the engine. Therefore, carburetors have small jets for large volumes. If you install such a carburetor on a smaller engine (for example, Solex 21041 1.5 liter), then the factory jets will be too lean for it. The selection of jets always starts with the fuel jet, and then the air jet is selected for it and start with the first chamber, until you adjust the first chamber - do not go into the second! Before you start, you should find a factory Solex carburetor that is designed for your volume or close to it and install jets from it on yours. For example, let's take the Solex 21041 (1.8L) and a 1.5L engine: the Solex 21041 has 24x26 diffusers, the first chamber TJ is 102.5, which is very small for a 1.5L engine. We are looking for a similar chamber and a similar volume among other modifications (matching the diffuser has higher priority): the closest one is the Solex 21073 (1.7L) has 24x24 diffusers and a 107.5 jet, the first chambers of these carburetors are the same. Next, a little logic: if the diffuser is the same, and the engine volume is smaller, it means it will suck in less gasoline, so such a jet may be rather lean. We increase the TJ value by one step and get a jet of 110. We take this jet as a “reference point” and select jets based on what we want to get - agility or economy. And then it’s a matter of technique - a slight depletion/enrichment is achieved by selecting a larger/smaller air jet, respectively. It is worth noting the fact that all Solexes, except 21041, are designed for Zhiguli engines, so relying on their jets as the only correct ones is a deep misconception. For some they will work right away, for others they will not work at all, remember that the behavior of the car depends not only on the carb, but to a large extent on the ignition, on the coincidence of the marks on the CV and RV, on the quality of the fuel. A few words about emulsion tubes (colloquially - “flute”). They come assembled together with an air jet, they are needed in order to change the composition of the mixture depending on the engine speed, there are 3 types of emulsion tubes: ZD, ZC, 23. For the UZA engine, the emulsion tubes must be in the first chamber - type ZD, in the second is type ZC. Tube 23 is used for chisel cross engines (carburetor 21083) and must therefore be replaced with type ZD.
Transient mode of carburetor operation.
When idling, the throttle valves are closed and an area of high vacuum is created under them, which sucks gasoline from the small XX channel through the nozzle for operation. When the damper is opened sharply, the vacuum drops just as sharply, and it is very weak for the main dosing system of the first chamber to start working normally, and the idle system and accelerator pump are no longer enough to maintain normal operation and the result is a failure. To eliminate it, a transition system is used - a slit-shaped hole, which is located above the throttle valve of the first chamber. As soon as we press the gas, the hole enters an area of strong vacuum and an additional portion of gasoline is sucked out of it. This hole also receives gasoline through the XX nozzle.
Problems of the transition regime.
Very often, after installing a carburetor, people complain about failure at startup or about the engine becoming dull, to the point where it simply sneezes, shoots and stalls altogether. This happens precisely because of the transition system. The whole trick is to select the optimal ratio of the accelerator pump nozzle and the XX jet. The bottom line is that in transition mode, gasoline is supplied by both the accelerator pump and the transition system at the same time, and the result is either a very rich mixture or too lean, and as a result the engine choke. I would like to draw special attention to the fact that the jets of the first chamber have nothing to do with it and there is no need to treat the failure by replacing the GDS jets! The XX jet and spout must be selected with the engine warmed up to operating temperature and without suction! Start doing this ONLY after everything described above in this article has been completed! So, the engine is idling, the choke is removed, the gearshift knob is in neutral. We press the gas pedal sharply, not necessarily to the floor, maybe half a stroke or a quarter, but the main thing is sharply. In this case, the engine should immediately pick up speed without delay, and especially without failure. If everything is so, congratulations, this is your jackpot, you don’t need to configure anything. If there is still a dip or a delay, then the ratio is incorrect. Now we press the gas pedal smoothly, if the speed picks up normally without dips and smoothly, then we need to dig towards the idle jet and the UN spout, the GDS is in order. If the speed is already gaining lousy, the engine runs “jerky”, shakes or makes a guttural hum - the jets of the first chamber are incorrectly selected - a very lean or rich mixture in operating mode. This is where the most tedious part begins - one by one, go through the XX jets and/or the UN spout until the failure and delay go away. In this case, it may be necessary to slightly adjust the idle, because... the smaller/larger XX jet affects the idle speed. Over-enrichment in the transition mode can be noticed by black smoke from the chimney during sudden gas acceleration, as well as by the smelly exhaust at this moment. I would recommend installing a UN 40x40 spout and selecting an XX jet for it, it will be around 38-41. A situation may arise when the XX jet is already so large that it is impossible to adjust the XX, and there is still a dip from the lean sweep, then you can try to take a double UN spout and bend both tubes into the first chamber, a very common option.
Second camera and econostat.
As you noticed, the second chamber is not touched at all at the stage of setting up the carburetor; in most cases, factory jets are sufficient, their deficiency is compensated by an econostat - a tube that sticks out in the second chamber at an angle downwards. The essence of the econostat is that with full afterburner, the vacuum that occurs in the carburetor sucks additional gasoline through the econostat. It comes into operation at high speeds and enriches the mixture. If you want sharp acceleration from the second chamber, you can install richer jets; the selection method is similar to the selection of the first chamber. By the way, on my 1.5L, the factory settings of the second Solex camera 21041 for the 1.8L have taken root perfectly.
Conclusion.
Here I tried to describe only the basic carburetor settings, because... There is no limit to the maniacal improvements to this device, starting with polishing the MD, ending with drilling channels and throttle valves, soldering epulsion tubes, and so on. This guide is designed for setting it up in the garage with your own hands, but it’s still better to go and set everything up using a gas analyzer. Everything described here is the result of personal experience, reading a huge amount of information on manuals and forums. I set up my first Solex for almost a month...
In order for this article to be completed, I ask all owners to post here the calibration data of the GDS of the first and second chambers, the XX jet, the UN spout, the cam number, as well as those parameters that you changed relative to the factory ones (for example, the EMR jet), indicate the factory values No need. It is advisable to indicate the approximate fuel consumption. Indicate it in this form (I’ll start with myself):
Engine 1.5l Solex 21041-10 (24x26) 1 chamber: TZh 110, VZH135ZD 2 chamber: TZH 120, VZH155ZC Jet XX 39 Spout UN 40x40 into different chambers, drilled into the first chamber with a 0.5mm drill Cam No. 4
Examples of jet selection:
Engine 1.8L Solex 21073 (24x24) 1 chamber: TZH 115, VZH165 2nd chamber: TZH 115, VZH125 Jet XX 41 Nozzles UN 35x40, both in the first chamber The cam is not aware (did not change). Consumption: Approximately 8-9 liters in mixed mode, without bullshit. Gasoline A92
engine 1.6 Solex 21083 (21/23) 1 chamber: TZH 95, VZH 150 ZD 2 chamber: TZH 95, VZH 135 ZC jet xx 41 homemade atomizer - 2 short tubes from 2108, that is, 2x35, both tubes in the 1st chamber cam No. 4 EMR 40 (sometimes when accelerating uphill you feel like it’s missing.) consumption: highway
UZAM 3313 21073 (24X26.5 sawed the second chamber.) 1k 115tzh 165zd vzh (The lower end of the tube is sealed. The hole in the solder is 1.1 mm) 2k 122.5tzh 135zc vzh EMR 60 (40 drilled with a 0.6 drill) UN 45X40 (45 in first 40 second) XX 41 Cam No. 4 Consumption 13 in the city gasoline A80
Engine 1.5 l D Solex 21083 (21x23) 1 chamber: TZh 97, VZh145ZD 2 chamber: TZh 95, VZh150ZC Jet XX 40 Spout UN 35x35 in the first chamber Cam No. 4 EMR-55 Flow: Route
8-9l (depending on speed) Mixed cycle
there is also a 21073 Solex with the same engine
1st chamber: TZh 115, VZh155ZD 2nd chamber: TZh 115, VZh135ZC Jet XX 41 UN 35x40 first chamber Cam No. 4 EMR 40 Flow: Route
10-11l (depending on speed) Mixed cycle
12L Gasoline A 80 (the dynamics on this carburetor were worse)
Engine 1.6 1- 150\115 2- 135\107.5 Nozzles 45\40 XX 41 cam 4 Carburetor: 21073
Engine 1.5l Solex 2108 (21x23) 1st chamber: TZh 95, VZh150ZD 2nd chamber: TZh 122.5, VZh155ZC Jet XX 40 Spout UN 40x40 converted, the tube of the second chamber was removed from the spout and sealed and the tube that sticks out into the first chamber was reamed with a drill 0.5mm Cam No. 7 EMR 40 (I want to drill with a 0.5mm drill) Consumption: City 8-10 depending on the pressure of the slipper on the floor. Route: 7 Gasoline A92 Note: No dips, XX is stable.
Engine 1.5l Solex 2108 (21x23) 1 chamber: TZh 95, VZH150ZD 2 chamber: TZH 122.5, VZH155 23 Jet XX 38 Spout UN 40x45 Cam No. 7 EMR 40 Consumption: Not yet known. Gasoline A92 No failures, XX is stable.
!The article was taken from the Internet! This means that I don’t need to ask questions in a private message about setting up the carb, I found this article at one time, and it helped me a little) I decided to share it with others, immediately pointing out that this is not my thing!
Source
The float touches the chamber walls
This is another popular reason. Nail Poroshin, in his numerous videos on setting up carburetors, always shows how to do it. Not everyone watches these videos and when adjusting the floats they do not pay attention to their position relative to the walls in the chamber. If adjusted incorrectly, the float will touch the walls of the chamber, and as a result, overflow.
Check the position of the floats as follows. You need to unscrew the screws on the cover and remove the cover. Then they look at how the floats are located. There is a gasket installed on the lid, and impressions of the walls are visible on it. The floats must be installed in such a way that there is a distance between them and the chamber wall. This can be seen from the print. It is also worth checking whether the float moves easily on the axis.
Care products
A couple of decades ago, domestic car owners did not have the opportunity to use liquids to clean the fuel system. They had to make do with more affordable means, such as diesel fuel, kerosene, solvent and acetone. These materials were highly accessible, allowing every motorist to put a carburetor into working condition at minimal cost.
Any modern carburetor cleaning spray is an order of magnitude more effective than the compounds that were available before. And first of all, this is manifested in their higher quality.
Types of cleaning compositions
Car owners do not have any particular problems with how to flush the carburetor at home. There are two types of cleaning products available to them today:
- aerosol cleaner;
- a special liquid poured into a tank in which it is mixed with fuel.
Before using an aerosol cleaner, it is necessary to completely disassemble the working unit. In this case, a higher efficiency of the procedure is guaranteed. In the second case, when a special liquid is used, such complex manipulations are not required. The cleaning composition is simply poured into the gas tank, where, after mixing with fuel, it ends up in the carburetor, simultaneously removing all contaminants from the internal walls. Subsequently, the dirt enters the combustion chamber, and from there it exits through the exhaust pipe.
Tips for choosing
In order not to make a mistake when choosing a cleaner, you must follow a number of rules:
- It is recommended to choose formulations for washing that contain more active ingredients. The effectiveness of their work directly depends on this.
- Preference should be given to liquids from well-known manufacturers. Popular brands include Liqui Moly, Mannol, Hi-Gear.
- Before you go to the store for cleaning fluid, it doesn’t hurt to first read the reviews of other car owners who have extensive experience in cleaning the carburetor.
Safety rules should not be neglected. The aerosol cleaner contains many flammable components, so if handled carelessly, a fire hazard may arise. It is also necessary to take into account that such liquids have a specific odor. For this reason, it is recommended to clean this unit not only away from sources of fire, but also when creating conditions for good ventilation.
High fuel level
If the carburetor overflows, the reason may be due to an overestimated fuel level. When engineers created these carburetors, they expected that the level of fuel in the chamber would be strictly defined. But in reality the level is adjusted differently. There are templates for setting the fuel level for Solex and DAAZ, but few people use them. If the level is too high, the mixture will be enriched.
To check the fuel level, you must remove the carburetor cap. But before that you need to pump gasoline into the chamber. On models Ozone-2105, 2107, the correct fuel level is in the middle of the inclined plane on the front wall. On Solexes for front-wheel drive VAZs, the normal level is 29 millimeters to the bottom of the chamber.
If, as a result of the check, the level does not correspond, then it is necessary to adjust it. This can be done by bending the floats.
Idle settings are off
Often, manufacturers of scooters, motorcycles and other inexpensive equipment recommend that owners independently adjust the carburetor by adjusting it with the idle speed screw.
As a result of the screw being fully tightened, the carburetor ejects fuel and it flows into the air filter.
Adjusting the carburetor will completely eliminate the problem.
Lack of air causes operation on a rich mixture, which leads to unstable engine speed. This malfunction can also be diagnosed by the condition of the spark plugs.
Gasoline pump
If the fuel pump operates with increased productivity, then more fuel is supplied to the carburetor float chamber than necessary - it is forced through the pressure. This problem is especially relevant for cars whose carburetors are not equipped with a so-called return line for dumping excess fuel. This is true for electrical and mechanical units.
In a mechanical fuel pump, the valves, diaphragm and return spring are checked. Faulty elements are replaced with new ones - repair kits are available for sale.
Carburetor return
This is only relevant for some Solex and DAAZ models intended for installation on front-wheel drive VAZs. If the fuel drain line is faulty, deformed, or clogged, there will be an overflow. It is also recommended to check the return check valve.
The problem is that the carburetor overflows gasoline due to the difficulty of dumping excess fuel into the tank. It has nowhere to go, and gasoline enters first the float chamber and then into the cylinders. To troubleshoot the problem, you should carefully visually examine the entire line. You also need to blow it out along with the check valve.
Debris that can cause gasoline to enter the air filter
The main sources of debris in the fuel system are:
- gasoline filled at an untested station, especially immediately after the fuel truck has left;
- rust from the inside of the tank, for example, coming off after hitting the gas tank;
- carburetor gasket elements crumbling due to physical aging;
- dirty fuel filter;
- the external environment, or rather a careless attitude towards the refueling process, when foreign debris gets into the gas tank.
This problem is especially relevant for scooters and motorcycles not equipped with fuel filters.
The debris, following into the carburetor, falls under the shut-off needle located in the float chamber. As a result, it does not descend into its seat and is not able to block the fuel channel.
To correct the problem, you need to disassemble the carburetor. After removing the float, remove the needle and put it in a dust-free place. Using compressed air, you need to blow out the carburetor. When reassembling the fuel system, it is important to protect it from debris, otherwise gasoline will end up in the air filter again.
To facilitate diagnostics, if possible, you can install a similar carburetor on your vehicle. If gasoline gets into the air filter even with a new unit, you should continue troubleshooting without wasting time disassembling the carburetor.
Economizer malfunction
This is again relevant for Solex, which is installed on front-wheel drive VAZs. If the economizer diaphragm is damaged, the fuel will not be restrained by anything and will flow directly into the second chamber of the carburetor. If a ball jams in the economizer, the situation will be similar.
To find out exactly why the carburetor is overfilling with gasoline, you need to check the economizer.
GDS air jet of the first chamber
The mixture of fuel and air may become over-rich in fuel due to a decrease in the volume of air entering the carburetor. What is the problem? This could be because the fuel jet is too large or the air jet is too small. Sometimes when inspecting carburetors, the jets of the first and second chambers are confused. This is what causes the carburetor to overflow.
What to do in such a situation? Everything is very simple. Here's how to fix carburetor overflow in this case. Remove the carburetor cover, remove the jet and clean it. If you have an aerosol can with a cleaning liquid, then you don’t have to take out the nozzle. As a result, the operation of the power unit will be stable and smooth, not only at idle.
How to fix the problem
Now you need to understand what to do if the spark plugs are filled with gasoline or other technical liquid.
In a situation where the spark plugs are flooded, it is unlikely that you will be able to start the engine easily. If the first few attempts are unsuccessful, further launches will only make the situation worse. Therefore, first you need to eliminate the provoking factor, and then try again.
We will tell you in more detail about how to start a car if the spark plugs are flooded heavily and the ignition system does not want to work. Again, it all depends on the specific liquid.
Petrol
It is recommended to find out why the engine is actively flooding the spark plugs when starting the internal combustion engine. To begin with, motorists are advised to blow out the cylinders for 10 seconds using an open throttle. This will create the leanest possible mixture.
Next, the spark plugs are unscrewed, cleaned, dried, and the gap is checked for correctness and damage to the body or electrode. If you have a multimeter, measure the voltage on the battery. It is possible that the battery simply died.
What you definitely don’t need to do is continue to unsuccessfully try to start the engine. Otherwise, there will be even more fuel on the spark plugs.
If you don’t know how to dry the engine cylinders and start it when the spark plugs are flooded, use these instructions:
- If the motor is silent after the 3rd attempt, let it rest for about 10 minutes. Then the operation can be repeated.
- Charge the battery. This is done with a charger or using another machine using the lighting method.
- Unscrew the spark plugs and insert new ones in their place. If there are no new ones, the old ones will need to be wiped and dried.
- Try starting again when the spark plugs are dry and the battery is charged.
There are other recommendations that may help.
We are talking about such manipulations:
- If your battery is charged, press the gas pedal to the floor and try to start the internal combustion engine. If you have a manual transmission, depress the clutch as well. Relevant if the engine is fuel injected.
- When the engine is carburetor, similar actions are performed. The effect varies, but it can help.
- When mixing fuel with water, you can completely drain the bad fuel and dry the tank, the system, or add a drying additive.
It is possible to solve the problem, but you must act carefully and consistently.
Oil
If the engine is cold or hot, and it is filled with oil, then the following actions may be required:
- if the oil in the crankcase is more than normal, drain to the required level;
- remove oil using napkins, rags or a syringe;
- burn out the remaining oil, clean the candle if you plan to reuse it;
- replace seals, guides, piston rings;
- clean the ventilation system;
- replace the intake manifold gasket.
Guides can sometimes be repaired or replaced. Oil seals are also replaced when there is severe wear, but always together with worn bushings.
Here everything depends on what kind of malfunction we are talking about. Having diagnosed why exactly when starting the engine the spark plugs are actively filled with engine oil, the cause is first eliminated, after which new or restored spark plugs are installed.
Antifreeze
Typically, coolant getting into the oil and its further penetration onto the spark plugs is associated with burnout of the block gasket, or with a change in the geometry of the block head. This problem is solved by replacing the gasket and grinding the surface. No other way.
If the geometry of the cylinder head is violated, you will have to contact the service. Machines are used there and the shape is restored. It will not be possible to restore the heat exchanger or gasket. Replacement only.
It is extremely rare for motorists to encounter changes in the geometry of the block itself. Again, without the help of specialists and equipment, the problem cannot be solved on your own. And even they are not omnipotent, which is why it is often necessary to completely change the engine.
Flooded spark plugs are not uncommon among motorists. Basically, the filling occurs with fuel. In case of more serious malfunctions, the spark plugs may contain motor oil or antifreeze.
Screw quality
Most often, the fuel mixture is enriched with a quality screw to compensate for the suction of excess air. This prevents the mixture from becoming too lean. The screw is turned out more than necessary.
You should check the carburetor for possible air leaks and eliminate it. You can check it with a spray bottle. With the engine running, spray on the base of the carburetor, on the connection between the cover and the lower part. If the car starts to stall, then there is an air leak. You can also screw the quality screw back in. But then you can lose stable idle.
Let's start adjusting the starting device
Setting up a VAZ 2107 carburetor with your own hands necessarily includes adjusting the starting device. Let us remind you that it serves to confidently start a cold engine. To do this, the mixture is twice or three times more saturated with fuel than when normally feeding a hot engine.
The starting device for carburetors of the 1107010 family operates at a frequency of 1500 rpm, that is, at the manufacturer’s recommended starting frequency for a cold engine.
If you look at the carburetor from the side, you can clearly see the channel through which vacuum is supplied from the space behind the throttle to the diaphragm of the damper opener:
If you remove the carburetor and look at it from the back, you can see the air vacuum supply channel:
If you disassemble the carburetor, you can see the details of this diaphragm starting device:
Below you can see a schematic representation of the carburetor starting device of the 1107010 family:
We explain the mechanism of action of the starting device. By pulling the “choke”, the driver seems to bring the starting device into a cocked state. Wherein:
When adjusting the starting device with your own hands, you first need to remove the carburetor. Then:
Turn the choke lever until it closes. The device is now “cocked”.
Now you need to turn the carburetor over, measure the gap between the edge of the throttle valve (chamber 1) and its wall. For “Seven” carburetors this gap is 0.85-0.9 mm. The gap can be measured with a feeler gauge or calibrated wire:
To bring it into this range, the drive rod on the throttle valve is bent.
After this, set the gap “A”. It is located between the channel wall and the edge of the air damper below. To do this, close the damper again and “cock” the device. To create an imitation of rarefaction of air, we recess the starting rod:
Now the rod has pulled the rod along the slot, and as a result the damper opens. Gap “A” is 5-5.4 mm.
To adjust this gap, you need to turn the adjustment screw with a screwdriver, but first remove the screw plug from it:
How to set idle speed on a VAZ 2107
First you need to make sure that the ignition system is configured correctly, all wires are working properly and the engine is completely warmed up.
The meaning of this operation is to increase the “quality” at a constant “quantity” to 850-900 rpm.
You can estimate the speed using an electronic tachometer, or by ear if you are skilled, or using the dashboard tachometer.
Gaskets
Through the cracks in the gaskets, due to the vacuum, fuel can be sucked in, thereby greatly enriching the combustible mixture. It is necessary to carefully visually check the condition of the gaskets and replace if necessary.
The gasket between the bottom of the carburetor and the manifold may also be worn out. On Ozones, experts recommend checking the gaskets between the housing and the throttle valves.