In the cold season, it can be very uncomfortable in a car without such a useful option as heated seats. Unfortunately, in older models of domestic cars, for example, the VAZ 2114, the manufacturer does not provide this option. But it is quite possible to install heated seats 2114 yourself. This will be discussed in today's article.
Heated seats VAZ 2114
Why does the VAZ-2114 seat heating not work?
The option of heated seats on domestic cars is no longer new. This feature should be present on every machine. With the onset of the first frosts, more and more VAZ owners are wondering why the heating does not work on the fourteenth. This is especially true for those whose cars are parked on the street.
Concerns from the northern countries were the first to install heated seats on manufactured cars. Initially, the option appeared on expensive cars, and later this will not surprise anyone on domestic vehicles.
Naturally, those who have already tried this option have only positive things to say about it.
Now we will look at the reasons why the seat heating system on a VAZ-2114 may not work. The information contained in the article will be partially useful to car owners of other cars, because the operating principle of the heaters is similar.
Let us immediately draw your attention to the fact that the process of troubleshooting is quite troublesome and will require you to have experience in carrying out repair work on the vehicle’s electrical network and the availability of certain devices.
Is modernization possible?
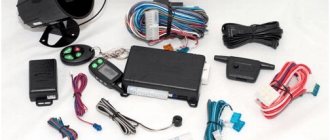
Often, while in the process of modernizing their own car, many drivers try to connect heated seats, which is quite often successful. What’s remarkable is that there is a ready-made circuit that can be easily installed in your car. It is suitable for several models at once: from 2111 to 2115. It should immediately be noted that the pricing policy for this invention is quite diverse, but experts strongly recommend not saving. A poor-quality heating system can fail without working for even a few months.
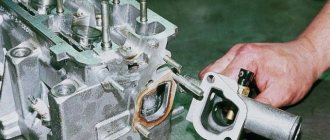
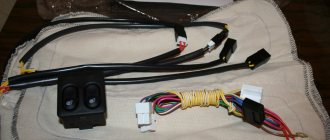
The installation process begins with disassembling the seats, inside of which the heating elements are mounted.
This is not at all difficult to do even for an ignorant driver. The greatest difficulty is the connection process.
A special button is mounted directly next to the handbrake, allowing the system to be activated at the moment when the driver needs it. All that remains is to connect the wiring. Most often this is done through the ignition relay and cigarette lighter, but variations are also possible, invented by the driver himself. The manufacturer clearly indicates all the nuances, providing the VAZ 2114 seat heating system with a color description. It will be almost impossible to get confused in it. However, if difficulties still arise, you should definitely contact a professional. Electronics are a rather fragile thing that, if handled incorrectly, will instantly fail. The entire car will be damaged.
In the cold season, it can be very uncomfortable in a car without such a useful option as heated seats. Unfortunately, in older models of domestic cars, for example, the VAZ 2114, the manufacturer does not provide this option. But it is quite possible to install heated seats 2114 yourself. This will be discussed in today's article.
Why do you need heated seats?
Having such an option in the car is extremely necessary during periods of severe frost. Getting into a car that has been parked in the cold for a long time is unpleasant and dangerous for the health of the driver and passengers.
Overheating of seats also poses a danger to human health, as well as to the car.
There are many articles on the Internet about the benefits and harms of heating. Let's dot all the i's. Driving with a heater for long periods of time can be harmful to women and men. Accordingly, it is recommended to use the option consciously in order to protect yourself from cystitis or prostatitis.
General rules for using heating:
- Do not allow the seats to become overheated significantly.
- In cold weather, turn on the heating and do not sit on them for a while.
- Once the seats have been warmed up, turn off the system. Next, heat the interior with a stove.
- You cannot stay in the cabin in warm clothes for a long time.
Following these rules will allow you to protect yourself from overheating and not harm yourself.
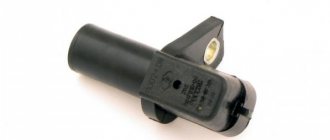
Operating principle of heated seats
At the head of the system is a heating element, which is connected to the on-board network of the machine.
The parts are placed in an elastic panel and mounted in the front seats. The systems are divided into two types: some are built into chairs, others are made in the form of seat covers. The operating principle of both types is almost the same. The heating elements are treated with a special coating that insulates them from direct contact with the upholstery. There are designs with one or two heating elements. The heaters are connected to the vehicle's electrical network through a control unit. Some system models allow you to adjust the temperature.
A sensor that controls heating is placed next to the heater. When the required temperature is reached, the system turns off the power. It is also possible to have a function for automatically maintaining the heating level, which is set by the driver. Other systems are controlled by a timer.
Dual-element built-in units can provide a quick warm-up, after which the system switches to lower power and less heat. The number of modes depends on the heater model.
Possible malfunctions with heated seats
The heating device must have a fuse. On the VAZ-2114, two such elements are responsible for the stable operation of the heating. One fuse is located in the mounting block (F16), the other is located under the dashboard.
If you notice that the control lamps do not light up when the heating is turned on, the problem most likely lies in the fuses.
Relay problems:
- The system is turned on in an electromagnetic relay, which is located under the dashboard.
- After the unit is triggered, check the voltage at terminal 87 with a multimeter.
- If operation does not occur, then you need to examine the relay winding at terminals 86 and 87 with an ohmmeter.
- If the problem lies in the relay, it needs to be replaced.
Another problem may be the usual lack of nutrition. To check this, do the following:
- It is necessary to check the power with the power off at the connectors under the seats.
- The black wire is the ground of the car, the second is the power supply, which should have 12 volts.
- Use an ohmmeter to check the resistance of the heater windings. As practice shows, the problem most often lies here. The windings burn or break.
Depending on the situation, the problem with heated seats can be solved independently. However, this requires disassembling the chairs.
To summarize the article, we note that we have not considered all the possible reasons why heated seats may not work. But using the information above, you will know which direction to go to identify the problem.
If you have experience in carrying out such a repair plan, then finding the problem will not be difficult for you. Otherwise, we recommend contacting a specialist.
Heated front seats VAZ 2113-2114-2115
- Front seat heating activation diagram
- 1 – left front seat heaters
- 2 – left front seat heater switch with on indicator lamp
- 3 – relay for turning on front seat heaters
- 4 – ignition switch
- 5 – mounting block
- 6 – switch for the right front seat heater with a warning light
- 7 – right front seat heaters
- 8 – 16 A fuse
- A - to power supplies
On parts of the Lada Samara 2, a heating system for the front seats is installed. Heater switching diagram
The heaters are turned on by switches 2 and 6 (left and right seats, respectively). The heaters have built-in thermostats for electric seat heating. The thermostat contacts close at a seat surface temperature of (25±5) °C, and the thermostat contacts open when heated to a temperature of (31±4) °C. The temperature difference between closing and opening the contacts of the built-in thermostat must be at least 5 °C.
Selecting heated seats
In order to choose heated seats, you need to decide what kind of heating you need. There are several types of seat heating for Lada Priora: Cover, Standard heating, Emelya heating
Heated seats from the cigarette lighter (cape)
This type of heating has a wide area of application and is quite easy to install. To install heated seats from the cigarette lighter, you do not need any auto electrician skills. To install such heating, you just need to insert the heating plug into the cigarette lighter and select the heating position. It should be noted that the reliability of such heating leaves much to be desired. Filaments are used as a heating element, but since the cape is poorly attached to the seat and is often subject to creases, which leads to the breakage of the filament and, consequently, failure of the entire heating.
Heated seats standard
The standard heating for Lada Priora is a very reliable device that can be bought at any auto parts store at a price of 1000 rubles. Standard heating has only one heating position and does not regulate the heating temperature, i.e. The seat will heat up until you turn it off. This is its only drawback. The advantage of this heating is that there is no need to use additional intermediate relays to unload the contacts. Since the relay itself is already built into the button. The standard heating has heating elements for the seat and lower back.
Heated seats Emelya
Emelya's heated seats have proven themselves quite well on the market. The cost of such a heating kit is not cheap, starting from 2000 rubles. This heating is installed in the same way as standard heating. However, a significant difference from standard heating is the ability to regulate seat heating. But it is also worth noting that installing the seat heating button in the standard place will be difficult; you will have to cut out and trim the standard place. This type of heating has heating elements for the seat and lower back.
Case – “cloak”
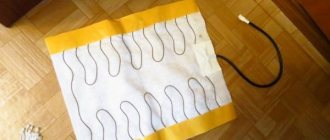
The easiest way to make your interior seats warm is to add an outer cover. You can purchase overhead covers at almost any auto store. The pads are made from ordinary dense fabric, inside of which heating elements are sewn.
A more expensive option is covers made of rubberized fabric; they will last longer than the first option. These “capes” are attached simply – just pull them over the seats and attach them to the springs. The heating elements operate from the cigarette lighter.
Despite the simplicity and cheapness of the method, heating the seats of the VAZ 2114 using a “cowl” cover has several disadvantages:
- The covers can only be placed on the front seats.
- The cigarette lighter will always be busy.
- The product does not have temperature controls, so your seat may become uncomfortably hot.
There is another interesting option - putting new covers on the seats with sewn-in heating elements. This method is good because it allows you to transform the interior of the car, making it more representative, especially if the new covers are made of genuine leather.
Compared to a simple seat cover, such covers have a number of advantages:
- The heating is connected to the vehicle's on-board system and does not occupy the cigarette lighter.
- You can retighten both the front and rear covers.
- Ability to regulate temperature.
Well, you can’t avoid the downsides. The most important thing is that the cost of purchasing the covers will cost a pretty penny.
Advice! It is better to entrust the work of connecting heating elements and embedding buttons to professionals so as not to burn the car.
Installation of heated seats
We will look at installing seat heating using the example of installing standard heating. Since the installation of other heating systems will be similar to the installation of standard seat heating.
In order to install heated seats yourself, you need to remove the seats from the car and remove the upholstery from them. The heating installation will be divided into several stages.
- Removing the seats
- installation of thermoelements in them
- putting the seats back
Removing the seats
Tools needed to remove seats:
- Ratchet
- Head at "13"
- Head on "8"
- Head at "10"
- Screwdriver “+”, “-”
- Insulating tape
Seat removal process
- Move the seat forward as much as possible and pull out springs 1 and 2
- Using a ratchet with a head set to “13”, unscrew the seat mounting brackets
- Using a ratchet with a head set to “8”, unscrew the seat skis in 5 places
- Disconnect the seat belt sensor plug
- We take out the seat
- Next we move on to disassembling the seat itself and installing thermoelements
Installation of thermoelements
- We bend the plastic clips of the seat upholstery and lift the upholstery up.
- We slip the thermoelement under the upholstery and sew it to the foam rubber.
- We stretch the upholstery over the seat frame and secure it with plastic clips.
- Fold the backrest, pulling out the hooks securing the backrest.
These latches must be released
- Remove the backrest adjustment knob. You need to pull the plastic gear towards you and it will come off.
- Using a “10” socket, unscrew the bolt securing the gear to the seat
- We bend the pins holding the backrest upholstery and remove it from them.
carefully bend the pins and remove the fabric
- We slip the thermoelement under the upholstery and sew it to the back.
- We stretch the upholstery over the back of the seat and secure it with clamps.
- Connect the seat heating plug to the lumbar heating plug
- We extend the same procedure with the second seat.
Button installation and connection
Connection diagram
A simple diagram for installing standard seat heating in a Lada Priora
Connection
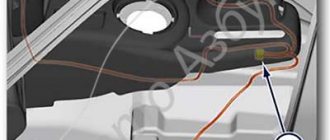
- We drill holes on both sides near the air duct for the rear passengers' feet to bring out the plugs for each thermocouple.
- Remove the cover for the seat heating button.
- We insert the wires into the holes under the seat heating button and separate the thermocouple wires in different directions and insert the holes.
- We screw the ground wire under the nut securing the central dashboard near the gearshift lever.
- We stretch the positive wire to the fuse block under the central dashboard.
- We connect the positive wire to fuse F11, this is the wiper fuse, power appears on it only after the ignition is turned on.
- We insert the wiring plug into the heating button and install the button in its normal place.
Seat installation
- We connect the free plug on the seat with the heating wiring.
- We check that the connection is correct, that is, the right button should be responsible for the right seat. If it’s the other way around, remove the button and swap the wires.
- Installation of seats is carried out in the reverse order of removal.
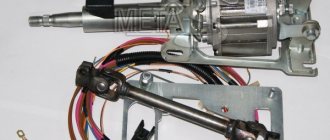
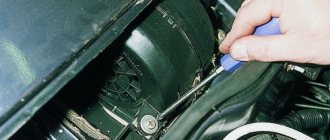
How to remove the dashboard of a VAZ 2114
First of all, turn off the power to the electrical circuit. To do this, remove the “positive” terminal of the battery. So, the procedure for removing it looks like this:
- On the driver's side, on the left side of the console, the side trim must be removed. To do this, unscrew the five screws and dismantle the part. The same steps must be done on the passenger side. After this, disconnect the plugs leading to the radio, cigarette lighter, ashtray and their backlight.
- Now you need to pull out the heater switch handle. To do this, pry up its screwdriver and pull it towards you. The same is done with the damper control handles. It is best to put all small elements in some container so as not to lose them.
- Next, unscrew the screws on the instrument panel. Two of them are located on top, and the other two are located on the bottom. It is more convenient to perform this procedure with a figured screwdriver. Pull out the plug next to the heated rear window button and unscrew another screw. After this, the pad is lifted and moved towards the seats. You will immediately see a large number of plugs and chips. All of them must be removed and marked so as not to be confused during assembly. It is best to remove the steering wheel.
- Unscrew the steering column fasteners from the bottom and lower it down. This is done so that it does not interfere with further disassembly. On the heater control unit, unscrew all the screws and push the last one into the panel.
- Locate the metal brackets (from the floor to the panel) and remove all the screws that secure them. Don't forget to unscrew the cross member.
- Grasp the hydraulic headlight adjustment handle and pull it towards you. Remove it and the instrument panel backlight brightness adjustment knob. Now pull out the cover and remove the LED insert. After this, unscrew the nuts that appear.
- Pull out the remaining immobilizer plugs and the glove compartment lighting chip.
Installation of heated seats "cape"
The heated seat “cowl” fits over the cover or seat of your vehicle. Fixed on the seat with elastic bands. The heating plug is inserted into the cigarette lighter and narrower, after which the desired operating mode is selected on the heating button. Such heating is dangerous because some models do not have protection and leaving it in the cigarette lighter can lead to dire consequences.
The installation of heated seats on your vehicle is complete. Standard heating only works when the car's ignition is turned on.
We hope our article was useful to you.
Standard heating
Standard heated seats on the VAZ 2114 are the best option of all. You just need to buy a seat heating kit from a dealer or a specialized store that sells original spare parts for VAZ.
To install, you need to remove the trim from the seats, glue the heating element, embed the VAZ 2114 seat heating buttons, run all the electrical wires and put the trim back on.
If you don’t have the opportunity to buy standard heating, it doesn’t matter. Modern manufacturers offer good options for third-party heated seats.
Pay attention to the built-in blocks from the domestic one. These seat heating models are suitable for almost all passenger cars.
Problems with heating VAZ 2114
Heating a VAZ 2114 is a fairly common problem that haunts many motorists.
The most annoying thing is if the breakdown occurs during the cold season, when the stove is needed more than ever. However, if the problem is accidentally discovered during the warm season, it is also not recommended to ignore it.
It is better to understand the issue in advance, while there is an opportunity. In the future, it may be forgotten and reappear on the horizon only with the arrival of the first cold weather. Then it will have to be resolved urgently and, if not independently, then at any cost.
Fuse connection diagram
The figure below shows the order of connecting the plugs in the mounting block.
Drawing of connecting the plugs to the corresponding blocks of the mounting block.
The figure below shows a complete diagram with mounting block symbols.
From this diagram it is not difficult to figure out the order in which the plugs are connected.
- K1 - serviceability of lamps,
- K2 - windshield cleaner,
- K3 - turn signals, emergency lights,
- K4 - low beam,
- K5 - high beam,
- K6 - additional relay,
- K7 - heated rear window,
- K8 is an unused relay on VAZ models of the tenth family.
Video on removing the unit and replacing fuses
What could happen?
It should be noted that heating problems in the VAZ 2114 can arise for various reasons, but they can be conditionally divided into two categories:
- heating is not provided;
- the air is heated too weakly.
It is quite possible to understand the problem on your own. However, first, it is important to understand where exactly you need to look for the root cause of the problem.
In particular, the culprit of difficulties may be:
- Airlock. Once in the area of the cooling radiator, air has every chance of moving into the thermostat. It is not possible to “drive” it out by starting the engine. You will have to add antifreeze to the pipe, thanks to which the air lock will quickly dissolve. Another, unspoken reason is lack of fluid. The antifreeze level should be checked at least once a month.
- Blockages. Quite often, the stove does not work due to the formation of blockages, which can be eliminated by dismantling and then cleaning the part. Immediately after this, the stove begins to heat up like new.
- Malfunction of the stove tap. It is quite simple to check the likelihood of this problem occurring - by tightening the cable located in the immediate vicinity of the pedal assembly. If the faucet does not open in this case, the only way out of this situation is to replace it.
- Broken fuse and relay. The simplest and at the same time unpleasant problem, which any technically savvy driver can easily cope with. However, determining why this situation has developed will be problematic. Most often, both the fuse and the heating relay fail due to a short circuit. But, if the driver wants to delve even deeper into the specifics of the problem, it would be more reasonable to move the car to the nearest service station.
- Motor failure. This usually happens when the car is used for a long time, and this component is rarely repairable. The most reasonable thing would be to simply replace it with a new element, having first checked the integrity of the remaining components. If everything is in order, you can purchase a new motor and install it in place of the previous one.
The heating system on the VAZ 2115 is standard. However, without sufficient skills and dexterity, you should not undertake repairs. It is better to entrust the issue to a professional who certainly cannot do any harm.