It becomes extremely inconvenient to operate a car if the fuel level indicator on the dashboard is lying or not working. To avoid getting into a hopeless situation with an empty tank, the driver has to record the odometer readings and calculate the approximate mileage based on fuel consumption. Another option is to constantly carry a spare canister filled with gasoline or diesel fuel in the trunk. Getting rid of these inconveniences is a trip to a car service center or self-diagnosis and troubleshooting.
What to do in such cases?
If the fuel level sensor shows an incorrect value, there are several ways to solve the problem.
It is necessary to adjust the device itself:
- First way. The spoke of the float that you replaced must be moved from one extreme position to the other. As you understand, in this case the arrow readings on the instrument panel should also vary from one position to another. In this case, you may need the help of another person. If you notice that when you move the spoke, the arrow on the dashboard shows the wrong value, you will need to slightly bend one of the adjusting tabs.
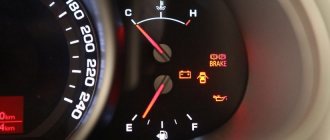
The arrow shows a full tank
- Second way. You will need to adjust the gas level on the dashboard. To do this, you will need to disassemble the dashboard. Accordingly, first you should turn off the ignition. The gasoline sensor arrow should be removed, after which all the wire blocks must be reconnected to the “tidy”, without installing it in place. Having done this, turn the key in the ignition, but do not start the engine. Wait about 10 minutes. After this, the spoke of the regulator itself should be moved to the position corresponding to an empty tank (if there is no gasoline in it) or full (if the tank is completely filled). Fix the arrow, install the “tidy”, then turn off the ignition and turn it on again.
- You can also test the instrument panel if you think there is a broken contact somewhere. Hold down the daily mileage reset button while turning the ignition key, and then release the button. In this case, all the arrows on the “tidy” must move along their scales. If this does not happen, then the problem is in the panel itself.
- Another option is to disconnect the connector that goes to the fuel sensor and watch the arrow. If it lies in the position indicating the absence of fuel, then the sensor is undoubtedly shorted.
If your car is equipped with an on-board computer, then it would not be a bad idea to diagnose it.
Diagnostics and repair methods
To check and identify a malfunction, perform a number of preparatory work:
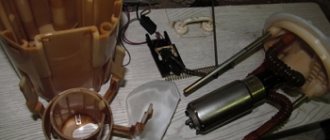
- Find a service hatch in the car that gives access to the electric fuel pump and float mechanism unit. Usually located under the rear sofa, where the fuel tank is installed.
- Unscrew the pressure flange and pull the assembly out through the hole. Clean all contacts and the rheostat plate, reinstall the unit.
- Prepare a “control” with a light bulb and a multimeter.
The first step is to accurately determine the “culprit” - check the sensor and pointer separately. The performance of the device is diagnosed as follows:
- Turn on the ignition and connect one terminal of the multimeter or test light to the ground of the car.
- Connect the second contact to the positive terminal of the wire going into the technological opening. The meter should show the voltage of the on-board network.
- Remove the positive terminal and short it to ground. If the instrument on the panel is working properly, the arrow will show a full tank. This means the fuel level sensor is not working.
- If there are 2 wires coming to the gas tank, connect them alternately to the vehicle ground. From one the control lamp should light up, from the second the pointer should move to maximum. If the listed symptoms are observed, change the sensor.
In the case when there is a voltage of 12 volts on the wires, but after a short to ground the pointer indicator does not respond, you will have to disassemble the dashboard and remove the device. Similar actions are taken when the minimum gasoline remaining indicator is not working.
It is somewhat more difficult to independently check the updated system installed in cars of recent years; simply shorting the terminals will not do anything. Using a multimeter, make sure that there is supply voltage on the wires, and then you need to connect another, working sensor to them. If the arrow on the instrument panel reacts when the float moves, the element should be replaced.
Thorough cleaning of the slider and rheostat turns helps in cases where the fuel level sensor simply lies. The moving contact can be carefully bent so that it passes along the unworn part of the turns. Clean the current-carrying strips of the potentiometer with a soft cloth soaked in alcohol to avoid damaging the surface of the element.
Conditions for correct operation
If you have not previously encountered electrical devices and do not know how the fuel level indicating system works, familiarize yourself with the following concepts:
Most systems for indicating the fuel level in a tank operate on the same principle. There is a float in the tank, on the counterpart of which there is a sliding contact. The sliding contact moves along a plate with contacts (resistive substance), rigidly fixed to the meter body. Moving the sliding contact changes the resistance value, thereby increasing or decreasing the amount of current passing in the circuit. The lower the resistance, the more current flows in the circuit and the more the fuel level indicator needle deviates.
Common problems
The fuel volume control system in the gas tank is susceptible to the following malfunctions:
- the pointer indicator lies at zero regardless of the amount of fuel remaining in the tank;
- the device does not display the fuel level correctly - it is lying up or down;
- the needle “jumps” or changes readings in a short period of time;
- The yellow minimum fuel indicator indicator does not light up.
Reference. In some domestic car models, the fuel sensor is lying from the factory. An example is the Chevrolet Niva SUV of the first releases, where the device greatly underestimates the actual level of gasoline. The driver, guided by the sign, pulled into a gas station, only to discover that the tank was full to the top.
There are several reasons why the needle drops to zero:
- Sticking or jamming of the lever.
- The float lost its seal and sank to the bottom.
- An electrical circuit is broken due to oxidized contacts or a wiring problem.
- Failure of the indicator itself or the lever sensor - potentiometer.
Typically, incorrect readings and “jumps” of the needle are a consequence of contamination of the rheostat and slider. On a car with high mileage, these parts can wear out - the thin layer on the plates wears away, causing contact to disappear between them and the runner.
The fuel level sensor in the tank sends conflicting signals that are reflected on the dashboard.
One of the reasons for the minimum level indicator not working is a burnt-out light bulb on the instrument panel. Less common are problems with the end contact located inside the tank, or a break in the electrical wiring. In the newest systems, the lamp even lights up at the command of the controller when the resistance of the lever potentiometer reaches a certain value.
Malfunctions
For what reasons may the fuel level indicator not work:
- lack of good contact on any part of the circuit (breaking off wires, oxidation at the junctions of connectors, cracks at soldering points);
- malfunction of the instrument panel indicator (for example, broken solder joints);
- disconnecting the float from the sliding contact;
- fuse burned out;
- lack of contact between the resistive track and the sliding contact. The reason may be the formation of oxides and deposits on surfaces, weakening of the pressure of the sliding contact on the resistive layer, and abrasion of the tracks of the resistive layer.
The pointer is lying and works intermittently
Reasons why the gauge incorrectly shows the fuel level in the tank:
- the presence of additional resistance in the circuit (oxidation at the connectors, poor ground contact, formation of oxides, deposits on the resistive layer and sliding contact);
- Float casting defect, causing it to fill with fuel. Failure is extremely rare, but still possible, as is bending of the float rod due to mechanical impact during unqualified repairs;
- formation of deposits on the guide post (typical only for tubular type sensors). In this case, the movement of the float will be difficult.
The arrow always shows a full tank if the system has:
- the float has separated from the sliding contact (in this case, the slider will always be in the extreme position);
- the wire going to the indicator has a short to ground somewhere, which causes the resistance in the circuit to decrease.
A twitching arrow of the UUT indicates partial abrasion of the resistive track of the potentiometer. This will also cause interruptions in the operation of the pointer. Since the car is most often used with a fuel tank filled to 40-60%, it is in this range that abrasion of the resistive layer occurs most quickly. Therefore, the pointer can only work properly when the position of the sliding contact falls on an intact resistive layer.
Main malfunctions in the sensor operation
If the sensor does not display the fuel level correctly, you can judge that a certain breakdown has occurred and needs to be repaired. Modern sensors that record the fuel level, like all vehicle parts, fail from time to time. In this case, it is necessary to repair the fuel level sensor.
Malfunction in indicators
The main sign of a sensor failure is the display of false data displayed on the pointer. Based on its “behavior,” certain conclusions can be drawn regarding the resulting breakdown. Here are the most basic types of breakdowns and their causes:
- The indicator is at zero, regardless of the fuel level. The problem is that the float stop is broken.
- The pointer moves, but still drops to the zero mark. In this case, you need to pay attention to the general condition of the device winding, as well as the reliability of the contact between the sensor and the current collector.
- Fluctuations in fuel quantity indicators. This malfunction indicates sufficient wear on the contacts.
- When starting the engine, the fuel gauge does not rise above the zero mark. Such a malfunction is directly related to the electronics of the vehicle. Here it is important to check the wires for possible breaks and the degree of reliability of the connection. It is important to ensure the overall integrity of the fuse.
- The low fuel light does not come on. This problem is often associated with device failure.
- The fuel level sensor is lying. In such a situation, it will be necessary to check the float for the level of tightness.
According to modern traffic regulations, operating a car with a faulty indicator is strictly prohibited. Problems that arise with sensors must be eliminated as promptly as possible.
Mechanical and functional malfunction
Along with problems that are expressed in incorrect indicators, sensor failure can manifest itself in the following malfunctions:
- loss of tightness of the built-in float;
- strong bending of the wire holder;
- violation of the general tightness of the housing and the resulting decrease in the level of resistance;
- mechanical break of the variable resistor;
- loss of tightness at the point where the device is attached to the fuel tank.
After the float loses proper tightness, the control device, with a full tank, will indicate an incomplete fuel level. If there is a sufficiently strong loss of tightness, the indicator will immediately show the minimum fuel level. In this case, the actual quantity will not matter. To fix this problem, you will need to remove the sensor and replace the float. If it is not possible to purchase a float, you will need to completely replace the entire device.
Quite often, the sensor fails due to long-term movement over rough or uneven terrain. Repeated impacts on the tank will cause serious damage to the wire holder of the built-in float.
With such bends, the behavior of the indicator will directly depend on where the holder was bent. If the bend is directed upward, the parameters will always be increased, if downward, the parameters will be underestimated. If the breakdown involves such a bend, you just need to straighten the wire holder and give it its original shape.
Often the seal of the sensor housing is broken. This happens after an accident has occurred, as well as after long-term use of low quality fuel. If gasoline gets into the device, it will malfunction and, as a result, cause incorrect sensor readings. These malfunctions can only be eliminated by completely replacing the device.
We recommend: What is a TDI engine
If the variable resistor breaks, this will cause the sensor to always show a full or completely empty tank. Similar signs can be observed in the process of a break in the signal wire running from the sensor to the display unit. Before removing the sensor, you will need to connect a variable resistor with a resistance level of 100 - 200 Ohms to the car body and to the signal contact. As you rotate the knob, you need to make sure that the sensor readings change. In this case, the malfunction can only be eliminated by completely replacing the device.
The main sign of a complete loss of tightness at the installation site of the device is the appearance of the smell of gasoline in the cabin.
DIY diagnostics
To find the reason why the fuel level sensor does not work, you will need a multimeter (we recommend reading how to use a multimeter) and a tester. The first step is to determine whether the cause of the breakdown is in the sensor located in the tank or in the indicator. To do this, remove the connector connected to the fuel section (located at the gas tank flap, which in most cases is accessible from the passenger compartment). Using the wiring diagram of your car model, determine which wire goes to the dashboard indicator. Turn on the ignition, then apply negative potential to the corresponding pin of the connector through the test lamp. If the pointer arrow quickly points upward, then the problem is in the sensor. For further diagnostics it is necessary to remove the fuel section. A multimeter will measure the resistance of the potentiometer.
Eliminating the causes of malfunctions - repairing the automotive fuel level sensor
Some fuel sensor malfunctions can be resolved yourself. A damaged float can be easily changed, either in tandem with a lever or without it (depending on the make of the vehicle). Broken or damaged wires are repaired using a regular soldering iron. The resistive element plates can be replaced with new ones. However, you need to choose the right parts according to the make and model of your car.
In most cases, in order to avoid serious breakdowns, you need to contact a specialized service to diagnose the FLS, identify the exact causes of malfunctions and take adequate measures to eliminate them. Most often, carrying out repair work is not economically feasible.
Experienced specialists are ready to provide a full range of services in this area. If the fuel level sensor does not work, contact our company to replace the faulty element. The cost of a new part is quite affordable.
Design and types of fuel level sensors
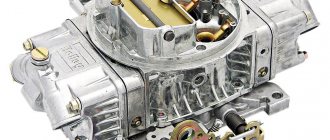
A sensor (FLS) located directly in the fuel tank is responsible for measuring the fuel level in the tank. In most cases, it is located in the fuel supply unit, but on carburetor models it can be combined with the fuel intake.
The vast majority of sensors are divided into two types:
- lever type (the most common);
- tubular type (used in large cars).
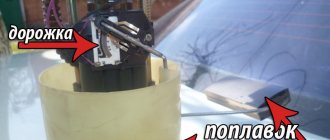
A lever sensor is a potentiometer connected to a float using a lever. The float is located on the surface of the fuel in the tank. When the fuel level changes, he uses a lever to change the position of the potentiometer slider. The transmission of electric current occurs through metal plates; at a high fuel level, the transmission of electric current occurs along the shortest path; a decrease in the level will include an increasing number of plates. When the tank is maximally full, the transmission resistance will be about 7 Ohms, and when almost empty - up to 340 Ohms. The numbers are approximate, as they may vary slightly in different cars.
The tubular type sensor has a similar operating scheme. It does not come with a potentiometer, but the principle of its operation is used. The tube is immersed in fuel; gasoline or diesel fuel enters it through the lower hole with a float floating on the surface. It is constantly in contact with the looped resistance wire. The higher the float level, the lower the resistance of the electric current transmitted to the indicator; accordingly, as the fuel level decreases, the resistance increases.
Replacing the fuel sensor
Remove the plastic gas tank trim.
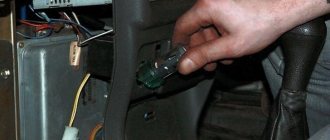
1) Disconnect the two wires from the sensor terminals, having previously marked their location.
Replacing the fuel sensor VAZ 2101-2107
2) Use a Phillips screwdriver to loosen the screw securing the fuel hose clamp and remove the hose from the fuel intake fitting.
3) Using a key set to “7”, unscrew the six nuts and 4) carefully remove the sensor from the gas tank.
Install the new sensor in reverse order.
5) We install a “ground” wire under one of the sensor nuts.
Causes of failure
Depending on the manifestation of the malfunction, the main causes of the breakdown can be determined. They can be divided into two main groups:
- mechanical damage to the fuel level sensor located in the car tank;
- Incorrect indicators displayed by the pointer on the dashboard.
That is, the cause of incorrect readings is either incorrect measurements or incorrect indicator readings on the dashboard.
The main sensor failures include:
- depressurization of the float;
- bending of the lever connecting the float to the sensor;
- wear of the potentiometer sectors.
It is sector wear that is the most common problem with the fuel level sensor. Due to contact with the runner, the sectors wear out, after which a strip forms on them. Poor contact of the slider with the sectors leads to the fact that the indicator needle can jump, constantly show an empty tank, etc.
The most basic reasons for incorrect fuel level display on the VAZ-2112 instrument panel
It happens that the fuel level sensor fails, but there can be many reasons why the fuel level needle is lying, and in this article we will look at the most basic of them.
Fuel level surges
When the fuel level readings “jump”, showing one value or another, the malfunction may lie in the “abrasion” of the circuit board tracks on the fuel level sensor (located on the fuel pump in the gas tank - approx.). They are most often erased due to the impact of the slider on them. This problem can be solved by bending its base to the track, but if they are worn out too much, you will have to replace them together with the float.
Some of the tracks on the board have been erased.
Please note that if you are going to replace the FLS (fuel level sensor - approx.), be sure to look at its markings. Since there are many analogues for the VAZ-2112 sold, and the resistance values for them are all different. And if the sensor differs from the previous one, the problem will not disappear, since the readings will also be incorrect.
What to do
First you need to carry out diagnostics, that is, find out which part is damaged - the sensor, wiring or the indicator itself. For this, a regular multimeter is used, but you can replace it with a test lamp.
First you need to gain access to the fuel section and the fuel level sensor itself. To do this, with the car running, you need to remove the connector in the service hatch under the rear sofa of the car. Then, using the electrical supply diagram, you need to determine which wire goes from the sensor to the fuel indicator. One connector of the multimeter must be connected to the ground of the car, the other to the positive terminal of the wire coming out of the hole. The multimeter should show the on-board voltage (12 V). If you close the positive terminal to vehicle ground, the indicator arrow should show a full tank. If this does not happen, the wiring or the indicator itself is to blame. If the needle shoots up to the extreme position, the problem is in the fuel sensor.
Modern fuel sensors are best replaced as an assembly. Their price is not so high as to make repairs that do little to help the business. However, in some cases, you can try to clean the sensor from dirt and try to adjust the slider. To do this, you will have to remove the sensor (you must first drain the fuel, turn off the car and remove the negative terminal from the battery). After removing the sensor, you need to inspect the working surface of the sectors for wear. If the width of the wear line is small, you can adjust the slider so that it moves along the undamaged surface of the sectors.
If incorrect readings of the fuel level indicator are not associated with the fuel sensor, then you will have to remove the indicator from the dashboard. Wiring problems can also be diagnosed using a multimeter. The malfunction of the device itself is determined manually after removing the device - if the arrow is jammed, you can try to clean it and adjust it.
FLS fuse
Sudden sensor failure suggests a blown fuse. But the on-board network of a modern car does not provide a separate fuse to protect the fuel supply circuit of the FLS. Everywhere, the indicator and meter circuit is part of a whole group of sensors and actuators, protected by a common fuse for the instrument panel. Therefore, in the event of a short circuit in the sensor circuit, the fuse-link of the instrument panel burns out.
How to prevent the problem
It is almost impossible to prevent sensor damage, since mechanical wear of the sectors or float is an absolutely natural phenomenon. Therefore, if the indicator needle begins to behave strangely, and the check reveals problems with the sensor, it is better to replace it as an assembly, fortunately its price is not very high.
The same statement is true if the indicator itself breaks down. Service work to prevent damage to this device is not provided - only replacement if a malfunction is detected. Problems with electrical wiring, including a break in the wire leading from the fuel level sensor to the indicator, can also be solved by replacing the wire.
Doesn't show fuel level AT ALL
When the arrow points to “0” with a full tank, then attention should be paid to all contacts and connections:
- First of all, this concerns the bolts located on the back side of the instrument panel, since they are the ones who create contact by fixing on the indicators.
- It is possible that the fuel level needle has lost its position and needs to be adjusted.
- The instrument panel itself may also be faulty. Since its mechanical parts are very susceptible to wear.
- We test all the “negative” wires, especially the one located near the handbrake. Because often it is he who is promoted.
- The float or the FLS itself is jammed.
Having analyzed all of the above, we can come to the conclusion that this whole problem lies entirely in the power supply system and the mechanical part of the fuel level sensor.
Please note that if you have an on-board computer (not older models - approx.), it is possible to control the fuel level electronically. You just need to enter the readings after each refueling of the car and the faulty FLS needle will no longer bother you.