Share
Mitsubishi Lancer 9 fuel filter
One of the common problems with Lancer drivers is poor engine starting. This applies to used Lancers, where engine problems are accompanied by unpleasant jerking when driving, a drop in power and other symptoms. If the Mitsubishi Lancer 9 fuel filter or sensors are to blame for all this, then you will learn how to solve the problem yourself by reading the article to the end.
Replacing the fuel filter
As the manufacturer advises, the fuel filter should be replaced every 120,000 km, but most likely the filters do not last that long on our domestic gasoline.
Why filters? Because there are two of them in the fuel tank. The first is the coarse filter, which does not need to be changed at all, just rinse it thoroughly in gasoline. Then comes the fine filter, which contains all the dirty substances that passed through the first filter. Catalog numbers of fine filters:
- Mitsubishi MR552781 - original filter, cost approximately 3500 rubles.
- Japan Parts FC-523S - analogue
- Ashika 30-05-523 - analogue
- Concord FL20016 - analogue
- JS Asakashi FS6501U - analogue
- Nipparts J1335052 - analogue
- Sakura FS-1037 - analogue
- Direct Parts 44095C - analogue
The cost of analogues is almost the same, ranging from 800 to 1300 rubles. In terms of workmanship, I can’t recommend an analogue. If anyone buys it, please tell us about it in the comments.
Let's start replacing the fuel filter
1. First of all, we climb back and remove the rear seat. I think that everyone knows that it can be removed quite simply: we pull it upward on both sides, thereby tearing it off its seats.
2. Remove the sound insulation and unscrew the 4 screws using a Phillips screwdriver:
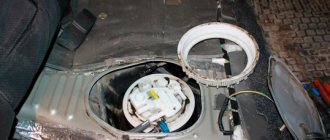
3. We have a view of the fuel tank, everything is covered in dirt and debris. I recommend cleaning everything with a brush and a cloth so that debris does not accidentally fall into the tank. After cleaning, remove the fuel supply and return hose, then unscrew the 6 nuts. Be careful, over time the car is used, the nuts may become tightly stuck and come out together with the torn stud. To prevent this from happening, it is recommended to spray the nuts and studs with everyone's favorite liquid, WD-40.
4. After all the nuts are unscrewed, remove the black pressure plate and remove the filter.
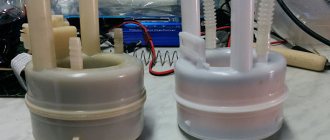
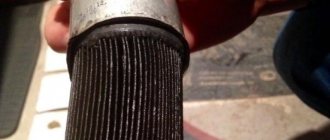
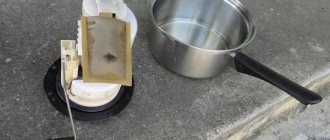
5. Photo of the old filter assembly:
6. Now you need to disassemble the filter, namely, remove the fuel pump with a coarse filter and install it in a new purchased filter. Don't forget to clean the coarse filter. If it is in a very dirty state, it is recommended to change the refill and, of course, the filter.
7. Install everything in the reverse order of removal.
Comments (73)
I haven’t climbed into the Mitzda, but in Toyota and Honda this plastic case serves precisely the function of the case, i.e. holder of the pump itself, and the filter is just a mesh. the fine filter should be on the pressure, but not on the suction
with all due respect - the crap written.....
if anything, the pump should come from the vase (there is also a Bosch pump or another company), the only thing is that you need to resolder the connector.
How can you say something if you haven’t even climbed into Mitsu, as you write, kindergarten.
You are not right. Everything was done right there. The pump suction is cleaned by coarse cleaning, and the outlet is cleaned through a fine filter, which is located in the module housing, where you should install your pump when replacing
the writing is not crap! Every word of the author corresponds to reality. I myself encountered a replacement (the symptoms were jerks at the beginning of acceleration when I sharply pressed the gas). I was really very careful with the studs, I turned 2 off at my place, thank God it’s not nearby, although I tinkered slowly for 2 days, spilling it with VD and restoring the thread with a tool. As for the analogues, I can say that I took the Sakura FS-1037 from Japan - it didn’t fit for 2 reasons 1e - the block is completely different and the shape and number of contacts 2e - the pipes of the native filter look almost in the same direction for the Sakura FS-1037 - the analogue ones are at 90 degrees those. You can’t put on the return line at all. In theory, it’s possible to “prank” this filter (resolder the block, extend the tube), but it’s very hemorrhagic. I did the following: I removed the fuel pump and, with great difficulty, blew the filter in the opposite direction, how much brown shit flew out of there is a different story. In general, I cleaned the receiving grid, reassembled and put everything back - the result was great, the car began to accelerate smoothly and much more confidently, however, this procedure was enough for 30 thousand km, now the symptoms are returning. As soon as it gets warmer I will change the filter, but only with the ORIGINAL one.
Dmitry, I’m interested in your opinion on the following question: I have a Lancer X, the problem is the following: periodically it does not start the first time, or the second time, or you need to turn it for several seconds. Could a dirty fuel filter be causing this problem? If not, then what?
MASUMA MFF-M311 fits like original and costs less, about 1200 rubles
Good afternoon, dear fellow car enthusiasts. I recently registered in the Drive2.ru community to also be useful. Today I will share my experience of replacing fuel filters in the Lancer 9 tank. The mileage of my car is 131,800 km, and the filter, I think, has not been changed before... I read the reviews of other motorists and decided to change everything too. Before starting work - Disconnect the battery terminals!
I bought a housing with a fine filter from Nipparts, a coarse filter from Toyota + a fixation washer, a rubber sealing ring (it didn’t fit!), and having chosen a day, I got to work.
I will describe in more detail the nuances that I encountered, and the description of the components can be seen in the photo, or is in other reviews: So, when preparing to replace fuel filters, BE SURE to read the reviews of other motorists in the community, thus obtaining a more complete understanding and saving yourself time and forces: Do not forget to wait until the pressure in the fuel system is released.
To do this, just wait 2-3 hours after disconnecting the battery before starting work. I Bought a Nipparts Filter - after reading other reviews and comparing prices for NON-original spare parts. The issue price is about 600 rubles. (versus the original - 3500 rubles). Can be changed at least every 30,000 km))))
I also bought a sealing rubber band for the filter, and also wanted to change it, but it turned out to be Larger in Diameter, and did not fit... although the old rubber band did not harden much and returned normally (alas, I didn’t take a photo, and I don’t remember the number). But I realized that there is no need to change it (the mileage of the car is 130 thousand). Having opened the filter hatch under the rear seat, I discovered... that no one had changed anything before me... everything was covered in dust.
I had to thoroughly wash everything with Brake Cleaner (or universal cleaner) in a spray bottle... it was under pressure and quickly washed off all the dirt (it was in the garage, that’s why I used it). The result was this spectacle:
Separately, it is worth mentioning when unscrewing the nuts securing the round plate of the Filter, they are almost all rusty... and rusty nuts are half the problem, and rusty studs on which they are screwed are the problem! I recommend spraying them with WD-40 in advance, a day or two in advance, and preferably cleaning them with a small metal brush... it’s very easy to rip off a pin, be careful... I tore off one, but put washers under the nuts when assembling, and everything fit tightly! A little about the coarse filter: On the advice of my colleagues from Drive2.ru, I took a filter from Toyota (pictured). The original filter was quite dirty...and some metal particles (such as small shavings) were visible in it.
Comparison of the original filter and the Toyota one.
The filter from Toyota fit perfectly, despite the fact that it is larger in size - there is enough space in the tank! After unscrewing the nuts, carefully pull out the fuel filter (complete with fuel pump). Gasoline leaks - stock up on rags! After that, we move the fuel pump from the original filter (together with wires and terminals) and the lower clamp - this takes no more than 15 minutes... and install the Coarse Filter (it is fixed with a small washer, but this is covered in other reviews).
What did I notice! IMPORTANT! The Nipparts body is approximately 4-5 mm shorter than the original... when installing the Fuel Pump, there is a slight play - up and down... but in the end this does not affect anything, because the fuel pump is rearranged with the rubber seal (both top and bottom) and everything turns out fine in the end) We install everything in the reverse order. Before installing the assembled filter with the fuel pump back, I stuck my hand with a small Magnet into the TANK, through the Filter installation hole, and collected some small metal shavings with a magnet... After all the procedures, we put everything in place. Assembled version:
since the metal ring was a little rusty, I cleaned it and primed it... and then also lubricated it with Lithol24 so that it would not rust further. I installed new nuts along with body washers for a better fit (especially since one stud is missing, this can be seen in the photo). I smeared more Litol on the nuts on top, and screwed another nut onto each stud to protect the studs from further corrosion! *(yes, I’m such a Perfectionist)* And after checking for the absence of tampering, I’ll also smear everything with Lithol! Therefore, further dust or moisture will no longer be a problem. Friends! Especially for YOU, I was not lazy and disassembled the old fine filter. Inside it turned out to be quite dirty!
I assembled it, connected the battery terminals... turned on the ignition 2-3 times to pump up the Fuel and - voila, it started up almost immediately. I drove around the city a little and found no problems. Therefore, go for it! Total:
New filter - 600 rub. Mesh from Toyota - about 190 rubles. Sealing rubber (which did not fit) - 130 rubles. Universal cleaner - 150 rubles (I didn’t use all of it). Nuts, washers (were at home) - about 20 rubles for everything. It took no more than 1 hour (of which 30 minutes spent struggling with rusty studs).
The reason for replacing the fuel filter may be poor engine starting, jerking when driving, or a drop in power.
If the filter becomes dirty, fuel and debris will enter the combustion system and the engine will begin to operate intermittently.
Filter location
The fuel filter is located inside the fuel tank.
The filter is replaced from inside the cabin, for which you need to remove the rear seat.
According to the regulations, it is replaced every 60 thousand mileage . But due to poor fuel quality, some motorists change the filter much earlier than the specified period.
Tool
To replace the filter element you must have:
- flat screwdriver;
- shaped screwdriver;
- narrow nose pliers;
- set of spanners;
- set of heads;
- knife.
High pressure is created in the engine fuel system, so before replacing it is necessary to turn off the power to the fuel pump, start the car and wait until it stalls!
Replacement algorithm
To replace the filter you need to:
- Place the gearbox in neutral and apply the handbrake. Remove the rear seat and remove the sound insulation, under it there will be a gas tank hatch.
The fuel tank flap is secured with four self-tapping screws.
We protect the hoses from debris and unscrew the fuel pump mounting nuts.
Use a screwdriver to press the fasteners and remove the cover.
To remove the pad, use a screwdriver to pry up the plastic retainer.
Using a knife, remove the retaining washer.
Press the latch and disconnect the wire.
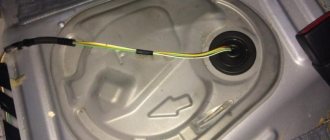
The arrows in the photo show the fasteners that need to be cut.
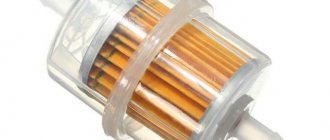
Fuel pump with a new mesh filter from Toyota.
We install the pump in the fuel tank and check its operation.
Articles
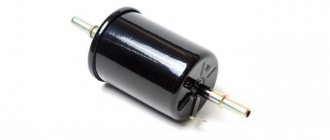
We recommend fine fuel filter MR552781 or " NIPPARTS " J1335052 . But it is also necessary to immediately replace the coarse filter MR204495 or its analogue “Toyota” 2321746090 , 2321716490 . It is the first to let fuel through and looks like a regular mesh.
The Toyota filter is cheaper and has a different shape, which does not at all affect the quality of fuel purification.
The coarse fuel filter can be filled with acetone and left for 15 minutes , then cleaned, preferably blown with air under pressure. After this procedure, it will become cleaner and can wait to be replaced.
Often, many car enthusiasts forget to replace the fuel filter on time. This can lead to various malfunctions in the fuel system, and subsequently to interruptions in engine operation and its complete stop.
According to instructions from the Mitsubishi car manufacturer, the fuel filter for Lancer 9, Lancer 10 and Lancer X should be replaced after 120 thousand kilometers. However, there is one significant point that darkens this rosy picture completely - this is the low quality of our fuel. Much to our chagrin, in our country not a single person is immune from gasoline with various impurities, dirt, metal particles, squeaks and other elements that can harm various systems of your car. According to Russian standards, the allowed content of impurities in fuel is from 100 to 450 grams per 1 ton.
However, research work has demonstrated that over 5 thousand kilometers, the filter has the ability to accumulate about 50 grams of dirt. In accordance with this, replacement must be carried out much earlier than the mileage of your car approaches 120 thousand kilometers. The main signs with the appearance of which it is necessary to replace the Lancer fuel barrier (9,10, X):
- the engine does not start the first time;
- the car's power has decreased;
- in case of sudden acceleration, the engine stalls;
- uneven operation at idle.
But here you need to be careful, since the fuel pump and the dirty air filter of your Lancer may show similar signs. If you notice that fuel consumption has increased and black smoke is coming out of the exhaust pipe, this means that the air filter is faulty. In all other cases, the issue will be in the fuel filter. To change it, you must first purchase it. Here a lot depends on the state of your finances, since the official filter is very expensive. But you shouldn’t be upset and you can get by just fine by purchasing a Chinese-made part, which is almost ten times cheaper.
New fuel filter
In order to save on filter replacement services, this work can be done independently. If you carefully read the instructions, it will take you no more than 30 minutes. Let’s say right away that the work on replacing the fuel purification barrier for the Lancer 9, Lancer 10 and Lancer X models is almost identical, so let’s look at everything using one example.
Before starting work, it is necessary to reduce the pressure in the system in advance. To do this, you need to stop the engine and let the car sit for several hours. This is in principle optional, but it won’t be superfluous. It is better when there is as little gasoline in the tank as possible, and ideally no more than a quarter. The car must be set to the handbrake and set to neutral speed.
Video “Lancer fuel filter location (9, 10, X)”
If you have not yet figured out where the fuel purification barrier is located, be sure to watch this video.
We hope that you learned a lot of interesting and useful things from this article and that you completed this simple task successfully. If something didn’t work out or you have any suggestions, please leave a comment.
If the engine power drops, there is increased noise, or periodic “whining” noises are heard when the fuel pump is operating, then most likely the fuel pump has failed.
Pre-check the pressure in the fuel supply system in the following order:
— check the serviceability of the fuel pressure regulator (see “Checking and replacing the fuel pressure regulator”);
— if in idling mode the pressure in the system is less than 265 kPa (2.65 kgf/m2), remove the pump and wash the fuel coarse filter mesh;
— if this does not help, replace the fine fuel filter.
If in this case the pressure does not increase, the fuel pump must be replaced.
You will need: an “8” wrench, a flat-blade screwdriver, pliers with thin jaws.
1. Reduce the pressure in the fuel supply system (see “Reducing pressure in the fuel supply system”).
In the process of reducing the pressure in the power system, the hatch cover at the base of the body above the fuel pump was removed and the wiring harness block was disconnected from the pump.
2. Squeeze the plastic clips of the drain pipe hose tip clamp and remove the hose from the pump fitting.
3. Squeeze the bent ears of the fuel supply hose clamp and slide it along the hose.
4. . and remove the hose from the fuel pump fitting.
5. Unscrew the six nuts securing the fuel pump.
6. . remove the pressure ring.
7. . and remove the fuel pump along with the rubber sealing gasket from the fuel tank.
Be sure to replace the gasket if it is torn or severely compressed.
8. Squeeze out the plastic clips.
9. . Remove the fuel filter plug and drain the remaining fuel from the filter.
Be sure to replace the gasket if it is torn or severely compressed.
10. Prying up the plastic clips.
eleven. . remove the electric fuel pump cover.
12. Check the condition of the rubber stop of the electric fuel pump; replace the stop if it is torn or severely compressed.
13. Prying off the plastic retainer.
14. . Disconnect the wiring harness connector from the electric fuel pump.
15. . and remove the electric fuel pump from the fuel pump module.
The electric fuel pump is sealed in the module housing with a rubber gasket; remove it from the housing if it remains inside the housing when removing the pump. Replace the gasket if it is severely compressed or torn.
Also check the condition of the spacer ring, replace it if damaged.
16. Prying with a screwdriver.
17. . remove the retaining washer of the fuel pre-filter.
Straighten the washer if it became deformed during removal.
18. Remove the coarse fuel filter from the electric fuel pump and wash or replace the filter if it is dirty.
19. Pressing the earth wire clamp.
20. . Disconnect the wire from the fuel pump module housing.
21. Pressing the latch.
22. . Disconnect the wiring harness connector from the pump module housing.
23. . and remove the fuel pump module wires from its housing.
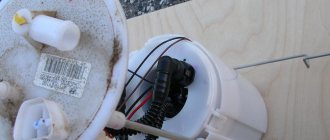
This is what the fuel pump parts look like. The fine fuel filter is located in the housing of the fuel pump module (shown with an arrow in the photo); it can only be replaced together with the housing.
24. Assemble and install the fuel pump in the reverse order of disassembly and removal.
25. After installing the fuel pump, start the engine and check the tightness of the connection to
fuel hose pump.
The 9th and 10th models of the iconic Lancer from Mitsubishi can often be found on the roads of Russia and the CIS countries. Like all other cars in the post-Soviet space, they run on fuel that, frankly speaking, is not of very high quality. Such fuel not only prevents maximum efficiency from the Mitsubishi Lancer engine, but also negatively affects its condition. In order to avoid premature wear of car parts, each owner must promptly change the fuel filter and systematically monitor its condition. More details about how this machine unit works and how to operate it correctly will be discussed below.
Fuel filter device
The fuel filter in any car is a very important element, since its correct operation largely determines how well and how long the other components of the vehicle will work. The most important functions of the fuel filter are:
Structurally, the Lancer 9 and 10 fuel filters are very similar. They are located in the gas tank as a separate module. The latter, in turn, consists of two main elements:
- a fuel coarse filter, which is designed to remove large impurities from fuel (water, fractions of at least 1 mm in size, etc.);
- a fine fuel filter that filters the fuel for smaller impurities.
Working in the system, both filter elements of Mitsubishi Lancer 9-10 maximally clean the fuel from foreign fractions. After which the fuel successfully reaches the injector through the fuel lines, and then to the engine, without harming the vehicle components at all. It is worth understanding that filters are not eternal devices, so over time their cellular structure becomes clogged with dirt and they can no longer filter fuel.
Article number and cost of the branded fuel pump Mitsubishi Lancer 9 and its analogues
The original fuel pump for Mitsubishi Lancer 9 has article number MR566825. Its price ranges from 7 to 20 thousand rubles. There are fuel pumps from third party manufacturers. Their cost is significantly lower than that of a branded product. Moreover, many options are not inferior in quality to the original. The list of the best third-party manufacturers of gasoline pumps for Mitsubishi Lancer 9 is given in the table below.
Table - Analogs of the fuel pump for the Mitsubishi Lancer 9 car
ManufacturerArticle Cost, rubles
| STELLOX | 10-01015-SX | 770-800 |
| MAXGEAR | 43-0076 | 1100-1200 |
| PATRON | PFP024 | 1300-1500 |
| BOSCH | 0 580 454 094 | 1600-2000 |
Signs that the filter needs to be replaced
Of course, removing the Lancer 10 or 9 fuel filter every time for inspection is an extremely irrational and time-consuming undertaking. In addition, it will only be possible to check the coarse filter element, since it is visible to the naked eye, but its brother is in a closed container, as a result of which checking its condition becomes impossible. How then? The answer is extremely simple - carefully monitor the behavior of your car.
Many car owners with at least a little experience know that the breakdown of even an insignificant, at first glance, component of the car will make itself felt. A dirty fuel filter is no exception. In most cases, a clogged filter element on a Mitsubishi Lancer 9-10 provokes such phenomena in the car’s behavior as:
- increased fuel consumption;
- instability of the engine at idle and with increasing speed;
- poor engine starting “cold”;
- general loss of vehicle power and dynamics;
- during movement - tripping, spontaneous braking and jerking of the car.
It’s no secret that similar symptoms can appear with many other breakdowns of the fuel system of the Mitsubishi Lancer 9-10, however, with a problem specifically with the filter, there is one significant difference - a gradual increase in symptoms. That is, instability in the operation of the car will begin to manifest itself from the most insignificant phenomena and over time will begin to cause significant discomfort to its owner.
In addition, it is possible to determine the feasibility of replacing the filter based on the time frames that the manufacturer regulates for its models. According to information from the Japanese automaker, the fuel filter for Mitsubishi Lancer 9 and 10 is necessary:
- check - every 15-20,000 kilometers;
- replace - every 120,000 kilometers.
It is worth noting that given the poor quality of fuel in Russia and the CIS, it is advisable to reduce these terms by 15-30%. This is the only way to achieve truly truthful information.
Causes of poor startup
So, why does the engine of used Lancers start poorly over time? One of the reasons is called the fuel filter or FTO. Lancer also has a mesh installed that “inspects” the fuel before it is supplied to the thin filter, thereby collecting large debris and particles before they enter the FTO.
Obviously, a dirty filter is not able to function normally. Dirty fuel will enter the engine, and it will not be surprising if malfunctions begin.
In fact, when problems begin with starting the engine, Lancer drivers want to make do with small sacrifices, and first of all start by replacing the filters. Does this help? Of course, if this is the reason. And if not?
The Lancer's 9th generation automotive system, however, like any modern car, is quite complex. It is replete with the presence of a variety of sensors, which can also cause poor starting. One such regulator is the oil pressure sensor.
There is also a camshaft position sensor, which also cannot be underestimated, because its glitches lead to increased fuel consumption, engine malfunctions, and of course, difficulties with starting.
Replacement
Replacing the Lancer 9 and 10 fuel filter is not such a complicated procedure, so if you wish, you can save on having it done at a specialized service station. To carry out manual repairs of this machine component, you will only need basic car repair skills, some training and knowledge of the essence of this process. Our resource, of course, will not help you with the first ones, but we will be happy to provide you with information regarding the last two points.
So, first of all, purchase a new fuel filter. It is advisable to change the entire assembly, however, if one of the fine or coarse filter elements is in normal condition, it is quite possible to get by by replacing only the damaged part. When buying a new filter, it is important to ensure that it is completely identical to your vehicle.
Secondly, prepare before the replacement itself. This stage includes the following procedures:
- Gather the necessary set of tools: a standard set of wrenches, a screwdriver, rags and pliers.
- Next, place your Mitsubishi Lancer 9-10 on a flat surface that has good space.
- And finally, be sure to take care of safety precautions: eliminate the presence of open flame sources nearby, place a fire extinguisher near the repair site and find protective equipment for yourself (rubber gloves are enough).
Direct replacement of the Lancer 10 and 9 fuel filter is carried out as follows and is absolutely similar on both models from Mitsubishi:
- First, relieve the pressure in the vehicle's fuel system. To do this, you need to turn off the battery, remove the fuel pump fuse from the mounting block, connect the battery and start the car. After it stalls, crank the starter a couple of times and disconnect the battery. This procedure is done in order to avoid gasoline leaks from disconnected fuel lines.
- Remove the rear sofa and dismantle the existing sound insulation.
Unscrew the four fastenings of the soundproofing cover that prevents access to the gas tank, and remove this hatch.
Now you can disassemble the module and replace the necessary filter elements. After replacing, restore the car and start it, letting it run for a couple of minutes.
In general, replacing the fuel filter of Mitsubishi Lancer 10 and 9 is not so difficult if you know the basic nuances of this procedure. We hope the material presented above was useful to you. Good luck with the repair and on the road!
Video about replacing the fuel filter Mitsubishi Lancer 9-10:
Oyunçu kontrollarını gostərin
- Tarixində dərc edildi 4th July 2018
Step-by-step replacement of the fuel filter in Lancer 9.1.6 2006
DDM
Oil pressure sensor The oil
pressure sensor or oil pressure sensor is easy to change, especially since it is inexpensive - only 150 rubles. You can even use a DDM replacement at a car service center, where they will charge nothing at all for the service along with a new sensor - 200 or 300 rubles.
The DDM is located near the oil filter. Access to it is blocked by a box with an air filter, which must be removed. Then you can unscrew the DDM from the bottom, on the side of the driver's wheel (left-hand drive Lancer) with a 27 socket.
It’s not really possible to approach this sensor from above. It is hidden by many hoses and communications, and working on a “hot” car is generally dangerous, since you can easily burn the skin of your hands.
You can install a similar sensor, albeit with a different size. The main thing is not to allow oil to pass through.
Şərh • 19
Tell me why you changed the filter, how did the car behave before the replacement?
By the way, if you don’t climb there for a long time, the nuts will become sour and it will be impossible to unscrew them. If you twist the filter mounting studs, it will be impossible to install a new filter unit.
This is a consumable that must be replaced regularly. The car drove before and after the replacement. There are no “wow” effects observed. If that's what you meant. What will happen if you don't change it at all? One day the car will stop moving.