Replacing brake fluid is an important point in car maintenance, since the health of the brake system is the key to the safety of the driver and his passengers. The hydraulic braking system is based on the transmission of force from pressing the brake pedal to the wheels through a special brake fluid.
Brake fluid is an excellent “transmitter” of the driver’s foot force to the wheel brake cylinders. Since fluids have a minimum degree of compression, energy from the master cylinder is transferred to the working (wheel) brake cylinders without distortion.
Be sure to watch the video instructions on how to change the brake fluid in your car yourself, which is located at the end of this article.
Brake fluid replacement timing
Car manufacturers recommend that the brake system fluid be completely renewed after approximately 40 thousand kilometers or once every 1.5-2 years under normal vehicle operation. Some car enthusiasts believe that nothing can happen to the fluid in a closed brake circuit. Therefore, there is no need to change it.
In fact, there are compensation holes in the expansion tank of any hydraulic brake system. Through them, the liquid communicates with the atmosphere. And the main disadvantage of the “brake seal” is its hygroscopicity or ability to absorb water from the air. The more moisture gets into the brake fluid, the worse it copes with its duties.
Special testers allow you to check the condition of the brake fluid. They determine such an important parameter as the boiling point. Based on the readings of the device, one can judge the performance of the brake system.
- If the tester shows a value of 175 degrees or higher, then the brake fluid can continue to be used.
- If the value falls within the range of 165 to 175 degrees, brake fluid can only be used if its age does not exceed a year.
- When the device shows a boiling point below 165 degrees, urgent replacement is necessary.
In addition to the natural “wear and tear” of the brake fluid, there are other reasons for replacing it.
- Mixing different types of fluids will result in reduced performance. This often happens when the car owner does not know what kind of brake fluid is in the car. Wanting to replenish the level, he buys liquid to top it up at random. As a result, a complete replacement of the cloudy and dirty “slurry” is required.
- A leak in the brake system leads to rapid saturation of the fluid with oxygen. At the same time, the boiling point decreases and an urgent replacement of the brake fluid is required.
More complete information about automobile brake fluids can be found in our article: “Brake fluids for automobiles: types, properties, labeling.”
Test for compliance with the declared boiling point
I have already said that the effectiveness of the brakes depends on this temperature, or rather, the higher the boiling point, the better.
Our famous tiles will help you conduct such an experiment. Unfortunately, I only have two heat-resistant cups, so there will be some kind of competition.
Felix DOT-4 and Lukoil DOT-4
For the test, we will take liquids in approximately the same pricing policy: Felix DOT-4 and Lukoil DOT-4.
To make the process more fun, let's add thermal paste under the cups.
Please note that the first formation of bubbles began already at 190 degrees. But at a temperature of 200 degrees, both Felix and Lukoil boiled almost simultaneously.
Although Felix claims 250, and Lukoil – 230.
Lux and SINTEC
The next ones are Lux and SINTEC. Let's see how they perform. Active boiling of Lux brake fluid begins even before 200 degrees. He comes out of our experiment.
That leaves SINTEC. SINTEC began to boil at a temperature of 220 degrees. It’s not bad at all, but it’s still less than what’s stated on the label.
How can you trust the manufacturer after this?
Castrol and AWM
Our next tested oil is Castrol and AWM. The temperature is already more than 200 degrees, and the liquids still don’t even think of boiling. This makes me very happy.
I moved the thermometer and the AWM began to boil at 220 degrees. In principle, this is not bad, although for its price it is not very good.
Castrol boiled at 240 degrees.
Neva DOT-3 and Motul DOT 5.1
And the final test is Neva DOT-3 and Motul DOT 5.1. Let's see who wins. In theory, DOT-3 should boil at 180 degrees, and Dot 5.1 should boil at about 270.
The Neva began to boil, but not very actively at a temperature of 230 degrees. How is this even possible? Even Motul has already begun to boil slightly.
In this experiment, Neva will definitely be the leader.
Now let's move the thermometer to Motul and see what temperature it has. Motul also boiled, but at 240 degrees, that is, we have almost a leader somewhere on par with Castrol, only Motul 5.1, and Castrol DOT-4. Let's see how it performs in the next tests.
Now we will mix all our brake fluids, that is, pour them into one test tube in small quantities, including DOT 5.1, DOT-4 and DOT-3.
This experiment will clearly show us whether it is possible to add some kind of brake fluid or change it by substitution if we do not know what was filled in.
There are some distortions in the liquid. This suggests that they were not poured from the same barrel. Let's try to heat them up a little more and see what happens.
As you can see, there is no reaction, emulsion or sediment. This suggests that these brake fluid classifications are easily mixed.
Preparing to change brake fluid yourself
In some modern cars with complex “sophisticated” ABS, ESP and SBC systems, it is easier to replace the brake fluid at a specialized car service center. This will take a little time (about 30 minutes), the system will not be air-filled, and the price is within 1000 rubles. not so scary.
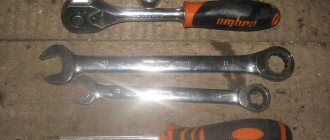
For those who like to save money, and also in the absence of trust in the service station employees, you will have to change the brake fluid yourself. To work you will need several tools, devices and materials:
- a soft transparent tube, the inner diameter of which corresponds to the outer diameter of the bleeder fitting on the wheel cylinder;
- an open-end or socket wrench for unscrewing the “bleeder”;
- container for collecting used brake fluid;
- new fluid;
- reliable assistant.
It is better to carry out the work in a viewing hole or on an overpass. If you can get to the bleeder fittings from below with a wrench and a tube, then it is not necessary to remove the wheels. Otherwise, you will need a jack and a wheel wrench, and you will also have to spend extra time dismantling and installing the wheels.
One person goes under the car with a wrench, hose and container. The second one sits comfortably behind the wheel of a car. There must be constant voice communication between partners.
The operating sequence depends on the type of brake system of the vehicle.
- With a diagonal circuit pattern, the rear right wheel is pumped first, then the front left, rear left and finally the front right.
- To bleed a parallel system, you need to start from the right rear wheel, moving sequentially to the left rear, right front and left front wheels.
What you need to know:
- Brake fluid should only be used as specified by the auto manufacturing company.
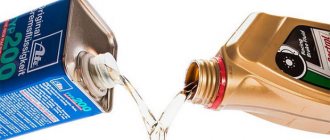
- When topping up, you need to use only new fluid and only that which matches the old one. Under no circumstances should you fill in a liquid that has already been used before, as it will contain various types of contaminants, impurities and oxides.
- When working with this liquid, you must behave very carefully and carefully, as it is very toxic. Never try to suck out brake fluid with your mouth. Store it only in a container, excluding general access to it. When working with it, you should always have clean rags on hand, since if it gets on the car body or other plastic parts, they may be damaged. If, however, chemical liquid gets on the above-mentioned parts, then in this case you need to rinse them with water and clean them with a rag.
- Do not allow brake fluid to come into contact with mineral oils. Even tiny traces of mineral oil can render brake fluid ineffective and lead to failure of the entire braking system. Gaskets and seals of the system can be damaged if they interact with products that contain mineral oils.
- Rags soaked in mineral oils are not used to clean system components. The liquid tends to absorb moisture from the environment and therefore should always be kept closed.
- The frequency of replacing brake fluid is once every 2-3 years, regardless of the mileage traveled. Or if the car has traveled approximately 50-60 thousand kilometers, then it should also be changed. It is recommended to replace the brake fluid after the cold season. The liquid is food that should not be thrown away or thrown away with everyday waste.
Procedure for replacing brake fluid
The principle of changing brake fluid and bleeding the brakes is quite simple.
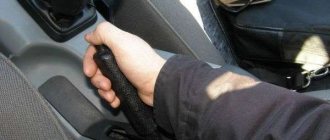
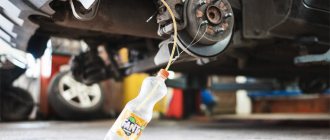
- First you need to remove some of the old fluid. To do this, a tube is pulled onto the drain fitting of the first wheel to drain the old fluid. The fitting itself unscrews about half a turn. The partner must then press the brake pedal.
- As soon as the pedal “falls” under the assistant’s foot, the worker under the machine needs to tighten the fitting.
- Now new brake fluid is poured into the expansion tank, the draining operation is repeated until clean “brake fluid” begins to drain into the container.
- Similar operations are performed sequentially depending on the circuit diagram with other wheels. After finishing work, put the dirt caps on the drain fittings.
Read more about the features of bleeding ABS brakes.
If the system becomes airy when replacing the fluid, the brake pedal will sink or start working in the second half of its stroke.
Bleeding the brakes
For this you will need an assistant. The procedure for bleeding the brakes is the same as when draining or filling brake fluid. Ask your assistant to smoothly and fully press and release the gas pedal 4 times, then press it again and not release without your command. After the assistant has pressed the pedal for the fifth time, unscrew the bleeder valve and observe whether liquid comes out with bubbles or not.
To do this, it is convenient to lower the hose 1-2 cm into the brake fluid poured into a transparent container. If after 5-7 times no air bubbles appear, proceed to the next wheel. Do not forget to add brake fluid after bleeding each wheel. If during the process of changing the fluid or bleeding the brakes, fluid gets on the brake pads, roll the car out of the pit, overpass or lift and wash the pads with a stream of water.
Removing air from the car's brake system
An assistant will again be needed to remove the air. Its main task will be to create pressure in the brake system by frequently pressing the pedal. To do this, make 5-6 presses on the pedal, after which it is held in the pressed position.
- When the worker under the machine receives a signal to hold the pedal, he must unscrew the fitting on which the hose is placed, lowered into the container for collecting the “brake fluid”. As soon as the pedal reaches the floor, tighten the fitting.
- The operations are repeated until air stops coming out of the wheel cylinder. In this case, the brake pedal will begin to operate earlier with greater resistance.
- The presence of air is checked at each wheel, and it is important to monitor the fluid level in the tank.
After replacing the fluid and removing air, it is necessary to securely tighten all the bleeder fittings, replace the wheels and carry out a test test on a “desert” road. If the braking process occurs with the slightest pressure on the pedal, then the fluid replacement has been completed successfully.
Withdrawal procedure
- Disconnect the electrical connector of the brake fluid level sensor.
- On vehicles with a manual transmission, remove the clamp securing the clutch hose to the master cylinder and move it to the side.
- Disconnect the clutch hose from the master cylinder.
- Carefully disconnect the tank by prying it with a screwdriver.
- Remove the tank. To do this, tilt it to the side and pull it up.
- Remove the reservoir connectors from the master cylinder body.
How to determine whether the fluid needs to be changed?
If the brake pedal sinks significantly when driving along mountain serpentines or after prolonged braking, this is a sign of a large amount of moisture in the system.
A tight brake pedal when braking in winter can also be a clear indicator. For example, if while driving on a highway at -15 degrees the pedal becomes tighter than usual, then you should plan to change the fluid.
Toyota brake fluid has excellent lubricating and cleaning properties, so over time you can observe cloudiness of the composition in the reservoir under the hood. If you buy a used car and find a cloudy substance in the tank, it is better to immediately replace the composition.
There are also special devices for measuring water content. Such devices are inexpensive and in appearance resemble a ballpoint pen, only with built-in LEDs or even a display. To check, you need to dip the device's spout into the tank, wait for the signal and see the amount of water in the system. If the percentage of moisture content is more than 3-4, then the fluid must be replaced immediately. Toyota brake fluid accumulates a large amount of water in just a couple of years.
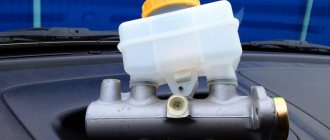
Where is the tank located?
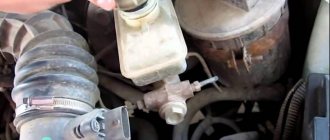
Toyota brake fluid has excellent cleaning properties and begins to darken as it wears out. You can visually see the condition of the composition in the expansion tank under the hood, which is located on the panel between the passenger compartment and the engine on the steering wheel side.
The reservoir, as a rule, has a bright yellow cap and is located on the brake master cylinder, which is a black round part screwed to the shield between the engine and the passenger compartment.
Installation procedure
- Lubricate the new bushings with clean brake fluid. Install the connecting sleeves into the master cylinder body.
- Install the reservoir onto the master cylinder.
- On vehicles with a manual transmission, install a clamp to secure the clutch hose to the master cylinder.
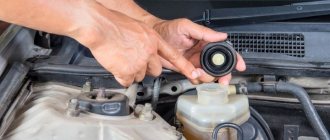
- Add brake fluid.
- Raise the vehicle and place it on the supports provided for this purpose.
- Bleed the brake system. See "Hydraulic Brake System"
or "How to Bleed Brakes"
.
Bleed the clutch master cylinder.
See "Clutch". - Lower the car.
- Connect the electrical connector of the sensor.
How much does it cost to replace it in a workshop?
Few car owners know how to replace Toyota brake fluid. And when they see the instructions, they completely refuse to carry out the work themselves.
In fact, the replacement procedure is very simple and only takes about an hour. The cost of one liter of brake fluid starts from 400 rubles. Toyota brake fluid will cost from 1,500 rubles.
In case of replacement at the station, you will have to pay additionally for the work. At an official dealer, such a procedure can cost from 4,000 rubles + materials, but at a car service center they will ask for from 1,500 rubles + materials. In case of self-replacement, you will only need a canister with new liquid, a syringe and hoses from the system from the pharmacy.
Which one to choose for Toyota?
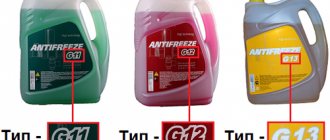
Currently, manufacturers produce several types of brake fluid:
- DOT3;
- DOT4;
- DOT5;
- DOT5.1.
Compositions numbered 3, 4, and 5.1 are mixed with each other if topping up is necessary. Their chemical composition is supplemented with polyglycols; the packaging should indicate Hydratic.
Solutions containing silicone (DOT5) are designated Silicone base and are strictly not mixed with other liquids. It is also worth understanding that silicone content can cause damage to rubber products if they are designed for DOT4, DOT5.1 or DOT3. The difference between the compositions is fluidity, viscosity, freezing and boiling points.
So what kind of brake fluid should I fill in a Toyota? It's actually simple. The required composition is always indicated in the operating instructions or on the reservoir under the hood. Most often - DOT4. This applies to the choice of products from third-party manufacturers; if you purchase the original composition from Toyota, the necessary liquid will be inside the jar.
Where to buy liquid?
You can purchase the original composition from Toyota from an official dealer. You should look for substitutes from the official representative of the brake fluid brand in your locality or contact well-known online stores. Purchasing from small stalls or garages can lead to replacement of brake system elements as a result of filling with counterfeit products.
When choosing a composition from a third-party manufacturer, it is better to give preference to:
- Bosch;
- TRW;
- Motul;
- Castrol;
- Ate;
- Liqui Moly.
All the manufacturers described above are responsible for the quality of their products and have proven themselves well in the market. Also on each package there is a protection by which you can identify a fake.