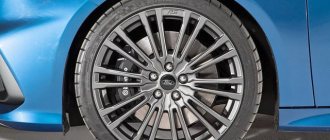
The suspension of the Ford Focus 2 is quite reliable, as evidenced by the technical characteristics of the Ford Focus 2. It has a long service life, but if you repair the Ford Focus 2 suspension, then some problems often arise. It is not easy to fix breakdowns yourself. In view of this, if you choose this model, you will have to immediately look for a good service station.
The average cost of major repairs to the front suspension of a Ford Focus 2 is 13 thousand rubles. Repairing the rear suspension of a Ford Focus 2 will cost 23 thousand rubles.
What is the reason for such a noticeable difference in price?
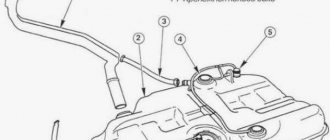
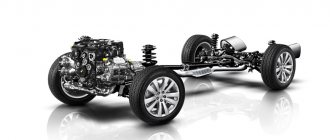
The thing is that the design of the front suspension of the Ford Focus 2 is quite common and simple. It consists of a shock-absorbing strut with a spring, a lever equipped with a ball end, a stabilizer link and a steering end. This is the well-known McPherson type. By the way, the Ford Focus 2 fuel filter is located not far there, just under the hood.
With the rear suspension of the Ford Focus 2, the situation is much more complicated. It is multi-link-spring (on each side there is 1 longitudinal and 3 transverse levers), independent. Among other things, the suspension is equipped with a stabilizer bar and telescopic shock absorbers.
Replacing the rear stabilizer link
If a knock appears in the rear suspension area, it is likely that the stabilizer links are worn out. Changing parts is quite simple; if there are no complications during removal, you can replace the stabilizer strut in half an hour or even faster.
It is convenient to perform the replacement on a pit or a lift; the wheel does not need to be removed to perform the operation. We carry out the work in the following order:
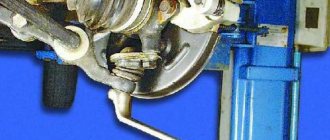
- unscrew the nut that secures the strut to the wishbone of the suspension; for this you will need a 15 mm spanner. To prevent the strut from turning along the axis when unscrewing the nut, hold it with a hexagon;
- then use the same keys to unscrew the upper nut that holds the strut to the wishbone;
- Having unscrewed the fasteners, remove the old part, install the new one, and at this point we can consider the work completed.
Everything was simple, but the old stand does not always turn away normally. The thread on the ball pin becomes clogged with dirt, and when you try to unscrew the nut, the hex wrench turns in the body of the pin. Before you start unwinding the connection, you must:
- clean the threads on the stabilizer link from dirt;
- spray WD40 on it;
- wait 15-20 minutes for the remaining dirt to “eat off”.
Only after this should you begin to unscrew the nuts. If, nevertheless, the ball pin rotates in the body, and the nut rotates with it, you will have to use a small grinder to cut off the worn stabilizer link.
What is the service life of suspension parts on a Ford Focus 2?
Front suspension Ford Focus 2
In the front suspension of the Ford Focus 2, the weakest link is considered to be the silent block at the lower arm. Even the service station will not replace it, since this requires specialized expensive equipment. All this means that if the silent block is damaged, you will have to change the lever. The suspension arms are designed for approximately 80-100 thousand km. mileage
Shock absorbers have the same service life. If there is a need to replace them, it is worth changing the support bearings at the same time.
The service life of stabilizer struts and steering tips is 110-130 thousand km. mileage
A wheel bearing lasts approximately 50-60 thousand km. It is changed along with the hub.
Rear suspension Ford Focus 2
The service life of silent blocks of the trailing arm is 80-110 thousand kilometers. To replace them, you will need to disassemble the suspension. This is why repairing the rear suspension of a Ford Focus 2 is more expensive.
However, silent blocks are the most fragile parts in the rear suspension. The remaining parts will last longer, shock absorbers - approximately 90-130 thousand km, stabilizer struts - 130-140 thousand km.
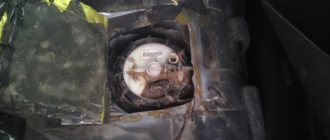
Replacing rear shock absorber Ford Focus 2
If oil stains appear in the area of the rear shock absorber rod, and the car begins to drive over bumps with the rear part of the body swaying, the shock absorber has failed and needs to be replaced. We carry out the work as follows:
- for convenience, remove the rear wheel;
- We place a support under the rear suspension (for example, an old unnecessary wheel rim), and lower the car a little on the jack - you need to make sure that the suspension spring is compressed somewhat;
- this is done so that when the shock absorber is removed, the spring does not straighten without load and shoot upward;
- unscrew the bottom bolt that holds the shock absorber, for this you will need a wrench with a 15mm head;
- from the body (inside the wheel arch) unscrew the two bolts securing the shock absorber support to the body; here you will need a 10 mm socket wrench or a socket with an extension and a wrench;
- We dismantle the part to be replaced, install a new shock absorber in place, and carry out the assembly.
How to determine the condition of the Ford Focus 2 suspension?
It is best to check on an overpass or pit, lifting each wheel in turn. It is recommended to carry out this action every 20 thousand km. mileage or after the car received a strong blow while driving through a deep hole.
First you need to start with the wheels
- unscrew it with your hands. The rotation of the wheel should be uniform, without any extraneous sounds or jamming.
- grab the wheel from below and from above, the upper part must be pulled towards you, and the lower part in the other direction. Repeat the procedure, but in reverse.
When you do this, there should be no knocking or play. In a situation where there is play, you should ask your partner to press the brake and check the play again.
Now there is no play? This indicates that the wheel bearing has failed. Is there any backlash left? This means the reason is in another suspension part. The next thing we check in this case is the ball joints.
Checking ball joints
Insert a strong screwdriver between the steering knuckle and the suspension arm and press it out. Is there any play? So it's time to change the support. If the cover is cracked, it must be replaced.
Silent blocks of levers of the rear and front suspension of Ford Focus 2
Move the arm eye using a screwdriver inserted between the subframe and it. If it moves easily enough, the silent block needs to be replaced.
The rubber bushing of the silent block should not bulge, and there should also be no cracks.
Ball joints at the anti-roll bar struts
Move them with your hand. The appearance of play indicates that it is time to replace the stabilizer struts.
Inspect the protective covers of the stabilizer ball struts. Covers must be elastic and free of rips and cracks.
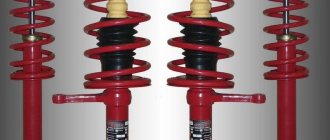
Telescopic front suspension struts, shock absorbers, rear suspension springs Ford Focus 2
If oil leaks from the shock absorber, it is faulty.
The telescopic stand requires replacement if the rubber element at the top support shrinks or breaks.
The springs must be intact. The shock absorber compression buffer, rubber bushings and cushions must be free of tears and cracks and without any deformation.
And then a video about repairing the Ford Focus 2 suspension:
You can also read on this topic:
Diesel BMW X3 with manual transmission is an excellent crossover for Russia
Used Opel Astra H on the secondary market, what to look for when buying
The Porsche Panamera Sport Turismo station wagon will arrive at the Geneva Motor Show
How reliable is the 2005-2010 Volkswagen Passat B6?
Which business sedans are more valuable on the secondary market?
Share on social networks
Alex S February 21, 2014
Published in: German cars, Russian cars
Tags: German cars, Advice for motorists
Repair and installation of suspension (shock absorbers/springs/struts/levers), part 3
== == == == == == == == == == == == == == == == == == == == == == == == == == == ==
== == == == == == == == == == == == == == == == == == == == == == == == == == == == rear suspension: arms, silent blocks, struts and stabilizer bushings == == == == == == == == == == == == == = = == == == == == == == == == == == == == == == == == == == == == == == == = = == == == == == == == == == == == == == == == == == Rear suspension diagram
== == == == == == == == == == == == == == == == == == == == == == == == == == == ==Spring loaded arms
:
“
bent (humpbacked)
” on the left: Ford 1 548 460 “
straight
” on the right: Ford 1 357 317, Ford 1 909 108 (sedan, hatch); Ford 1 357 319 (station wagon)
(source)
options: Meyle 716 050 0041 (straight, comes complete with camber bolts, has reinforcements in the place where the stabilizer struts are mounted, (source)) Sidem 3870 (straight) Mapco 59647 (straight) Monroe L16584 (straight) SH-31096 ( humpback
) (from Mazda-3, mazda drivers are happy source1, source2, photo report on purchase 70 thousand km normal flight)
Before ordering levers, it is best to bend down and look under the stern to see which ones actually exist (bent or straight), often catalog programs in stores provide information that does not correspond to the actual state of affairs!
The Focus-2 levers have a subtle, but still quite important feature - they have a hole for screwing in the stabilizer (the hole in the middle of the lever) reinforced with a welded overlay. None of the replacements issued by Existist have this overlay, therefore the applicability is indicated only for Focus-1. It’s possible to install it, but either weld on the reinforcement or monitor the appearance of cracks from this hole more often. Levers from both generations are “bent” and “straight”, depending on the type of stabilizer. They are not interchangeable without altering the stabilizer design. (source)
Camber bolts:
camber bolt - Ford 1 456 980 (in 12 they came with a nut and washer, now people buy and there is only one bolt) eccentric washer - Ford 1 456 979 nut - Ford 1 471 745
options: camber bolt - Mazda BP4K-28-66ZB eccentric washer - Mazda BP4K-28-473A nut - Mazda 9YB1-01-209
(Ford nuts and washers fit only on Ford bolts, Mazda nuts and washers fit only on Mazda bolts
, photo of the washers here)
spring side mounting bolt (M12 x 75MM) Ford 1 471 980 Ford 6 699 982 Ford 1 473 945
suspension travel limiter (bump stop on the lever) - Ford 1227616 lower spring spacer - Ford 1355153 upper spring spacer - Ford 1532650
silent blocks for spring-loaded lever
(rubber), (polyurethane)
== == == == == == == == == == == == == == == == == == == == == == == == == == == ==
Lower wishbones (bones)
:
the bones of sedans and barns are the same
Ford 1 061 668 Ford 1 105 524 (station wagon, for feng shui fans)
options: Ford 1 703 145 (from FF3) Mazda BBP3-28-500A (details) VOLVO-30666072 Lemforder 32007 01 TRW JTC 1290 Moog FD-TC-0952 Sidem 3574 (2 years and 45 tkm - normal flight! source) Amiwa 09 -11-217 Meyle 716 035 0005 Ruville 935264
Upper wishbones (sickles)
:
the sickles on sedans and barns are different, be careful!
Ford 1 517 403 (sedans, left): Ford 1 755 222 (from ff3) Ford 1 448 127; 1,752,565 (station wagon, right)
options: Lemforder 32008 01 TRW JTC 1446 Sidem 3478 Meyle 716 035 0006 Moog FD-TC-0951 Ruville 935276 Ruville 935258 (cast, source) Sidem 3479 (for station wagon)
Fasteners: Rear wishbone bolt M12 x 65MM - Ford 1471995 or SWAG 50 92 9451
silent blocks for bones and sickles
(rubber + polyurethane)
== == == == == == == == == == == == == == == == == == == == == == == == == == == ==
Lever kits
:
1. Meyle 716 050 0039/S , Meyle 716 050 0042/S for sedans and hatchbacks - Meyle 716 050 0039/S > opc.meyle.com
For station wagons - Meyle 716 050 0042/S > opc.meyle.com
The sickles are different.
In station wagons they are less curved so that they do not cling to the lower ones when the trunk is full . source
Meyle 716 050 0039/S - the spring-loaded levers have the same reinforcements in the form of welded plates
source1 source2 separately levers Meyle 716 050 0041 - can come without amplification or with this source (+ messages following)
Reviews on the quality of Meyle kits:
Repair and installation of suspension, shock absorbers, springs, struts (post #13839359) Repair and installation of suspension, shock absorbers, springs, struts (message #13812217) Repair and installation of suspension, shock absorbers, springs, struts (post #13274563) Repair and installation of suspension, shock absorbers, springs, struts (post #13263742) Repair and installation of suspension, shock absorbers, springs, struts (post #12367347) Repair and installation of suspension, shock absorbers, springs, struts (post #11460603)
100 thousand
mileage on the Meyle kit - Construction and repair rear suspension (P). (post #16775419)
x
2. Mapco 53612/1, Mapco 53613
Mapco 53612/1 - for sedan\hatchback, complete set with bolts
Mapco 53613 - for a station wagon, without bolts, but one and a half times cheaper and there is reinforcement for the stabilizer link on the spring-loaded arm.
Various links, reviews: Repair and installation of suspension (shock absorbers/springs/struts/levers), part 2 (message #16769938) Mapco arms have been running for the 3rd year Installation and repair of rear suspension (R). (message #15575760) shit, drove 30-35 tkm on flat roads and died Reviews of spare parts manufacturers (message #19015633)
x
3. Ruville 935264S
Ruville 935264S
there are no guarantees and no reviews (except those that you can google yourself) just for information
x
4. Ruville 935259S
Ruville 935259S (unlike 935264S, butterfly silencers are added source
x
Plus topic Reviews of spare parts manufacturers
== == == == == == == == == == == == == == == == == == == == == == == == == == == ==
Front rear trailing arm silent block
(aka eared, aka butterfly)
Ford 1 061 670 Ford 1 304 124
options: Volvo 30666821 Lemforder 29794 01 code update: 3683101 Moog FD-SB-0191 RBI D25MZ301 Masuma RU-472 Sidem 803900 Meyle 714 710 0001 Ruville 985217 Hutchinson 590180
fasteners: Bolt M12 X 30MM - Ford 1471994
== == == == == == == == == == == == == == == == == == == == == == == == == == == ==
Stabilizer's pole
:
L-shaped
(a spring-loaded lever is placed on the “curve”)
Ford 1 734 686
Ford 1 814 315 (from FF3, ATTENTION: the diameter of the lower fastener is M12, it is BIGGER than the “standard” and for installation you will have to drill the mounting holes in the stabilizer, details here and here, a little about the reliability of this “replacement” here)
options: Lemforder 32010 01 Moog FD-LS-3662 Sidem 3266 Meyle 716 060 0015 Ruville 916558
straight
(installed on a “straight” spring-loaded lever)
Ford 1 500 682 (set of 2 pieces) Ford 1 719 542 (from FF3, set of 2 pieces)
original strut, but loose: Ford 1852661 Stabilizer strut stud Ford 1424805 Stabilizer strut bushing Ford 1424901 Nut stabilizer's pole
options: MOOG FD-LS-10437 Hanse HS 400 017 (trash) Sidem 67160 (they say it’s rare rubbish, too) Vaico V25-0576 Metalcaucho 05293 (source, set of 2 pieces, they say it’s bullshit) Sasic 2306031 (source) Amiwa 09-11-753 TRACK SL70-170 Mitsubishi 4056A052 (from Mitsubishi Colt from the front stabilizer, they stand up like family here, the comrade has driven 100 thousand on them) Meyle 716 060 0010
== == == == == == == == == == == == == == == == == == == == == == == == == == == ==
Stabilizer bushings
:
Ford 1 345 913
options: Sidem 803906 Metalcaucho 05294 Sasic 2306085 Moog FD-SB-12667 Meyle 714 615 0017
== == == == == == == == == == == == == == == == == == == == == == == == == == == ==
== == == == == == == == == == == == == == == == == == == == == == == == == == == == Which manufacturer to choose
: in the topic “reviews of hidden text” a list of “good” and “not good” will open, the list will give a rough idea
== == == == == = = == == == == == == == == == == == == == == == == == == == == == == == == = = == == == == == == == == == == == == == == == == == == == == == == == == = =
Replacing the Focus trailing arm
A silent block is installed in the front part of the Ford Focus trailing arm, through which the arm is secured with two bolts to the body. The rear wheel hub assembly is secured to the rear of the lever with four screws. Replacement of the lever is required when it is deformed or the silent blocks are worn.
As with other levers, we carry out replacement work in a pit or overpass (lift) with removal of the spring and wheel. Plus you need to place a stop under the lower arm. Without an adjustable stop, removing the bolts from the silent block eyes will be problematic.
Remove the three wheel speed sensor wire holders from the trailing arm holes and disconnect the wire block from the wheel speed sensor.
Using a 10mm head, unscrew the self-tapping screw securing the stop of the parking brake cable sheath and remove the stop from the hole in the lever.
Disconnect the lower end of the shock absorber from the trailing arm, then disconnect the transverse suspension arms from the trailing arm.
We remove the hub assembly, then use a 15mm head to unscrew the two bolts securing the lever to the body and remove the trailing arm.
Install the new trailing arm in reverse order. An important point - we finally tighten the threaded connections in the “vehicle on wheels” position (under load), this will extend the life of Ford Focus silent blocks.
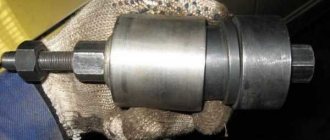
Preparing tools and accessories for replacement
Before changing the silent blocks of the rear levers on the Focus, you need to make sure that all the necessary tools and accessories are at hand. First of all, you will need either pullers with grips for pressing out silent blocks, or a press. It is not always possible to knock out the bushings with a sledgehammer, even if you have spacers of the required diameter. But spacers are still necessary. Here are their drawings and dimensions. This is a spacer for pressing out the silent blocks of the spring-loaded rear lever:
Replacing the lower front arm Focus
As in the case described above, we will need to remove the spring, remove the wheel and place an adjustable stop or a hydraulic jack under the lower arm at the junction of it with the trailing arm, and using the stop we raise the arms so that the rear suspension takes the “car on wheels” position. . Naturally, we do all this on a pit or overpass.
Then, using a 15mm wrench or socket, unscrew the bolt securing the lever to the trailing arm and remove the bolt. Similarly, unscrew the bolt securing the lever to the subframe and remove the bolt. Using a screwdriver, pry the ends of the lever out of the brackets and remove the lever. Photos for clarity are attached below.
Install the new lever in reverse order. In this case, it is worth considering one important point: the inscription “FRONT” on the lever should be directed towards the front of the car.