The stove on VAZ-2114 cars may not work for several reasons. Do not rush to blame the switch (faucet) for everything, since there are other possible culprits for problems. Once you are sure that the problem is with the switch, you can check and replace it. The work is not difficult, but painstaking. If desired and possible, do it yourself.
How to replace the VAZ-2114 heater switch
The stove on VAZ-2114 cars may not work for several reasons. Do not rush to blame the switch (faucet) for everything, since there are other possible culprits for problems. Once you are sure that the problem is with the switch, you can check and replace it. The work is not difficult, but painstaking. If desired and possible, do it yourself.
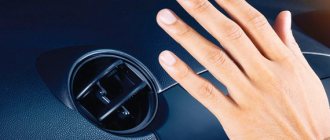
Fan in heating system
The fan plays a major role in the operation of the heating system of the machine.
Heater fan VAZ 2114
Any car is not protected from the release of their system, not only the fan, but also the heating system as a whole.
See:
To understand the question of why the fan does not work, you need to: start the car, switch the oven at speed 1, 2, 3 in order. If additional sounds appear, the fan simply does not work.
If the fan does not turn on during the first two speed modes, but starts working in the third, the problem lies in the operation of the additional resistor or in the switch itself.
Causes of stove problems
Switching to different positions does not give any result, which indicates a malfunction in the heating system. The heater may not respond for the following reasons.
- Fuse. Everything looks quite simple, because you need to replace the fuse with a new one. But its failure is associated with a short circuit in the system. If the cause of the short circuit is not found, the fuses will continue to burn. Therefore, before replacing a fuse, it is better to check the entire system. The required fuse is marked F7. If they burn out often, it is better to send the car to a good service to a competent electrician.
- Contact. If there is faulty wiring in the mounting block, this also leads to breakdown of the stove. Try moving the bundle of wires carefully. If at some point the heater started working, then you have found the reason. All that remains is to change the wire.
- Relay. The ignition relay often causes the stove to malfunction. In this case, you need to change the element located on the center console.
- The heater on the VAZ-2114 does not work in the second position of the heater or when the first mode is turned on. If the system does not work in these positions, it will take a long time for the interior to warm up. The fact is that the heating system on the VAZ-2114 is designed in a certain way. In the first and second positions, the electrical impulse passes through the resistor and goes to the fan. And the third position receives electricity directly. The resistor itself is located near the gas pedal. It cannot be repaired, so you need to immediately replace it with a new one.
Work order
Before starting work, you should generously anoint your hands with some cream (they will be easier to wash later, and cuts are possible in this process) and you can begin this labor-intensive process. So:
- Drain the coolant (if your coolant is sealed, then the cap of the expansion tank should be closed; after you wrap the hose into the engine instead of the plug, open the cap and the coolant will carefully flow into the container prepared in advance).
- Then you need to remove the glove compartment and side panels; in this case, you need to unscrew all the mounting screws that you see.
- Also, do not forget to unscrew the fastenings to the floor - there are two screws on the sides, on the left and right sides of the panel. Then we unscrew the mounting screws that secure the cables (on the left and right sides), these screws on the driver’s side also hold the radiator cap, there should be three of them.
- It is necessary to make sure again and check whether all the screws and bolts are loosened (do not forget to unscrew the two screws located closer to the passenger door and the one installed in the upper right corner of the panel, it is located near the buttons and is closed with a plug). Gently pull the panel towards you. We place some kind of block or maybe a plastic bottle into the gap formed between the panel and the frame on the passenger side.
Removing the side panel on a VAZ 2114
- We unscrew the two clamps from the radiator, do not forget to place some container under the pipes so as not to flood the interior with coolant. There is still a sufficient amount of coolant left in the system, so do not rush to remove the container. In order to completely drain the coolant, you can remove and put on the pipes. You can see this process in more detail in the photo.
So, we drained all the liquid, pulled off the clamps, the radiator comes out a little and rests against the bottom of the panel. In this case, one cannot cope, one needs to lift the panel, and the other at the same time pulls out the radiator, the same algorithm applies during assembly. So:
- We take a new heater radiator, and everything is assembled in the reverse order as the instructions show. You also need to understand that you should not save on the heater radiator, and buy the model whose price will make you laugh; believe me, it will not last long and this complex procedure will have to be repeated again. It’s better to buy a high-quality heater radiator once and not have any problems with it for many years.
The most difficult thing in this matter is to remove the radiator, and after that you can blow it with compressed air to clean, solder, or even change it. Also, during the installation process, pay attention to the pipes; if they need to be replaced, do it immediately, while everything is open and accessible.
Replacing the heater fan on a VAZ 2114
Replacing the electric heater motor on a VAZ 2114
If the heater fan on your car does not work, then this is a disaster, regardless of the time of year. Car windows fog up even from the breath of the driver, and especially from the breath of passengers who celebrated something. As a rule, opaque glass is an immediate threat to safety; in short, it is necessary to replace the heater fan on a VAZ 2114 car or replace the heater electric motor on a VAZ 2114; in any case, both operations are carried out in the same way.
Checking the switch (faucet)
If the stove switch does not respond during the work carried out, then the problem is in the faucet. Replacement is not always necessary. Before changing the device, you should check its functionality:
- remove the center console;
- prepare a lamp and a couple of wires;
- turn on the car engine;
- short the minus to ground;
- plus is closed to a three-phase resistor;
- if the lamp lights up with such contact, then everything is fine with the switch;
- if the lamp does not light, then the reason is an open circuit or a blown fuse.
Important! Another possible cause of a switch malfunction is a broken motor. Check its condition and replace if necessary.
Video: how to install LED strips to illuminate the stove in a VAZ 2114
Of course, the stove in the car’s interior will perform its functions properly even when the lighting is off. However, this brings obvious discomfort for the driver and passengers in the dark. After all, this device not only regulates the degree of air heating, but directs its flows in different directions. The lack of backlight makes it noticeably difficult to control this device, while repairing it is not overly difficult.
It stopped turning on, installed a new oven motor and a new resistor, it didn’t help. This rubbish has not been turned on and remains silent. And now it’s not May - it’s cold!
Thanks for the responses
Oha, it also stopped starting. I'll go charge the battery. maybe because of him. I stood in the cold for a long time
It stopped turning on, installed a new oven motor and a new resistor, it didn’t help. This rubbish has not been turned on and remains silent. And now it’s not May - it’s cold!
Thanks for the responses
that is, the radiator is hot, but the fan itself does not spin?
Do you have any tolmut for the car?
Of course, you need to start with the fuse, now I’m looking for a circuit in Tolmut and can’t find anything.
Last edited by Creptolizer; 12/20/2012 at 00:15.
Oha, change the engine. I tried to get it out for an hour, then split it into two parts and somehow pulled it out. The new one was also stuck in with perversions and the wires were connected. Silent. Here I took the new heater knob. I'll try to install it tomorrow. I thought the fuses were OK (
Don’t be fussy, I’m just thinking, I’m looking for information now.
I already poured out all my evil on the constructs when I took out the motor)
I already poured out all my evil on the constructs when I took out the motor)
Well, I dug up something, cut it off, and here’s the diagram -
Instructions for replacing the switch
It cannot be said that replacing switches installed on VAZ-2114 stoves is a difficult task. The procedure is painstaking and in many ways inconvenient.
Important! Experienced craftsmen advise making the repair a little more complicated, but making the work comfortable and convenient. To do this, you need to remove the dashboard and completely drain the coolant. This will allow you to change the faucet and old coolant in one go.
But it is not necessary to remove and drain. Use your own discretion.
To work you will need:
- wrench 10;
- rags or old rags;
- cooling liquid;
- worm clamp (its diameter will be 15–23 mm);
- screwdriver (phillips);
- capacity of at least 5 liters;
- new switch (faucet).
When everything is prepared, you can begin work. The replacement will take you several hours, but will save a decent amount on the services of specialists from a service station.
- Replacement begins with removing the entire center panel or just the side wall. It is located on the front passenger side. Shoot what is most convenient for you.
- Throw rags and rags at the feet of the passenger seat that absorb moisture well. Place rags under the faucet to prevent spilled coolant from leaving marks on the floor. It is also better to remove the rugs immediately.
- Lift the hood, remove the heater hose clamps (outlet and inlet). The pipes are removed from the faucet. Drain all coolant from the system into a prepared empty container.
- Return to the interior of the VAZ-2114 car. Use a Phillips screwdriver to unscrew the clamps that hold the heater pipes to the faucet. Disconnect them. Place the container there, because the liquid will flow from there. Drain all coolant.
- Using pliers, you need to remove the bracket from the faucet lever rod. It is removed through the hole in the lever.
- We need to go back to the engine compartment. There, using a 10mm wrench, remove a couple of fastenings of the heater faucet to the shield.
- Run to the salon, where you can completely remove the switch (faucet).
Reassembly
Once the old switch is removed, you need to begin reassembling the entire assembly. This stage is no less important.
- Make sure that the new faucet (switch) is in good condition and has no defects or damage. Buy a quality item right away so you don’t have to do the same work again later.
- Replace the switch. From the engine compartment side, the faucet is fixed with a pair of nuts. It will be better if you lubricate them with anti-corrosion lubricant before installing the nuts. They will last longer.
- Open the tap completely, coming from the interior side, and then tighten the bracket.
- Already from the engine side, and then from the passenger compartment, put on the pipes and secure them properly. Make sure the fastening is secure.
- If you decided to drain the coolant during the dismantling stage, you can now refill it. Or immediately change all the antifreeze for prevention. If only part of the liquid comes out, then you need to unscrew the pipe on the throttle assembly and add the missing amount of coolant.
- Return the pipe to its place, start the engine and warm it up well. Tighten all clamps after heating, then turn on the stove.
Important! After replacement, air may accumulate inside the heater radiator. This is indicated by cold air coming out of the heater after replacing the switch. Remove the air and the repair is complete.
All you have to do is return the panel to its place and check the operation as you go. If everything is done correctly and other potential causes of stove failure are eliminated, then the heating equipment will begin to supply hot air as before.
Do you think the heating system of the VAZ-2114 is really that bad or does it all depend on the specific car? Share your impressions, leave comments and ask your questions. We will be happy to answer them.
When is replacement needed?
In what cases is it generally necessary to replace the heater radiator in a VAZ 2114 car:
Very often, replacing a VAZ 2114 heater is accompanied by endless swearing and a lot of wasted time for the owners of this car. It is not difficult to change the stove radiator with your own hands, but getting to it is quite difficult. So, what you need to stock up on:
- Knowledge (for interest, at least read the Murzilka)
- A set of all kinds of screwdrivers, preferably short ones
- You can study such material as replacing the heater stove VAZ 2114 video
- And the most important thing is to have patience, which you will need in immeasurable quantities in this matter.
Replacing the stove light
Most often, car enthusiasts perform just such a replacement, since the backlight of the VAZ 2114 stove control in its original form is quite dim and often breaks.
In order to change it to a new one, you will need:
- screwdriver;
- pliers;
- knife;
- new LEDs that will be installed to replace light bulbs.
The entire replacement is done very simply and in just a couple of steps, for this you need:
- Disconnect the terminals from the battery.
- Disassemble the torpedo at the location of the regulator.
- Remove the old lamps (one of them is located directly on the regulator, and the second is on the air flow adjustment levers). This should be done extremely carefully, since the lamps are fragile.
- Install new LED lamps.
- Perform a performance check (this should be done with the torpedo disassembled).
- If the circuit is in good condition and the lamps are on, then reassemble.
- Connect the terminals to the battery.
LED bulbs should be installed in accordance with their polarity. If you are not exactly sure which of the wires going to the socket is “positive” and which is “negative”, then you can carry out a quick check using a multimeter. When measuring DC voltage in accordance with the color of the probes (red for positive, black for negative), the screen will simply show voltage (12 v). Otherwise (if the red probe is applied to the minus, and the black one to the plus), the voltage on the screen will be shown with a “minus” icon (-12 v).
Replacing the fan motor
In order to perform the operation of replacing the stove fan, you will need to prepare the following tools:
- Phillips screwdriver;
- a set of keys;
- pliers.
The replacement of the VAZ 2114 stove fan itself should be carried out in the following order:
- Disconnect the ground (negative) terminal from the battery.
Disconnect the power wires
- Unscrew the fasteners of the plastic protective lining located in the engine compartment.
- Remove the plastic cover itself.
- Remove the hood seal.
- Remove the protective casing of the heater motor.
Removing the protective casingUnscrew a pair of mounting bolts securing the motor from the sides.
Unscrew the fan mounting screws
- Find the “positive” plug of the device in the cabin under the panel and pull it out of the socket.
- Find the ground wire of the motor under the panel, secured with a nut.
- Unscrew the nut securing the negative wire.
- Rotate the motor to an angle that allows you to remove it.
- Dismantle the device.
We dismantle the VAZ 2114 stove motor
Reassembly is performed in exactly the same order, but in reverse order.
Manufacturing of LED backlight
Sometimes simply replacing the VAZ 2114 stove light bulb seems like an insufficient measure to motorists, and they resort to completely redoing the lighting using an LED strip. For such tuning, you will need to purchase a 10-centimeter piece of white LED strip and 2 pieces of blue and red tape, 5 cm each (many electrical stores agree to sell even this length. Otherwise, you will have to buy a longer piece and cut a piece from it).
The tools for installing the LED strip will be the same as in the previous case. You will also need a soldering iron, electrical tape (or heat-shrink tubing) and a PCB plate.
The lighting of the VAZ 2114 stove with an LED strip is mounted in the following order:
- disconnect the on-board network from the battery;
- remove the stove scale compartment cover;
- take ready-made pieces of LED strip or cut existing ones to length;
- take a textolite plate and cut it to the size of the internal cavity of the stove scale;
- Paste pieces of tape onto the plate in the following order: white on top, blue on bottom and red next to it. It should be glued so that the tapes are placed almost right next to each other;
- attach the plate with the tapes located on it to the inside of the torpedo using self-tapping screws;
- solder the wires of the “native” backlight to the contacts on the tapes. When doing this, be sure to observe polarity (how to check it was discussed above);
- insulate solder joints using heat shrink or electrical tape;
- apply a filter film to the back of the scale (many car enthusiasts recommend using Oracal8300-073). It will help make the light softer and less blinding to the eyes. If one layer does not seem enough after a trial run, you can stick a second layer;
- put the cover back in place;
- connect the battery.
If, after turning it on, it seems to you that the light is pleasant to the eye, but you want a little more contrast, you can unscrew the plate with ribbons and mount it again, but not directly to the body, but through small bushings that will help bring the LEDs closer to the scale.
Lighting made in this way will not only make the VAZ 2114 stove regulator more visible, but will also noticeably transform the interior appearance of the cabin.
Experience of car enthusiasts
I finally decided to change the light bulbs in the heater lights, which were not working for me when I bought the car. Before this, I scoured the Internet and found out that there are two ways to replace these light bulbs. The first way is to disassemble the entire torpedo, etc. and so on. The second way is to get to them through the dial of the stove controls. I used the second method. Tools: Phillips screwdriver, small pliers, flashlight for illuminating the lamp replacement process. First, the red and blue socket is removed, the rods under this socket are pushed apart with a screwdriver, and the old light bulb is carefully pulled out with pliers. Then he goes across the road to the nearest auto store, shows the salesman the old light bulb, and buys the same new one. A new light bulb is inserted using the same method. All! The backlight works! Whoever needs it, use this method, everything works. The main thing is that your hands do not shake and do not drop the lamp with tweezers or pliers))))
If, after turning it on, it seems to you that the light is pleasant to the eye, but you want a little more contrast, you can unscrew the plate with the ribbons and mount it again, but not directly to the body, but through small bushings that will help bring the LEDs closer to the scale. As a result, the lighting will become less diffuse.
In order not to remove the entire dashboard, you can limit yourself to removing only the translucent scale on the stove. The method is rough, but effective. To do this, use a thin and wide screwdriver to pry the scale on the right (you can’t do it on the left because of the protrusions there!) and at the same time pull the middle of the scale toward you with your fingers so that it bends slightly in an arc. After this, the light bulb will be visible behind the plastic guides, which must be moved apart. Then, using tweezers with non-slip ends, remove the light bulb from the socket and replace it with a new one. When returning the scale to its place, you need to insert it from left to right, again slightly bending it in an arc.
Heater cables VAZ 2114
Winter has come and you, anticipating a comfortable and warm ride in your car, start its engine and wait for it to warm up. And now, the moment to turn on the stove has come! You redirect the airflow towards you, and what happens? Absolutely nothing! It's all because of the VAZ 2114 stove cables.
The side and central deflectors give out a portion of barely warm air, and blowing the glass does not melt the ice as quickly as we would like. Many car owners put up with such injustice, the quirks of the domestic automobile industry. But you and I are not one of them and are going to radically move the situation forward!
VAZ 2114: what to do when the stove heats up but doesn’t shine
Usually, a heating device, if it is not a fireplace, requires high-quality heat release, and not pleasing the eye with lighting delights. But for a car heater, the backlight is not much less important than the heat it emits. Its front part, together with the switch, being a component of the car’s dashboard, should facilitate clear orientation of the driver and be accessible to his gaze at any time of the day, especially in the evening or at night. That is, the lighting of the stove carries a purely functional load, which, however, does not in the least prevent it from being beautiful. This is exactly what many drivers are striving for today, replacing standard backlight bulbs with LED strips.
The principle of operation of the heater cables on the VAZ 2114
The operation of a car's heating system is to transfer and redirect the heat that is released as a result of engine operation. Heat is removed by the cooling system and supplied, among other things, to the heater radiator. Then, when the switch is turned on (turned on), the heating system starts a motor that blows out hot air and passes it through the car panel deflectors. Air redirection to a particular area is carried out directly by the driver by switching the airflow positions.
When clicked, the picture enlarges
Most cases of stove malfunctions are associated with just one reason and this is the VAZ 2114 stove cable. The fact is that over time the tension of the cable weakens. This occurs as a result of its constant tension, weakening when moving the lever for adjusting the heating mode (cold and hot). There are also cases when the cable completely flies off the stove tap. As a result, the stove valve does not open completely, thereby you do not receive significant portions of hot air from the heating system.
What to do? To change or not to change? Here are the most common questions from car enthusiasts. Let's answer this: before replacing anything, you should find the cause of the malfunction and try to eliminate it.
How does it work
The principle of operation of the system is quite simple. It is based on the transfer of heat from a liquid. So, the heater radiator is connected to the main terminals of the engine cooling system. Inside the heat exchanger there is antifreeze or antifreeze. So, when the engine heats up, hot liquid flows in a “large” circle to the heater radiator. When the ACS (control unit) is turned on, the heater motor is activated. Warm air begins to move through the nozzles. The direction can be different - on the windshield, side, in the center of the cabin. One or more deflectors are activated, depending on the position of the stove lever.
That is, heat exchange occurs - hot antifreeze is cooled not only in the main radiator (which stands in front of the engine and is shown in the photo below), but also in the heat exchanger of the heating system.
Of course, the engine temperature drops significantly. Therefore, in severe frosts, motorists close the honeycomb cavity of the main radiator so that the engine is not very cold. The most optimal operating mode is 80-90 degrees Celsius. When you turn on the stove, this figure immediately drops by 10-15 percent. However, let’s not dwell on the principle of operation and consider the main malfunctions of the VAZ-2114 heating system.
Diagnostics of the operation of the VAZ 2114 stove cables
In order to inspect the valve cable of the VAZ 2114 stove, you need to dismantle the side panel trim on the driver's side (to the right of the gas pedal). Further details:
- Start and warm up the car engine thoroughly.
- Unscrew the three side trim mounting bolts.
- Turn your gaze towards the heater valve.
- Check to see if the cable has come loose from the faucet.
- Move the heater lever on the instrument panel to maximum heating mode.
- Pull the cable towards you and hold it in this position
- Check if hot air is coming from the deflectors.
Now that the source of the problem has been identified. It is required to fix, give constant tension and thereby ensure good operation and correct throughput.
One of the options for increasing the tension is a method in which a part (0.5-1 centimeter) of the cable is bent at the point of direct connection to the heater lever. To do this you will need:
- Remove the second trim, only from the passenger seat side.
- Take pliers and pull the cable towards you (at this moment, the temperature switch should be at maximum heating mode).
- Bend the additional amount of cable formed (its amount is selected experimentally, and in each specific case it differs and, as a rule, amounts to 0.5 centimeters).
- We hook it up to the temperature switch of the stove.
Attention! To avoid damage, perform all tension-related actions carefully and do not use excessive force. If you overdo it with tension, you can damage the system and the functionality of the heating system.
Diagnosis of heating system faults
Heating system malfunctions are accompanied by the following symptoms:
- the fan does not work;
- cold air enters the cabin;
- the damper does not work;
- there is a coolant leak;
- the stove begins to make uncharacteristic sounds (whistles, hums, gurgles);
- Steam or smoke appears from the heater ducts.
Why the stove does not work or does not heat the air
If the stove fails, it either does not work at all, or it works but does not heat the air. In the first case, first check the fan wiring, starting with fuse F7. If the fuse is blown, replace it. Then they check the relay, which may not turn on the first time or only when the engine is warm. In this case, the relay is replaced with a new one.
Then the serviceability of the electric motor is assessed. To do this, power is directly supplied to its contacts from the battery. If the electric motor starts to operate at maximum speed, then it is in good condition. Otherwise, it will need to be repaired or replaced.
The intensity of the air flow is adjusted using a resistor having two spirals with resistances of 0.82 Ohm and 0.23 Ohm. In the first mode, the current flows through both spirals, in the second - only through a spiral with a resistance of 0.23 Ohms, in the third - bypassing the spirals, that is, without resistance at all. If the resistor is faulty, the fan will only operate in the third mode at maximum speed (handle in the extreme right position). The problem is solved by replacing the resistor, which is located on the driver's side above the accelerator pedal.
If the resistor is faulty, the heater fan will only be able to operate at maximum speed.
If cold air enters the cabin, this may be due to:
- Airlock. It could have formed when replacing the coolant, when the system was depressurized, or because there was insufficient amount of coolant in the system. To remove the plug, remove the heater radiator pipe, use a watering can to add antifreeze to the maximum and put the hose back in place. After starting the engine, coolant under pressure will displace the remaining air from the system.
- Stove tap jammed. This happens if the tap was not initially opened all the way, and during operation, oxide and scale formed on the inner surface, preventing the normal circulation of the liquid. You can try to open the tap using pliers or immediately replace it with a new one.
- The stove radiator is clogged. When using low-quality coolant, the radiator honeycombs may become clogged. The problem is solved by flushing or replacing the heat exchanger. The feasibility of washing is determined by the scale of contamination.
- Installation of a low-quality radiator. In a defective product, the honeycomb may be incorrectly soldered. The radiator should be replaced.
- Low pressure in the cooling system. If heat transfer increases at higher speeds, the pump needs to be replaced.
- Low coolant level. It is necessary to check the level and add antifreeze if necessary.
- Damage to the heater fan impeller. The impeller is carefully inspected and replaced if mechanical damage is detected.
- Cabin filter dirty. If it is heavily polluted, the power of the electric motor will not be enough to pump warm air into the cabin. The filter is replaced with a new one.
- Damage to the cylinder head gasket. If the cylinder head gasket is blown, white smoke will come out of the exhaust pipe. The problem is solved by replacing the gasket and dismantling the cylinder head.
Heater dampers don't work
The distribution of air flows throughout the cabin is carried out by dampers, which, in turn, are controlled using cables. When these cables fail, problems arise with directing the air flow to the windshield or to the foot area. In addition, the damper that blocks the flow of air from the street begins to work incorrectly. In this case, adjustment of the damper drives is required.
Such situations can arise even on a new car. Slightly warm air begins to flow from the lower, upper and side deflectors, and hot air begins to flow from the center console. This is due to the poor build quality. There are gaps between the joints of the air ducts and the dampers, which leads to warm air entering only from the center console and heating the panel from the inside.
The drive cable is always taut. Therefore, over time it bends, breaks off or stretches. In this case, it is necessary to adjust the damper drive, which is performed in the following order:
- In the stove, we look for a bracket with which the cable sheath is held on the heater body.
- A galvanized metal lever located on the left side is pulled back. This position corresponds to the maximum opening of the damper.
- The length of the cable is tightened and adjusted. The long lever on the lever block in the extreme right position should open the damper completely.
- After adjustment, the cable is securely fixed.
Video: stove repair using the example of a VAZ 2114
Why is antifreeze leaking from the stove?
A coolant leak in the heating system can occur from:
- stove radiator;
- stove tap;
- stove pipes.
If a coolant leak occurs from the radiator, it is usually replaced with a new one. Repairs to restore tightness are usually complex and labor-intensive. In addition, if the radiator has been in use for a long time, its tubes become clogged with deposits and dirt, and, as a result, heat transfer decreases.
The valve opens and closes the coolant supply to the radiator, thereby regulating the heat in the cabin. Over time, it may begin to leak, as evidenced by the characteristic smell of antifreeze in the cabin, a puddle on the floor on the passenger side and a decrease in the coolant level in the expansion tank. The faucet cannot be repaired and in such cases is replaced entirely.
Replacing heater cables on a VAZ 2114
Sometimes situations occur when, for one reason or another, the product becomes bent or even breaks off. Such cases require removing the device and replacing it with a new one. Recommendations for analysis are as follows:
- The metal clips that hold the cable in place must be disconnected.
- One end of the cable is connected to the tap, the other side to the lever for adjusting the air temperature in the cabin. Any sequence of disconnection can be followed. But it will be most convenient to first disconnect the end from the stove tap, unfasten all the clips and, last of all, disconnect it from the lever.
- Now the product should be carefully removed from the case.
- When reinstalling the new part, start by attaching it to the tap.
There are a lot of different models on the auto goods market that differ in length, thickness, various types, and shapes of both ends. In order not to make a mistake when purchasing a new product, we advise you to take it with you to the store. Usually cables are sold in one set of several pieces at once.
So we learned how to change the heater cables on a VAZ 2114. The most important thing when carrying out work is not to rush, to understand the principle of operation of the hot and cold air supply mechanism. We wish you warm heaters!)
Unable to adjust temperature
Often, owners of domestic cars (including VAZ-2114) are faced with the impossibility of setting the air temperature on the control unit. The stove blows equally hot or cold, regardless of the position of the main lever of the automatic control system (in the photo below - located at class=”aligncenter” width=”700″ height=”452″[/img]In this case, experts note a malfunction of the dampers or malfunctions in the operation of the control unit itself. The temperature sensor is also diagnosed. It is located next to the light control lamp on the ceiling. Rotate the position of the lever several times. The air heating should change tactilely. If the temperature changes only when the sensor is in the extreme position, the element must be replaced.
Heater cables VAZ 2114
Winter has come and you, anticipating a comfortable and warm ride in your car, start its engine and wait for it to warm up. And now, the moment to turn on the stove has come! You redirect the airflow towards you, and what happens? Absolutely nothing! It's all because of the VAZ 2114 stove cables.
The side and central deflectors give out a portion of barely warm air, and blowing the glass does not melt the ice as quickly as we would like. Many car owners put up with such injustice, the quirks of the domestic automobile industry. But you and I are not one of them and are going to radically move the situation forward!
Which motor to choose
When choosing a replacement device, it is recommended to purchase domestically produced fan motors, which are originals produced at AvtoVAZ. Their number is indicated in the catalog as 2108-8101078. They are quite universal and are installed on VAZ models 8 to 9 and 13 to 15, making them easy to find for sale in any car store.
Among the available, but at the same time proven, analogues, it should be noted such as: Fenox HM 81002 made in Belarus and Master-sport 2108-8101078-PCS-MS, made in Germany. Both of these motors have approximately the same cost (around 1,500 rubles) and are of equally high quality.
If there is a desire (or need, for example, due to a damaged air duct) to purchase and install the entire fan assembly, then preference should be given to the Pekar 2108-8101091 and Luzar 2108-8101091 models. They combine high quality workmanship and budget cost.
Thus, replacing the motor or even the entire fan with your own hands is not difficult. The most important thing is to take your time and first check all possible causes of the malfunction, and only then proceed with replacement.
The principle of operation of the heater cables on the VAZ 2114
The operation of a car's heating system is to transfer and redirect the heat that is released as a result of engine operation. Heat is removed by the cooling system and supplied, among other things, to the heater radiator. Then, when the switch is turned on (turned on), the heating system starts a motor that blows out hot air and passes it through the car panel deflectors. Air redirection to a particular area is carried out directly by the driver by switching the airflow positions.
When clicked, the picture enlarges
Most cases of stove malfunctions are associated with just one reason and this is the VAZ 2114 stove cable. The fact is that over time the tension of the cable weakens. This occurs as a result of its constant tension, weakening when moving the lever for adjusting the heating mode (cold and hot). There are also cases when the cable completely flies off the stove tap. As a result, the stove valve does not open completely, thereby you do not receive significant portions of hot air from the heating system.
What to do? To change or not to change? Here are the most common questions from car enthusiasts. Let's answer this: before replacing anything, you should find the cause of the malfunction and try to eliminate it.
Characteristics and device
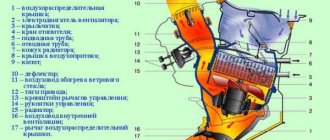
The main purpose of this system is to maintain optimal temperature in the cabin during the winter season. In addition to comfort, the stove is needed to prevent the windows, especially the windshield, from sweating. To prevent condensation from forming on it, special nozzles are provided at the top of the panel. However, first things first. Below is a diagram of the interior heating system:
It is the same for all models of the Lada Samara family, including the VAZ-2114. So, the system structure includes the following elements (circuit decoding):
- Water deflector shield.
- Windshield heating nozzle assembled with air ducts.
- Side nozzle designed for heating and ventilation of the interior.
- Central deflector.
- The heater is assembled with an electric motor.
- Interior ventilation nozzle.
- Stove tap seal.
- Rear heater pipe of VAZ-2114.
- Stove supply pipe.
Where is the heating system located? The VAZ-2114 (including the injector) is equipped with it in the cabin. The stove is located in the front panel, which is also called the “torpedo”. Depending on the modification, the heating and ventilation system of the VAZ-2114 is interconnected with an air conditioner and evaporator, or goes without it.
The design also includes the stove faucet and the heat exchanger itself. The latter works together with a gearmotor.
Diagnostics of the operation of the VAZ 2114 stove cables
In order to inspect the valve cable of the VAZ 2114 stove, you need to dismantle the side panel trim on the driver's side (to the right of the gas pedal). Further details:
- Start and warm up the car engine thoroughly.
- Unscrew the three side trim mounting bolts.
- Turn your gaze towards the heater valve.
- Check to see if the cable has come loose from the faucet.
- Move the heater lever on the instrument panel to maximum heating mode.
- Pull the cable towards you and hold it in this position
- Check if hot air is coming from the deflectors.
Now that the source of the problem has been identified. It is required to fix, give constant tension and thereby ensure good operation and correct throughput.
One of the options for increasing the tension is a method in which a part (0.5-1 centimeter) of the cable is bent at the point of direct connection to the heater lever. To do this you will need:
- Remove the second trim, only from the passenger seat side.
- Take pliers and pull the cable towards you (at this moment, the temperature switch should be at maximum heating mode).
- Bend the additional amount of cable formed (its amount is selected experimentally, and in each specific case it differs and, as a rule, amounts to 0.5 centimeters).
- We hook it up to the temperature switch of the stove.
Attention! To avoid damage, perform all tension-related actions carefully and do not use excessive force. If you overdo it with tension, you can damage the system and the functionality of the heating system.
The heater blows poorly into the legs and side windows
The heating system of the VAZ-2114 is not reliable. Over time, the stove stops heating the legs and side windows normally. Moreover, the problem is not in the temperature of the air (on the contrary, it can be hot), but in the strength of the flow with which it comes from the nozzles. In this case, you will have to modify the air flow channels. To do this, remove the front panel so that there is access to the nozzles.
Next, a new corrugated hose is installed (just plastic tubes come from the factory). Additionally, we treat the joints with the heat-insulating material “Spleen”. All cracks between the top and bottom of the panel are also covered with it. Next, you should modify the stove damper, which directs the flow to the desired area. Often it does not fit well against the body. Because of this, a large percentage of hot air is simply lost in the panel and “walks” in the cracks. So, we remove the damper and remove the old yellow factory seal. We seal all the cracks with modelin. Instead of a sponge, we glue “Bitoplast”. It is advisable to apply it in several layers.
Replacing heater cables on a VAZ 2114
Sometimes situations occur when, for one reason or another, the product becomes bent or even breaks off. Such cases require removing the device and replacing it with a new one. Recommendations for analysis are as follows:
- The metal clips that hold the cable in place must be disconnected.
- One end of the cable is connected to the tap, the other side to the lever for adjusting the air temperature in the cabin. Any sequence of disconnection can be followed. But it will be most convenient to first disconnect the end from the stove tap, unfasten all the clips and, last of all, disconnect it from the lever.
- Now the product should be carefully removed from the case.
- When reinstalling the new part, start by attaching it to the tap.
There are a lot of different models on the auto goods market that differ in length, thickness, various types, and shapes of both ends. In order not to make a mistake when purchasing a new product, we advise you to take it with you to the store. Usually cables are sold in one set of several pieces at once.
So we learned how to change the heater cables on a VAZ 2114. The most important thing when carrying out work is not to rush, to understand the principle of operation of the hot and cold air supply mechanism. We wish you warm heaters!)
Minor troubles
And the last trouble that a car owner may encounter is the incorrect supply of air masses to the cabin. Fortunately, adjusting and repairing dampers is a simple procedure! You need to take pliers and bend the cable at the flap under the driver's steering wheel. Then the damper will tightly close the air duct again and the problem is solved.
Let's try to figure out why the heater fan on the VAZ 2114, 13, 15 may not work.
To understand that your heater fan is not working, you just need to try turning on the heater at different speeds with the car running. If the fan starts working, you will immediately hear a noise. By the way, if the fan operates at one speed, then the problem is in an additional resistor or in the stove mode switch.
Stove fan device
If the VAZ-2115 has stopped heating the interior, first let’s figure out how the stove’s operating system works. The structure is simple: the temperature of the air supplied to the cabin is regulated by the heater tap, when opened, coolant (antifreeze) enters the heater radiator, warming up to 95 degrees. By adjusting the fan operating modes from minimum to maximum, you change the speed of the stove, determining the required amount of incoming heat. All that remains is to direct the air flow in the desired direction using the dampers located along the perimeter of the panel of your car.
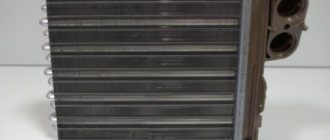
Choosing a new heater radiator
New cars of the VAZ family are equipped with heat exchangers from the Dimitrovgrad Automotive Component Plant. Their production uses technology from the French company VALEO (SOFICA).
The original heater radiator produced by DAAZ has small honeycombs
When purchasing a new radiator, the first things to consider are:
DAAZ radiators differ from their analogues in their tiny honeycombs, in which the transverse plates are located at a very small distance from each other. Due to this, the air remains in contact with the core for a long time and heats up more. The high rigidity of the plates does not allow them to deform under light impacts.
Possible reasons
What could have happened? There are several most common options:
- The fuse has failed. In our case it is F7 (30A). The problem is simple and at the same time complex - replacing the fuse is easy, but the reason it blows is that there is a short circuit somewhere in the circuit. In this case, it is better to check the entire safety circuit to avoid recurrence of the problem in the future.
- Ignition relay malfunction. This applies to cases where the fan turns on immediately after the engine has warmed up. There is only one way out - replacing the relay itself, located under the dashboard in the center console.
- Poor contact inside the mounting block. An inevitable problem is a consequence of the operation of the car. The problem can be solved quite simply - just go through the block with wires in the mounting block and, if necessary, replace the oxidized elements.
- The heater switch does not work. To check the serviceability of the switch itself, a regular 12-volt light bulb with two wires is enough. You need to remove the central instrument console, turn on the ignition, connect one wire (“minus”) to body ground, and the second to an additional resistor. If the switch is working properly, the light should light up. Otherwise, connect the lamp to the positive wire on the position switch. If in this case the light does not light, then you need to look for an open circuit or replace the faulty fuse.
- The heater fan motor has failed. If, after checking and eliminating all the possible malfunctions listed above, the heating of your VAZ-2115 still does not start working, there are only a few options left. Poor contact of the fan mass, sticking of the brushes or, in extreme cases, burnout of the motor are possible. In any case, the motor must be replaced, since once it fails, it will continue to regularly cause you inconvenience.
The stove blows cold
Dampers and temperature controllers rarely fail. Therefore, if the stove blows cold all the time, most likely the gear motor has failed. This element is shown in the photo below.
How is the heating system of the VAZ-2114 repaired in this case? It doesn't matter whether it's an injector or a carburetor. Due to the complex design, the entire gearmotor is changed. To do this, you need to completely disassemble the “jabot” of the front panel. Next, using a Phillips screwdriver, unscrew the three screws on the stove block, pull out the wires and remove the old gear motor. The new one is connected in the same way. Check how the VAZ-2114 interior heating system works. The air should change its temperature when the lever on the block moves from cold to hot mode and vice versa.
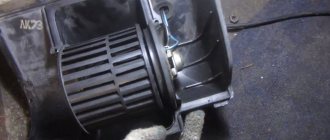
Replacing the VAZ 2115 stove fan
So, a replacement was still needed. There's nothing wrong with that - today you can choose from a variety of alternatives, in a wide range of price ranges. You will have the opportunity to save money, but remember that the main thing when choosing parts for your car is not to go cheap. In general, the average cost of an optimal fan ranges between one and a half thousand rubles.
Removing a faulty fan is not difficult - you only need to have a regular set of tools with you. In the VAZ-2115, the heater unit is located under the hood, directly under the windshield. The procedure is as follows:
- disconnect the terminal (“minus”) from the battery and the power wire (“plus”) directly from the motor itself;
- remove the protective cover of the fan casing, secured with two screws;
- disconnect the ground (the nut located at the bottom connecting to the heater);
- open the casing and unscrew the screws securing the fan and air intake grilles;
- We move the fan towards ourselves a little, removing it from the mount, then turn it 90 degrees and remove it.
The process of installing a new part is carried out in exactly the same way, but in reverse order. After installation, ensure that all fixing screws are properly secured. All that remains is to test the new heating - and you can continue to enjoy the warmth of your car. Good luck on the roads!
- goods for tourism Kharkov
- dress for baby
- ruler for cutting and sewing
- buy Castrol oil 5w40
Replacing the Heating Fan
How to replace the stove engine on a VAZ 2114 excites many car owners. Replacing the VAZ 2114 stove heater involves the following steps:
- First, you need to disconnect all the bolts in the space under the hood that secure the plastic cover.
- Remove the pad for ease of use.
- Remove the rubber band from the hood.
- Remove the cover protecting the oven motor.
So, get to the fan, then:
- Remove the two bolts securing the sides of the engine.
- Then go to the interior and under the driver's side panel, you need to find the positive wire plug and unfasten it.
- Then locate the negative wire attached to the nut and unfasten it. These wires can be inserted into the hole in the machine body through a rubber band.
- We take out the heater motor, turn it at a certain angle and take it out from the right side.
If it is necessary to replace the VAZ 2114 heating fan, a new model is purchased, and the entire system is assembled in the same way, but in reverse order.
Replacing the fan on a VAZ 2114 is possible for every car enthusiast; it’s worth setting aside a little time for this.
How much does a VAZ 2114 stove engine cost, buying it in a separate form or assembled with a body. Therefore, the price for the engine of heating system is about 500 rubles, the price indicator for the assembly with the housing will be about 1000 rubles.
Replacing the heater VAZ 2114
As many car enthusiasts as there are, there are as many reasons for performing such an operation as replacing the heater on a VAZ 2114. However, there is no single solution for how to fix similar faults.
The first “jamb”: the stove tap
The first problem area of the VAZ 2114 is the valve at the antifreeze inlet into the stove. On the one hand, its undoubted advantage is that if you accidentally break off the fitting on which the pipe is placed, it is enough to replace the tap. For example, on most foreign cars produced in the 90s, these fittings are an integral part of the heater radiator. If they are broken during repairs, you will have to replace the entire radiator. But on the other hand, due to this design, the quality of coolant circulation is much worse. And that means comfort from being in the cabin.
In addition, the supply of hot antifreeze for the stove is controlled mechanically on the VAZ 2114 using a cable. And this cable becomes dirty and “pulled out”. The fastening of this cable itself may weaken over time. As a result, the stove will not work properly.
Usually, if problems arise with cold air from the stove, it is recommended to tighten the cable.
Adjusting the heater tap cable
The problem arises due to the general unreliability of the mechanical cable system for controlling the interior heating controls on the VAZ 2114. We have already talked about this. Loosening or pulling the cable over time leads to the fact that the stove tap no longer closes (opens) completely when moving the slider on the control panel. To solve this problem, you need:
- Find the control cable for the stove tap. It runs under the panel near the gas pedal.
- Pull the cable so that when the damper is fully open, it also opens fully. Sometimes, with a strong stretch, the cable is shortened a little for this purpose. Do not overdo it, otherwise the tap will not close. Warm air will continue to blow in summer.
This basically works. But it may happen that you have to tighten it regularly. Often the problem returns periodically. The fundamental measure to solve it is the following method: removing the tap from the system.
conclusions
The reasons for the VAZ-2114 heater fan not working are quite simple and even a novice motorist can fix them. Of course, in 50% of cases, all malfunctions are related to the fuse, replacing which will normalize the operation. But, if the reasons are quite complex and the car enthusiast is not able to cope with them on his own, it is necessary to contact a car service center, where everything will be repaired cheaply and efficiently.
Good evening to all car enthusiasts, I read everything, everything is familiar, but the reason for me is that the fuse burns when I sharply stomp on the gas pedal, when I drive in quiet mode, the heater works and does not light up. If anyone has encountered this, please tell me what it can do be a reason?
Set the fuse to 20
Thank you very much for the detailed information! I fixed the stove in a couple of hours. The cause was a faulty contact group. Saved a good amount)))
I have a VAZ 21014 - the heater fan started to shut down, it only turned on if I drove for a while, it was like this for 3 weeks, then it stopped turning on at all. I checked the relay and resistor and fuses, but all this was in vain... then I decided to do this - I lifted the soot, removed the filter and the casing on the heater motor - I exposed the wires going to the fan with small cuts - the current rang... when I turn on the valve, but it doesn’t work... I took out this valve, turned it sideways up and pushed it to the right wing of the car there it’s wider and it came out (I cut off the wires because I had to climb out of the inside to disconnect it into the rubber band and then put it in again; I don’t want to have to suffer with getting in... I disassembled this miracle; there were pre-prepared brushes on the table - but alas, on the armature of the motor there were copper contacts in contact with the brushes completely erased in two places...a dead spot appeared.... I note that the supply of brushes was still normal. The machine is 7 years old, the fan always worked constantly - in the cold in the summer in the warm in the winter... in short, if the motor does not work, it is better to immediately buy a new one ..... I didn’t find the bearing, there is a bronze seal on the side of the brushes, and as I understand it, you can’t get to the other side without breaking it..... a new motor costs 650 rubles. You have to go buy it and push it from under the hood..... I’ll carefully connect the wires clamp and insulate it. Now I understand why these motors are not repaired, but are advised to be replaced with a new one right away.