The importance of the cabin filter
The cabin filter is designed to clean the air that enters the cabin through the air intake openings from the street. The task is extremely relevant if you live in a large city. The concentration of exhaust gases on the road is high, and even with the windows closed, a huge amount of harmful substances enters the car. Air from the road contains a lot of substances hazardous to health:
- tire dust;
- small rubber particles;
- asbestos from brake pads;
- bacteria, viruses and plant spores.
If we talk specifically about the exhaust gas from a car, it includes more than 200 different toxic substances. These are oxides of carbon, sulfur and nitrogen, compounds of heavy metals, soot, hydrogen fluoride and much more. Even for a completely healthy person, a high concentration of exhaust gases is dangerous, but what can you say if you have asthma or other diseases of the respiratory system?
All these substances can lead to extremely unpleasant consequences: oxygen starvation, which causes headaches, shortness of breath and even a decrease in reaction speed. Nitrogen oxides lead to damage to the respiratory tract and lungs, while benzene, soot and formaldehyde lead to carcinogens. With constant exposure, chronic development of lung diseases is possible.
Experiments show that cabin filters are capable of trapping up to 99.5% of small and medium particles. However, as it gets dirty, of course, the part loses its effectiveness, which forces drivers to regularly replace it. We recommend not to neglect this, because your health directly depends on the quality of air in the cabin. In addition, replacing the cabin filter in the Kia Rio 3 takes just 5-7 minutes in a garage.
The process of replacing the cabin filter on Kia Rio 2010-2015
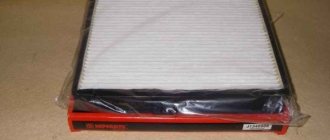
Of course, before starting work, you have to buy a new filter element. Carbon filters are considered the most recommended. Nowadays their variety is very great. Choose according to your taste.
First, you need to clear the front panel glove compartment of foreign objects.
You need to remove the side plugs.
Now, lower the glove compartment door all the way down.
Inside there will be a special shelf for the filter with clamps located on the sides. Squeezing the clips, being careful not to damage the rubber seals, remove it.
Finally, the old filter element can be replaced with a new one. At the same time, do not be afraid if it does not fit in width. In this case, simply compare the dimensions of the filters and cut the purchased one with scissors along one of the ribs.
The replacement can be considered complete. All that remains is to put everything back in reverse order and enjoy the freshness and purity of the air entering the cabin.
How often to change
The filter is a consumable item; accordingly, there is a regulated replacement frequency. According to the requirements of the third generation Kia Rio, the filter should be replaced every 15 thousand kilometers, however, there are a number of factors that can reduce this period:
- In the summer, many drivers prefer to drive with their cars closed and the air conditioning on. Due to this, most of the air enters the cabin through the filters, which reduces their service life to 7-8 thousand kilometers.
- In spring and autumn, there is an increased level of humidity, which can lead to rotting of the filter material. In this case, naturally, you will need an emergency replacement of the cabin filter on the Kia Rio.
- During active driving in urban or industrial areas, the filter becomes actively clogged with soot, which reduces throughput. The part may become unusable after 5-7 thousand kilometers.
Thus, one cannot rely entirely on the indications in the regulations. The optimal method is to check the filter every 5 thousand for the level of contamination.
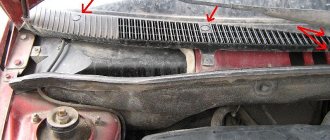
Where is the cabin filter located?
Of course, this car already has several generations, and the Kia Rio is updated almost every year, but the designers do not change the location of the cabin filter.
It is located behind the glove compartment (glove compartment), located on the front panel on the passenger side.
Moreover, the cabin filter is installed there in all Kio Rio models - II and III generations, 2010-2015 model years. Of course, there are some replacement nuances for models of different years, but they are not significant and will be discussed below.
Which filter to buy: varieties
Please note that models supplied to Russia are versions for China, and not for Europe. Accordingly, if you bought a foreign car in the Russian Federation, then you need the following article number for the filter - catalog number 97133-OSOOO. This is a filter for models before 2012 that have not yet been restyled. The filter involves only rough cleaning (only from leaves, therefore, it is not able to retain dust), so drivers buy non-original, but more advanced models such as MANN CU1828, MAHLE LA109, VALEO 698681 or TSN 9.7.117.
If we talk about models after 2012, then a classic filter is already used here, designated in the catalog - 97133-4L000. If you are looking for its analogues, we recommend looking at TSN 9.7.871, Filtron K1329, MANN CU21008. According to many drivers, the quality of original and non-original models is practically the same. Considering the frequent replacement of this component, it makes no sense to overpay for a branded part.
The price of filters is quite varied. The simplest and cheapest models can be found for 150-200 rubles. It’s difficult to call them effective, so we recommend choosing something from the middle price range. The most expensive models with high filtering qualities can cost up to 3,500 rubles. Some drivers try to make filters themselves. Technically, this task is feasible, but it is difficult to make a high-quality filter that fits exactly into the slot in the car.
Additionally, you can always find a lot of other filters on the Internet that may well be compatible with your foreign car. If you are going to buy a third-party Kia Rio 3 cabin filter, we recommend that you familiarize yourself with the general classifications and key advantages of each type:
- Anti-dust filter. It is a rectangular structure made of cellulose or synthetic fibers with corrugated paper. The key benefits of these filters include their affordable price and the ability to filter pollen and other small particles. Disadvantages - such a filter does not absorb unpleasant odors and does not cope with toxic substances. The highest quality models have a service life of up to 30 thousand kilometers.
- Carbon filter. Made of synthetic fiber that stops small particles (down to 1 micrometer) due to electrostatic voltage. Able to cope with 95% of all harmful substances and convert ozone into oxygen. The only drawback is the high cost of production. Some of the most durable ones can be used for 60 thousand kilometers.
Make your choice based on filter compatibility with your machine and your budget.
When to change, what interior to install
To perform scheduled maintenance operations, there are regulations, as well as manufacturer recommendations. According to them, replacing the cabin filter of the Kia Rio III QB heating and air conditioning system should be done every 15,000 kilometers or once a year.
Considering that the operating conditions of the car in most cases will be far from ideal, experts advise performing this operation approximately twice as often, in spring and autumn.
Characteristic symptoms:
- Windows often fog up;
- the appearance of unpleasant odors in the cabin when the airflow is turned on;
- deterioration of the stove and air conditioner;
They may make you doubt that the filter element is coping with its tasks and an unscheduled replacement will be required. In principle, these symptoms should be relied upon when choosing the correct replacement interval.
Suitable sizes
When choosing a filter element, owners do not always use products recommended by the car manufacturer. Everyone has their own reasons for this, some say that the original is unreasonably expensive. Some people in the region sell only analogues, so there is a need to know the sizes by which you can subsequently make a selection:
- Height: 15 mm
- Width: 189 mm
- Length: 210 mm
As a rule, sometimes analogues for the Kia Rio III QB may be a few millimeters larger or smaller than the original, there is nothing wrong with that. And if the difference is measured in centimeters, then of course it’s worth looking for another option.
Selecting an original cabin filter
The manufacturer recommends using exclusively original consumables, which, in general, is not surprising. They themselves are of good quality and are widely available in car dealerships, but their price may seem overpriced to many car owners.
Regardless of the configuration, on all third-generation Kia Rios (including the restyled version), the manufacturer recommends installing a cabin air filter with article number 97133-4L000 (971334L000). Sometimes, instead of a filter, a mesh with number 97133-0C000 is installed; of course, it does not protect from dust, but only from debris getting into the impeller.
It is worth noting that sometimes consumables and other spare parts may be supplied to dealerships under different part numbers. Which can sometimes confuse those who want to purchase an original product.
When choosing between a dust and carbon product, car owners are advised to use a carbon filter element. This filter is more expensive, but it cleans the air much better.
It is easy to distinguish - the paper filter accordion is impregnated with a carbon composition, and therefore has a dark gray color. The filter cleans the air flow from dust, fine dirt, germs, bacteria and enhances the protection of your lungs.
Which analogues to choose
In addition to simple cabin filters, there are also carbon filters that filter the air more effectively, but they are more expensive. The advantage of coal SF is that it does not allow foreign odors coming from the road (street) to penetrate into the car interior.
But this filter element also has a drawback - air does not pass through it well. GodWill and Corteco carbon filters are of fairly high quality and are a good replacement for the original.
However, in some retail outlets the price of the original third-generation Kia Rio cabin filter may be greatly inflated. In this case, it makes sense to purchase a non-original consumable item. In particular, cabin filters are considered quite popular:
Conventional dust cabin filters
- Mann Filter CU21008 – high-tech consumables from a well-known manufacturer
- BIG filter GB-9971 – popular brand, good fine cleaning
- RU54 CF-931 – Russian manufacturer with an affordable price
Carbon cabin filters
- TSN 9.7.872 – high-quality and thick carbon coating
- BIG filter GB-9971/C – activated carbon
- Nevsky filter NF-6348C – normal quality, affordable price
It makes sense to take a closer look at the products of other companies - they also specialize in the production of high-quality consumables for passenger cars:
- Corteco
- Filtron
- SCT
- Sakura
- GoodWill
- Fram
- JS Asakashi
- Champion
- Zekkert
- Masuma
- Nipparts
- Purflux
- Knecht Mahle
- Nevsky filter
It is quite possible that sellers may recommend replacing the Rio III QB cabin filter with non-original cheap substitutes with a much smaller thickness. They are not worth buying, since their filtering characteristics are unlikely to be at the proper level.
Signs of filter wear
As mentioned earlier, it is recommended to change the filter more often than indicated in the regulations, because in fact the documentation indicates the service life under optimal conditions. This raises the question: how can we determine that the filter has become unusable? Here are a few signs that will help you:
- Fogging of the windshield is one of the most common signs that indicates that the Kia Rio 3 cabin filter needs to be changed.
- The appearance of foreign odors in the cabin in the presence of a carbon filter. This means that it has exhausted its absorbent capacity.
- Changes in microclimate and malfunctions of the heating system. A clogged filter may be causing temperature fluctuations.
- Insufficient air flow in the cabin.
- The inside of the dashboard and windshield began to get dirty much faster.
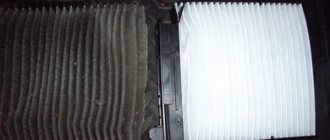
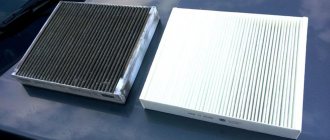
The suitability of a filter can also be judged by its appearance. If it has acquired a distinctly gray or even black-brown tint, feel free to change it. Do not attempt to wash or blow out filters. These methods are ineffective and therefore are not able to completely remove all contaminants. Considering the relatively low cost, it is much easier to change the cabin filter on a Kia Rio.
When and why you need to change
The main reason why installing a new car module is required is to reduce the level of travel comfort:
- The heater has stopped working correctly (it doesn’t heat in winter and doesn’t cool in summer).
- The appearance of foreign odors.
A working filter removes up to 99% of toxic impurities from the air entering the cabin. If it becomes clogged, dust, soot and decay products of exhaust gases will enter the car.
Toxic microelements enter the lungs and have a detrimental effect on the body. A person who breathes toxic air for a long time gets tired faster. His concentration decreases, dizziness and a sore nose occur.
Signs of a clogged filter
It is not at all necessary to go to a car service to check the car cleaning system. A malfunction can be identified by characteristic symptoms:
- When you turn on the heater, you hear whistling, clicking and other strange sounds.
- The climate control unit does not maintain the set temperature, and heating occurs intermittently.
- In winter, moisture appears on the windshield and the side windows fog up.
- The air deflector blows weakly (especially noticeable in summer).
- An unpleasant smell comes from the street.
A distinctive sign that the part is clogged and needs to be replaced is that the dashboard and seats begin to periodically become covered with dust, even when the car is hermetically sealed.
Cabin filter replacement interval
According to the maintenance regulations, it is recommended to install a new cleaning module after 15 thousand kilometers. This mileage, after which a spare part needs to be replaced, is reduced by 2 times with constant use of the car under the following conditions:
- in spring and autumn (absorbent material begins to rot due to high humidity);
- in industrial areas;
- on city streets with heavy traffic;
- in long traffic jams;
- with the air conditioner on continuously.
Also read: Removing the Kia Rio 3 bumper: step-by-step instructions, necessary tools and the main reasons for replacement
Experienced drivers advise checking the Kia Rio 3 cabin filter after 4-6 thousand kilometers for damage and contamination. If the surface of the material has become dark in color, then there is no need to try to blow it or wash it. The filter has already lost its absorbent properties. Therefore, it would be more practical to install a new module and throw away the old one.
Replacement procedure
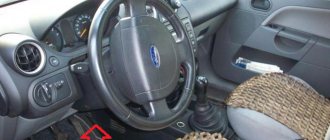
First, we should tell you where the Kia Rio cabin filter is located? It is located behind the glove compartment, so access will require some minor dismantling work. Best of all, you don't need any specialized tools to perform the replacement. As a last resort, only a regular slotted screwdriver. It is fashionable to change the filter both in the garage and in an open space, preferably in good lighting.
All that remains is to find out how to change the cabin filter on a Kia Rio? Drivers just need to follow the following instructions:
- Open the glove compartment and remove all items from it. There are two limiters on the right and left inner sides. You need to pull them out. If they are difficult to give in, you can use a screwdriver. Be careful not to damage the seats.
- Lower the glove compartment all the way down and then carefully remove it from its hinges.
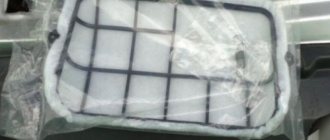
- Find a rectangular container in the space behind the glove compartment. It must be closed with a lid, which is secured with two clips on the sides. It is enough to squeeze the latches on both sides and pull the cover towards you.
- Remove the old filter and install the new one. Please note that the part has a special arrow-shaped indicator. The filter must be inserted so that it points down.
- Make sure that the filter fits tightly into place and is not wrinkled.
- Replace the cover by snapping the two latches into place.
- Place the glove compartment in its original position and reinstall the stoppers.
As you can see, the whole process takes 5, at most 10 minutes. The main thing is not to damage the drawer stops. If you still have questions, watch the video at the end of the page.
How to replace?
Many people are interested in the question of how to change the cabin filter?
Simple enough! There is no need to contact service organizations here. Basically, the work consists of the simplest process of removing a component from the compartment in the glove compartment of the KIA Rio 3. Having dealt with the degree of clogging, we determine the need for replacement. If it is relevant, then remove the expired filter and install a new component, acting carefully. We do not allow the use of parts with gaps present on the working surface, because these “artifacts” can lead to a deterioration in the quality of air purification in the KIA Rio 3 cabin.
How to diagnose the problem?
Here it will be useful to determine the true need to replace the part, as well as where it is located. Smells in the cabin cannot fully indicate the fact of a blockage.
Here you need to independently verify the degree of clogging of the filter component. And know how to change the cabin filter.
- Given the need for verification, we proceed to action. Open the glove compartment lid and unfasten the latches present inside, which are located on the side surfaces.
- Kia Rio 3 allows you to diagnose without resorting to special efforts. Here you will need to rotate the element 360 degrees and remove it towards you.
- In the second generation of the popular model, the clamps had a composite design, and considerable effort was required to loosen them.
- Let's continue. After deactivating the fasteners, the filter element appears before the eye.
- Removal requires simple dismantling of the latches, after which the cover becomes accessible.
- We set it aside to provide sufficient access to the frame of the filter element itself.
- Only after removing the frame will it be possible to remove the filter and assess the degree of contamination of its working surface. We determine the condition by color. For a gray filter, vacuuming will be sufficient. If the element shows a black or dark gray tint, then it will need to be replaced in order to stop the harmful effects on the health of the people present in the Kia Rio 3 cabin.