17 June 2016 25,383
Disassembling the Priora headlight may be required in case of modification or tuning (paint masks, install lenses, etc.), or for repairs (use new glass, or glue the old one well so that the headlight does not sweat). Let's look at the process of removing glass from a headlight in detail.
The process of disassembling a Priora headlight can vary greatly, and it depends on the manufacturer of the optics. Removing glass from a Bosch headlight is much easier than from a Kirzhach headlight.
General procedure for disassembling the headlight:
- Remove the light bulbs from the headlight;
- Heat the sealant until it goes from hard to soft, like chewing gum;
- Separate the headlight housing and glass using a utility knife.
In the case of Bosch, a household hair dryer will be enough for heating. It will be very difficult to melt the sealant on Kirzhach headlights, so here are some tips:
1. To bring the sealant to the desired state, use an industrial hair dryer (set the temperature to about 200..250 degrees). The melting temperature of the sealant is very close to the melting temperature of plastic, be careful not to damage the headlight housing!
2. To heat the glue evenly, the headlight unit can be wrapped in cloth and placed in the oven for 15 minutes at a temperature of about 170 degrees. More details about this in the video:
3. Instead of an oven, you can use a box with a hole into which you insert a technical hair dryer.
4. The junction of the glass and the body is covered along the entire perimeter by a plastic side. It will have to be carefully bent (by heating), or, in extreme cases, cut off.
5. If all else fails, you can cut off the headlight glass using a Dremel. Glue it back together using quick-drying epoxy glue, such as Contact. It is worth considering that after cutting out the glass it will become 1-2 millimeters smaller.
Attention!
You can remove the headlight sealant using a special product, sold on AliExpress (see selection of products from Ali). Instructions using Vesta headlights as an example.
Have you dismantled the Priora headlights yourself? What recommendations can you leave for future auto tuning enthusiasts? Let us remind you that some modifications can be made without disassembling the optics, for example, installing eyelashes or buying already tuning headlights for the Priora.
Where can I buy
: in our online store (Priora Headlights category).
Photo: 7ski in-flight magazine
Key words: Lada Priora headlights
Share on social networks:
Found an error? Select it and press Ctrl+Enter..
Comments
Guests cannot leave comments on the site, please log in.
Products for LADA at the best price
A selection of accessories for LADA from AliExpress
Published: March 23, 2016
I welcome you to the website dedicated to automotive optics and lighting devices - FaraInfo.
Today in the “Repair” section I will tell you how to disassemble the headlight on a Lada Priora at home. Disassembling a headlight is an activity that does not require special skills or special equipment. tool. However, without knowing the various subtleties and not following a certain sequence, you can fumble for a long time or break something.
Why do you need to disassemble the headlight?
Disassembling the headlight may be necessary when you want to do headlight tuning, for example, you decide to tint the headlights or give angel eyes to your car.
Before you disassemble the headlight on a Priora, you need to understand something. The fact is that the headlights on the Lada Priora come in two types - produced by Kirzhach and BOSCH. Visually they are not different, the difference between them is only during disassembly. It is not difficult to disassemble Kirzhach headlights, which cannot be said about BOSCH headlights. German quality and the powerful sealant used in the manufacture of these headlights make them an “impregnable fortress”. The headlight glass is glued with a hard sealant and holds so tightly that during disassembly, due to the need to heat the sealant very much, the body of the headlight itself melts. There is, however, a way out to simplify the process; you need to cut off the top plastic strip that runs around the entire headlight and along with it some of this sealant with a utility knife.
As I already said, the headlamp consists of a plastic body and curved glass, which are securely glued together using sealant. Disassembling the Lada Priora headlight will require you to have a household hair dryer (we will use it to heat the joint), a stationery knife (with its help you can cut off the plastic strip that was discussed at the beginning), as well as several screwdrivers (with which you can separate the two parts block headlights).
Disassembling the Priora headlight
Unlike the VAZ-2110 headlight unit, the Priora headlight glass is secured with a sealant, and not with latches alone. Therefore, to replace the main headlight glass you will need the following tools and materials:
- household hair dryer;
- replacement glass;
- new Abro brand sealant for headlights;
- thin screwdriver or knitting needle.
Place the headlight in the prepared area and warm the glass with a hair dryer set to maximum heat until the sealant softens and begins to melt. Use a thin screwdriver or a knitting needle to pry up the glass and pull it out, being careful not to damage the protective edge. Thoroughly clean the seat from any remaining old sealant and allow the surface to cool. Fill the landing ditch with a fresh layer of adhesive, spreading it evenly over the surface. You need to fill the groove to about half the depth. Quickly and carefully install the new glass prepared for replacement. Press firmly. It is best to secure it by pressing the repaired Priora headlight with adhesive tape and leave it to dry. We recommend keeping the glass for at least 12 hours.
After the specified time has passed, carefully remove the adhesive tape and begin assembling the Priora back. Reinstall the headlight after replacing the glass. Connect the wiring harness. Secure the upper protective cover and put back the front bumper. The repair of this unit is now complete. Check whether the headlight turns on and off.
All that remains is to adjust the beam of light. There are many instructions on how to do this yourself by drawing the necessary marks on the wall. But practice shows that it is still better to contact a service to do this using the device.
The video shows the removal of headlight units on a Priora in order to repair or replace it:
Instructions for replacing fog lamp glass
Replacing PTF glass can be done by a person who does not have special knowledge, skills and tools.
- To replace the fog lamp glass, you need to find out how the PTF is attached to the bumper or to the car body? As a rule, the headlight is attached to the bumper with screws or nuts. The most convenient way is to partially or completely remove the bumper from the car. There is nothing complicated about this; to make the process easier, use the instructions for repairing your car.
- Then disconnect the PTF terminals from the on-board network.
- Inspect the removed fog lamp, determine the integrity of the reflective surface of the headlight.
- Apply a sufficient amount of adhesive-sealant to the dry, grease-free rim of the headlight so that the layer of sealant fills the entire space between the glass and the headlight housing; you can use any water-heat-resistant adhesive-sealant that meets the operating conditions of the PTF: temperature from -45°C to +150 °C
- Press the glass firmly against the headlight body (you can use a clamp for a better result) until the sealant is completely dry. That's the whole procedure for replacing PTF glass.
- Now install the light bulb, attach the PTF to the bumper, connect the terminals and put the bumper back in the reverse order.
Disassembling the Priora headlight
Unlike the VAZ-2110 headlight unit, the Priora headlight glass is secured with a sealant, and not with latches alone. Therefore, to replace the main headlight glass you will need the following tools and materials:
- household hair dryer;
- replacement glass;
- new Abro brand sealant for headlights;
- thin screwdriver or knitting needle.
Place the headlight in the prepared area and warm the glass with a hair dryer set to maximum heat until the sealant softens and begins to melt. Use a thin screwdriver or a knitting needle to pry up the glass and pull it out, being careful not to damage the protective edge. Thoroughly clean the seat from any remaining old sealant and allow the surface to cool. Fill the landing ditch with a fresh layer of adhesive, spreading it evenly over the surface. You need to fill the groove to about half the depth. Quickly and carefully install the new glass prepared for replacement. Press firmly. It is best to secure it by pressing the repaired Priora headlight with adhesive tape and leave it to dry. We recommend keeping the glass for at least 12 hours.
After the specified time has passed, carefully remove the adhesive tape and begin assembling the Priora back. Reinstall the headlight after replacing the glass. Connect the wiring harness. Secure the upper protective cover and put back the front bumper. The repair of this unit is now complete. Check whether the headlight turns on and off.
All that remains is to adjust the beam of light. There are many instructions on how to do this yourself by drawing the necessary marks on the wall. But practice shows that it is still better to contact a service to do this using the device.
The video shows the removal of headlight units on a Priora in order to repair or replace it:
Examples of PTF glass installation
More examples of installing glass on headlights in our VK group Our VKontakte Group
Photo reports on replacing the fog lamp glass:
One of the significant disadvantages of the Lada Priora is the ill-conceived design of the headlights; they are not dismountable, so in order to replace the glass in the headlight or the light bulb, you either have to buy a new headlight, or get out and disassemble the old one. “It’s not the first time for our brother to get out,” as they say, there have been more difficult cases. However, despite this question , is a big problem. The fact is that this requires a lot of time and effort, as well as some experience. The Priora is equipped with two and “BOSCH” headlights. The first ones are much more difficult to disassemble, but still possible. Today, I will tell you how to do it correctly so that you don’t have to buy new headlights.
The headlight block consists of two parts, which are fastened together with very strong sealant or glue. In order to disassemble the Priora headlight, you need a household hairdryer; it heats up the glued joint, after which the sealant melts and becomes liquid, which allows you to separate the two parts of the headlight block.
What tools are needed to remove headlights on a Priora?
The process of removing the headlight unit on a VAZ-2170 is not complicated, and for all modifications of this car model it is identical. In order to correctly perform the dismantling procedure for the purpose of subsequent repair or replacement of the front lights, you will need to first prepare the following tool:
- The key is "10". For convenience, it is better to use a head with a ratchet.
- A Phillips screwdriver (preferably several screwdrivers with different tip diameters) for unscrewing self-tapping screws and mounting bolts.
- A slotted screwdriver with a long shaft (preferably at least 20 cm). It is needed to disconnect the bumper from the body part. You can use a screwdriver with a shorter shaft length, but in this case the likelihood of damaging the paintwork on the bumper or car body increases.
To carry out work, the car does not need to be placed on an inspection hole or jacked up. For safety reasons, it is recommended to only disconnect the negative terminal from the battery, after which you can begin performing the planned manipulations.
This is interesting! Many people are wondering how to remove the headlights on a Priora without removing the bumper. This is almost impossible to do, since it is under the bumper that the fastening elements of the device are located. However, it is not necessary to completely remove the bumper, especially if the headlight is removed only from one side.
How to disassemble the headlight of a Lada Priora - step-by-step manual
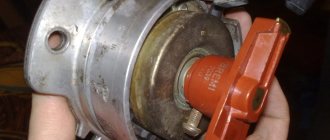
2. Take a hairdryer, heat it to a temperature of 250° and heat the joint as in the photo. We heat the sealant evenly around the entire circumference of the headlight until it begins to melt.
Note: When disassembling a Priora headlight, some “craftsmen” recommend cutting off the plastic side that runs along the entire edge of the headlight. This certainly simplifies the process, but as practice shows, this is not absolutely necessary; it can only be bent a little. If the joint is well heated, then you can “open” the headlight without damaging the body of the headlight unit.
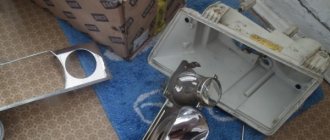
3. When the joint of the headlight unit is warmed up, carefully separate the front part, while continuing to warm up. On BOSCH headlights you also need to get four fixing brackets.
How to remove glass from a Priora headlight?
Sometimes a situation arises that it is simply absolutely necessary to change the glass on the headlight on the Priora.
For example, a pebble bounced off the side of the road, bad parking and cracked glass. Or the ventilation has been disrupted, the inside of the headlight has fogged up and become dirty, and you even need to, if not replace, then at least wash this glass. But to do this, the headlight must first be removed, and then also disassembled. But this procedure for the Priora is not as simple as on previous models. The only VAZ car on which removing the headlight is just as difficult is the Lada Kalina. But now we’re talking about Priora. Attention! When performing any work on electrical equipment, the battery must be disconnected first.
Removing the headlight from the car
The particular difficulty of removing the headlight on a Priora to replace the glass is that the lower edge of the headlight unit is covered with a bumper, and it also controls the glass, and under it there are two lower mounts for the headlight itself. Therefore, whatever one may say, for a trivial replacement, you will have to remove the entire bumper.
Removing the Priora bumper to repair or replace headlights
This action will require both effort and tools. In general, you will need the following equipment:
- Phillips screwdriver;
- flat screwdriver;
- socket wrench with a “10” head.
Attention! Before removing the bumper, it is advisable to lay a blanket or an equal piece of thick fabric on the floor, since although it is light, it is massive and can get scratched if dropped.
First you need to unscrew the lower mounting screws. They are located along the lower edge of the bumper and along the edge of the front part of the wheel arch. The Priora has 6 mounting bolts on each side: three on the bottom and three on the fender liners. Next, unscrew the 4 bolts securing the bumper to the upper front part of the body wall - the cross member, and the 2 bolts securing the headlight casing. Carefully inspect the fog lights in the bumper, if installed, for repair or replacement. Remove and set aside the bumper.
Removing the headlight to replace the glass
On top of the front light there is a plate covering it - a casing. It is secured with 3 screws to the upper cross member of the engine compartment. After removing it, you will have access to the upper mounting bolt of the Priora headlight. Since the bumper has already been removed, all that remains is to unscrew the top and 2 bottom screws. That's it, you can carefully move the headlight forward and disconnect the control wire harness from the connector. The Priora headlight has been removed. You can disassemble and replace the glass.
Disassembling the Priora headlight
Unlike the VAZ-2110 headlight unit, the Priora headlight glass is secured with a sealant, and not with latches alone. Therefore, to replace the main headlight glass you will need the following tools and materials:
- household hair dryer;
- replacement glass;
- new Abro brand sealant for headlights;
- thin screwdriver or knitting needle.
Important! Work must be carried out on a clean, dry and preferably soft surface. We recommend treating your hands with something degreasing so as not to leave streaks on the new glass prepared for replacement.
Place the headlight in the prepared area and warm the glass with a hair dryer set to maximum heat until the sealant softens and begins to melt. Use a thin screwdriver or a knitting needle to pry up the glass and pull it out, being careful not to damage the protective edge. Thoroughly clean the seat from any remaining old sealant and allow the surface to cool.
Fill the landing ditch with a fresh layer of adhesive, spreading it evenly over the surface. You need to fill the groove to about half the depth. Quickly and carefully install the new glass prepared for replacement. Press firmly. It is best to secure it by pressing the repaired Priora headlight with adhesive tape and leave it to dry.
We recommend keeping the glass for at least 12 hours.
After the specified time has passed, carefully remove the adhesive tape and begin assembling the Priora back. Reinstall the headlight after replacing the glass. Connect the wiring harness. Secure the upper protective cover and put back the front bumper. The repair of this unit is now complete. Check whether the headlight turns on and off.
All that remains is to adjust the beam of light. There are many instructions on how to do this yourself by drawing the necessary marks on the wall. But practice shows that it is still better to contact a service to do this using the device.
shows the removal of headlight units on a Priora in order to repair or replace it:
What kind of lamps are installed in the Priora headlamp?
The Priora's rear light has 4 lamps, which are responsible for turning on the turn signal, dimensions, reverse, brake light and PTF. They are almost the same, but have some differences.
- The turn signal lamp is marked PY21W and is orange; when installing a regular white lamp, the turn signal will blink white.
- The size and brake lamp has two spirals, which are responsible separately for braking and illumination.
- The reverse lamps and PTF lamps are the same.
Tail light lamp marking table
| Purpose of lamps | Marking | Peculiarities |
| Reverse | P21W | White |
| Turn signal | PY21W | Orange color |
| Brake light and dimensions | P21/5W | Two spirals for dimensions and a brake signal |
| Rear PTF | P21W | White |