What are fog lamps for?
The main task of the PTF is to illuminate the space in front of the car. Correctly adjusted “fog lights” can illuminate a section of road 10–15 meters long. This distance is quite enough for safe movement by car in poor visibility conditions. The switching on and off of such lighting devices must be fully controlled by the driver.
Adjustment of fog lights is carried out during their installation. The procedure does not take much time, but requires care and precision. You can install the rear and front PTFs yourself.
Difficulty adjusting
The VAZ 2114 does not provide for adjustment of fog lights, even in cars equipped with them. If on new cars no problems arise when passing a technical inspection, then after several years of operation (the front bumper touching foreign objects or bumps is inevitable on our roads), the direction of the light beam ceases to comply with GOST.
The only way is to install gaskets, overlays or other devices that change the angle of inclination of the light flux or its direction relative to the plane of the road. It is impossible to carry out this operation without a special stand. Having some knowledge, you can draw some semblance of such a stand on your garage door and independently adjust not only the fog lights, but also the low or high beam.
Installation diagram of fog lights
The connection of fog lights is carried out according to certain rules. They, first of all, relate to the placement of PTF on the car. The locations for installing headlights are strictly defined.
Layout of daytime running lights
Manufacturers of modern car models pre-mark the PTF installation locations on the bumpers. As a rule, such lighting elements are most often available in the luxury version of the car. If the headlights themselves are missing, then their installation sites are closed with special plugs.
Distance at which fog lights can be placed
How to install and connect fog lights yourself
We said earlier that fog lights on the VAZ-2114 and other Samaras are installed from the factory only in “luxury” versions. And without PTF, driving is very uncomfortable, because the head light on the Samara is very weak - worse than on the Nine. This is why many car owners are wondering how to install fog lights themselves?
In fact, the whole process is very simple, but it takes time. You can even get by with an old bumper without holes for the PTF - cut it out with a jigsaw and install “glasses”.
Checking the functionality of the PTF
After the work has been carried out to connect the fog lights on the VAZ 2114, it is worth checking their functionality. If everything is done correctly, then when you turn on the side lights and press the button, voltage will begin to flow to the relay, after which the lights should light up. If you turn off the headlights, the fog lights should also go off, regardless of the position of the button. If everything is done correctly, then the next step is to adjust the light beam so as not to blind oncoming drivers. Having done this by eye, the light from the fog lights should be 10-15 meters ahead of the car, but no more. It is best to contact a service station with special equipment to adjust the headlights, or read the instructions in more detail on how to do it yourself. Useful: How to adjust the headlights and PTF on a VAZ 2114? Correct adjustment is the key to safety on the road, not only for you, but also for other road users. By installing fog lights, car enthusiasts want to get not only direct functionality, but also improve the appearance of the car. Since public roads require driving with the optics always on, fog lights can take over this function. Thus, you can install high-quality lamps in them and spend less on constantly replacing burnt-out light elements in the headlights. As described earlier, at the most unexpected moment, PTF can help you out when visibility deteriorates when driving along the highway during fog.
How to install and connect PTF?
Installation and connection are carried out in 3 stages:
- We install the PTF in the bumper.
- We connect the wiring to the mounting block via a relay.
- Install a button in the panel.
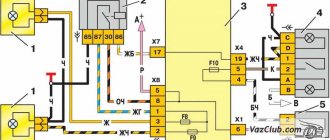
Connection diagram
Well, I think everything is clear here! However, the diagram is not indicated in full: the mass of the PTFs themselves on the body, which must be done without fail, is not indicated. It needs to be secured in a safe place, on metal of course! Before fastening, be sure to clean the metal from dirt and tighten the mass well so that there is no loss of tension. Otherwise, the PTF will burn dimly and unevenly.
Bumper installation
As stated above, there are two options - either install a new bumper with ready-made cutouts for the PTF, or cut it yourself with a jigsaw. To do this, remove the element, mark the mounting holes, and cut it.
Next, we install the “glasses” - they cover the cutout on the outside of the bumper, they consist of two parts:
- Decorative - external.
- Internal - attaches glasses to the bumper using side latches and holds the PTF.
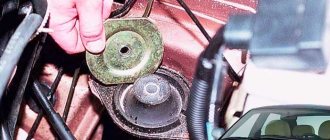
Connecting wiring to the unit via a relay
Relay with wire set
- First of all, open the hood, find the required block and unscrew its two fastenings to the body on the sides, remove the cover.
- From the bottom of the mounting block, unfasten the two outer wire blocks marked “7” and “8”.
- Take the installation kit: put the wires from the kit on the relay.
- We add their other ends to the block of wires “7” and “8” according to the diagram.
- We stick the pads back into the mounting block and fasten it back to its original place
- Next, we attach the relay to the car body in any place you like: for example, next to the same block.
- We run long wires from the mounting block blocks (which we have already installed) to the fog lights and connect them. We also attach the PTF mass to the car body.
Installing a button in a panel
To install the button that comes with the mounting kit, you will need to partially disassemble the front panel.
Removing the center console
Fortunately, the factory prudently installed wiring for the PTF in all Samar configurations, so all we have to do is remove the center console and find a block in the wiring for connecting the button.
Next, find the wire block, install the button and assemble the panel.
Then you need to check the headlights for functionality.
Don't forget that they only work after the side lights are turned on!
After installation, the PTF will need to be configured and adjusted!
Fog lights on VAZ 2114: installation and connection diagram
Fog lights or simply PTF are an important element of the lighting system for a car. Alas, not all manufacturers equip their cars with these devices. AvtoVAZ with its model 2114 is no exception. PTFs for the fourteenth are available only for an additional fee and in the most expensive configuration.
Not everyone sees the point in buying the most complete version just to get PTF. An excellent solution is to install foglights yourself.
Beautiful and effective
Installation methods
There are several options to equip your car with a fog light system. The choice depends on your personal preferences and capabilities.
| Way | Peculiarities |
| Buying a bumper with built-in PTF | Such bumpers are bought at a tuning studio, where everything will be connected and connected for you. The disadvantage of this option is the high cost |
| Buying a bumper from a VAZ 2115 and installing it yourself | To do this, you will have to buy a bumper from an older model, which has holes for fog lights. All that remains is to find a suitable set of PTFs and install them |
| Purchase of PTF and facing elements - glasses | Today this method is in greatest demand because it allows you to do the installation yourself for little money. |
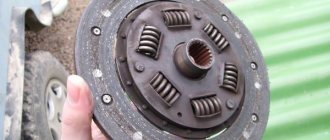
The standard PTF kit includes several elements:
- Headlights;
- Light bulbs;
- Switching relay;
- Set of wires;
- Connection diagram;
- Button to turn on/off PTF.
When choosing a set, pay attention to the fact that the headlights match the shape of the glasses, that is, the facing elements.
Standard kit
Today, for VAZ 2114 owners who want to install fog lights, it is recommended to choose rectangular kits from the Kirzhach company. It is used for factory installation of PTF on expensive versions of the model.
Xenon in PTF
Many car owners are thinking about installing xenon lamps in their fog lights. Is it good? Not really.
The thing is that when installing xenon in the PTF, focusing is disrupted. The operating principle of xenon is somewhat different compared to conventional Kirzhach type lamps.
Standard PTFs are designed for certain types of lamps, so they cannot cope with xenon. As a result, excessive reflection is observed in the reflector, rays are refracted, and the light is blurred. Where does this lead? To blind oncoming drivers.
The xenon option is not a practical or successful solution. Therefore, we recommend that you avoid it.
Another option is a combination of xenon and yellow fog lights. You will need H1 xenon bulbs, which are mounted in a bottle cap and only then placed in the headlight. This way the light beam has smoother boundaries, does not blind oncoming traffic, and better illuminates the roads in bad weather. Only after installing this combination lighting, be sure to make sure that your headlights really do not blind oncoming cars.
If oncoming cars stubbornly continue to shine their high beams on you, try adjusting the light beam. If this does not help, it is better to abandon xenon.
VAZ 2115 fuse box pinout
The most common models are 3722010 (since 2004) and 21150 3722 010 10. The set of protective elements of electrical equipment in them is not very different from each other, but there are differences, and they are reflected in the decoding of the diagrams below.
| K1 | Headlight cleaners |
| K2 | Turn signal and hazard warning switch |
| K3 | Wiper |
| K4 | Lamp integrity |
| K5 | Window lifters |
| K6 | Sound signals |
| K7 | Heated rear window |
| K8 | High beam |
| K9 | Near |
| Circuit breakers | Power, A | What is he responsible for? |
| 1 | 15 | Main relay |
| 2 | 15 | Constant power supply to the controller |
| 3 | 15 | Fuel pump |
| K4 | Fuel pump |
| K5 | Cooling fan |
| K6 | Main relay |
Starter fuse and relay
Cigarette lighter fuse
It is numbered F4 with a rating of 20 Amps. The new ones are marked as F7 with a power of 30 A. The element often does not work due to short circuits.
Fuel pump fuse and relay
Placed in an additional interior mounting block under the glove compartment. The first is marked as F3 and its power is 15 A, and the number of the second is K4.
What kind of lighting do you prefer?
Built-in Chandelier
Where is the relay and ignition fuse located?
It is located in the cabin, under the instrument panel on the driver's side.
VAZ 2115 heater fuse: where is it located?
Fan
The relay was placed in an additional block under the glove compartment - K5. The insert is located in the main block - F5 with a rating of 20 Amps.
Generator
A three-level voltage regulator relay was placed on the installation. It can be seen right next to the wires coming from the latter.
Turn signal relay
Lada 2115 has been marked K2 since 2006. Located in the engine compartment mounting block.
Installation
The PTF installation process can be divided into three main stages:
- Installation of headlights;
- Network connection;
- Functionality check.
So now we will talk about each stage separately.
Installing headlights
We will consider the option of installing PTF on a standard bumper. Therefore, it does not have holes for new optics. You will have to do them yourself.
To work you will need a certain set of tools and materials:
- File;
- Drill and drill bits;
- Electric jigsaw;
- Roulette;
- Marker.
Connection elements
Now directly about work.
- First of all, remove the bumper. Work is performed only if it is disconnected from the seat.
- Remove all dirt from the bumper.
- Make markings for the installation of future fog optics.
- It is best to mount the headlights slightly to the side of the lower air intake. Try to place the PTF strictly under the main optics of your car.
- For decorative glasses that have outer and inner halves, make markings. The outer half is decorative, and the inner half is designed to fix the outer part and headlights.
- The outer part of the glasses has a protrusion on the inside. With this mounting protrusion, the element should fit into the hole made in the bumper.
- To determine the optimal dimensions, you should measure the landing protrusion. This way you can make the appropriate markings on your bumper.
- Using an electric jigsaw, holes of the required size and location are cut.
- Use a file to file the cut areas.
- The outer part of the glasses should eventually fit tightly into the hole.
- Fog lights are mounted in the resulting holes. For this purpose, the kit includes special mounting bolts.
- Attach decorative glasses to the top of the headlights. The bumper can then be returned to its place.
Connection
Together with the PTF, a diagram for connecting the devices must be attached. It is not complicated, so even a beginner will be able to understand all the nuances of connecting the components to each other.
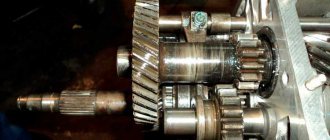
You will need to embed the wiring from the foglights into the mounting block, which is located in the engine compartment to the right of the windshield. To do this, just unscrew the bolts from the block, lift it and find the pads marked Ш7 and Ш8.
These blocks are used to connect fog lights, although these lighting devices are not installed standard at the factory. Wiring from the headlights and from the fog lamp relay, which is provided in the purchased PTF kit, is connected to these blocks.
Your job is to make the correct connection. This is done according to the following scheme:
- The output wire from pin 87 is ground, so you need to connect it to the car body;
- Pin number 85 goes to the block marked Ш7 and is connected to connector number 17;
- Pins numbered 30 and 86 go to block Ш8. In this case, connect pin 30 to connector 8, and lead 86 to connector number 1;
- Having installed the headlights, stretch the positive wire through the engine compartment, as they are connected to the Ш8 block. But these wires need to be inserted into connectors numbered 2 and 3;
- Now connect the block to the mounting block, and return the block to its place;
- Select an area near the block where the fog light relay will be installed.
Connection result
Button
Now all you have to do is connect the control system for your PTFs. Included with the fog lights is a corresponding button, which will stand on the panel in the seat provided by the manufacturer.
PTF button
The manufacturer, that is, AvtoVAZ, provided for this. Therefore, under the panel you will find a control block. The panel is removed, the corresponding block is located and the button is connected to it. That's it, the controls are ready.
Headlight installation
Since the standard bumper does not have seats, you will have to make them yourself. To do this you may need:
- Drill with drill;
- Jigsaw;
- File;
- Measuring tools (tape measure, ruler, etc.);
- Marker;
The installation of fog lights is carried out with the bumper removed. Markings are first made on a bumper that has been cleaned of dirt. The optimal installation location is at the level of the lower air intake, but at a certain distance to the side of it. It is advisable that PTFs be placed strictly under the headlights.
First, we determine the distance at which the fog lights will be removed from the air intake. Then we figure out what size holes need to be cut. Decorative “glasses” will help with this. They consist of two halves - the outer (which is decorative) and the inner (which secures the outer part and the headlights themselves).
The outer half of the glasses has a mounting protrusion on the inside, with which it should fit into the hole in the bumper. To determine the size of the hole, the dimensions of this mounting protrusion are measured. Then we apply markings with the appropriate dimensions on the bumper.
Having completed the markings, we proceed to cutting out the holes with a jigsaw. After this, it is advisable to correct the edges of the hole with a file. It is important to ensure that the outer part of the glasses fits tightly into the hole.
We fix the fog lights in these holes using bolted connections. All that remains is to attach the “glasses” over the headlights.
After installing the fog lights, we install the bumper on the car. This completes the first stage.