So, in the previous entry you may have already appreciated how the Shniva’s stove whistles. Let's add to this the fact that repairing something in winter is not the most pleasant pleasure, which is why we replaced the heater motor in advance.
The book says that you need to remove the entire panel and only then replace it, but on the forums they write that you can get by, which is what I did. (in principle, this is no longer a new operation for me ) Replacement by removing the glove compartment + air duct.
First, we need a new fan (preferably with bearings, but I bought it from what I had). From personal experience, check that the new fan rotates normally if you buy it at the first store you come across, otherwise trouble may occur. With my second heater motor, I thought - well, at least it turns somehow and that’s okay, then I got this:
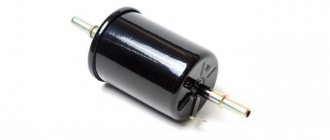
Next, you can immediately buy a cabin filter - when will we get there again? A light source wouldn't hurt either.
To replace it, you need to disassemble the glove compartment and also remove the cabin filter.
I started with access to the air intake into the cabin.
We take out the cabin filter and go to the glove compartment.
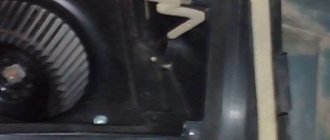
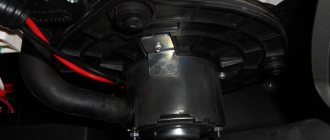
Now we have access to the heater fan!
We unscrew the 3 screws (or O_o screws) that hold our fan.
As a result, the motor can be moved up and down, but it will not be possible to pull it out. We climb into the air intake and unscrew the 4 nuts there (don’t forget to catch the screws!)
If everything works well, then install the cabin filter and tighten everything. ____________ *You can disassemble and lubricate the whistling fan, clean its collector and put it back. Mine was obediently silent for half a year after this procedure. (It works both in summer and winter) **I would like to note that you may want to separate the impeller from the fan and push them in one by one, without unscrewing anything in the air duct. In practice, the pin that prevents the impeller from turning was constantly flying out, so it’s impossible to see if the grooves of the impeller and this pin match. You may simply not notice how it flew out... Although if you fix it and have an assistant, then it’s quite a good option ***For someone, I read, there was no need to touch the screws in the air intake at all, the fan came out just fine.
Determining the malfunction of the stove fan
The stove in the Niva Chevrolet is turned on from the passenger compartment. The regulator is located on the dashboard. It has four positions . Three of them are designed to switch the operation of the heater in different power modes. The fourth is used to turn on the electric motor.
The heater fan turns on in the fourth position.
When you put the regulator in position “1” , the sound of the motor will not be heard if it is out of order. Also, its operation should be checked in all other positions. If it doesn't work, it will have to be replaced.
Main causes of problems:
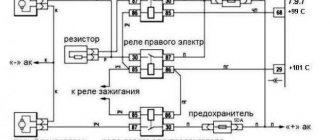
- No battery power.
- The power supply cable to the fan is damaged.
- The fuse has failed.
- The pre-resistance is faulty. In this option, the fan will not work only in some positions.
- The ignition is not turned on.
- The fan has reached the end of its service life. It needs to be completely replaced.
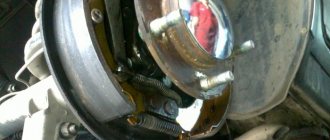
Due to problems with the wiring and winding, the stove fan melted the impeller.
We remove the fan with our own hands on a Niva Chevrolet
When the cause of the fan malfunction is established, it will need to be removed from the car . Before starting work, you need to disconnect the negative on the battery (the ignition in the car must be turned off).
Disconnect the negative terminal.
To make the work more convenient, you must first remove the dashboard from the passenger compartment . Next you will need to disconnect the inlet pipes on the stove. Then you should check with your hand that the impeller can be easily rotated.
If there is no possibility or desire to remove the instrument panel, you can try to crawl up to the stove from below. In this case, you will definitely have to remove the glove compartment, since it is not possible to remove the motor any other way.
We remove the glove compartment, unscrewing everything that will interfere with us.
Then you need to disconnect the connector on the motor. If the motor does not work in only one position, you should simply replace the board.
Disconnect the fan power supply and rubber hoses.
Removal process:
- Press out the locking lugs using a screwdriver.
Using a screwdriver, unscrew the three screws securing the fan motor.
After twisting the fan a little and moving the box towards you, we remove the electric motor along with the impeller.
Next, you need to inspect the air ducts for damage. They may contain foreign elements. Clean the air ducts . Then you should check the operation of the motor itself. To do this, you can connect it directly to the battery.
If only fourth speed works
In cases where the motor refuses to work at the first, second and third speeds, but turns perfectly at the fourth, the same resistor with three isolated windings is to blame. If you can’t buy it, you can try to restore it yourself. True, only in the case when the thermal fuse has blown, naturally, no one will rewind the windings, the game is not worth the candle.
Fan resistor
You can remove and check the resistor without dismantling the engine. This is done like this:
- Use a Phillips screwdriver with a short blade to unscrew the rightmost screws securing the glove compartment.
- We gain partial access to the motor, but this is enough to get to the resistor.
- Remove the terminal block and move the wiring harness to the side.
- Using a Phillips screwdriver, unscrew the screw securing the additional resistor.
- We remove the resistor from the housing.
- We check the integrity of the thermal fuse with a multimeter. If it is faulty, you can try to replace it.
- Installation of a new or restored resistor is carried out in the reverse order.
Built-in fuse
To replace the built-in thermal fuse, any type KSD-160 or RY01-165 is suitable. They work up to a temperature of 150-165 degrees. To solder a new resistor, be sure to use low-melting solder so as not to overheat the part, and during soldering, hold it with thick pliers for better heat dissipation. Good luck to everyone and a comfortable temperature in the cabin!
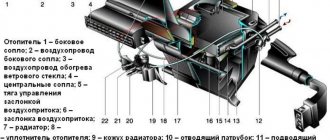
Location of the heater fan on the Chevrolet Niva
The heater fan is located in a special niche under the cabin filter, just below the windshield of the car. Under its impeller there is an electric heater motor connected to the on-board electrical network and to the vehicle's safety unit.
The Chevrolet Niva heater fan impeller is located under the cabin filter and is marked with the number 15
If the owner of a Chevrolet Niva decides to replace the heater fan, then it can be removed in two ways: through the interior of the car, partially disassembling the dashboard, or through the hole in the cabin filter (but before that you will have to remove the filter itself, of course). The second method will be discussed below, since it is considered the least labor-intensive and even a novice driver can use it.
Chevrolet Niva LE+ Full insulation StP › Logbook › Replacing the heater motor
Well, now my turn has come. The fan rustled at 1500-2000 km. I decided to climb (without contacting the dealer - just wasting time and nerves, it's over...) to remove the heater fan. I decided to write my own article about this, because for some reason in other articles that I looked at, they almost remove the torpedo (and some even remove it for some reason) in order to remove the fan. And according to the time they write, it takes 3-4 hours. On the second attempt it took me about 45 minutes to remove/install. The first time I removed/set 1.5 - I just lubricated the motor with silicone grease, but it didn’t help, it rustled again, then I decided to just change the motor to the Kaluga one.
Next, pull out the filter and remove the retaining ring from the fan impeller.
Next, we climb into the car and remove the glove compartment.
We remove the terminals and hose from the engine.
The motor hangs on only 3 screws. You will need a long and a short Phillips screwdriver. Everything unscrews easily - half a minute per screw.
We take 2 screwdrivers and insert them at 90 degrees (more if possible) to each other clearly in the center where the shaft is. And use a lever to throw off the impeller - if you did everything correctly, it will fly off in one step (5 seconds), if you fiddle for 5 minutes, you inserted the screwdrivers incorrectly. (even a specialist took a photo after everything)
Do not lose the key that is inserted into the shaft.
I sharpened the burrs with a file and went over them with a zero. I tested the fan - it did not creak. I sprayed the bearing a couple of times with silicone grease and began reassembling it.
It’s more interesting to assemble =) Firstly, you need to guess the very key in the groove on the impeller - you’ll understand what I mean. Draw a line on the impeller as the groove goes - your assistant will need it. In short, try to get there. We got it right the first time: we installed the groove and key on the shaft “across the machine.” An assistant held the impeller from the street, and I slowly lifted the engine up, guessing the key into the groove.
Signs of malfunction of the Chevrolet Niva heater fan
There are several typical signs by which a driver can understand that something is wrong with the fan. Here they are:
- the fan does not rotate. It’s impossible not to notice this, because the car’s interior suddenly becomes unusually quiet. This problem occurs when fuse F18 in the safety block, which is responsible for the electrical circuit of the fan motor, fails. In addition, the winding on the fan motor itself may be damaged. For example, the insulation on it may be broken, after which the adjacent turns short-circuit;
The adjacent turns on the Chevrolet Niva fan winding shorted and the motor burned out
Replacing the heater fan on a Chevrolet Niva
Before you start work, you need to stock up on everything you need. Here's what we need:
- hex keys, set;
- Phillips screwdriver;
- new heater fan.
Replacement sequence
- The hood of the Chevrolet Niva opens. Near the windshield there is a niche with a cabin filter installed in it, which is covered with a plastic cover with latches. They are opened manually, the cover is removed, and then the cabin filter is removed. Access to the furnace fan impeller is provided.
After removing the cover from the Chevrolet Niva cabin filter, access to the fan impeller opens
The mounting bracket on the Chevrolet Niva impeller moves to the side
The Chevrolet Niva fan motor can be accessed by removing the glove compartment
The Chevrolet Niva fan motor is held on by three screws
Chevrolet Niva fan motor removed through the glove compartment
The Chevrolet Niva heating fan impeller is removed through the cabin filter niche
Important nuances
There are several important points that must be taken into account when changing the heater fan on a Chevrolet Niva. Here they are:
- The cabin filter cover should be removed very carefully, since the latches that hold it in place are easily broken. This point is especially relevant if you have to change the fan in the cold;
- when lowering an unscrewed electric motor, you should remember that there is a small guide bushing on its shaft, which is very easy to lose: it falls, rolls down the glove compartment directly into the engine compartment and it will be very difficult to find it there;
The guide bushing from the Chevrolet Niva heater fan is very easy to lose
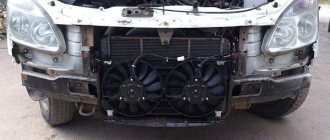
Installing a LUZAR fan on a Chevrolet Niva is justified only as a last resort
Replacing a broken fan on a Chevrolet Niva is not that difficult. Even a novice car enthusiast who has held a Phillips-head screwdriver at least once in his hands can cope with this task. The main thing is not to damage the latches on the cabin filter cover and not to lose the fan guide bushing.
Problem
The question, as always, turned out to be extremely simple - the quality of the original delivery. It turned out that the Chevrolet Niva heater motor was supplied to the conveyor assembly assembled from the Kaluga plant. The official name of PJSC Kaluga Automotive Electrical Equipment Plant is KZAE. This plant, as you know, is almost entirely configured to work with the Volkswagen plant, which is located there, and supplies products to AvtoVAZ only for the assembly line. And even these supplies are not enough and we have to install stove motors from other manufacturers. There is a very big difference, both in the resource of spare parts and in the ease of installation. Of course, the main supplier of the Russian spare parts market is China or Luzar (which is not very important). The motors initially hum very loudly, but most importantly the impeller is pressed onto the motor shaft. While on the Kaluga product it is located on a lock washer, which greatly facilitates the installation and dismantling of the spare part. There is another Tolyatti product, if I’m not mistaken, of a similar design. But with a minimal difference in price, it is better to supply a conveyor original, especially since, as I said earlier, the plant serves Volkswagen.