Welcome to the kuzov.info blog!
In this article we will look at how to replace thresholds with your own hands.
The threshold is a stamped panel, which is a structural part of the supporting body of the car.
In a monocoque design, sill panels provide structural reinforcement that influences the vehicle's underbody rigidity and also provide torsional rigidity. While the front and rear parts of the body have zones of planned crumple, the sills provide rigidity to the middle part of the body, which should remain as intact as possible in a crash. Thus, the safety of the driver and passengers depends on the condition of the thresholds.
Thresholds, especially their lower part, are often ignored when washing. Road salt and other contaminants left on them accelerate the onset of corrosion. Also, these elements are constantly exposed to stones and sand that fly from the road while driving and act as an abrasive.
Since the thresholds are a closed, non-ventilated structure, they are vulnerable to corrosion. The worst aspect of threshold corrosion is that it starts from the inside and spreads outward. Thus, corrosion becomes visible when the threshold has already been significantly destroyed. In advanced cases, it may even be impossible to use special places for a jack to lift the car, since these areas have lost their strength due to corrosion. Another problem caused by both completely rusted sills and the bottom can be exhaust gases that can enter the car interior.
What are the defects?
According to the type of attachment to the supporting body, the thresholds are classified into removable, which are installed on the body with bolts, and non-removable. The elements are welded to the sidewall and provide the car structure with the necessary rigidity and reinforcement. Regardless of the type of installation, the elements suffer the same damage.
- Dents. Defects are formed from impacts with gravel, careless parking, or as a result of a minor accident. Mechanical damage from gravel damages the outer part of the underbody, wheel arches, and side members.
- Scratches, chips. The outer part is damaged. The defect does not affect driving safety; the appearance of the car suffers.
- Corrosion. Rust occurs due to natural wear and tear of the metal and due to improper processing or lack of anti-gravel protection. The degree of wear affects driving safety. If the non-removable threshold, as part of the power element of the body, rots, the overall geometry of the structure changes, the main components and assemblies are distorted: the engine and transmission elements.
Depending on the defect, the repair method is selected: welding, pulling out dents, straightening using spot welding, or sealing holes with adhesive.
Restoration methods
There are more than ten ways to repair car thresholds with your own hands without welding. With the advent of new samples of glue, resins, protective fibers and equipment, the number of methods is increasing. The most common, simple ones for garage repairs:
- fiberglass treatment;
- epoxy glue;
- construction foam;
- hood without painting;
The use of a reverse hammer, as well as a spotter, are both spot welding repair methods.
fiberglass
Repair using fiberglass or fiberglass is quite simple, cheap, but reliable. Advantages:
- does not interact with reagents on the roads - water, acids, electrolyte;
- has little weight;
- easy to use;
- used for a long time;
- has a low price.
As an alternative, fiberglass or fiberglass is used. The method is used if there are pronounced pockets of corrosion on the metal, without impact deformation. Epoxy glue or resin is used together with the material.
For repairs you will need sandpaper, hardener, brushes, spatulas of different sizes. As a substitute for epoxy glue, you can use polyester resin, which is similar in properties, but somewhat inferior to epoxy in strength. To complete the surface sealing you need:
- Use a grinder to remove the paint layer.
- Sand it with sandpaper.
- Cut a patch from the fiberglass larger than the corrosion area.
- Degrease and prime the surface.
- Glue the patch with putty or epoxy glue.
- Fill the surface and prime it.
- Treat with anti-gravel compound.
- Paint it.
Epoxy glue
A common epoxy adhesive is the ED-20 brand; as a rule, it comes complete with PEPA hardener. These components are mixed in a ratio of 1:10
When working with epoxy glue, you must take precautions, protect your eyes and hands. Contact with chemically active substances can cause severe irritation of the skin and mucous surfaces of the eyes, which can cause allergies.
The repair procedure is similar to using fiberglass. If the deformation is minor, it is permissible not to use reinforced mesh. The glue is applied to the damaged area in several layers, puttyed, primed and painted.
Construction foam
Manufacturers of Japanese vehicles often use special foam, which is used to fill the permanent threshold box during factory assembly of the car. It is believed that the material will ensure that there is no corrosion inside the threshold and will preserve the parameters of the seal. The sealant is anti-corrosion resins and mastics, polyester components, which have nothing in common with construction foam.
When making repairs yourself, you cannot pour standard foam for construction work into the body cavities; the metal begins to rot much faster. It is allowed to use foam when applying a thin layer of the composition to previously cleaned areas of severe rust. To strengthen the threshold, mesh and fiberglass are used. It is mandatory to prime the surface and apply an anti-corrosion coating.
Repairing a jammed car sill without painting
Repairing thresholds without subsequent painting is a rather rare type of work. If the element is not removable and there is a small dent, but there are no sharp edges, then you can use suction cups. The complexity of the method lies in the fact that the tool is difficult to install on the part; it is necessary to make a cut.
It is easier to use a reverse hammer and a spot welder to draw out the metal. Restoration of body parts without painting is carried out at specialized service stations using tools; the PDR method is used for straightening dents on wings, doors, bumpers, and roofs. The cost of work is from 3,000 rubles.
When the threshold is removable, you can remove the dent without painting using straightening hammers and polish, if the dent is shallow and there is no break in the paint layer.
Common Mistakes
If you have no experience in body repair, you can make mistakes even when correcting minor damage. To prevent them, it is useful to familiarize yourself with the mistakes that beginners and non-professionals make most often.
Common mistakes when repairing thresholds:
- When repairing metal thresholds, the surface is not cleaned properly. The entire outer part and connector must be carefully treated to remove all traces of rust.
- Metal patches welded to thresholds are not treated with anti-corrosion compounds. To prevent the metal from becoming leaky, it must be cleaned and an anti-corrosion compound applied on top. They also need to process the insides of removable thresholds.
- I don't treat the underbody of the car. When repairing, it is necessary to apply protective mastic to it.
- They forget to check the drainage holes. They need to be cleaned and Movil or another preservative must be poured into the cavity of the thresholds.
Every car enthusiast will be able to eliminate minor defects in thresholds, having the necessary tools and materials at hand. If everything is done correctly, you can postpone contacting the service for a couple of years. Complex damage requires the use of welding and certain skills, and if they are not available, it is better to turn to professionals.
- How to change the fluid in a car air conditioner yourself: sequence of work
- Where is the front wheel hub located, its structure and purpose
British port is turning into a giant car park
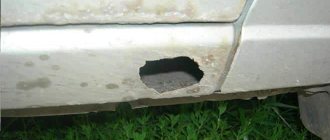
Repairing a rotten car threshold
If corrosive wear of more than 40% is observed, it is recommended to use partial or complete replacement of the part. Re-welding of thresholds is more often used on non-removable elements; removable fairings are replaced in 80% of cases with new ones. The cost of removable parts does not exceed the cost of repair. Depending on the extent of the damage, drivers choose one of the following options:
- Partial replacement of a rotten section without replacing the amplifier. The rotten part is cut out or knocked out, and a metal patch is installed.
- Complete element replacement. It is used if corrosion has destroyed the threshold amplifier, electric welding is used.
- Redecoration with fiberglass. Used only as a temporary measure. More often than not, unscrupulous owners hide rotten body parts in such a cheap way before selling them.
Fiberglass and mesh
To repair more extensive damage, an aluminum patch mesh is used. A piece slightly larger than the hole is cut out of it and attached with masking tape. Next, sealing holes in the car body without welding is carried out in the following sequence:
- a thin layer of fiberglass putty is applied without touching the tape;
- after drying, the tape is removed;
- subsequent layers of putty are applied after the previous one has dried;
- the surface of the car is treated with sandpaper or a grinding machine until smooth;
- To strengthen the mesh, several layers of putty are applied to the back of the body.
Long-term auto patches are made from fiberglass and epoxy resin. Several overlays are cut from it, the first of which should cover the hole with a margin of 2 cm. The size of each subsequent piece is made larger than the previous one. The last overlay should cover all the metal stripped during the preparation process.
The cut pieces are impregnated with resin and placed on the hole in a sequence of increasing sizes. If you need to seal large holes on the back of the body, use linings to prevent the fabric from sagging. After laying all layers of fiberglass, wait for the resin to completely harden. The time required for this is indicated in the instructions.
Read more: Ford Explorer 4 photos
Stages of work for complete replacement
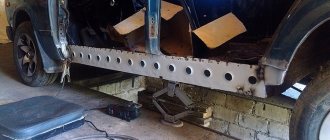
Replacing a threshold is a labor-intensive and complex process, but this type of repair remains the most productive and reliable. During the repair process, all main parts of the body are checked: the bottom, fenders, wheel arches. If the elements have traces of rust, dents, etc., then drivers can immediately carry out reconstruction and preserve the body for at least another 5 years. A complete replacement of the threshold takes place in stages:
- interior dismantling;
- cutting out an old threshold;
- preparation of the seat;
- welding of a new threshold;
- painting.
Tool needed
To replace the threshold we will need a set of screwdrivers, a welding machine, an angle grinder, a pneumatic chisel, hammers, hooks, straighteners, and a workbench.
If you do not have the skills to work with such a tool, then you can turn to people who have already encountered this for help.
Repair technology
Fixed thresholds are repaired in two ways: with or without welding. The method of sealing holes in the outer cover of an element with a soldering iron is not recommended either by experienced drivers or service station technicians. After soldering, the process of electrochemical corrosion begins on the metal, as the structure of the metal of the patch and the base is destroyed. You can solder the threshold in exceptional cases, not forgetting that this is a temporary measure that will require a complete reinstallation of the part in 3-6 months.
It is also recommended to use fiberglass to seal through individual corrosion plaques in exceptional cases. This is a short-lived cosmetic type of repair that does not provide reliable structural rigidity. Repairing car thresholds with epoxy glue and fiberglass in steps:
- Use a grinder to cut off the old paint and clean the area of corrosion.
- Treat the surface with a rust converter and sand it with sandpaper.
- Dilute the epoxy resin, be sure to add aluminum or copper powder to the glue.
- Cut 3-7 patches from fiberglass with an area slightly larger than the hole to be repaired.
- Apply epoxy slurry to the surface and apply a patch.
- Coat the repair area and apply fiberglass in several layers.
- Roll with a rubber roller, remove air and excess glue.
Epoxy glue dries in 24-36 hours. After this, it should be cleaned with medium abrasive sandpaper, primed and painted.
The best method of repair remains welding; how to digest thresholds depends on the degree of damage to the element. It is recommended to use electric welding using a carbon dioxide semiautomatic device or an inverter. Gas welding using electrodes is a rather complex type of work, since it is necessary to have extensive experience and practical skills in order not to burn through the metal and lay a high-quality seam.
From A to Z: everything about dismantling and replacing car thresholds
What are the defects?
Based on the type of attachment to the supporting body, the thresholds are classified into removable, which are installed on the body with bolts, and non-removable. The elements are welded to the sidewall and provide the car structure with the necessary rigidity and reinforcement. Regardless of the type of installation, the elements suffer the same damage.
- Dents. Defects are formed from impacts with gravel, careless parking, or as a result of a minor accident. Mechanical damage from gravel damages the outer part of the underbody, wheel arches, and side members.
- Scratches, chips. The outer part is damaged. The defect does not affect driving safety; the appearance of the car suffers.
- Corrosion. Rust occurs due to natural wear and tear of the metal and due to improper processing or lack of anti-gravel protection. The degree of wear affects driving safety. If the non-removable threshold, as part of the power element of the body, rots, the overall geometry of the structure changes, the main components and assemblies are distorted: the engine and transmission elements.
Depending on the defect, the repair method is selected: welding, pulling out dents, straightening using spot welding, or sealing holes with adhesive.
Repairing a jammed car sill without painting
Repairing thresholds without subsequent painting is a rather rare type of work. If the element is not removable and there is a small dent, but there are no sharp edges, then you can use suction cups. The complexity of the method lies in the fact that the tool is difficult to install on the part; it is necessary to make a cut.
It is easier to use a reverse hammer and a spot welder to draw out the metal. Restoration of body parts without painting is carried out at specialized service stations using tools; the PDR method is used for straightening dents on wings, doors, bumpers, and roofs.
When the threshold is removable, you can remove the dent without painting using straightening hammers and polish, if the dent is shallow and there is no break in the paint layer.
Repairing a rotten car threshold
If corrosive wear of more than 40% is observed, it is recommended to use partial or complete replacement of the part. Re-welding of thresholds is more often used on non-removable elements; removable fairings are replaced in 80% of cases with new ones. The cost of removable parts does not exceed the cost of repair. Depending on the extent of the damage, drivers choose one of the following options:
- Partial replacement of a rotten section without replacing the amplifier. The rotten part is cut out or knocked out, and a metal patch is installed.
- Complete element replacement. It is used if corrosion has destroyed the threshold amplifier, electric welding is used.
- Redecoration with fiberglass. Used only as a temporary measure. More often than not, unscrupulous owners hide rotten body parts in such a cheap way before selling them.
Stages of work for complete replacement
Replacing a threshold is a labor-intensive and complex process, but this type of repair remains the most productive and reliable. During the repair process, all main parts of the body are checked: the bottom, fenders, wheel arches. If the elements have traces of rust, dents, etc., then drivers can immediately carry out reconstruction and preserve the body for at least another 5 years. A complete replacement of the threshold takes place in stages:
- interior dismantling;
- cutting out an old threshold;
- preparation of the seat;
- welding of a new threshold;
- painting.
At service stations, tinsmiths need up to 2 days to carry out high-quality installation and welding work. When repairing yourself, you can spend up to 5 days if you have no experience in welding and tin work.
Preparing to replace the threshold
Before cooking thresholds on a machine, you need to prepare tools and materials. The car needs to be installed in a garage or box on a lift to make it convenient to work. In some cases, during a complete replacement, for example, when installing a profile pipe instead of an original part, the machine is turned over on its side. Dismantling of elements proceeds in steps:
- Fuel is draining.
- The negative terminal is removed from the battery or the unit is removed completely.
- The door on the side of the threshold being repaired is dismantled.
- The chairs and floor coverings are pulled out, and the lining of the pillars is removed.
- The metal of the bottom is tapped and the jacks are checked.
After dismantling the door, it is recommended to install a spacer between the posts or weld the channel. This will prevent the body from distorting during the welding process.
Replacing thresholds with your own hands will require the following materials and tools:
- New threshold included with amplifier.
- Electric welding.
- Grinder, chisel, hammers.
- Sandpaper R-80, automotive putty, primer, bitumen mastic.
Dismantling elements
In specialized services, thresholds are cut using a welding machine along a factory resistance welding line. In some cases, this helps keep the sill and B-pillar reinforcement intact. This method is not used if you need to digest the thresholds yourself, since in 70% of cases you have to change the entire assembly: the outer part of the threshold, the central pillar amplifier, the threshold amplifier.
Before dismantling the elements, a new threshold is applied to the car, a marking line is drawn, near which the metal will be cut out. The part is cut with a grinder, starting work from the central pillar to the left and right. Step by step process:
- Use an angle grinder (grinder) to clean the old threshold from paint to white metal.
- Drill out spot welding areas.
- Die-cut or cut out the outer part along the marked line.
- Check the amplifier, if the element is rotten, cut it out or cut it off.
- Carry out a complete stripping of the metal body, remove the rust with a grinder, and sand it with sandpaper.
- Attach the new fairing, check the fit, mark the location for the spot clamps.
If an original replica is used for repairs, it is necessary to clean it of the black transport primer in which the part is wrapped for reliable transportation. It is recommended to remove factory primer with sandpaper; do not use an angle grinder.
DIY replacement
The most important step remains the welding process. If the center pillar amplifier is damaged, then first of all the spar is cut out, a similar part of the amplifier is selected and welded. Welding algorithm for a permanent structure:
- The bottom part or connector gets stuck.
- The amplifier is welded.
- The doors are temporarily installed to check the geometry and avoid body distortion.
- The outer part is arc welded.
- Welding seams are cleaned; it is recommended to use a grinder.
- The surface is primed and leveled with putty.
- After the putty has dried, at the final stage it is treated with anti-gravel and painted.
Masters recommend not starting the car for 24 hours after repair until the car enamel has completely dried.
Repair technology
Fixed thresholds are repaired in two ways: with or without welding. The method of sealing holes in the outer cover of an element with a soldering iron is not recommended either by experienced drivers or service station technicians. After soldering, the process of electrochemical corrosion begins on the metal, as the structure of the metal of the patch and the base is destroyed. You can solder the threshold in exceptional cases, not forgetting that this is a temporary measure that will require a complete reinstallation of the part in 3-6 months.
It is also recommended to use fiberglass to seal through individual corrosion plaques in exceptional cases. This is a short-lived cosmetic type of repair that does not provide reliable structural rigidity. Repairing car thresholds with epoxy glue and fiberglass in steps:
- Use a grinder to cut off the old paint and clean the area of corrosion.
- Treat the surface with a rust converter and sand it with sandpaper.
- Dilute the epoxy resin, be sure to add aluminum or copper powder to the glue.
- Cut 3-7 patches from fiberglass with an area slightly larger than the hole to be repaired.
- Apply epoxy slurry to the surface and apply a patch.
- Coat the repair area and apply fiberglass in several layers.
- Roll with a rubber roller, remove air and excess glue.
Epoxy glue dries in 24-36 hours. After this, it should be cleaned with medium abrasive sandpaper, primed and painted.
The best method of repair remains welding; how to digest thresholds depends on the degree of damage to the element. It is recommended to use electric welding with a carbon dioxide semi-automatic machine or an inverter. Gas welding using electrodes is a rather complex type of work, since it is necessary to have extensive experience and practical skills in order not to burn through the metal and lay a high-quality seam.
How to digest rapids
Do-it-yourself welding of car thresholds takes place according to the following algorithm:
- An inverter is the simplest method of semi-automatic welding; it is recommended not to buy the device, but to rent it.
- Check the garage electrical network for load capacity and stable voltage supply without surges.
- Charge the welding machine with wire, connect the phases, check the electric welding for functionality.
- Before welding work, the threshold is grabbed onto points and the geometry of the body and the tightness of the door are checked.
- It is recommended to weld not with a continuous seam, but in increments: 2 cm seam, 5 cm gap.
- They start cooking from the central counter, first under the front door, then under the back.
- After welding, the seam must be carefully cleaned without completely removing the beads, this reduces the rigidity of the structure.
Repair cost
You can save tenfold on repairs if you carry out the welding yourself in the garage.
This is justified when the driver has minimal welding skills, knows the design of body elements, and understands what material needs to be used in what sequence. You won’t be able to save time; independent work, even with an assistant, rarely fits into 3 days; you need to be prepared to spend a week. Original article: From A to Z: all about dismantling and replacing car thresholds
How to digest rapids
Do-it-yourself welding of car thresholds takes place according to the following algorithm:
- An inverter is the simplest method of semi-automatic welding; it is recommended not to buy the device, but to rent it.
- Check the garage electrical network for load capacity and stable voltage supply without surges.
- Charge the welding machine with wire, connect the phases, check the electric welding for functionality.
- Before welding work, the threshold is grabbed onto points and the geometry of the body and the tightness of the door are checked.
- It is recommended to weld not with a continuous seam, but in increments: 2 cm seam, 5 cm gap.
- They start cooking from the central counter, first under the front door, then under the back.
- After welding, the seam must be carefully cleaned without completely removing the beads, this reduces the rigidity of the structure.
Self-brewing
Restoration of non-removable thresholds and the bottom can begin only after placing the car on a repair platform or in a pit with a size sufficient for welding. The bottom is inspected by tapping it with a hammer.
In case of severe rust damage, it is necessary to clean the surface around the embedded area using sandpaper or a grinding tool..
Repairing a body by welding, including welding the bottom, comes down to installing a small patch of metal of the same structure and thickness on the damaged area.
But first you should prepare the problem area, namely, carefully cut out the rusted metal.
If painting after welding is not intended, then the appropriate color of the patch should be selected in advance, which, together with the threshold, after repair, must be carefully sanded and treated with an anti-corrosion compound.
Repair cost
If you need to replace thresholds on a car, then it is worth considering that the price of work at a service station starts from 10,000 rubles. A comprehensive restoration of arches and wings will cost at least 25,000 rubles. The high cost is fully justified by the labor required by the craftsman and the cost of components. A common belief is that repairing body parts is a simple job and can take no more than an hour of time, rather than a marketing ploy.
You can save tenfold on repairs if you carry out the welding yourself in the garage. This is justified when the driver has minimal welding skills, knows the design of body elements, and understands what material needs to be used in what sequence. You won’t be able to save time; independent work, even with an assistant, rarely fits into 3 days; you need to be prepared to spend a week.
Simple manual
How much does it cost to collect your own auto kart?
DIY karting: detailed description Shaped metal parts cost a lot of money. Even more than corrugated sheeting or metal tiles, therefore it makes sense to make a simple machine for bending sheet metal, and with its help make as many corners, ebbs and other similar parts as you need, and exclusively to your own dimensions.
If you're worried about appearance, you shouldn't be. On sale today there is sheet metal not only galvanized, but also painted. In all designs, the sheet is fixed tightly, so that when working it does not slide on the table, which means that the paint does not rub off or get scratched. It is also not damaged in places of bending. So the products will look quite decent. If you try, they will look even better than what they sell on the market.
Powerful sheet bending machine from brands
This sheet bending machine will require a flat surface (table), preferably metal, three corners with a shelf width of at least 45 mm, and a metal thickness of at least 3 mm. If you plan to bend long workpieces (more than a meter), it is advisable to take wider shelves and thicker metal. You can use brands, but this is for bending metal sheets of large thickness and length.
You will also need metal door hinges (two pieces), two large diameter screws (10-20 mm), wings on them, and a spring. You will also need a welding machine - weld the hinges and make holes (or a drill with a metal drill bit).
For a homemade sheet bender, a 70 mm brand was used - three pieces of 2.5 m each, two bolts of 20 mm in diameter, a small piece of metal 5 mm thick (for cutting jibs), a spring. Here's the procedure:
- Two brands are folded, and grooves are cut into them at both ends for hinges. The edges of the recesses are beveled at 45°. The third tee is cut in the same way, only the depth of the recess is made a little larger - this will be the clamping bar, so it should move freely.
Cutting notches for hinges
Boil the loops well
Weld pieces of reinforcement to the bolt head
Homemade sheet bender in progress
This option is very powerful - you can bend long workpieces and sheets of considerable thickness. Such scales are not always in demand, but they can always be reduced. The video suggests a similar design of a smaller size, but with a different fastening of the clamping bar. By the way, no one bothers you to also install a spring on the screw - it will be easier to raise the bar. What’s interesting about this design is that you can make beading on it, something that such devices usually cannot do.
From a corner with a different type of clamping bar
This model is welded from a thick-walled angle, the frame is made like an ordinary construction sawhorse, which is welded from the same angle. The handle is from a luggage trolley. The design of the screws is interesting - they are long, the handle is curved in the shape of the letter “L”. Convenient to unscrew/screw.
Vulnerabilities of the Lada Kalina
Let's study them. Let's take the hatchback as an example as the most popular version of the Lada Kalina. The hatchback has a medium-sized, harmoniously proportioned silhouette and is made of medium-quality materials. The headlights of the Lada hatchback are medium-sized, teardrop-shaped, often fail to work, and as a rule, the contacts burn out quite quickly. In extreme frost conditions, the headlights even crack, and it is not necessary to cling to them; the damage occurs on its own, without any reason.
The foam rubber of hatchback seats is also not of good quality. It remains in perfect condition for no more than three years, and then turns into something frightening and unaesthetic. Therefore, knowledgeable car owners prefer to immediately, after purchase, replace standard seats with better ones. Installing seats on a hatchback does not take much time, and this is a plus.
Professionals also include the sealing of windows and doors among the shortcomings of the Lada Kalina hatchback model. If installed anyhow, it soon leads to squeaking, and it has to be changed. Rear door locks often jam; this is a purely VAZ problem that most car owners are familiar with.