In order for an engine with a 402 carburetor from a UAZ to work normally, you need to set the ignition correctly, and how to do this will be described in this article. Many novice car owners incorrectly set the marks when changing the timing belt, so our auto service often receives engines that require major repairs. This should not be allowed, since, firstly, it is costly for the owner. Secondly, such a breakdown leads to the purchase of a new engine. But this doesn't happen often.
Ignition system elements
The elements of ignition of fuel in the engine are dominant. Through it, the power unit is started. A couple of types of ignition systems have been developed for gasoline engines:
- contact;
- contactless.
The elements for igniting a combustible gasoline engine are given in the list:
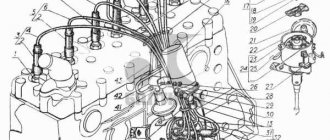
- distributor or spark breaker. Installed to determine the moment in ignition when a spark appears and transfers high voltage to the engine cylinders. The device combines its work with the movement of pistons in the cylinders;
- coil;
- switch. This part extinguishes the flow of electricity to the coil winding and turns the signal from the regulator into a current signal;
- candles;
- lock;
- starter;
- resistance. Sometimes they add.
Attention! On an engine from a Gazelle or UAZ, a non-contact ignition system is used. A generator is added to it to control signals and devices to regulate advance: vacuum and centrifugal.
Experienced mechanics advise reading the characteristics given below to set the ignition correctly:
- The operation of the engine cylinders is carried out in this way: one, two, four, three;
- the rotor device always rotates counter-minutewise;
- the centrifugal part has a lead angle of eighteen degrees;
- the vacuum part has a lead angle of ten degrees;
- SZ play does not exceed 0.8 mm;
- R resistor does not exceed 8 kOhm;
- R SZ no more than 7 kOhm;
- R in the stator winding – 0.5 kOhm.
Now let's talk about how ignition of fuel in the power unit works.
Features of fuel ignition
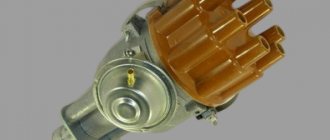
Before installing and correctly setting the ignition order on the 402 engine, it is important to understand the design features of the distributor.
This engine was equipped with an electric flow distributor without traditional metal contacts. The innovation is that the complex process is controlled together with the generator by a vacuum advance regulator. The distributor sets the order in which the spark appears and the sequence in which the fuel is ignited in the cylinders. A mechanical slider helps to correctly “catch” the moments of the spark discharge. It is mounted directly on the pulley. Has a resistor to help mix noise. The switching device disconnects the circuit in the first coil. Subsequently, it converts electrical impulses emanating from the node into an intermittent short-circuit current.
How the ignition system works
The fuel mixture is ignited as follows:
- The driver turns the key in the lock.
- Current from the battery goes to the starter.
- The crankshaft begins to rotate.
- The distributor turns on.
- Current flows to the coil.
- It passes through the switch to the distributor.
- The last device distributes the current among the spark plugs.
Similar article Technical characteristics of the ZMZ 402 engine
This ensures proper ignition in the engine. However, there are early and late arson. Then we can talk about malfunctions of the power unit.
Early ignition
Early ignition occurs before the cylinder piston approaches top dead center. Gasoline with air and oil is ignited while the piston is still moving. Such problems arise due to an incorrectly set ignition angle.
Experienced mechanics identify such a breakdown by the following signs:
- the power unit does not start immediately;
- unstable operation of the engine when idle at traffic lights, when the car is standing still;
- the appearance of a chattering sound that does not go away when the load increases;
- When disassembling the engine, mechanics discover carbon deposits on the spark plugs. This means that the fuel does not burn out completely;
- increased fuel consumption;
- dark smoke from the muffler pipe.
These are all signs of pre-ignition. Let's look at what happens when the ignition is slow and ignition does not occur on time.
Late ignition
If the marks are set incorrectly on 402 ZMZ engines, late ignition occurs when the piston has already passed the top point. The car owner can notice this by a drop in power with increased gasoline consumption.
Experienced mechanics notice late ignition by the following signs:
- candles turn gray or white;
- the engine begins to heat up very much, although the cooling system is in order;
- The motor may stall when the load increases.
Correct ignition adjustment and adequate placement of marks will help to cope with the problems described above.
Fine tuning: weights and springs
The adjustment of the weights begins after this. This is already called fine adjustment of the distributor. In this case, the UZ is being adjusted, for which the proofreaders - TSNTR and VK - are directly responsible.
The first, centrifugal regulator contains two weights and two springs. When the distribution rotor rotates, the weights, under the influence of the CNTR forces, diverge to the sides. During this process, the shaft with cams or the shutter moves (if the ignition system is contactless). Thus, the contacts operate noticeably earlier.
Two springs act as counteraction to the CNTR force, on which the effective functioning of the entire ignition system depends. The springs themselves are different, and this is done this way for a reason.
- The first spring is longer, it is responsible for the moment the CNTR regulator, which carries out tension, comes into play. At the same time, this spring adjusts the right angle up to 1.2 thousand revolutions per minute, ensuring rigidity.
- The second spring is shorter, but it is much stiffer than the first. Corrects the breaking moment, ensuring free movement.
Experts insist that the second spring must be provided with free movement. However, some car enthusiasts believe that this results in unstable operation of the internal combustion engine at low speeds. It is supposedly regulated by the tension of this spring.
As for the VK or vacuum corrector, it contributes to the occurrence of advance only during the operation of the first chamber. In other words, when it comes to partial load on the power plant.
By itself, this advance regulator cannot create advance either at high speeds or under loads. This should be understood. And on XX, by the way, too.
Video below about the operation of weights on a distributor
Procedure for adjusting the ignition system
To correctly adjust the ignition, you need not only to set the advance angles, but also to position the marks correctly. By the way, if the car owner does not understand and does not understand the design of the engine, then it is better to give this work to experienced mechanics in the service center.
Let's look at all the nuances of ignition adjustment.
Label matching
To correctly compare the marks and set the engine ignition, do the following:
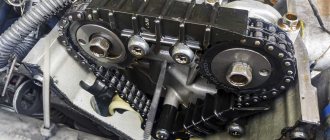
- Set the first cylinder to top dead center.
- The crankshaft is turned so that the mark on its pulley aligns with the mark on the cylinder head.
To do these steps, you will need to remove the spark plug from the first cylinder and plug the hole with a rag. Rotate the crankshaft until this rag is removed by air, which creates pressure inside the cylinder.
Similar article Technical characteristics and reviews of the Chrysler engine for the Volga and Gazelle
Such actions will help to find the end of the compression stroke, otherwise the top dead center of the cylinder.
Advance angle adjustment
To set the ignition timing of the ZMZ 402, you need to do the following:
- Slightly unscrew the octane number corrector bolt on the distributor.
- Set the advance angle on the engine to the center of the scale.
- Slightly unscrew the screw that secures the plates of the octane correction device.
- Rotate the distributor until the red mark on the rotor head is directly in front of the mark on the stator.
The car owner must then hold the engine distributor with one hand. And with his second hand he will tighten the screws. This is how the ZMZ 402 ignition is set.
Checking the correct installation of the ignition
Now the car owner will only have to check that the ignition is installed correctly. Whether he installed the ignition correctly or not can be determined as follows:
- Accelerate the vehicle to 60 kilometers per hour.
- At this speed, press the gas pedal sharply.
- Detonation will occur within three seconds.
- If it does not continue in the future, then the engine ignition was set correctly.
Attention! Experienced mechanics set the ignition in the engine using a strobe light.
Device malfunctions
Replacement and repair of the distributor on the domestic “six” is carried out in the event of incorrect operation of the mechanism.
Below are the main symptoms of breakdowns that indicate possible malfunctions:
- The vehicle jerks while driving. Moreover, these jerks are completely uncharacteristic of a car.
- The engine generally does not start.
- When trying to accelerate the car, the car may also jerk, and the acceleration process itself takes a lot of time, and the engine may detonate - the piston rings knock.
- Increased fuel consumption.
As you can see, in general the symptoms are similar to those that appear when the ignition is set incorrectly. Of course, if such symptoms appear, it cannot be said for sure that the fault lies in the distributor, but attention should also be paid to diagnosing this unit.
As for the breakdowns that may force the car owner to repair or replace the mechanism, they are as follows:
- The unit slider is worn out and burnt out.
- The problem lies in the cover itself - the contacts on it could have burned out.
- Hall sensor failure. The problem may be associated not only with a breakdown of the controller, but also with poor contact on the regulator plug.
- Another reason that domestic drivers encounter quite often is the distributor bearing. After a long period of use, it could become loose, but it could also simply jam.
- Presence of mechanical damage, including cracks on the cover.
- Engine fluid gets into the distribution unit; usually the problem is related to the seal of the cap.
Distributor Gas-3307 and Gas-53!
Installation of a distributor drive on trucks of the Gas family with a ZmZ-511 gasoline engine!
Hello dear friends! Again, after my observations using Yandex metrics, a wonderful tool for web masters, I made one substitution for myself.
How to install the ignition yourself
You can install the ignition yourself. For such a procedure you will need a standard set of tools. If there is a strobe, then that's good. The tool will allow you to set the correct ignition of the mixture, so as not to endlessly crawl under the hood.
And the procedure is done as follows:
- Warm up the engine to 80 degrees. This is its operating temperature.
- The instrument is connected to the on-board computer.
- The distributor cap lock will need to be unscrewed.
- The signal sensor must be placed on the high-voltage wire of the first cylinder.
- If there is an engine vacuum corrector hose, it must be plugged.
- Light from a strobe light is directed onto the engine crankshaft pulley.
- Start the engine and leave it idling.
- Rotate the distributor body.
- Combine marks.
- Tighten the clamp.
This completes the installation procedure.
Setting ignition timing on gas 24 marks for setting video
Finally I found the time and installed a contactless electronic ignition on the Old Woman. I did everything according to the OGSStudio instructions. The day before I bought a switch from nine, a 2-lead coil from Oka, a Hall sensor, Brisk spark plugs, a modulator and a platform for the Hall sensor, I ordered it through Avito so as not to mess around with it myself.
I had silicone wires from Oka, just 2 were left over from the set when the wires were changed on my grandfather’s Oka. The Hall sensor had to be changed because some do not have holes for non-standard installation; in short, you need to look for a sensor with 4 holes))).
I adjusted the ignition timing with a multimeter, which I borrowed from Andrey after yesterday's rides. I started it in half a whirl, but made a mistake - I turned it off to roll the bike out of the garage, forgot to turn on the ignition and that’s it, I filled the spark plugs. Oleg came to the rescue and brought me a fire starter; we started the old lady from the pusher.
Now pah-pah the motor runs smoothly. I hope that I will have time to collect it before the “Full Throttle” festival, I want to show off and go there in an old lady.
Installation of distributor with drive
Installation of the distributor with the drive is carried out as follows (all work is carried out with the power unit running):
- Turn the distributor counterclockwise.
- Be prepared for the engine speed to increase.
- If the car owner continues to crank the engine distributor, the power unit may stop working stably.
- When the engine speed drops, you need to turn the distributor clockwise.
Similar article Timing marks for 406 ZMZ engine
To test whether everything has been done correctly, it is recommended to sharply accelerate the car or, conversely, brake sharply and stand for a while. At the same time, the operation of the engine should be stable, and it should not stall.
Removing the distributor assembly with the oil pump drive
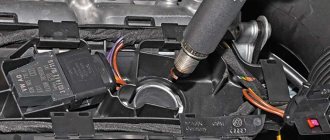
To carry out repair work on the distributor on a Gazelle or UAZ engine, you will need to remove it. This is done this way:
- Remove the cover along with the wires located there.
- Remove the vacuum regulator hose.
- Dismantle the fastening of the low-voltage wire.
- Remove the octane corrector fastenings. To do this, use a key of ten. And to dismantle the low-voltage wire, use a seven key.
- Finally, remove the engine distributor itself.
This task is easy and does not require special skills to complete. However, the car owner must have an understanding of the design of the motor. Installation is carried out in reverse order. It must be remembered that the distributor can only be installed in one position.
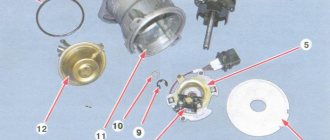
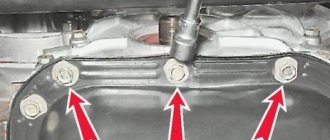
If you need to remove the oil pump with distributor, you need to do this:
- Remove the engine distributor cap. Remove high voltage wires.
- Now you need to remember how the slider is located relative to the body.
- Dismantle the vacuum hose and switch wire.
- Unscrew the two fastening nuts. The key is used for thirteen.
- Dismantle the distributor sensor and oil drive.
Remove the gasket on the engine and put in a new one if that's the problem. If the position of the engine crankshaft remains unchanged, install everything in the reverse order. If even small changes occur, then first the piston is moved to top dead center. Align the mark on the crankshaft pulley with the mark on the cylinder head. The cylinders must be closed.
Then the distributor is installed.
Preparatory process
Before you begin adjustment work with your own hands, you need to prepare the necessary tools and consumables, which include:
- set of measurement probes;
- a set of wrenches (socket or ring);
- new valve cover gasket;
- crankshaft ratchet key;
- spark plug wrench Needed to remove spark plugs;
- Phillips and flathead screwdrivers;
- clean rags.
Upon completion of preparation, when all the required tools are prepared, you can proceed directly to the adjustment work.
Source