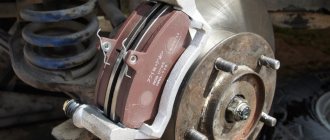
The bumper of any car sometimes has to be dismantled. This circumstance is due to the fact that this structural element is subject to frequent damage during an accident. In addition, performing various types of repair work also requires a similar procedure, since it creates obstacles to access to various components and assemblies of the machine during their repair. It will also need to be removed if the car owner decides to carry out tuning and replace the standard device with a non-standard one. That is why he must know how to remove the front bumper on a Chevrolet Niva.
We remove the front bumper on a Chevrolet Niva with our own hands
Removing the bumper may be required for repair work and tuning.
To dismantle the bumper, no special tools or knowledge are required. It is enough to have a good Phillips screwdriver, keys/sockets for 8, 10, 13 and 12, a knife, and a can of WD-40 penetrating lubricant would also be useful in case some bolt gets rusted.
Algorithm
Next we follow the action plan.
- We hang up the two front wheels and remove them.
- Open the hood and disconnect the negative cable on the battery.
- Now you need to remove the dust and dirt mudguard from the wheel arch on the right and left; you can only remove its front part.
The fender liner bolts are indicated by arrows.
Removing the decorative bumper trim.
Two screws securing the bumper under the license plate.
Two bolts securing the front bumper from the bottom.
Bumper installation
Installing the bumper is carried out in the reverse order. Good luck to everyone and smooth roads!
Removing the front bumper. Lift the hood of the car, disconnect the negative terminal from the battery, remove the license plate.
Remove the radiator trim.
Unscrew the four bolts 4 (Fig. 8-10) of the upper fastening of the front bumper 3 and the four nuts of the lower fastening, unscrew the screws 1 and 5 of the side fastening.
Disconnect the wiring harness connectors from the fog lights.
Remove the front bumper.
Install the front bumper in reverse order.
Removing the rear bumper. Open the tailgate of the car, remove the left arch and side panel trim.
Disconnect the license plate light wiring harness connectors from the rear accessory wiring harness.
Unscrew the bolts 7 (Fig. 8-10) around the perimeter of the rear bumper 8.
Unscrew the four nuts 9. Unscrew the four screws 5 and remove the bumper.
Install the rear bumper in reverse order.
Rice. 8-10. Removing the bumpers:
1 - screw; 2 — front bumper beam; 3 — front bumper; 4 - bolt; 5 — screw for the side fastening of the bumper;
Other section materials
| Body |
| Design Features |
| Removing and installing front fender liners |
| Removing and installing front fenders |
| Removing and installing decorative trims on the front fenders and doors |
| Replacing buffers |
| Removing and installing radiator trim |
| Removing and installing the hood |
| Removing, installing and adjusting the hood lock and drive |
| Tailgate |
How to prepare a bumper before painting
In order for the part to be perfectly painted and look like new, it is not enough to select the paint according to the color scheme and paint the element. The outcome will depend on how the part was prepared before painting.
How to prepare a bumper for repair and subsequent painting
Dismantling and washing of the bumper
The first stage is dismantling. To avoid contaminating the tools with accumulated dirt on the bumper, the element must be washed with detergents and solvent.
Removing previous coverage
This procedure is carried out in two stages: initially it is necessary to remove large parts of the coating, the separation of which can be done without the use of complex tools, then rough cleaning is performed using special equipment - an orbital sander. When the paintwork is removed, all corners, steps and burrs on the bumper are smoothed out.
All faults and defects are welded, then the seams are covered with putty instead of fiberglass. Dents and irregularities are straightened by heating and treated with a simple finishing putty. When everything is dry, the putty is sanded. When this stage is completed and all problems have been eliminated, the element is ground with P220 abrasive.
Degreasing and cleaning
Before you start priming the surface, it must be cleaned of dirt and dust that has accumulated after puttying and sanding. Next, it’s worth degreasing and treating with anti-silicone.
Applying primer
After cleaning and degreasing, two coats of primer are applied to the bumper. Then coat with a layer of 2-component acrylic primer. A new layer is applied only when the previous one has dried and has a matte appearance. Finally, a final liquid coat of primer is applied to the surface of the bumper.
When all layers of primer have been applied, the bumper is dried (naturally or accelerated).
Final sanding and cleaning
The bumper is dry, which means you can start sanding it with an abrasive that has a fine grain. It is used to smooth out minor defects, relief after rough grinding and many other errors.
Then the bumper is blown and its surface is degreased. With new elements they do the same thing, but do not remove the old coating and do not resort to repairs.
How to Remove the Radiator Grille on a Chevrolet Niva
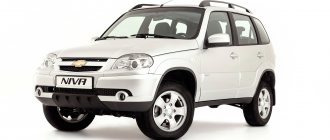
Features of the Chevalet Niva grille
Not only the Niva Chevrolet car manufacturers have taken care of the powerful engine, all-wheel drive and interior exterior, but they have also not forgotten the exterior, which has the rugged and serious appearance that an SUV needs. After all, off-road driving does not require sophistication and soft appearance; Shevik is designed to overcome various obstacles, overcome boundaries and achieve goals. But on the path of such an iron horse, obstacles can sometimes create certain types of damage, called damage. In this article we will tell you everything about the Chevrolet Neva grille, or rather about its purpose, replacement and tuning, in general about how you can change the appearance of the front of the car. The reason for the change in the appearance of the front of the car is modernization to improve aerodynamic properties, for additional protection, to improve cooling of the radiator and engine.
Often, drivers encounter problems with damage to the front end, and the front grille and headlights, the slightly smaller bumper and the windshield are the first to be affected. Therefore, it is necessary to protect not only the radiator, but also the grill itself. But first let's look at its purpose because many people think that it is only for the beauty of the car's design, but that is not the case.
Front grille and its purpose
Thus, its main use for Shniv is:
- First of all, it protects the radiator from damage caused by off-roading and bad roads, where the smallest gravel or branch can simply puncture the radiator. All drivers know how fragile the radiator is, but it is also an important part of the engine.
- It is also designed to improve the aerodynamics of the car, which not only improves acceleration on the road, but also saves the car on the road. It is known that poor aerodynamics contributes to increased fuel consumption and poor gravity.
- The beauty of the Chevrolet Niva exterior, which makes the car unique and unforgettable on the road.
The front grille consists of three parts: the Chevrolet check lining, a special protective mesh in the background and fastening to the structure.
Removing the front bumper with grille for Bertone models
The removal principle is quite simple, you need to unscrew the fastener and remove the front end. But this is a little more detailed as there are cases. “Everything seems to be unscrewed, but it doesn’t work!” To prevent such situations for novice drivers, a detailed description of the Shniva bumper removal sequence is provided.
- First of all, you need to install the front part of the lift or jack and then remove the wheels for ease of use.
- Disconnect the car from the battery to prevent wiring.
- The top grille is secured with three screws that need to be unscrewed.
- Next we go down below the license plate area where there are two screws that also need to be removed.
- lower part of the front bumper
There are also two mounting bolts that are easier to unscrew during inspection. - Remove the protective housing by tightening six screws on each side of the front bumper cover, you will also find two nuts there and remove them. The protective cover has been removed.
- Behind the body we will find wiring suitable for the PTF; it must be disconnected so as not to interfere with the wiring during removal.
- Continue removing the left and right lights. The cover is adhesive-based, so it must be carefully removed.
- There are two bolts behind the headlight cover, which are additionally designed to secure the front bumper. Remove and remove these bolts. Below. side mounting of the bumper to the supporting structure of the body.
- There is one screw on both sides of the car and the bumper is pulled back.
- Remove the 4 nuts securing the bumper wiring harness. After this, the beam is removed directly. The front of the car is completely removed, now if you need to disassemble all the components of the part.
How to remove the front grille for Shnivy models after 2009
Now, if there is a need to replace the front bumper, depending on the situation, it is easy to do. First, let's look at the sequence of front disassembly of individual parts. Sequence of disassembling the folded front bumper. 1) Remove the bottom cover. 2) When cutting the mounting brackets, remove the two screws.
4×4Chevrolet Niva
2022 Front Bumper Replacement Thanks for watching and subscribing. my.
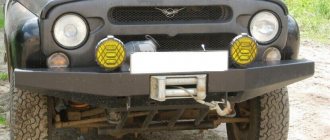
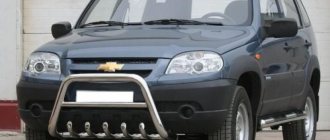
Types of protection
Chevrolet Niva bumper protection is made of metal and comes in two types:
- Simple. It consists of one or more one-and-a-half tubes, which are located no higher than the fog lights. They have a variety of designs, so each driver chooses the one he likes best. There are options that are made from more durable and expensive metals, and there are regular ones that can protect the bumper from small obstacles such as grass. This type of protection is preferred by drivers who do not want to attract attention to themselves.
- Difficult. This element received this name because of the complexity of its design; it is capable of protecting the front of the car from almost any impact. Made from expensive and durable metal. As a rule, it is prohibited to use a crash guard in urban conditions, since in the event of a collision, great damage is caused to another car. For this reason, many manufacturers use reinforced plastic for production, and for this reason this element has more of a decorative function than a protective one.
Also, to strengthen and additionally protect the side of the car, porges are installed that perform the following functions:
- Protects the side of the body from dirt and small stones
- Serves as a footrest, this is especially important for children
- Improves the appearance of the car
They come in two types:
- Decorative. The price for this type of product is low, this design is quite easy to install. The main disadvantage of this design is its unreliability; if there is a strong enough blow it can burst.
- Power. The price for them varies from 3 to 5 thousand rubles. But as for reliability, they are able to withstand quite heavy loads.
Replacement of Niva Chevrolet thresholds, as well as installation, occurs as follows:
- First of all, the plastic plugs are removed from the inside of the side pillars
- Mortgages are threaded through a special technological hole in the side members. A wide mortgage is attached to the outside of the car, and a narrow one to the outside
- Installation is carried out from the rear of the car; an inspection hole is best suited for these purposes. A pair of nuts that secure the reaction rods are unscrewed and the thresholds are installed on the bolts
- Then, in the front part, fastening nuts are attached in the central part of the mortgage, and then in the outer part. On the extreme side there is adjustment.
There are no difficulties in installing the product, so you can install it yourself.
Bumper painting
Before applying the paint (base/paint), you need to thoroughly wipe the surface to be painted with a sticky cloth. So, after such a maneuver you can achieve a perfectly clean surface for painting the bumper.
Next, you need to apply about 2-3 layers of paint to the surface of the bumper with intermediate drying of 5-10 minutes. In case there are stuck particles (debris) on the painted surface from somewhere, you should wait until the paint dries (this is about 20-25 minutes), and boldly use a special “interlayer” napkin to remove debris from the painted surface . But here you should act extremely carefully and not go too far with the force of wiping, so as not to tear off the painted layer.
The final steps of painting are pouring two layers of varnish onto the painted surface of the bumper with interval drying. If you get drips from very liquid varnish, then you need to dry it to the maximum, grind and polish the painted surface of the bumper. The average price of painting with straightening will cost from $50, depending on the car, and can reach up to $1000 per procedure.
Video on how to properly paint a bumper:
You can install a power bumper on a Chevrolet Niva yourself
In particular, you need a grinder and a welding machine.
If you don’t have such devices and have nowhere to borrow them, you will have to create a reinforced bumper for your Niva, resorting to the help of specialists. Installing a reinforced bumper Now that you have made sure that all the necessary materials and tools are available, roll up your sleeves and begin creating a bumper for the Niva. Cutting the material So, if you are immersed in the creative process, As a result of which you will be able to strengthen your car, you must first create a template on the basis of which the sheets of metal will be cut.
It is for this purpose that you will need cardboard, since it can be considered as an excellent tool with which the drawing can be easily transferred to metal. After all, indeed, there is nothing simpler than attaching cardboard elements to metal sheets and simply tracing them with a marker. Next, you will have to use a reinforced Chevrolet Niva bumper to cut out all the metal parts separately.
In production, specialists no longer use an angle grinder, since they have a laser machine that cuts out parts much faster. Carefully go around the edges of each prepared part with a sanding machine. This will ensure that you achieve perfect symmetry of the product in the future. Creating the main structure The reinforced rear and front bumper on the Niva can be created from individual metal elements, and then connected them using a welding machine.
You can do it differently, cut out a solid metal element, and then bend it in the desired direction. The one who directly carries out the tuning must figure out which actions will be less problematic for him. Of course, if you can easily figure out how to bend metal, then it’s better to do just that, since the appearance of such a reinforced Chevrolet Niva bumper will be more impressive in its aesthetics.
Many of them travel in their cars through difficult places, off-road, and direct impacts on the reinforced bumper of a Chevrolet Niva car are extremely dangerous for them.
Front power bumpers for Niva and Chevrolet Niva
reinforced bumper Chevrolet Niva An element such as a power bumper will not only take all the blows, but will also be able to protect the body. Other parts can also be used as a power body kit. These include: Such tuning is possible on cars with all-wheel drive, so both a removable winch and a power bumper can be installed on a Chevrolet Niva.
Today on the auto parts market you can find an incredible number of various variations of power bumpers. They can be made of steel, reinforced Chevrolet Niva bumper and fiberglass, aluminum and other durable materials. If you wish, you can even order titanium power bumpers at the car dealership. But this, naturally, will be quite expensive.
Preliminary preparation for dismantling
Before you start removing the bumper on a Chevrolet Niva, you need to study all the design features of this structural element of the car. The fact is that it is made of 90% plastic. Such plastic may be reinforced in some cases, but not in others. It all depends on what kind of restaling the manufacturer carried out on the Chevrolet Niva. The plastic, in turn, rests on a metal cross beam. That is why errors during dismantling can lead to damage to the buffer itself and the energy-absorbing beam.
Before starting dismantling, it is necessary, in order to avoid electric shock, to remove the battery terminal. In order not to experience difficulties in finding fasteners during work, it is worth preparing their diagram in advance indicating the exact number of fastening elements. If you prepare for the work in advance, they can be completed within half an hour.
Necessary tool
In order to perform the necessary work as efficiently as possible, you first need to put the car on a lift. As a last resort, it can be sent to the inspection pit. In addition, you need to select the following set of tools:
- wrenches for "ten" and "twelve".
- hammer.
- screwdrivers, flat and Phillips.
- in the case when all the attachment points are rusty, you will need an angle grinder.
Rear bumper
The rear bumper of the restyled Chevrolet Niva model does not have many distinctive elements, but there are practical innovations. The first thing that catches your eye is the horizontal insert in its upper part. Theoretically, it should serve for convenient loading or unloading of the trunk. But even if the owner doesn’t find any use out of it, it looks quite stylish. When the trim is painted in body color, the insert remains black. The rear bumper, like the front, has a lower part made of black plastic. The imitation buffer protection is also a license plate bracket. The air intake slots, even if they are not functional, give the car a semblance of GT styling.
By the way, in the updated version, body kits appeared on the wings and sills. The bumpers have smooth transitions under the linings, which creates a unified picture around the perimeter of the body.
Self-production of thresholds
For some reason, store-bought products may not suit car enthusiasts, so some car owners make them themselves.
To do this, take two tubes with the diameter you need; for greater reliability, a special insert is made on them, which can protect the driver from slipping during rain or snow. They are secured using a step and bolts, and the step itself is connected to the threshold by welding. As you can see, you can make thresholds for a Chevrolet Niva with your own hands without any problems. For additional protection of the thresholds, as well as to give them a better design, special linings are installed, which come in several types:
- Plastic. This type is the most common. Their main advantage is low price, quality and aesthetics.
- Chrome plated. They are more reliable and attractive; when installing them, you can be sure of their durability.
- Decorative. As a rule, they are made of fiberglass and are very popular. Quite high quality products that are quite reasonably priced.
- With backlight.
To install door sill covers on a Niva Chevrolet, you need to study the instructions that come with them, then degrease the surface with acetone and attach the cover.
To summarize, we can conclude that there are a large number of accessories that can be used to further protect the car body. Since the choice is quite large, when choosing, you can rely on your personal preferences and financial capabilities.
Sources used:
- https://infokuzov.ru/kuzov/snyat-bamper-na-shevrole-niva
- https://chevroletov.ru/remont/niva7/1357-demontazh-zadnego-bampera-na-restaylingovoy-shevrole-niva.html
- https://carfrance.ru/snimaem-perednij-bamper-na-niva-shevrole-svoimi-rukami/
- https://expertniva.ru/kuzov/snatie-bampera.html
- https://djeeprus.ru/shevrole-niva/kuzov/bamper-na-nive-shevrole
Dent removal algorithm
Repairing a dent on a plastic bumper is carried out in accordance with the following algorithm:
the part is dismantled in order to have equal access to both its outer and inner surfaces; The dent area is thoroughly washed and dried, making sure that its entire surface is dry and clean on both sides. Traces of rust, dirt, and fungus that could interfere with the normal course of the restoration process are strictly excluded; After preliminary preparation, it is necessary to level the bumper with a hairdryer, gradually warming it up
The entire repaired area must be uniformly heated to a temperature at which the plastic bumper softens, but there is no need to bring it to the melting point and you should press on it carefully during the work process. If this rule is not followed, the bumper will have to be repainted; warming up the product with a hairdryer, or pouring hot water on it, pull out the dent with gradual circular movements, pressing on it from the side
It would be great if this type of dent straightening is done using a blunt metal object. After warming up the bumper, you should wait a few minutes before straightening the dent, since under the influence of high temperatures, it can begin to straighten itself, returning to its previous state; after the part has taken on the old or received a new shape, and the dent has been eliminated, the bumper needs to be cooled at the site of damage using a wet rag, as well as a can of compressed air.
Separately, it is worth noting that in the manuals devoted to the topic: how to remove a dent on a bumper, it is specifically stated that some types of plastics have “shape memory.” It lies in the fact that when repairs are carried out a relatively short time after the bumper has received damage, it can return to its previous shape somewhere in 10-15 minutes after the end of heating the product. If the bumper is cooled in time, it will be fixed in a new state and will never return to its previous state. As for putting it back in place, this can only be done when the damper has completely cooled down and is not afraid of serious mechanical impacts.
Replacing a part or part of it
If there is more serious damage, removing dents will not help restore the integrity of the part. In this case, the body element, or its most severely damaged part, is replaced with a new one. When replacing, it is necessary to find a part identical to the one being replaced. If a specific area is being replaced, the patch is cut from the same metal. Next, it is welded to the part being restored.
Minor damage to the body, chips, scratches and dents on the car can be repaired independently without repainting. Parts of the body that were not previously damaged are subject to restoration. If paint cracking, breaks or kinks appear, repairs without painting will not be possible.
Repair
Often the body kit is removed due to its failure. Most often, drivers prefer to replace the bumper with a new one. But, in fact, in many cases it is possible to restore the bumper. This will avoid unnecessary costs for purchasing spare parts.
If there are minor scratches
, then you can simply polish this section of the bumper. This way you can restore the appearance of the part. If the damage is deep, you may need to use putty. After which the scratch is sanded, painted and polished.
Cracks are usually sealed. To do this, use a special device that slightly melts the plastic. But, when carrying out this work, it is worth stopping the further propagation of the crack. To do this, holes are drilled at its ends to the entire depth of the plastic. After which you can solder it.
Another common damage is broken pieces. But, even in this case, you can restore the bumper. Especially if a small piece of the body kit is lost. To do this, use fiberglass and PVA glue. The lost section of the part is formed from this mixture. After hardening, the bumper is sanded and painted.
How to remove the front bumper on a Chevrolet Niva
A long time ago, when cars first began to be created, they had a very monotonous appearance. The more they became, the more it was clear that they were monotonous. Each car was very similar to every other. People paid almost no attention to this, because for them a car is primarily a means of transportation. However, over the last hundred years, and especially now, a car has been more than just a means of transportation. Now it has enough comfort, such as:
- climate control;
- electric windows;
- heated mirrors;
- heated seats;
- rain sensors.
In fact, there are a lot of comfort systems in cars. Nowadays people treat cars with personality. They want there to be a twist in each of them. That's why they create a custom look for each car. The main part of a car's appearance is its bumper. It not only has the function of exterior but also protection. If earlier automakers created a metal body for good strength, now almost all automakers create plastic bodies, and a metal body reinforcement is placed underneath it.
Under the body there is not only an amplifier, but also many sensors. It is for the purpose of replacing or repairing sensors that sometimes it becomes necessary to remove the front bumper. There is also a little space behind the bumper, which is why when tuning a car or adding new parts to it, this free space behind the bumper can be useful. Also, sometimes in small traffic accidents, only the bumper is damaged, which is why it needs to be removed and replaced or repaired. Sometimes it is much more convenient to remove the bumper at home, since, for example, you can replace the sensor at home. You will learn how to remove the front bumper of a Chevrolet Niva in this article.
Insulation for the front radiator compartment
This is vital during the cold season, since without insulation, radiator grilles in severe frosts will determine the rapid warming up of the engine and, accordingly, will save fuel. An uninsulated car engine quickly cools down in the fresh air, so leaving the car even for 10 minutes risks having to warm up the engine again. What you will need is no secret; it will be an advantage for the car if you install a heat insulator in the radiator area. For this purpose, you need to purchase a special heat insulator with a foil coating on both sides; this coating perfectly protects the engine from frost. The heat insulator must be glued to the grille from the inside. It is also important to fasten it well so that it does not break off under the influence of the air flow and does not stick to the surface of the radiator. They also sell ready-made heat insulators that are attached to the radiator grille on the outside of the car; their installation is even easier than the previous option.
If the engine overheats, you can always remove the heat insulator whenever it is convenient for you. When the temperature of nature rises, the heat insulator is removed before the onset of subsequent cold weather.
Thus, the Chevrolet Niva has good parameters; for it, there are many types of tuning parts that can always be bought on the Internet, having previously looked at the photo and selected fasteners. Car tuning is no longer considered a luxury, it is intended to introduce innovations to the car and provide something special, to stand out from the crowd. And whoever the driver chooses the types of modernization for his own car according to his own liking. Successful design decisions for car modernization and repair!
Do you still think that diagnosing a car is difficult?
If you are interested in this issue, it means that you are enthusiastic about doing something yourself in the car and really saving money , since you are already familiar with the following:
And you are naturally tired of throwing money away, but in reality, driving for 100 all the time is out of the question, then you need a regular CAR SCANNER ELM327, which connects to any car and through a regular phone you will always find the problem, turn off CHECK and save a lot of money.
We ourselves tested this scanner on different machines and it showed excellent results, now we recommend it to EVERYONE! So that you do not fall for a Chinese fake, we publish here a link to the Autoscanner website.
Source
CHEVROLET NIVA engine cooling radiator replacement (with air conditioning)
In this lesson we will repair a stock bumper
from
Chevrolet Niva
we produce flat electrodes BAMPERUS. material .
5. Open the hood. Remove the radiator trim. It is supported by four screws. Here you will need a screwdriver. We work slowly so that the screwdriver does not slip and damage the radiator.
6. We disconnect the terminal block of the front wiring harness and thereby turn off the fog lights.
7. Remove the headlights. Use a Phillips screwdriver to loosen the front and rear screws securing the headlights. Remove the headlight trim. Be careful not to catch the front optics with the screwdriver.
8. There are bolts at the bottom of the bumper, but to get to them you need to remove the headlight trim covers (also called "eyelashes"). Remove the decorative headlight cover (eyelashes under the headlights) to the right and left (it is held in place by double-sided tape). simply lift the "G" knife, curved at the top. Legoneko cuts the tape that holds the eyelashes. You can now remove the latch from the latches and access the two screws under the headlight (these hold the bumper in place). Unscrew them with a key.
9. Fog lights should be removed from the coupling using a bundle. This will make it easier to further dismantle the bumper.
10. Using a 10 wrench, loosen the top bolts of the bumper cover.
11. We are removing license plates. Under them there are 2 screws that should now be unscrewed.
12. Loosen the side fasteners (2 bolts) at the bottom of the car and remove the bumper.
13. Now unscrew 1 screw and 4 nuts from the side securing the beam to the body.
14. We remove the beam.
Reassemble or replace the bumper with a new one in the reverse order.
Subscribe to our feeds on , and : all the most interesting automotive events in one place.
Letter of the law
Just recently, car owners were shocked by the fact that in Russia the government banned the use
metal kenguryatniks. This is what beginners call literally everything that protrudes from the front of the car and is made of metal.
But remember that there is nothing in common between a bumper and a power bumper. These are different concepts with their own nuances. Regarding legislation, there is no clear law that would prohibit you from putting a body kit on your car. But if you want to make such a change to the design, you will have to take care of the corresponding entry in the PTS. It's not that difficult, don't worry.
Just recently, car owners were shocked by the fact that in Russia the government banned the use