To understand how to remove the Niva Chevrolet door trim, it is worth studying the basic rules of this procedure and the nuances of self-repair. The sequence of dismantling actions may vary depending on further goals. If the fabric is worn out, the fabric needs to be replaced; if the door card is deformed, the structure must be disassembled and the defects corrected. Preparing equipment, selecting new materials and decorative elements will ultimately create an updated look for the salon.
Removing door trim from Niva Chevrolet
To understand how to remove the Niva Chevrolet door trim, it is worth studying the basic rules of this procedure and the nuances of self-repair. The sequence of dismantling actions may vary depending on further goals. If the fabric is worn out, the fabric needs to be replaced; if the door card is deformed, the structure must be disassembled and the defects corrected. Preparing equipment, selecting new materials and decorative elements will ultimately create an updated look for the salon.
The traction is broken.
Basically, the rod can bend if it was assembled incorrectly. The problem can also appear if the car is often used in off-road conditions and dirt gets into the cavity. This can happen if the plastic film peels off from the door frame. In this case, dust may accumulate inside it.
During movement, dust settles not only at the bottom of the cavity, but also on all components, including the levers. After the car gets caught in the rain or washed, all the dust turns into dirt, firmly settling on the insides. As it accumulates, it leads to a decrease in the lock stroke, and at the moment when the passenger tries to open the door, great efforts have to be made. Because of this, the rod begins to bend over time. And at some point its progress is not enough to unlock it. Even after it is straightened, the integrity of the system will already be compromised and components will need to be replaced.
In this situation, complete replacement of the door lock components, or dismantling, lubricating all components and cleaning the lock can help. This must be done as early as possible, even if the slightest problem arises, so that the Niva Chevrolet door handle does not become completely blocked.
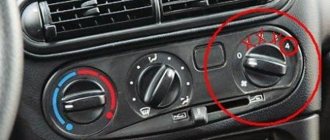
The rear door device is quite simple and does not contain complex mechanisms. The lock used is the same as on most AvtoVAZ models. The only difference is that its locking and unlocking is actuated by an actuator. Sometimes they fail and then it becomes necessary to open them manually.
In this case, it is necessary to know the nuances of this system. If you activate the system at the moment when one of the doors is open for at least one click, this can lead to the other one jamming.
What is the Chevrolet Niva door trim and its purpose?
The Chevrolet Niva lining has a standard appearance, but over time, natural wear and tear of the material occurs. Removing the rear door trim of a Niva Chevrolet will be required after an accident, mechanical damage to the door structure from the inside, or a desire to update the interior. The main purpose of the fabric element is to close the metal structure of the door, which contains electrical wiring and sound-proofing material.
The upholstery improves the appearance of the vehicle and makes the interior more cozy and comfortable.
Dismantling is recommended in cases where it is required:
- replacing the material with a new one due to stains, abrasions or damage;
- checking the functionality of electrical wiring, power windows, rear-view mirrors;
- installing speakers, disassembling a door handle or lock;
- replacing the clips that hold the panel, they are plastic and dry out over time;
- improvement of sound insulation, increasing the level of vibration protection.
Fabric inserts are found not only on the rear/front doors, but also in the trunk area. If removal does not involve replacement, then it is not necessary to completely remove the decorative panel from the door. It is enough to unfasten a few clips to gain access to the niche. During the replacement, it is possible to carry out a small auto-tuning of the interior.
Typical faults and solutions
If the door cannot close or open normally, then the problem does not always lie in the lock. Sometimes adjustments to the door structure or interior handle are required. To correct the situation, a number of improvements are provided:
If the installation of a new lock is carried out according to the instructions, then problems will appear only after the product’s service life has expired.
Source
Removing the front door trim
It is more convenient to work from the salon. To disassemble the driver's door in order to remove the trim, the following algorithm of actions is provided:
- Use a knife to pry off the plugs under which the screws are located.
- Remove the front and side bolts. You don't have to remove the cover if you don't intend to completely disassemble the handle.
- Disconnect the latches on the lock mechanism. It is better to put them inside so that they do not interfere with the removal of the panel.
- Unscrew the side mirror adjustment lever. Disconnect the electrical wiring: speakers, power windows.
- Unfasten the clips. Release the column from the facing niche. Remove the casing.
After this, access to internal elements will be gained. If repairs of individual parts are required, the casing will not interfere with the process. Reassembly is carried out in a similar manner.
Simple trim tuning
To carry out high-quality tuning, you need to draw up a plan for future changes. To make your salon more stylish, but without requiring significant expenses, you can use simple instructions:
- Replace speakers, car radio, standard handles with euro ones.
- Update the upholstery, choose a more expensive material for this.
- Make lining of additional niches.
- Cover plastic panels with film.
- Add LED and reflective elements.
The new fabric deserves special attention. When choosing, it is important to pay attention to the properties of the canvas: long service life, ease of care, presentable appearance, color range.
Source
Design of silent locks
The silent mechanisms are equipped with an internal latch. Thanks to this part, opening/closing occurs without any extraneous sounds. An additional pad on the body pillar ensures silent slamming of the doors. The silent device will not require adjustment. If the factory lock is out of order, then it is better to replace it with a design of European quality.
Chevrolet Niva Manual
Chevrolet Niva Removing the tailgate trim
We carry out the work when replacing the door cleaner and washer, door lock, and outside door handle.
Using a Phillips screwdriver, unscrew the four self-tapping screws securing the top door trim.
Remove the top door trim.
Using a screwdriver, remove the plug from the right cover. Similarly, remove the plug from the left door trim.
Using a Torx T-20 wrench, unscrew the self-tapping screw securing the right trim. Similarly, unscrew the self-tapping screw securing the left trim.
Using a Phillips screwdriver, unscrew the two self-tapping screws securing the right trim.
Remove the right door trim.
Using a Phillips screwdriver, unscrew the self-tapping screw securing the left trim.
Remove the left door trim.
Unscrew the cap of the door glass washer reservoir.
The process of removing the trim from the rear door
Painting, straightening, any welding work - these are situations in which it is necessary to remove the rear door . Or this is done in the case when the presence of such an element interferes with the organization of any other work.
First, prepare the necessary set of tools. Then they move on to the actions themselves, the sequence of which is standard :
- The minus terminal is disconnected from the battery to de-energize the entire vehicle. The driver's steering wheel is no exception. The bolts securing the door opening limiter are unscrewed with a ten-point socket.
- Rubber protection elements are removed from the wires that fit under the door. By squeezing the plastic clamp, the pads are disconnected from each other.
The retaining clips are removed from the door hinges using a flathead screwdriver . It is quite easy to pry the indicated space with it.
The door must be pulled up along the axes with a hinge to be removed from its place . At this stage, the repair work can be considered almost complete. Installation is in reverse order. The door mechanism is checked for functionality.
Installation of the part on the door
To dismantle the door fragment and replace the closing mechanism, it is important to prepare a place with a socket and a vice, as well as a set of tools:
The body rim cover is sold together with the lock. After the inner lining has been dismantled and the device has been removed, the main part of the Euro-lock is inserted into the door. It is important to tighten the fasteners well. Two holes are drilled in the rack to install the cover plate. The element is fastened with hardware. If the built-in niche for the latch protrudes a little, it can be filed or tapped with a hammer. The edges of the screws are also filed.
The process of dismantling the front door trim from a Chevrolet Niva
There are various reasons why there is a need to carry out such work . For example, when repairing a door mechanism or installing additional speakers. The work is easy to do yourself, you just need to spend some time studying the nuances.
The procedure is not at all complicated.
- The inner handle has two plugs; under them there are mounting screws for this design. To remove the plugs, just poke at the structure with a sharp object.
- Use a screwdriver to unscrew the screws from the armrest, and the latter is removed.
- Three screws hold a special pocket on the plastic, with which you can store various items inside. The screws themselves are located at the bottom.
- The plastic cover of the handle for opening the door is dismantled next. The handle is unscrewed, then the screw inside is removed. Remove the decorative trim by pulling part of the part towards you. The main thing is that the trunk is not damaged.
After this stage, everything is ready to get rid of the outer skin . Plastic dowels hold the product to the base. The keys are removed from the holes in the door sequentially - they are passed along the entire perimeter with tools. After this, there should be no problems with removing the trim in front.
Eliminating play in Shevik door handles
The handles on the doors had been dangling for a long time, but when yesterday I saw how far the right front handle had moved, I decided to go through them all.
First, let's disassemble the front door. I already wrote how to do this in the topic about installing front tweeters. Next, we bend the polyethylene to access the internal fastening of the handle:
I thought that it was he who had loosened, but it turned out to be properly tightened. Therefore, the handle had to be disassembled further)) The second screw securing the handle on the front door is located here:
It is not necessary to remove the handle, just put it in this position:
It was this screw in the front of the handle that was loosened:
Just in case, I unscrewed the screw and saw that the silumin tongue had been broken off. To calm things down, I glued it with superglue)) Although I understand that this won’t last long:
If the tongue is broken, then the front part of the handle is held only by a self-tapping screw. By the way, they were broken off on all the doors)) After assembly, the play disappeared.
To disassemble the rear door, you first need to remove the retaining ring under the window lifter handle:
After which the window lifter handle will be removed. Remove the trim around the inside door opening handle (similar to the front door), unscrew the screws for the T20 sprocket: one in the armrest and two at the bottom of the door:
Then we pull off the door trim, trying not to break the fastening pins. Here's where they are:
The outer rear door lock screw is located here:
In addition, it was not possible to turn the handle outward, as on the front doors, so I inserted a screwdriver through the hole in the door, pulling the handle:
Then we remove the plastic pieces to the right and left of the glass, for which we unscrew 3 screws for a screwdriver and 2 for a T20 sprocket, hidden under round plugs (on the left plastic piece, the lower screw for a screwdriver is long):
Unscrew the lid of the washer reservoir and take out the rubber band underneath:
After this, you can remove the rear door trim, but you need to do this carefully, helping with a flat-head screwdriver, since the pistons on it are more powerful than on the side doors, there is a possibility of breaking off the fasteners on the inside of the trim. If you break off the piston together with the bracket, superglue will help you; glue it directly on top of the old glue. The rear door handle outer screw is located here:
This is the only screw with a 10mm wrench, all other external and internal screws and lock nuts are 8mm wrenches.
Well, at the same time I lubricated the door stops with lithol so that they wouldn’t rustle:
The only thing I didn't disassemble was the right rear handle - it had no play at all.
Source
Removing and installing the tailgate lock
Disconnect the negative terminal of the battery.
Remove the tailgate trim as described above.
Disconnect the wiring connectors for the trunk light switch and the electric drive.
Use a flat-head screwdriver to pry and disconnect the lock switch rod end from the door handle
Use a screwdriver to pry the door handle rod off the lock lever.
Use a Phillips screwdriver to unscrew the three screws securing the lock to the door.
Using a Phillips screwdriver, unscrew the two screws
Removing the electric locking drive
Install the lock in reverse order
Castle repair
After removing the device, you can disassemble the Euro-lock to eliminate its malfunction. When the protective plastic fasteners are unscrewed, you will be able to gain access to the rod. It can be removed with an impact screwdriver and a wrench. The rod is connected to a latch and a switch. Further instructions:
After a careful visual inspection, the cause of the failure is determined. The spring is being replaced, lubricated, parts are cleaned of dirt, pins are adjusted, and corrosion is removed.
After repair, assembly is performed in reverse order.
Trim tuning: different solutions
Tuning of the interior parts is carried out to increase the comfort of passengers and the driver . The modern market offers many solutions, with different characteristics and features.
Interior insulation: what materials are used
The most common solutions:
- Madeleine. A type of seal with a fabric base.
- Bitoplast. Prevents so-called skips. It is distinguished by the presence of a sticky layer that simplifies fixation.
- Stizol. Suitable not only as a sound insulator, but also to contain heat inside.
- Isotone. It has excellent performance in absorbing sound waves.
- Vibroplast. Increased elasticity is the main characteristic due to which the base has become so widespread.
- Vizomat. Self-adhesive substance capable of absorbing vibrations of any type. The basis of impregnation is bitumen mastic. A closed car provides complete protection.
Reupholstering doors and panels with glue
Reupholstering complex surfaces raises the most questions , even among experienced craftsmen.
But it would be a good idea to familiarize yourself with the main nuances :
- First prepare the surface. Washing, sanding and degreasing are mandatory steps. Then the adhesion of materials increases, they adhere to each other faster and better. Special substances will help cope with degreasing.
- Next, glue is applied to the working surfaces and the material used. Applying with a brush helps with areas that have a lot of unevenness.
- Heating with a hair dryer promotes faster and better adhesion. Materials become more elastic.
Roof wrapping
In order not to stain the casing, it must be immediately wrapped in film.
After the roof space has become accessible, you can begin soundproofing the Chevrolet Niva.
Special materials for sound insulation have an adhesive base. The most common of them:
Vibroplast Silver. Foil material on a self-adhesive base. Coating thickness 2–4 mm. No heating required for gluing. Sold in sheets.
- "Bitoplast 5" (anti-creaking). Made of polyurethane. It has a sticky base that does not require heating. Thickness from 5 to 10 mm. Designed to prevent noise and squeaking.
- "Splen 3004". Because this material is heat-bonded, it can be used in areas such as wheel arches and transmission tunnels.
Before gluing the sound insulation, you need to wipe the surface with a damp cloth, then degrease it. First, you need to glue the main part of the roof with whole sheets of soundproofing material, then seal the perimeter with separate pieces.
It takes about 3 square meters of material for the roof. m.
After gluing the roof, the ceiling cladding is installed in the reverse order.
Chevrolet Niva. disassemble the back door.
The door trim of a Chevrolet Niva car plays a role in arranging the interior design of the cabin. Without it, it would be very difficult to call the salon comfortable and elegant. But it acts not only as a piece of furniture, but also serves as some protection from extraneous noise. Let's consider the main purposes of the door trim of a Niva Chevrolet SUV, its removal and installation.
Removing the limit switch from the Chevy Niva door lock
This way we remove the glass frame. Next, unscrew the filler plug and remove the neck trim of the tailgate glass washer reservoir. Carefully pry up the upholstery with a screwdriver and remove the pistons. During work there is a danger of damaging the painted surface.
There will not be a serious dent, but a scratch may still remain, so it is recommended to wrap the end of the screwdriver with insulating tape. The upholstery is put back in place in the reverse order.
If the pistons are damaged, they must be replaced with new ones. Let's move on to the tailgate lock drive.
The same screwdriver will come in handy during the process. The rear door door card is removed even when the door is locked. First, unscrew the two screws from the bottom of the door card. Remove the window handle by bending the handle with a flat screwdriver and pulling the latch upward.
Replacing the lock cylinder on a Chevrolet Niva
Unscrew the screw securing the decorative trim under the door handle, pulling the handle towards you. The door card is held on by six pistons - two at the bottom, two at the center and two at the top. They snap off if you pry them with a long screwdriver.
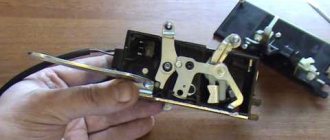
The door card can now be removed. Video about removing the lock on a Niva Chevrolet Opening the door The lock can be unlocked by pulling the plastic tongue of the actuator or another lever, using a long screwdriver, you can move the lock latch itself. When the door has opened, you can remove the lock, but before that you need to remove the negative terminal from the battery.
The lock is held on by fastening screws at the end of the door. After removing them with a long screwdriver, you need to remove the drive rods, disconnect the terminal blocks and remove the lock from the door cavity along with the actuator. After this, when the lock is in hand, the reason will become visible. In extreme cases, the lock can be replaced.
The four-door body of the Niva Chevrolet, in comparison with the Niva 2121, looked like just a limousine. What a shame it is for Shnivy owners when this body turns into a three-door. What to do when the back door on a Chevrolet Niva does not open, we will consider the reasons and solutions to the situation right now.
Minor repairs: restoring the driver's door switch
Greetings to readers and guests of the logbook of my car. Today I dealt with a breakdown that affected many shnivovods - a non-working limit switch in the door lock. Most often, the driver's door mic breaks, and that's understandable - the most popular door in the car))) Specifically, my mic has malfunctioned before, but rarely - about once a month, you open the door - the light does not come on, and the homemade door open indicator blinks for a fraction seconds. Usually it helped to slam the door hard a couple of times and everything would be restored, but since the day before yesterday this method stopped working. Therefore, today I dismantled the lock to study and defect the little bastard))
So, the first thing to do is to remove the door trim (for those who don’t know how, look here) and bend back the polyethylene in the lock area:
My driver's door microphone was acting up, but I think the locks on the other doors can be removed in the same way) Next, unscrew the 3 screws securing the lock to the door:
Next, we unhook the interfering rods: first, the rod on the inside door handle:
Simply lift the plastic latch up and remove the rod:
Next, use a thin screwdriver to unhook the rod on the door soldier and take it out. We also pay attention to the lock actuator rod (red arrow) - it doesn’t interfere with disassembling, but during reassembly it will need to be put back as it was)
Unwind the gray tape and disconnect the 3 plugs:
Remove the rod on the lock cylinder with a wide flat screwdriver:
... and in a similar way, pull from the outer door handle:
After this, the lock can be removed from the door:
To disassemble the lock, unscrew 3 self-tapping screws (the red arrow is a pin that comes out a little tight when disassembling)
...and unfasten these latches:
Then we move the lock cover to the side from under the mustache:
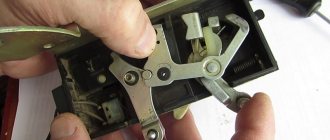
Now you can take out the mikrik - here it is, the brat)
By the way, the microphone is normally closed, when the doors are closed - the microphone bracket is pressed and the contacts open) We disassemble it with a thin screwdriver, but CAREFULLY
- Small parts inside!
Using tweezers, carefully remove the “spring” and remove the “contact”
And here is the very reason for the mikrik not working - a speck of soot:
Cleaned it out with a thin file.
After which you can reassemble everything in reverse order. In this case, you need to pay attention to: 1) We insert the micrik spring with tweezers and very carefully - it tries to fly away 2) When assembling the lock cover, you need to ensure that the tabs in it fall into place: the left one should fall into the hole, and the right one should go to the left of the plate:
Tips for using sewing machines
General recommendations for better results:
- The surface and elements are prepared for further use of the pattern.
- Paper is used as a blank, where the elements are transferred.
- Lines along which further work is carried out are marked on the material.
- The stitching of the material is carried out along the lines outlined in advance. Afterwards everything is stitched.
- Excess parts are carefully trimmed.
- The adhesive composition is applied to the reverse side. After which the products are connected to each other.
- The main thing is to protect the front surface from glue. Removing it does not cause any trouble.