If, while operating a LADA car, you notice that during load (when the air conditioner is running, the heating is on, etc.) in a traffic jam, the engine begins to operate unstably (troits, pulls poorly, etc.), perhaps the reason lies in the ventilation system crankcase The article proposes to solve the problem by installing a PCV valve from a foreign car.
Operating principle of SVKG
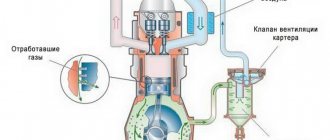
Car engines have a ring gas exhaust system. The resulting gases as a result of the combustion of diesel fuel, gasoline or liquefied gas are not released into the environment, but are returned to the engine, where they are re-burned. The second end of the crankcase ventilation hose is attached to the intake manifold, with the help of which gases again enter the cylinder chamber for combustion. A significant part of the gases, when re-entered, ignite at the moment the fuel ignites, and the remaining ones are released into the atmosphere using the exhaust system. A small percentage of the gases are sent back into the cylinder chamber for re-combustion. This process is ongoing.
see also
- Priora crankcase ventilation 16 valves
- Installation of industrial ventilation
- Ventilation of the hive in omshanik
- Installation of asbestos pipes for ventilation
- Fresh air ventilation
- Silencer for ventilation
- Ventilation engineering companies
- Ventilation for hood
- Fire ventilation valve
- In the state, breathing increases significantly and pulmonary ventilation increases
- Design of a ventilation system for a public building
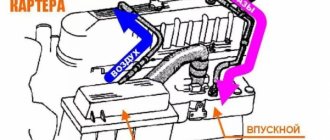
DIAGRAM OF THE STANDARD Crankcase VENTILATION SYSTEM
The crankcase ventilation system of VAZ engines consists of two circuits that operate at different load modes and speeds:
- The small ventilation circuit
is connected to the valve cover and the intake manifold (behind the throttle body). This connection diagram provides intensive crankcase ventilation due to the vacuum that occurs in the intake manifold when the throttle is closed. To avoid an effect such as hyperventilation, the cross-section of the small circuit is limited by a jet in the cable throttle body with a diameter of 1.7 millimeters. This circuit operates in the region of 800-1500 rpm. - A large ventilation circuit
is connected to the valve cover and the air pipe (in the pre-throttle space). This scheme provides intensive crankcase ventilation at high speeds. The cross section of the large contour is 16-18 millimeters
Examples demonstrating the shortcomings of the standard crankcase ventilation system:
- A car is going down a hill with the gear in gear. In this mode, the engine operates at higher speeds with a reduced load. A high vacuum is created in the crankcase, and a large ventilation circuit is connected, in which there are no control valves. Since both circuits are connected to one volume of the oil trap, a strong vacuum in the crankcase will draw a fresh portion of air bypassing the throttle. The mass air flow sensor will show increased air flow, and the ECU will try to close the throttle. Having realized that this is not possible (it is already closed), the lean mixture will be corrected by increasing the fuel supply (fuel consumption will increase). As a result, the entire internal volume of the engine will work as a parallel receiver of very significant volume, connected to the intake, bypassing the throttle. It is this volume that will interfere with the formation of a high-quality mixture.
- A car in a traffic jam drives under tension with additional consumers (for example, the air conditioner is on). The compressor clutch is connected, the load increases abruptly. The engine does not have enough air, it begins to pull it from the crankcase, bypassing the throttle. But the ECU is also aware of the clutch engagement and also supplies more air by opening the throttle. The vacuum drops sharply, the vacuum brake booster (VBR) does not have enough strength to hold the car. Leap forward. The ECU sees an increase in oxygen and closes the throttle. A sharp increase in vacuum, VUT seizes. The car jerks, the transmission hits. And so on ad infinitum.
As a result
in both cases, when the engine is running, speed jumps occur and the engine choke under the load. Jerking and vibration are possible on manual transmissions, automatic transmissions and automatic transmissions. To eliminate these shortcomings, it is proposed to modify the design according to one of the presented schemes.
Repair of VAZ 2170 (Priora): Cleaning the crankcase ventilation system
Over time, tarry deposits from crankcase gases accumulate in the engine crankcase ventilation system, making it difficult to remove these gases into the engine cylinders for combustion. Because of this, the gas pressure inside the engine increases and oil leaks through the seals appear. To avoid this, periodically clean and flush the system.
According to the manufacturer's recommendation, the crankcase ventilation system must be cleaned every 60 thousand kilometers.
| Helpful advice Clean the crankcase ventilation system before each oil change. |
You will need: an “8” wrench, a Phillips-blade screwdriver, and pliers with narrow jaws.
1. Remove the decorative engine cover (see “Removing and installing the decorative engine cover”).
2. Remove the air filter (see “Removing and installing the air filter”).
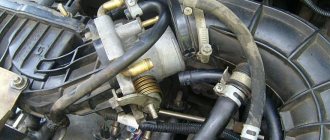
| 3. Loosen the clamp... | 4. ...and disconnect the hose of the large branch of the crankcase ventilation system from the air supply hose. |
| 5. Loosen the clamp... | 6. ...and disconnect the air supply hose from the throttle assembly. |
| 7. After loosening the clamp, disconnect the hose of the large branch of the crankcase ventilation system from the cylinder head cover and remove it. | 8. Similarly, remove the hose of the small branch of the crankcase ventilation system by disconnecting it from the fittings of the throttle assembly and the cylinder head cover. |
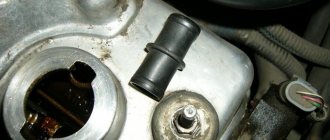
| 9. Loosen the clamp... | 10. ...and remove the supply hose of the ventilation system by disconnecting it from the pipe of the cylinder head cover... |
11. ...and in the same way from the cylinder block fitting.
12. Rinse the hoses with gasoline or kerosene, blow with compressed air and dry. Clean the holes in the fittings and pipes for connecting the hoses.
13. Remove the cylinder head cover (see Replacing the cylinder head cover gasket).
| 14. Remove the six bolts securing the separator from the inside of the cylinder head cover... | 15. ...and remove the separator. |
| 16. Squeeze the separator oil deflector clamps with pliers... | 17. ...and remove the oil deflector from the oil separator. |
| 18. Carefully pry off the rubber O-ring with a screwdriver... | 19. ...and take it off. Replace a ring that is severely compressed or has lost its elasticity with a new one. |
| Note Before installing the cylinder head cover, clean (remove old sealant) and degrease the mating surfaces of the cylinder head and cylinder head cover. Apply a thin layer of sealant to the mating surface of the cylinder head. |
20. Install hoses and parts in the reverse order of removal.
1. Car structure 1.0 Car structure 1.1 General information about the car 1.2 Passport data 1.3 Car keys 1.4. Controls 1.5. Heating and ventilation of the cabin 1.6 Ensuring a comfortable air temperature in the cabin 1.7. Doors 1.8. Passive safety equipment on the car 1.9. Seats
2. Recommendations for use 2.0 Recommendations for use 2.1. Safety rules and recommendations 2.2 Running in the car 2.3 Operating the car during the warranty period 2.4. Preparing the car for departure
3. Malfunctions along the way 3.0 Malfunctions along the way 3.1. The engine does not start 3.2 Malfunctions of the fuel injection system 3.3 Idle speed has disappeared 3.4. Interruptions in the operation of the 3.5 engine. The car moves jerkily 3.6 The car accelerates poorly 3.7 The engine stalled while driving 3.8. Oil pressure dropped to 3.9. Engine overheating 3.10. The battery does not recharge 3.13. Knocks in the engine 3.16. Wheel puncture
4. Maintenance 4.0 Maintenance 4.1. General provisions 4.2. Inspection work 4.3. Lubrication and filling works 4.4. Diagnostic work 4.5. Repair and adjustment work
5. Engine 5.0 Engine 5.1 Design features 5.2 Possible engine malfunctions, their causes and solutions 5.3 Useful tips 5.4 Checking compression in the cylinders 5.5 Removing and installing the decorative engine casing 5.6 Removing and installing the engine splash guard 5.7 Installing the piston of the first cylinder to the TDC position of the compression stroke 5.8 Replacing the timing belt and tension roller 5.9 Replacing the power unit supports 5.11. Replacing engine seals 5.13. Engine cylinder head 5.15. Engine repair 5.16. Lubrication system 5.17. Cooling system 5.18. Power supply system 5.19. Design Features
6. Transmission 6.0 Transmission 6.1. Clutch 6.2. Gearbox 6.3. Front wheel drives
7. Chassis 7.0 Chassis 7.1. Front suspension 7.2. Rear suspension
8. Steering 8.0 Steering 8.1 Design features 8.2 Possible steering malfunctions, their causes and solutions 8.3. Steering column 8.4. Steering linkage 8.5. Steering gear
9. Brake system 9.0 Brake system 9.1 Design features 9.2 Possible malfunctions of the brake system, their causes and solutions 9.3 Bleeding the brake system hydraulic drive 9.4 Removing and installing the vacuum brake booster 9.5 Replacing the brake pedal axle bushings 9.6. Main brake cylinder 9.7. Front wheel brakes 9.8. Braking mechanisms of the rear wheels 9.9. Pressure regulator 9.10. Brake hoses and tubes 9.11. Parking brake
10. Electrical equipment 10.0 Electrical equipment 10.1 Design features 10.2. Battery 10.3. Mounting block (relays and fuses) 10.4. Generator 10.5. Starter 10.6. Ignition switch (lock) 10.7. Electronic engine control system (ECM) 10.8. Ignition system 10.9. Lighting, light and sound signaling 10.10. Windshield cleaner 10.11. Washer reservoir 10.12. Electric fan of the engine cooling system 10.13. Electric motor of the heating and ventilation system fan 10.15. Cigarette lighter 10.16. Instrument cluster 10.18. Electronic anti-theft remote control system 10.19. Immobilizer 10.21. Replacing sensors and switches
11. Body 11.0 Body 11.1 Design features 11.2 Possible body malfunctions, their causes and solutions 11.3 Removing and installing windshield frame lining 11.4 Removing and installing soundproofing upholstery in the engine compartment 11.5. Removing and installing bumpers 11.6 Removing and installing the fender liner and protective wing cover 11.7 Removing and installing the front fender 11.8 Removing and installing decorative sill trims 11.9. Hood 11.10. Trunk lid 11.11. Doors 11.12. Seats 11.13. Seat belts 11.14. Rear view mirrors 11.15. Interior fittings 11.16. Instrument panel 11.17. Heater 11.20. Body care
12. Appendices 12.0 Appendices 12.1 Appendix 1. Tightening torques of threaded connections, Nm 12.2 Appendix 2. Fuels and lubricants and operating fluids 12.3 Appendix 3. Nominal filling volumes 12.4 Appendix 4. Basic data for adjustments and monitoring 12.5 Appendix 5. Spark plugs, used on a car 12.6 Appendix 6. Lamps used on a car 12.7 Appendix 7. What you need to have in a car 12.8 Appendix 8. Tools used when repairing a car
13. Electrical diagrams 13.0 Electrical diagrams 13.1 Diagram 1. Instrument panel harness connections 13.2 Diagram 2. Vehicle front wiring harness connections 13.3 Diagram 3. Engine electronic control system (ECM) harness connections 13.4 Diagram 4. Vehicle rear wiring harness connections 13.5 Diagram 5. License plate light wiring harness connections 13.6 Diagram 6. Left front door wiring harness connections 13.7 Diagram 7. Right front door wiring harness connections 13.8 Diagram 8. Rear door wiring harness connections
PRIORA oil in the air duct
Hello everyone. In general, the client’s car had covered 70,000 thousand miles, with five thousand kilometers, oil appeared in the air duct, ran out from under the valve covers - in general, the engine was all in oil, this did not bother him much - while the oil began to accumulate strongly in the air duct, then it ran through the DMV to air filter. In general, the oil level was enough for 6,000 thousand. I changed the valve seals, piston rings, timing belt, etc. I left. The other day he arrived (5,000 thousand traveled) oil in the air line, pressure is normal, gases do not go into the breather, in principle says it doesn’t consume oil (strains the oil in the air duct) maybe with a separator (on the valve cover) what’s wrong (no wonder oil appeared in the air duct in the first 5 thousand) anyone have any thoughts? The car was taken from the showroom
How to change the breather on a Priora
When creating new car models, special attention is paid to environmental protection. Thus, the crankcase ventilation system (Priora, Kalina) has been modernized, which meets modern environmental safety requirements. It ensures the removal of combustion products of the fuel-air mixture, which collect in the oil pan as a result of exiting through the not very tightly fitting piston rings to the cylinder walls.
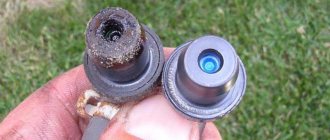
Symptoms of a Stuck PCV
- Engine misfires at idle
- Lean air-fuel mixture
- Presence of engine oil in PCV valve or hose
- Increased oil consumption
- Hard engine start
- Rough, unstable engine operation at idle
Additionally, a stuck PCV valve can cause a check engine light due to increased air flow. And the diagnostic computer may mistakenly show this error due to the mass air flow sensor or oxygen sensor, making it difficult for you to identify the real source of the problem.
Why is the PCV valve important?
Faulty PCVs can cause engine oil contamination, sludge buildup, oil leaks, high fuel consumption, and other engine damage problems, depending on the type of fault.
While some of these problems can be caught before they escalate with simple checks, failure of the PCV valve or related components often results in costly repairs. This is because most car owners do not include the PCV system in their maintenance routines. Even though some car manufacturers suggest replacing this part regularly, car owners still forget to replace it. Additionally, not all manufacturers emphasize the importance of regular system checks.
Later in this article we will discuss how car owners can test their own PCV valves.
But before we get to that, here's this entire article in a nutshell: what the crankcase ventilation valve does, what happens when it fails, and how to test it.
Why does oil squeeze out through the breather: how to fix the problem
A fairly common problem on many domestic and foreign-made cars is that oil flows through the breather. In winter, especially with the onset of significant cold weather, you can encounter a malfunction when the breather freezes, oil is squeezed out and streaks are visible on the outer surface of the power unit. Let us immediately note that this symptom, as well as smoke and oil from the breather, are a reason for immediate engine diagnostics, since ignoring this problem can lead to quick and expensive engine repairs.
We also recommend reading the article about what a breather is and what its purpose is. From this article you will learn about the design of the engine breather and other components, the principles of operation of the element and other features.
Note that if there is oil coming through the breather, diagnosing the root cause may be difficult. To accurately determine the underlying problem, skills, special equipment, etc. will be required. However, in some cases, the driver can understand why oil is leaking from the breather without the involvement of third-party specialists. In other words, diagnostics are carried out independently in a garage environment. In this article we will talk about why oil drips from the breather, as well as what a car owner should do if oil comes out through the breather.
Breather oil: what to do and how to find the cause
Let's start with the fact that during engine operation, so-called crankcase gases accumulate in the crankcase. To prevent excess pressure from being created, there is a special valve for ventilation. This solution allows the closed crankcase to communicate with the atmosphere. This valve is the breather. In simple words, a breather on an internal combustion engine is actually needed to equalize the pressure inside the engine.
It should be noted that in the crankcase gases mix with oil mist. As a result, lubricant particles enter the breather. Although there is a special oil trap inside the device, a certain part of the oil may escape out. Given this information, minor contamination of the system is acceptable, which is normal. In cases where a lot of lubricant leaks, you should look separately for why oil is leaking from the breather.
Oil leaks through the breather lead to clogged channels, in some cases soot is formed, etc. Excess soot gets into the engine crankcase, and the lubrication system becomes coked. As a result, loaded parts are less well lubricated and engine wear accelerates. Let us add that traces of oil will not necessarily be visible from the outside in the engine compartment. On engines with a carburetor, if there is a leak through the breather, oil in the air filter housing or on the filter element itself is a characteristic sign of a malfunction.
On injection engines, traces of oil getting into the throttle area are noticeable, the power unit also loses its throttle response and power, and fuel consumption increases noticeably. It turns out that to check it is necessary not only to inspect the outer surfaces under the hood, but also to remove the air filter, throttle assembly, etc.
Why does oil leak through the breather?
If oil appears from the breather, there may be several reasons. Given the various features, before self-diagnosis, you need to pay attention to additional symptoms.
Drives oil through the breather: diesel and gasoline internal combustion engines
Engine diagnostics for oil leaks through the breather requires an integrated approach. There is no need to disassemble the power unit to check. It becomes clear that at the initial stage you should assess the condition of the breather, make sure it is working and clean the device if necessary. The oil level is also checked using the dipstick. If everything is fine with the level and there are no other additional signs of a problem, then it is optimal to replace the breather with a known good one.
After making sure that the breather is working properly and ventilation is at an acceptable level, you will need to make a series of measurements and assess the condition of the CPG. As already mentioned, the cause may be failed rings, that is, you will need to measure the compression in the engine.
We also recommend reading the article on how to correctly measure compression in cylinders. From this article you will learn about why, how and with what tools this procedure is carried out to obtain accurate data.
Also, the color of the exhaust gases can additionally indicate the need to measure compression. To check, just start the engine and then evaluate the exhaust. If the engine smokes blue or gray smoke, then this may be a sign of engine oil getting into the cylinders due to worn piston rings.
When checking compression, you need to take readings in each individual cylinder. In the normal state of the CPG, compression should be at 11 MPa and above (it is recommended to consult the technical literature in relation to a specific type of internal combustion engine).
If a run-up is detected according to the readings in the cylinders, the differences should not exceed 1 MPa.
Failure to reduce compression will indicate that further checks will be related to the ventilation system. The method for testing this system will be considered using the example of the domestic VAZ 2110 model. Other cars may have some individual features, but the general principle will be similar.
Let's sum it up
Taking into account the above, it becomes clear that an increase in crankcase gas pressure and oil leakage through the breather indicate a number of problems with the breather or internal combustion engine. Quick detection and elimination of faults will reduce the cost of repairing the power unit. This is true if the problem is eliminated at an early stage, that is, without the consequences that arise after a long period of ignoring the malfunction and further active operation of the engine.
We also add that cleaning the crankcase ventilation system is not a complicated procedure, so in some cases such an operation can be carried out in the garage with your own hands. Moreover, it is recommended to clean the ventilation system regularly during each scheduled maintenance in parallel with changing the engine oil.
Finally, we note that quite often heavy oil leaks through the breather do not appear immediately. In other words, the lubricant may leak slightly, which is sometimes unnoticeable. In other cases, about 0.5 or a liter of lubricant can escape through the breather from the lubrication system, taking into account a short mileage (on average, 1-3 thousand km). With such a significant leak, the operation of the internal combustion engine is stopped, diagnostics and repairs are carried out.
Source
SVKG device in Lada Priora
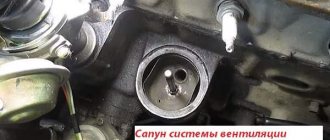
In all brands of cars, the SVKG is built on a similar principle. Only small details differ. On the upper side of the crankcase there is an oil separator, which looks like a hollow plug. An oil deflector is placed under the plug, which is designed to clean the gases from the crankcase as much as possible from oil particles. The oil separator has an outlet for the crankcase ventilation hose.
In order for the gases to return to the cylinder chamber, a ventilation valve is placed along their path. The valve has three modes, which allows you to maintain a certain level of gas rarefaction in the crankcase.
While the engine is idling, gases move through a small circuit hose through a special passage hole in the throttle assembly. At this time, a high vacuum is created in the intake hose, which allows crankcase gases to be effectively sucked out of the throttle block. The passage hole in the throttle regulates the amount of gases that are sucked out.
This allows you to stabilize the engine in idle mode. When the car begins to move, the throttle valve opens, causing gases from the crankcase to enter the cylinder through a large circuit hose for combustion.
Cleaning the crankcase ventilation system of Lada Priora
Over time, tarry deposits from crankcase gases accumulate in the engine crankcase ventilation system, making it difficult to remove these gases into the engine cylinders for combustion. Because of this, the gas pressure inside the engine increases, and oil leaks through the seals appear. To avoid this, periodically clean and flush the system. According to the manufacturer's recommendation, the crankcase ventilation system must be cleaned every 60 thousand kilometers.
Clean the crankcase ventilation system before each oil change.
You will need: an “8” wrench, a Phillips-blade screwdriver, and pliers with narrow jaws.
Remove the decorative engine cover.
Remove the air filter.
| rice. 1 |
| 4. Disconnect the hose of the large branch of the crankcase ventilation system from the air supply hose. | 5. Loosen the clamp |
| 6. Disconnect the air supply hose from the throttle assembly. | 7. After loosening the clamp, disconnect the hose of the large branch of the crankcase ventilation system from the cylinder head cover and remove it. |
| 8. Similarly, remove the hose of the small branch of the crankcase ventilation system by disconnecting it from the fittings of the throttle assembly and the cylinder head cover. | 9. Loosen the clamp |
| 10. Remove the supply hose of the ventilation system by disconnecting it from the pipe of the cylinder head cover | 11. ...and in the same way from the cylinder block fitting. |
Rinse the hoses with gasoline or kerosene, blow with compressed air and dry. Clean the holes in the fittings and pipes for connecting the hoses.
Article: 2112-1014056, additional articles: 2112-1014056Р
Order code: 006580
- Buy with this product
- show more
- Passenger cars / VAZ / VAZ-21101 drawing
- » href=»/catalog/vaz-3/legkovye_avtomobili-30/vaz_2110-10/sistema_smazki_i_ventilyacii-105/#part40486″>Lower hoseEngine / Lubrication and ventilation system
- Passenger cars / VAZ / VAZ-21121 drawing
- » href=»/catalog/vaz-3/legkovye_avtomobili-30/vaz_2112-12/sistema_smazki_i_ventilyacii-105/#part49102″>Lower hoseEngine / Lubrication and ventilation system
- Passenger cars / VAZ / Lada Priora 21701 drawing
- » href=»/catalog/vaz-3/legkovye_avtomobili-30/lada_priora_2170-480/sistema_smazki_i_ventilyacii-77/#part1578912″>Lower hoseEngine / Lubrication and ventilation system
- Passenger cars / VAZ / Lada Kalina 2192, 21941 drawing
- » href=»/catalog/vaz-3/legkovye_avtomobili-30/lada_kalina_2192__2194-1646/sistema_smazki_i_ventilyacii-56/#part3652972″>Lower hoseLubricating system / Lubrication and ventilation system
- Passenger cars / VAZ / Lada Kalina 21941 drawing
- » href=»/catalog/vaz-3/legkovye_avtomobili-30/lada_kalina_2194-1886/a501__sistema_smazki_i_ventilyacii-130/#part4210486″>Lower hose Lubrication system / A501. Lubrication and ventilation system
- Passenger cars / VAZ / Lada Granta 21901 drawing
- » href=»/catalog/vaz-3/legkovye_avtomobili-30/lada_granta_2190-1893/a501__sistema_smazki_i_ventilyacii-122/#part4242903″>Lower hoseLubricating system / A501. Lubrication and ventilation system
- Passenger cars / VAZ / VAZ-21111 drawing
- » href=»/catalog/vaz-3/legkovye_avtomobili-30/vaz_2111-11/sistema_smazki_i_ventilyacii-105/#part44794″>Lower hoseEngine / Lubrication and ventilation system
- Passenger cars / VAZ / VAZ-2110, 2111, 21121 drawing
- » href=»/catalog/vaz-3/legkovye_avtomobili-30/vaz_2110__2111__2112-415/sistema_smazki_i_ventilyacii-120/#part1302912″>Lower hoseEngine / Lubrication and ventilation system
- Passenger cars / VAZ / Lada Kalina 1119 Sport1 drawing
- » href=»/catalog/vaz-3/legkovye_avtomobili-30/lada_kalina_1119_sport-1556/sistema_smazki_i_ventilyacii-33/#part3438987″>Lower hoseLubricating system / Lubrication and ventilation system
- Passenger cars / VAZ / Lada Priora 21728 Coupe1 drawing
- » href=»/catalog/vaz-3/legkovye_avtomobili-30/lada_priora_21728_coupe-1878/sistema_smazki_i_ventilyacii-80/#part4190138″>Hose lower Lubrication system / Lubrication and ventilation system
- Passenger cars / VAZ / Lada Priora 2170 FL1 drawing
- » href=»/catalog/vaz-3/legkovye_avtomobili-30/lada_priora_2170__fl-1889/a501__sistema_smazki_i_ventilyacii-146/#part4224085″>Lower hoseLubricating system / A501. Lubrication and ventilation system
- Passenger cars / VAZ / Lada Vesta1 drawing
- » href=»/catalog/vaz-3/legkovye_avtomobili-30/lada_vesta-1883/141010__separator-148/#part4202781″>Crankcase VENTILATION HOSEAdsorber, separator / 141010. Separator
There are no reviews for this product yet.
Today, in the next article in the series “Crystal VAZs or typical breakdowns of domestic cars,” we will talk about the latest developments of the Volzhsky Automobile Plant: Lada Grante and Lada Largus. Let's talk about the history of the creation of these models, as well as their characteristic malfunctions.
How to Remove the Valve Cover on a Priora 16 Valves Video
How to remove the valve cover on a Priora 1.6 16kl
https://www.donationalerts.ru/c/melkiy_nikalek to support the project, a homemade snowmobile, with a Lifan engine, at least 15 hp.
Removing the cylinder head of a VAZ 2112 16 valves
The Auto_Repair channel will help you troubleshoot your car yourself.
how to fix oil getting into the spark plug wells of a vase
Thank you so much for watching my videos, tell your friends, leave comments and subscribe.
Priora repair. VAZ 21126. How to remove the cylinder head from the engine. How to remove the cylinder head from the engine
When you remove the cylinder head for the first time from a car whose engine has never been disassembled before.
installation of cylinder head VAZ 2112 -16 valves
The Auto_Repair channel will help you troubleshoot your car yourself.
How to remove the Cylinder Head of Lada Priora! Part 1. In detail! How to remove the cylinder head
Lada_priora #cylinder head #Ivanova #engine_repair The main symptoms that the cylinder head will have to be dismantled.
Replacing the timing belt and rollers on Priora 16-valve Kalina and Grant
Video review on replacing the timing belt on Lada Priora cars with 1.6 16-cl engines, Lada Granta, and Kalina.
removing the VAZ 16 valve ramp without removing the manifold
The Auto_Repair channel will help you troubleshoot your car yourself.
replacing timing belt 16 valves VAZ 2110-2112
The Auto_Repair channel will help you troubleshoot your car yourself.
Replacing the timing belt and pump with your own hands - nuances on Priora! Timing marks VAZ 2170, 2171,2172!
Replacing the timing belt and pump on a Priora! Do-it-yourself timing marks in street conditions from and to the nuances of VAZ 2170, 2171,2172!
Replacing the timing belt on Lada Priora 21126 2013 LADA Priora
Thank you for watching and for subscribing, all the best to you.
How to clean the valve cover (breather mesh) of a VAZ
Subscribe to the group on VK https://vk.com/public120461485 Instagram https://www.instagram.com/nik86_youtube/
Replacement of timing belt and pump 16kl.! Timing marks 16kl. VAZ 2110,2112,2111
Replacing the timing belt on a Priora! Timing marks VAZ 2170, 2171,2172! https://www.youtube.com/watch?v=T3DOAWfKt_k This video shows the work.
How to remove and wash injectors on a sixteen-valve VAZ 2110 engine. Cleaning the injector
Lada Kalina, Priora. How to remove the intake manifold without removing the engine on a 126 engine (16 valves)
We encountered difficulty in removing the receiver manifold on a 126 Priora motor, but found a way to do it, no.
Broken timing belt on Priora 21126 head repair.
Bent valve on Priora 21126 DIY repair. Thank you for watching and for subscribing, all the best to you.
How to quickly and correctly remove and install the Generator from Priora Lux
Diagnostics and repair of timing belt. Timing marks. VAZ (LADA) 16v
Do-it-yourself diagnostics and repair of timing belt of 16 valve VAZ engines. The video shows methods for finding faults.
oil in the air filter and bellows cause and solution
The Auto_Repair channel will help you troubleshoot your car yourself.
How to identify a faulty coil on a 16 valve engine
The video is aimed more at car owners rather than mechanics. A simple lifehack by definition of a malfunction.
Oil in the intake of Priora (problem 21126)
If you are not satisfied with the price of OSAGO, correct KBM - discount on OSAGO up to 50% FIX KBM HERE https://osago-kbm.blogspot.ru/p/bl.
Priors cylinder head analysis, part 2
Replacing the timing belt and rollers on 16 valve VAZ 2110, 2111 and 2112
How to replace the timing belt and rollers on a 16-cl. VAZ 2110, 2111, 2112 cars with engines 2112 and 21124. https://remont-vaz2110.r.
Differences 16th grade. VAZ engines detailed review
The review includes engines 2112-1.5 family ten, 21124-1.6 family ten, 21126-1.6 Priora/2114, 11194-1.4 viburnum. Differences.
Replacing valve cover gasket Daewoo Nexia 16v
https://avto.pro - auto parts for foreign cars without intermediaries. Greetings, dear car lovers, you are watching.
How to remove, disassemble and reassemble the starter on a Priora!
Detailed video report on disassembling and assembling a gear starter for VAZ cars! Removal and installation of retractors.
Repair of VAZ 2110. Replacement of cylinder head gasket, etc.
Communication, commercial inquiries: Channel assistance: PrivatBank 5168 7556 3188 1725, WMZ Z318291300563, WMU.
How to replace the LV without removing the generator on a Priora Luxury with air conditioning (voltage regulator)
Subscribe to the channel – https://www.youtube.com/user/TechBoyRus?sub_confirmation=1.
How to remove the VAZ crankshaft gear if it cannot be removed! How to remove gear crankshaft.
VAZ #2109 #21083 #Ivanova When replacing the crankshaft oil seal, which is located behind the Crankshaft gear, on a car.
Timing marks 16kl. VAZ! Checking timing marks on a VAZ
Timing marks 16kl. VAZ 2110, 2111, 2112. IF YOU CARRY OUT WORK ON THE VAZ 2112 1.5I 16cl ENGINE. or from 16kl. engine on.
HOW TO REMOVE THE TRANSMISSION OF VAZ 2110 2111 2112
How to fix an oil leak on a v16 engine
High-quality used spare parts for Daewoo – avtolanos.com.ua.
How to remove the crankshaft gear if it cannot be removed!
The need to replace the crankshaft oil seal or remove the oil pump requires first removing the gear.
The steering rack on a Priora is knocking - how to tighten it?!
Detailed video review of tightening the steering rack on a Lada Priora car. How to determine what is knocking.
Replacing the front crankshaft oil seal VAZ 21099, VAZ 2109, VAZ 2108
The video shows the process of replacing the front crankshaft oil seal of a VAZ 21099. At the same time, the timing belt was replaced (code 2108-100604.
Replacing the brushes of a VAZ 2112 generator without removing the generator
Well, there you are. LIKE AND DON'T FORGET TO SUBSCRIBE)) Brotherly My Instagram: https://www.instagram.com/sasha_058 We are changing.
How to check the thermostat? On VAZ 2110-2115 and 2170-2172-Priora.
How to check the thermostat? On VAZ 2110-2115 and 2170-2172-Priora. In this video I conduct an experiment on what temperature.
Replacing hydraulic lifters Hyundai Accent
In this video I show the process of replacing the ever-clacking hydraulic valves on a Hyundai Accent (TagAZ). Tools: ordinary.
Oil pump VAZ, INSTALLATION, Oil pump VAZ, INSTALLATION.
VAZ2109 #sealant #ingarage Video on how to properly install the VAZ front-wheel drive oil pump! Video.
How to remove the Cylinder Head of Lada Priora! Part 2. Details!How to remove the cylinder head
The main symptoms that you will have to dismantle the cylinder head will be an oil leak that is observed in the area.
REPLACEMENT OF THE TIMING GAME ON THE LADA VESTA LADA VESTA. REASON FOR THE BEND OF THE VALVES.
DISCOUNT ON AUTO PARTS shop motorring.ru promo KAIGRAVE: https://motorring.ru/?utm_source=kaigrave YouTube channel of the car shop.
That's how VAZ valves knock
The Auto_Repair channel will help you troubleshoot your car yourself.
REPAIR OF GEARBOX VAZ 2110,2111,2112,2114,2170,1118.
VAZ, gearbox, repair, VAZ 2110, 2112, 2110, gearbox, VAZ timing belt, VAZ clutch, VAZ repair, VAZ 2109, auto show (event), box.
VAZ 2112 stove replacement
Replacing the generator on VAZ 2110-2112 and 2114-2115
Video instructions for removing and installing a generator on VAZ 2110-2115 cars with your own hands. Description also.
Air in the Kalina cooling system - expansion tank cap needs to be replaced!
One of the reasons why the cooling system on Kalina may become airy is because the stove will be damaged.
ENGINES VAZ 21124 and VAZ 2112 16 VALVE MAIN DIFFERENCES
VAZ 2112 and VAZ 21124 What are the main differences between 16 valve engines. What are the differences between VAZ 2112 or 21124 16v engines. Diff.
Replacing the generator bearing
Replacing the front generator bearing on a Chery Tiggo with a Mitsubishi 4G64 2.4 and 4G63 2.0 engine. Bearing number – 6303.
Replacing the thermostat on a VAZ 2114.
In this video I will tell you how to change the thermostat on a VAZ 2114 with your own hands. Similar to Priors, Kalinas, and Grants.
How to remove the crankshaft pulley (using the example of a VAZ car)
Anacondaz – about Russia and the Motherland / vDud
MARCH 18 RUSSIAN KIRISH TAKILANDI. ANDY CHEGARAlar epildi
@Little Big – UNO Eurovision 2022 (Live @ Radio ENERGY)
Coronavirus / News / Myths / Comments | Doctor Komarovsky
MOSCOWADAGI UZBEKLAR DIKKATIGHA RASMIY YANGILIK..
Coronavirus in Russia and the world. New infections in Russia, increased mortality and vaccine trials
24 hours EAT food only on PROMOTION! Who will save the MOST? Elfinka
Kuji Live: self-restraint, happiness and the virus (Karginov, Konyaev, Saburov)
Navidi bomdodi 17-umi marti salt 2020
Nevsky. Shadow of the Architect. Episode 22
HOW TO SURVIVE IN THE ICY WATER CHALLENGE?! TESTING 3 WAYS!
UNCLE YURA'S KITCHEN IS COMPLETELY READY REVIEW / Maslenitsa WE BURN A SCARED AND MAKE PANCAKES FROM THE 90s
Lyubov Sobol announced her nomination to the State Duma
SARYCHEV vs KISHKOBLUD – EAT 150 KHINKALI IN 10 MINUTES – EPIC STOMACH FUCK
Damage to power plant mechanisms
Damage to the power plant mechanisms responsible for proper mixture formation and oil separation in the combustion chamber (piston scuffing, oil scraper rings, burnout of valves, disappearance of honing, etc.) In this case, the oil enters the combustion chamber of the car, where it mixes with fuel and air vapors, burns out completely. Oil consumption with such a malfunction can be enormous, more than 1 liter per 1 km. Black smoke begins to pour out of the exhaust pipe. This malfunction is caused by driving on a “cold” engine. After 50-60 cold starts, honing sets the oil scraper rings in one direction, the seal is broken and oil consumption increases. The skirt comes off the pistons, the valves burn out, the oil seals become hard. There is only one treatment - engine overhaul.
Engine breather VAZ 2112 16 valves
Cleaning the crankcase ventilation system on VAZ 2110, VAZ 2111, VAZ 2112
Welcome! The crankcase ventilation system is needed so that the atmosphere is not clogged and the exhaust gases are allowed to burn out again, this system was implemented in many cars, starting from the VAZ 2101 and ending with cars such as Lada Priora, Lada Granta, etc., but when the engine is worn out, this system is removed by the people themselves by removing all the hoses of the crankcase ventilation system, usually into a bottle, or just outside, we will analyze this in this article, so if your car has already covered quite a lot of mileage, then this article will be useful to you benefit. Note! We will only disassemble cleaning the ventilation on 16 valve engines; if you have an 8 valve engine, then go to the article: “Cleaning the crankcase ventilation on a VAZ 2114”, in this article this engine is described; to clean the crankcase ventilation of a 16 valve engine, you will need stock up on: Small pliers, screwdrivers with different heads and all kinds of wrenches; in addition, you will need sealant for the cylinder head cover and a new gasket!
Summary:
What does the crankcase ventilation system consist of? From the hoses, from the oil separator, from the oil deflector, all these parts can be seen in the diagram below, all of this gets dirty over time and therefore the crankcase ventilation system needs to be disassembled from time to time and cleaned inside from dirt and oil, then the engine will work normally and everything the dirt that is in the ventilation system will not fly into the engine to burn out again, but for engines that have traveled quite a long mileage (200 thousand km and more), we recommend simply putting this system in a bottle so that it does not choke the engine of the car and he was driving more or less, and to bring the crankcase ventilation into the bottle, you will need a screwdriver and a suitable (Small) container, for more details on how to do this, see the video clip which is located at the end of the article, it shows everything in detail.
When should you clean the crankcase ventilation system? It all depends on how well the engine works; if its piston rings are worn out and it constantly throws oil into the crankcase ventilation, then it will need to be cleaned much more often, unlike if the engine is new or overhauled, it’s easy to clean it in such engines a ventilation system is needed once every 40,000 thousand km. approximately (You need to clean it before changing the oil), you can do it more often if you have free time, it won’t make it worse, but a heavily polluted crankcase ventilation will make it difficult to remove crankcase gases into the cylinders, which will cause the gas pressure inside the engine to increase and the gases to there will simply be nowhere to go except for other types of seals to come out through the oil seals, and therefore oil will begin to flow through the oil seals (Mainly due to a dirty crankcase ventilation system, oil begins to flow through the front crankshaft oil seal).
Cleaning on VAZ 2101-VAZ 2107
Breeding
1. Remove the air filter housing from the car engine (for more details, see the article “Replacing the air filter housing”)
The note! Be sure to remove the flame arrester from the crankcase ventilation hose and wash it with kerosene in case of severe contamination.
2. Release the clamp by attaching the additional hose to the breathing cap (marked with a red arrow) and disconnect the additional hose. Continue unscrewing the main hose clamp (marked with the blue arrow) and remove it from the cover.
3. Remove the engine oil level sensor.
4. Unscrew the bolt securing the fan cover and remove the cover from the car engine.
5. Dampen a cloth with kerosene and wipe the inside of the oil separator.
The note! Be careful when wiping; Do not allow dirt to get inside the engine. If you are not comfortable cleaning dirt from the installed oil separator, remove it from the vehicle by unscrewing the lock nut (indicated by the red arrow). Place the removed oil separator in a prepared container with kerosene.
6. Clean the surface of the air filter from dirt by wiping it with a cloth soaked in kerosene.
The note! Remove the gasket from the filter housing and clean it of dirt.
Installation
This is done in the reverse order of removal.
The note! Replace broken or cracked gaskets with new ones. Make sure the metal shims are inserted into the air filter housing gasket (shown in photo).
READ Alarm Installation Map for VAZ 21214
Important! If a large amount of kerosene gets into the crankcase, change the engine oil! (Read more in the article “Changing Engine Oil”)
For beginners! Question: What does the oil separator look like? Answer: in the photo.
Product delivery options
Note! Below are the shipping methods available specifically for this product. Payment options may vary depending on the shipping method. Detailed information can be found on the “Delivery and Payment” page.
Parcel by Russian Post
Available payment methods:
- Cash on delivery (payment upon receipt)
- Using cards Sberbank, VTB, Post Bank, Tinkoff
- Yandex money
- QIWI
- ROBOKASSA
Shipping throughout Russia. Delivery time is from 5 to 12 days.
Parcel by Russian Post 1st class
Available payment methods:
- Cash on delivery (payment upon receipt)
- Using cards Sberbank, VTB, Post Bank, Tinkoff
- Yandex money
- QIWI
- ROBOKASSA
Shipping throughout Russia. Delivery time is from 2 to 5 days. More expensive than regular delivery by Russian Post, approximately 50%. Parcel weight up to 2.5 kg
Express Parcel EMS
Available payment methods:
- Cash on delivery (payment upon receipt)
- Using cards Sberbank, VTB, Post Bank, Tinkoff
- Yandex money
- QIWI
- ROBOKASSA
Shipping throughout Russia. Delivery time is from 3 to 7 days. More expensive than regular delivery by Russian Post, approximately 100%.
Transport companies
Available payment methods:
- Using cards Sberbank, VTB, Post Bank, Tinkoff
- Yandex money
- QIWI
- ROBOKASSA
Delivery is possible to any locality where there is a representative office of the transport company. Delivery time is from 2 to 10 days. Sending large parcels is approximately 50% more profitable than by Russian Post.
Courier delivery in Togliatti
Available payment methods:
- Cash upon receipt
- Using cards Sberbank, VTB, Post Bank, Tinkoff
- Yandex money
- QIWI
- ROBOKASSA
Delivery time from 1 to 12 hours.