Without a doubt, the dashboard is the most noticeable interior detail in a car, because it is located right in front of the eyes of passengers and drivers. The need to remove the dashboard on a VAZ 2110 may arise for car owners for a variety of reasons.
So, by removing this part, you can get full access to all the electrical components of your vehicle, replace the burnt-out wiring with a new one, connect additional devices or lighting, install a Euro trim or sound insulation.
Options for replacing the standard VAZ 2110 panel:
Panel trim for old VAZ 2110
Panel trim VAZ 2110 Euro-2
Panel trim VAZ 2110 Euro-1
Panel trim VAZ 2110 Euro-3
Overlay Kashtan panel VAZ 2110 (instrument panel according to class=”aligncenter” width=”1023″ height=”543″[/img] Overlay Kashtan panel VAZ 2110 (instrument panel according to class=”aligncenter” width=”660″ height=” 405″[/img] Panel trim VAZ 2110 Kashtan
Panel trim VAZ 2110 Kashtan
Panel trim VAZ 2110 Kashtan
If desired, you can cover the dashboard with various materials of your choice, thereby making the desired changes to the interior of the cabin.
Useful tips for removing a panel on a VAZ 2110
- It will be easier for you if you are not alone, but someone will help you. Of course, you will be able to freely do everything and do this work on your own, but with a friend everything will be much more elementary and faster, it is also advisable to somehow mark or make a note for yourself where each wire comes from. In order not to confuse anything in the future and not get confused.
- Let's get started, first we will need to remove the steering wheel and panel of your car. Everything is not as complicated as it seems at first glance.
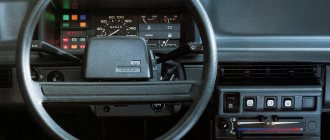
- The dashboard displays all the important information for you so that you are aware of the condition of your car, shows you the level of fuel in the tank, what is the temperature of the coolant in your car, as well as a tachometer, speedometer and twelve lamps.
- I would like to note that the instrument panel on the VAZ 2110 car is not durable, it is made of not very (to put it mildly) high-quality plastic, which is why it can unexpectedly be damaged (be careful with it), and also, over a short period of use, the plastic may will begin to crack.
When disassembly is required
There are several reasons why car owners want to remove the tidy:
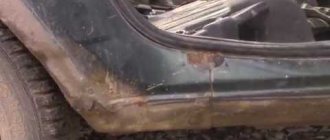
- It is damaged by mechanical shocks, as a result of hitting potholes, etc. In fact, the strength of the standard dashboard leaves much to be desired, so damage is not uncommon for dozens;
- There are scratches and abrasions on the surface of the device, the paint has peeled off somewhere, and there are signs of wear. That is, the appearance of the panel leaves much to be desired, so to correct the situation it needs to be removed;
- The desire to transform the interior of the car. Many VAZ 2110 owners decide to get rid of the old dashboard in order to put something more modern, original in its place, and change the backlight to LED lights.
To make any changes to the instrument panel, the first priority for the car owner is to remove the old structure. It's not difficult to do this yourself. Follow the instructions strictly, do not break the sequence of steps, and pay close attention to the markings of all elements and especially wires.
If you connect something incorrectly and reassemble the panel without checking, you risk not only having to re-disassemble the dashboard, but also encountering non-functioning devices, short circuits and even worse consequences.
How can we remove the dashboard on a VAZ 2110?
All fasteners for the VAZ 2110 panel: 1 – panel; 2 – side nozzle for ventilation and heating of the interior; 3 – instrument panel trim; 4 – screws for fastening the lining; 5 – panel fastening screws; 6 – box; 7 – console trim; 8 – cover; 9 – instrument panel; 10 – mounting block cover.
The entire process of removing your panel will take place in several stages of work.
Firstly, before removing the panel, you will need to disconnect the negative terminal, it is connected to the car’s battery, this is necessary so that in the future you will not have problems with the electrics of the car. How to disconnect, it is preferable to use some kind of plastic sticks (something in the form of a spatula) and remove the upper lining of the tunnel.
After which, you will need to proceed to the glove compartment. First, we need to open it and use a screwdriver to unscrew all the fastening screws, for a hint, they are located at the bottom, now that everything is unscrewed you can remove the glove compartment itself (do not forget to disconnect the wires going to its lighting, this is very important). Then be sure to remove the mounting block along with the cover.- Subsequently, we move on to the control details. We remove the handle that switches modes; to do this, you just need to forcefully pull it out of the panel towards you, it should come out very easily. Then you should unscrew the switch nut. Now all that remains is to get the switch itself; it is located on the inside of the panel of your car, but so that after unscrewing it remains hanging on our mounts, completely, there is no need to remove it.
Let's move on to the air system, we will need to remove the nozzles, which are located on the side at the top. You can use a plastic stick (or whatever is more convenient for you to do this, pry it) on the plastic latch, as if pressing on it, and turn it to the side. Now you can easily remove it; the same work needs to be done on the other side. After the work has been done, you will be able to get to the nuts located there; they also need to be removed and the screws unscrewed at the bottom of the panel of your car on the left, as well as near the lever that opens the hood, then also at the bottom where the connecting block is attached. On the left and right sides of the console, then the same work needs to be done behind the glove compartment and below on the right side.- So, after this, our car has a rubber seal, it is located on the front pillars, we need to remove it, then pick up the lining with something convenient, not sharp, the plastic fasteners should be easily removed. After all this, once the fastenings are removed, the image with the inscription “Lada” can be removed.
- And the most basic wiring, now you can turn it off. There is a set of wires running near your ignition, you will need to disconnect the block with the wires from the lock in your car. We cut off the plastic or whatever is holding them together and separate the block. After this, you will need to do the same action, disconnecting the blocks with wires that are located near the gas pedal, as well as the immobilizer block.
- Next, these are two pads that carry your signals, brakes and under the instrument panel, which is located on the driver's side.
- Once you have completed the work provided, you will easily be able to remove the dashboard of your car yourself. It is better to mark the wires where they were removed from, in order to avoid misunderstandings in the future and not get confused in the future during assembly or replacement.
- And so, let's move on to the steering wheel. First, we will need to remove the trim with the inscription “Lada” (it’s better to do it with something flat). As soon as you remove it, you will see that there are hidden screws that secure the signal cover, now we will need to unscrew them.
- We will need a screwdriver (it is better to use a Phillips head) in order to unscrew the cover where the steering signal is located.
- After all this, after removing the cover, we gained access to the steering wheel fastening nut, we need to unscrew it (you can use a 24mm socket, or use a wrench). To make it easier for you to unscrew the nuts, turn the steering wheel to the right until you see that it is locked, this will make it easier to unscrew the steering wheel.
- Once all the nuts are removed, the only thing left to do is to begin removing the steering wheel. First, align its position so that it is exactly in the center.
- Subsequently, you need to disconnect the wire that gives the signal, now you can remove the steering wheel. To achieve the desired result, we take it on the sides and remove it from the slots. It happens that it is difficult to remove, you will probably need to work harder.
- After all this, after removing the steering wheel and the ignition panel, we unscrew the two screws on the right side, near the central tunnel, and do the same work on the left side.
- After the work has been done, you need to remove the shield, it is on both sides, then you need to hook the plug to the place where the central tunnel is located.
- When you have done all this, you need to remove the screws on the central tunnel on one side and the other.
- After you have unscrewed everything, we remove our central tunnel of the car and you need to disconnect all the wires that lead to the cigarette lighter, then disconnect the cover from the gear knob.
- Next, you need to unscrew the interior heating duct; once you have unscrewed it, you need to remove it. After that, unscrew the panel at the front and rear and, of course, remove it too.
- After this, we move on to the glove compartment, we also need to unscrew all the fastenings of the glove compartment, and after unscrewing, remove it. We disconnect the suspension from the car glove compartment.
- Next, unscrew what is behind the glove compartment. After unscrewing them, you will see the screws that are located on the sides of the torpedo; we also need to unscrew them.
- After the work has been done, we need to unscrew the dashboard using a wrench and a screwdriver and remove the air duct, this can be done using a screwdriver (by prying it off with a screwdriver).
- After you remove the air duct, you will see a nut on the dashboard, you will need to unscrew it, then you need to remove the dashboard from the studs.
- You need to disconnect all connectors and for your convenience it is better to mark the wires so as not to confuse them in the future.
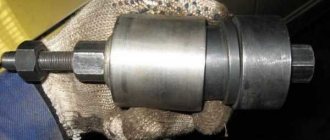
Speedometer drive: types and differences
A speedometer is an important element in cars, as well as several other vehicles, as it is necessary to monitor speed in order not to violate traffic rules.
But this is not the last function of this device. All possible speedometers have a high-speed magnetic unit; due to the rotation of the magnets, a flow is formed, it moves through the coil, thereby facilitating the induction of eddy currents. They thereby begin to create more magnetic fields. They interact with each other, the needle of the device moves along the frequency scale, with the help of this the magnet rotates.
All speedometers are divided into three categories.
- Mechanical speedometers.
- Electromechanical speedometers.
- Electronic speedometers.
Mechanical speedometers. In this type of speedometer, the process of speed measurement and indication occurs thanks to a mechanical device. A gear is used as sensors, which is connected to the secondary shaft of the gearbox; this is the speed unit with an arrow indicator and the drum counter. Previously, speedometers were used in the form of a drum and tape. But they stopped using them quite a long time ago.
Electromechanical speedometers. In these devices, speed is measured using various electronic or electromechanical sensors that are connected to the gearbox. The speed is indicated by a milliammeter or the speed unit of a mechanical speedometer, and the distance is indicated by a counting drum, which drives a stepper motor.
Source
Tags: VAZ 2109, speedometer drive, speed sensor, VAZ 2114
Comments 50
Thank you, it hasn’t been working for a long time, I’ll have to look into it, but I’m having the same problem. I tried somehow unscrewing the sensor, but it doesn’t come out and spins endlessly, and what did you hear, maybe it could fall into the box?
I honestly don’t know what could fall into the box.
Well, I read somewhere that when you pull out the drive, it looks like it might fall
I read the same thing, but I still don’t understand. Unless the plastic part comes off and falls into the box. I also read that 2 CV joints cannot be pulled out at the same time, as if something falls.
Damn, now I’m wondering whether to climb or not
Until you climb in you won't know)))
Until you climb in you won't know)))
I bought a sensor, installed it, to no avail, but I rocked the car without a sensor; this roller rotates on the drive
Thank you, it hasn’t been working for a long time, I’ll have to look into it, but I’m having the same problem. I tried somehow unscrewing the sensor, but it doesn’t come out and spins endlessly, and what did you hear, maybe it could fall into the box?
I fell today and it’s not visible at all (((ppts
I still didn’t dare to take it apart
In short, the speedometer drive fell through the differential housing (I’m not sure exactly) and fell into the clutch housing under the main pair... I didn’t dare to drive such a gearbox, lest a metal part get caught between the gears and break them... repairs would be expensive. although people said that when repairing the gearbox they found 4 pieces inside and nothing... from the previous owner to know))) but it’s better not to risk it
Vibrant variety of colors
Today, the fashion for changing the dashboard lighting is gaining fantastic momentum. Almost everywhere cars have neon lighting or internal LED illumination. However, all these innovations are not a cheap pleasure, which not everyone can afford. The situation is different when replacing the factory backlight with a multi-colored one.
You can, no doubt, use ready-made tuning options, but this will also cost a lot. It is best to do it yourself. In this situation, the main thing is to have the necessary materials and patience. First you have to disassemble the “tidy”. The protective glass must be removed. Next we remove the arrows. To do this, you need to use a screwdriver and hard cardboard.
It should be placed under the arrow, and then pry it off with a screwdriver. Then you need to carefully and slowly lift it to the top. Next, remove the backing. A utility knife will be useful for this. It must be inserted between the panel and the substrate and a layer of sealant must be cut in a circle. Then remove the backing. Let's disassemble the panel and get started.
1. Remove the filter layer using a utility knife. A filter is a colored layer of paint. It is applied from the back of the substrate and gives color illumination to the speedometer numbers and other sensors. To completely get rid of the filter, you can use acetone or another liquid that contains alcohol.
2. Next, change the backlight color. First, you can change the odometer backlight. To do this, you will need to dismantle the odometer screen, and then remove the blue film and remove the backlight bulb. It should be replaced with a multi-color universal LED. He can change colors. We connect the LED to the socket of a standard light bulb. Reinstall the odometer screen.
3. Now you can start completely replacing the backlight. We attach the LEDs to the “tidy” frame. Such LEDs can be purchased complete with a color switch. We install them in place and attach them to the standard dashboard backlight contacts.
4. Let's move on. Now we need to make sure that the arrows have the ability to change the backlight. To do this, remove the layer of red paint from the arrows. For this operation, you can use a stationery knife and acetone. Once the arrow is clean, it can be painted using white nail polish. The main thing is that the arrow is white, since this color conveys the color scheme of the LEDs.
5. Before the final stage, you need to attach the LED color switch to the panel. Such a switch can be installed, for example, in the lower right corner of the dashboard. After this, you can install everything in place. First, the substrate is installed. For greater reliability, you can use a sealant. After this, we put the arrows in place. We insert the protective glass. After that we admire the result.
Replacing the Drive Gear of the Speedometer Drive VAZ 2114
AutoNews / Reviews / Tests
Replacing the Speed Sensor Drive VAZ 2114
The procedure for replacing the speed sensor on a VAZ 2114 To measure speed while driving, cars with internal combustion engines equipped with carburetors were equipped with a mechanically driven speedometer. This drive was located in the gearbox housing. Through a rotating cable, the readings were sent to a speed indicator located on the dashboard. Electric speedometers began to be installed on the VAZ 2114 with an injector. Speed data is transmitted to them from speed sensors based on new operating principles. Modern DS use the Hall effect.
Preparatory work
Some are satisfied with dismantling without removing the remaining components of the interior, but this takes extra time and complicates the process as a whole. In order not to add more work to yourself, it is recommended to clear the interior for free movement.
Strictly observing the sequence, you need to remove:
- armchairs;
- glove box;
- steering wheel;
- disassemble the floor tunnel. To do this, you need to unscrew the screws and move the part back a little.
We dismantle the lower part in the same way. The next step is to remove the glove compartment, after which you should remove the relay and mounting block. As you disassemble, you need to mark all the wires. Particular attention should be paid to the speedometer.
What's next
After all devices are disconnected from the car, you need to remove the handles from the heater switches. This can be difficult to do, because they are fixed quite firmly. To install the handles, special latches are used, which are installed inside. There is a small protrusion on each handle that will help us remove them. You just need to get into this hole with the tip of a minus screwdriver, then pick up the latch and lift it up.
The further procedure is as follows:
- The handle of the stove motor is removed. It is enough just to slightly pull it towards you;
- The torpedo is fastened to the instrument block using several self-tapping screws. They are removed using a “plus” screwdriver;
- Next, you need to remove the plug. It is fixed with a single self-tapping screw that needs to be removed;
- The cover is held in place by two fasteners. And again the screwdriver comes to our aid;
- Let's move on to the cables that are connected to the switches. They must be carefully removed, having previously marked each of them;
- Next, remove the steering mount bracket bolts;
- remove the fasteners from the bottom of the bracket. The key to 8 will help us here;
- remove the light guide;
- Next in line is the heating system control unit. Unscrew the fasteners and remove the cartridges;
- in front of us is a decorative insert. We also don’t need it, so we temporarily get rid of it;
- remove the hydraulic corrector;
- The last step is to dismantle the upper and lower fasteners.
That's all, actually. Now the torpedo is carefully removed, and you can perform any necessary actions with it. Assembly is carried out in reverse order. The procedure is quite complex and troublesome, filled with various little things, so please spare yourself time and patience. If any points remain unclear to you, you can watch the video on our website.
There is a special offer on our website. You can get a free consultation with our corporate lawyer by simply submitting your question in the form below.
Speedometer drive: types and differences
A speedometer is an important element in cars, as well as several other vehicles, as it is necessary to monitor speed in order not to violate traffic rules. But this is not the last function of this device.
All possible speedometers have a high-speed magnetic unit; due to the rotation of the magnets, a flow is formed, it moves through the coil, thereby facilitating the induction of eddy currents. They thereby begin to create more magnetic fields. They interact with each other, the needle of the device moves along the frequency scale, with the help of this the magnet rotates.
All speedometers are divided into three categories.
- Mechanical speedometers.
- Electromechanical speedometers.
- Electronic speedometers.
Mechanical speedometers. In this type of speedometer, the process of speed measurement and indication occurs thanks to a mechanical device. A gear is used as sensors, which is connected to the secondary shaft of the gearbox; this is the speed unit with an arrow indicator and the drum counter. Previously, speedometers were used in the form of a drum and tape. But they stopped using them quite a long time ago.
Electromechanical speedometers. In these devices, speed is measured using various electronic or electromechanical sensors that are connected to the gearbox. The speed is indicated by a milliammeter or the speed unit of a mechanical speedometer, and the distance is indicated by a counting drum, which drives a stepper motor.
Electronic speedometers. This is a development of new electromechanical speedometers; the main difference is the replacement of the odometer - in an electronic device it is completely digital.
Replacing the VAZ 2114 speed sensor with your own hands
After the contacts, wires and the DS itself have been tested and it has been determined that the device does not work, you need to make a decision about replacing it. For a car owner who is not a car repair specialist, this work is easy to do, but still, you need to look into the car repair and operation department and see how to change the speed sensor on a VAZ 2114.
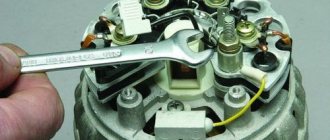
Before work, you need to prepare the necessary tool. Keys for “10”, “14” and “21” will be useful. In addition, you will need a rag to clean the manual transmission housing in the DS area from dirt and oil.
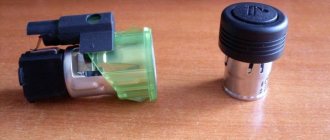
You also need to purchase a new speed sensor for the VAZ 2114 in advance. It has a catalog number - 2111-3843010. The average cost for a speed sensor 2114 is about three hundred rubles.
About the Hall effect
The essence of this effect is the emergence of a potential difference during the interaction of electric and magnetic fields. In this case, the electric field flows through the magnetic field, where the semiconductor wafer is located. It is at this point that the Hall voltage potential difference is formed.
In practice, the effect was applied as follows. When moving, the Hall voltage is converted into a pulse-frequency signal transmitted to the controller. The higher the speed, the higher the frequency of this signal becomes. From calculations it was possible to determine that the sensor produces 6004 pulses per 1 km of road. Due to the intervals between pulses, the sensor calculates the speed of the vehicle.
https://www.youtube.com/watch?v=rrO-5EmSUUo
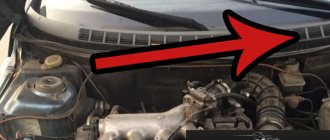
To perform any work with the DS, you first need to determine where it is located. The location of the speed sensor is the upper part of the gearbox housing. You can get to it through the engine compartment or from below if you park the car in a pit.
With panel disassembly
The first stage is carried out according to the plan already described. Next, we proceed like this:
- We assemble the trim, installing our instrument cluster, air duct panels and those accessories included in the kit;
- At the base of the panel we carefully attach the wiring harness;
- We connect the wires from the Euro pad to this harness, tightening everything with mounting ties;
- We connect devices to the required buttons using connectors;
- We secure the cover with self-tapping screws.
This method, although it takes more time, provides high-quality sound insulation to eliminate all annoying squeaks.
We also recommend replacing light bulbs with high-quality analogues or LEDs. So, the updated panel will look even more solid.
Torpedo device
What is a torpedo? In short, this is the dashboard. The word “torpedo” came to us from the West and has now become firmly established in the everyday life of domestic car enthusiasts.
Dashboard of a VAZ 2115 car
The instrument panels on the VAZ 2113, 2114 and 2115 are almost the same. These are complex collapsible structures made of metal with plastic inserts. In addition, in the panels of this line of VAZ models, engineers actively used polymer film, which covers most of the controls.
Diagram of the main elements of the VAZ 2115 dashboard