Repair / From Alexander Smirnov
- Types of heater radiators installed on the VAZ 2114/15
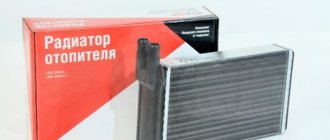
Table: comparison of the main characteristics of aluminum and copper heater radiators for the VAZ 2114/15 - Radiators DAAZ
- Symptoms of a problem
- Replacing the radiator without removing the panel
Video: replacing the VAZ 2214/15 heater radiator without dismantling the panel
The heater radiator is the main element of the vehicle interior heating system. Its failure leads to unpleasant consequences for the driver. In winter, the car interior becomes cold, and the windshield becomes covered with a layer of ice. Therefore, timely identification and elimination of radiator malfunctions becomes relevant.
Purpose and location of the heater radiator VAZ 2114/15
The heater radiator heats the air entering the car interior. It is the main element of the interior heating system. By passing hot coolant (coolant) through itself, the radiator heats itself and heats the air flow blowing over it. Air enters the stove both naturally while the car is moving, and forcibly with the help of a fan.
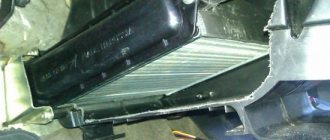
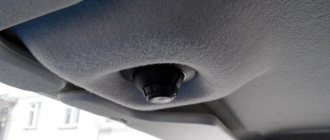
The radiator is installed in the heater casing under the center console of the panel, without dismantling which you can only see the inlet and outlet pipes connecting the radiator to the heater tap. This arrangement is very inconvenient when replacing the radiator. It is because of this that many VAZ 2114/15 owners prefer not to repair the heating system themselves, but to contact a car service center. However, replacing the radiator yourself is quite simple. To do this, you just need to know some of the features and secrets of its dismantling.
The heater radiator is located in the heater housing
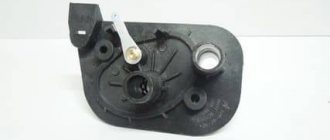
ADJUSTING THE TAP
Method one
So:
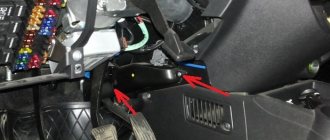
- Remove the bracket holding the cable sheath to the furnace valve body.
- We pull the cable off the stove valve lever.
- Open the tap with your hands to the maximum opening position.
- Unhook the cable from the levers.
- We take out this cable. (You can put it in your stash).
- We will close the tap in the spring, or you don’t have to close it at all.
If this method does not work, then:
- It is necessary to adjust the length of the cable and sheath so that in the extreme right position of the lever on the lever block the faucet is fully open
- Secure the cable with a latch
Method two
Damper adjustment:
- We remove the bracket that holds the cable sheath on the left side of the body - you will feel one lever there.
- We move the lever towards ourselves - this is the maximum open position.
- We adjust the length of the cable so that in the extreme right position of the longest lever on the block of levers, the damper is open as much as possible.
- Let's fix it.
By adjusting the heater, you can make sure that the heated air hits the windshield. The cabin will also become warmer.
Attention: It is important not to overdo it when adjusting, so as not to break the plastic to which the cable is attached.
If replacing the VAZ 2114 stove radiator does not suit you:
- We move the damper to the “hot” position, secure it tightly, covering it with plastic mass.
- At the same time, we send the drive cable to the spare parts warehouse. The positive effect is felt immediately, although the temperature of the cabin is now regulated only by the heater tap.
- It will become so warm that you can forget about hats and sheepskin coats. The driver becomes comfortable even in forty-degree frost. Cold air is insulated.
- However, the air on the right will be colder. It all depends on the deformation of the damper during the operation of the car: on the side opposite to the cable, the damper cover ceases to close tightly.
Types of heater radiators installed on VAZ 2114/15
The manufacturer installs its own aluminum radiators on the VAZ 2114/15 with a service life of 3–5 years, after which the radiator is replaced. Selecting a new heat exchanger is quite difficult. There is a wide range of radiators from various manufacturers on the market. Of course, there are fakes.
Heating system radiators for the entire Samar family have catalog numbers 2108–8101060 and 2108–08101060–00 and the same dimensions:
- length - 250 mm;
- width - 158 mm;
- height - 42 mm.
The scheme of their attachment to the body is also identical.
Radiators for the VAZ 2114/15 stove are produced under catalog numbers 2108–8101060 and 2108–08101060–00
The VAZ 2114/15 can be equipped with aluminum and copper radiators, which have their own advantages and disadvantages.
Table: comparison of the main characteristics of aluminum and copper heater radiators VAZ 2114/15
| Aluminum | Copper | |
| Service life, years | 3–4 | 5–7 |
| Heat dissipation, W/mg | 209,3 | 389,6 |
| Maintainability in the event of a leak | Conditionally repairable | Repairable |
| Cost, rub. | 800–1000 | 1600–1800 |
The main advantages of copper products are longer service life, increased heat transfer and maintainability. However, they usually cost almost twice as much as aluminum ones. The technical characteristics of radiators are largely determined by their manufacturer.
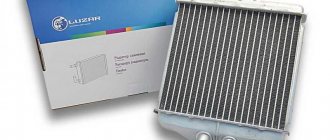
Radiators DAAZ
The most popular among VAZ 2114/15 owners are radiators manufactured by Luzar, Hola, Craft, Pekar, etc. They are all in the same price category and have similar performance characteristics.
DAAZ radiators are highly efficient and have a long service life
DAAZ aluminum radiators have improved parameters. They have a service life of 4–7 years and a price of about 1000 rubles. The design features of such radiators include a larger number of lamellas (thin plates), and this significantly increases the heat exchange area. DAAZ radiators are the best option for VAZ 2114/15 owners.
Due to the larger number of lamellas, DAAZ radiators have increased heat transfer
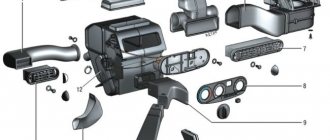
Heater design features
It must be said that the eighth and ninth family of VAZ cars have an identical heating system. In each case, the heat source is the main element of the car, which is represented by the engine. But the generated heat still needs to be conveyed, as they say, to the consumer. In this case, the coolant is antifreeze, which is supplied to the cooling system. It warms up the stove radiator. He himself is in a closed casing. It is blown by a stream of air, which is pumped by the heater turbine.
Heater design features: 1 – heater control damper lever; 2 – left heater casing; 3 – draft of the foot heating damper; 4 – radiator gasket; 5 – heater radiator: 6 – heater seal; 7 – electric motor; 8 – fan casings: 9 – impeller; 10 – windshield heating flap; 11 – air duct for heating the windshield; 12 – side nozzle air duct; 13 – side nozzle; 14 – draft of the windshield heating flap; 15 – central nozzles; 16 – foot heating damper; 17 – right heater casing; 18 – heater control handle; 19 – crane control rod; 20 – heater control damper rod; 21 – handle for supplying air to the windshield; 22 – handle for supplying air to the feet of the driver and passengers; 23 – control lever bracket; 24 – bracket for fastening the heater casings; 25 – internal ventilation air duct; 26 – window in the heater casing; 27 – heater control damper; 28 – lever for the foot heating flap.
There is an air duct for warm air to enter the cabin. If the heater radiator is cold, then we can definitely say that it is “sick.” This unpleasant situation can occur in all VAZ cars without exception. If the clogged radiator of stove 2114 is made of copper, then it will still last for some time. The case with an aluminum radiator requires immediate replacement.
Diagnosis of heater radiator malfunctions
If the stove begins to work less efficiently, you should not immediately change the radiator. The reasons for this unpleasant situation may be:
- heating system faucet that does not open completely;
- broken thermostat;
- clogged cooling system.
Therefore, before dismantling the stove radiator, you should definitely check these options.
Symptoms of a problem
The heater radiator usually fails for two main reasons:
- internal blockage;
- flow.
In the first case, the radiator tubes become clogged from the inside with dirt, corrosion and wear products. As a result, the coolant circulation in the heating system slows down or stops completely, and the air flow passing through the stove does not have time to warm up to the desired temperature. Cold or slightly warm air begins to flow into the cabin.
A leak occurs as a result of mechanical damage, drying out or corrosion of the radiator material. Most often, the tightness is broken at the junction of the tubes and tanks. It is sometimes difficult to immediately notice a leak, especially if the coolant begins to flow inside the stove. However, after some time, an unpleasant smell of antifreeze will appear in the cabin, and the inside of the car windows will become covered with an oily coating. At the same time, the coolant level in the expansion tank will noticeably decrease.
Repair or replacement
You can try to restore a clogged radiator by cleaning it with alkaline and acidic solutions of chemically active substances. At the same time, it is recommended to clean aluminum heat exchangers only with acidic solutions, and copper ones with alkaline solutions. Flushing can be done either with or without dismantling the radiator.
It is much more difficult to eliminate a leak. First, the leak is located, then it is sealed with a powerful soldering iron using special solder and flux. Using glue and cold welding will eliminate the problem only for a short time. It is much easier to solder a copper radiator. Aluminum, unlike copper, is difficult to solder.
In any case, a repaired radiator is only a temporary solution to the problem. Therefore, experts recommend replacing the heat exchanger with a new one in such cases.
What to choose?
Today, for the VAZ 2114, two options for radiators are offered, which differ in the material of manufacture. This can be a copper or aluminum unit.
To understand which one is better, let's conduct a comparative analysis.
| Radiator type | Advantages | Flaws | Price |
| Aluminum | — The number of side ribs exceeds those of the competitor — The air flow channels are wider, which reduces the risk of crashing and increases the efficiency of heat transfer at idle speed | — Rapid heating is accompanied by equally rapid cooling — If a leak is detected, repair is impossible, only replacement | from 1000 rubles |
| Copper | — It takes a long time to heat up, but at the same time it takes a very long time to cool down; — If a leak occurs, repairs can be made by soldering the holes | — In terms of the number of ribs it is inferior to its aluminum competitor; — The channels are narrow and small, they clog quickly, which reduces heating; — Repairs have to be carried out more often due to clogged channels; — Minimally heats at idle; — It is difficult to find a high-quality heater, since almost always, in addition to copper, there are impurities that reduce the efficiency of the radiator | from 1700 rubles |
From this we can conclude that aluminum ones are more popular than copper ones. But this popularity is due to the availability and opportunity to purchase a high-quality aluminum product.
Aluminum deviceWhich of these you choose is up to you to decide. Although copper is more expensive, it can be repaired, while if an aluminum device fails, you will certainly have to buy a new unit.
Copper analogue
Replacing the heater radiator on a VAZ 2114/15
To replace the radiator, you will need a trestle or inspection hole, as well as the following tools:
- wrenches 8, 10 and 13;
- socket wrench 24;
- two Phillips screwdrivers (short and long);
- car jack;
- a container for draining coolant with a volume of at least 5 l;
- polyethylene film;
- dry rags.
When replacing a radiator, the hoses of the interior heating system are usually also replaced.
Replacing the radiator without removing the panel
The VAZ 2114/15 instruction manual recommends replacing the heater radiator with the panel removed. However, you can do without dismantling, just moving the panel. To do this you need:
- Place the machine on an inspection pit or overpass.
- Disconnect the negative cable from the battery.
- Using a number 10 wrench, remove the engine protection.
When replacing the heater radiator, you need to remove the engine protection - Place a coolant container under the drain plug.
- Using a key number 13, unscrew the plug and drain the coolant.
To drain the coolant, use a 13 key to unscrew the bolt plug. - After the coolant has completely drained, tighten the drain plug.
- Close the heater valve by moving the control lever to the extreme left position.
- Move the front passenger seat all the way back and recline the backrest.
- Open the glove compartment, unscrew the six screws securing it and pull it out.
To remove the glove compartment, unscrew six screws - Remove the plug in the central part of the panel and unscrew the screw located under it using a Phillips screwdriver.
The screw is covered with a plastic plug - Unscrew the five screws securing the right center console cover. Repeat the same procedure for the left cover. To remove the center console covers, you need to unscrew the screws that secure them.
- Remove the instrument panel by unscrewing the four screws securing it (two on top and two on bottom).
The instrument panel is secured with four self-tapping screws - Remove the steering column cover by unscrewing three screws at the top and three at the bottom.
To remove the steering column cover, you need to unscrew six screws - Disconnect the electrical connectors of the radio and cigarette lighter.
- Remove the lining of the damper control levers and the knob for switching fan operating modes.
Before removing the control unit, you need to remove the plastic lever covers and the switch handle - Remove the screws securing the center console.
The center console is secured at the top with two screws. - Remove the diagnostic connector by unscrewing the two fastening screws.
To dismantle the diagnostic connector, you need to unscrew two screws - After disconnecting the electrical connectors from the switches, remove the center console. Before removing the center console, you must disconnect the electrical connectors.
- Using a size 8 wrench, unscrew the two screws securing the panel base to the car floor.
At the bottom, the base of the panel is attached to the floor with screws - Unscrew the four (two on each side) self-tapping screws for the side panel fastenings. The panel is secured on the sides with two self-tapping screws
- Unscrew the screws centrally securing the panel to its base.
To detach the panel from the base, you need to unscrew two screws in the center - Disconnect and remove the electronic control unit.
The ECU is removed along with the relay and fuse bracket - Pull back and slightly lift the panel on the right side. Secure it using a jack or improvised means. For greater convenience, the panel must be slightly raised with a jack.
- Cover the floor of the car with plastic film and dry rags.
- Using a Phillips screwdriver, unscrew the screws that tighten the clamps of the radiator pipes and disconnect the pipes.
To disconnect the pipes, you need to loosen the clamps - Unscrew the three radiator mounting screws. The heater radiator is secured with three screws
- Remove the radiator from the heater housing.
- Install a new radiator.
- Connect to the new radiator and secure the pipes.
- When replacing pipes, loosen the clamps securing them to the heater valve fittings. Remove the pipes.
- Reassemble in reverse order.
Video: replacing the VAZ 2214/15 heater radiator without dismantling the panel
Replacing the radiator with dismantling the panel
According to the repair and operation manual VAZ 2114/15, the heater radiator should be replaced as follows (the set of tools is the same):
- Place the car on a platform or inspection hole, remove the engine protection, drain the coolant, following paragraphs 1–6 of the replacement instructions without dismantling the panel.
- Remove the left and right side covers of the center console by unscrewing the screws securing them with a Phillips screwdriver.
- Disconnect the cigarette lighter and radio connectors and remove them.
- Remove the lining of the heater damper and valve control levers and the fan mode switching knob.
- Unscrew the screws of the upper mounting of the center console on the left and right.
- Unscrew the four screws securing the instrument panel (two at the top and two at the bottom).
- Use a Phillips screwdriver to unscrew the self-tapping screw under the plastic plug at the top of the panel.
- Remove the panel shield and move it to the right.
- Disconnect the wiring harness blocks, having previously marked them for ease of assembly.
- Using a size 8 wrench, unscrew the bolts of the lower fastening of the panel base on the left and right.
- Remove the housing of the central deflectors from the panel. The central deflector housing supplies air from the central air duct
- Unscrew the two screws of the top fastening of the panel base on the left and right.
- Using a screwdriver, unscrew the two screws securing the panel to its base under the heater control unit.
The panel is secured with two self-tapping screws - Together with the relay and fuse bracket, disconnect the electronic engine control unit from the base.
- Remove the heater control unit.
- Unscrew the six screws on the steering column housing (three on top and three on bottom).
- Disassemble the steering wheel.
- Using a 24 mm socket wrench, unscrew the steering wheel mounting nut. Remove the steering wheel.
To remove the steering wheel, you need to unscrew the nut with a 24mm socket wrench. - Unscrew the screws on the side panel fastenings (two on each side).
- Open the glove compartment, unscrew the six screws securing it. Pull out the glove compartment.
- Disconnect the electrical connectors from the glove compartment light bulb.
- Remove the panel along with the base and move it to the left.
After removing the panel, slide it to the left - After ensuring free access to the heater, lay plastic film and dry rags on the floor.
- Replace the radiator in accordance with paragraphs 25–30 of the previous instructions.
- Reassemble and install the panel in reverse order.
Thus, replacing the VAZ 2114/15 heater radiator can be done without resorting to the services of a car service. This will require a new radiator, a standard set of tools, free time and careful implementation of step-by-step instructions from specialists.
Diagnosis of faults, repair and replacement of the Chevrolet Lanos heater radiator with your own hands
Self-diagnosis and replacement of the fuel pump VAZ 2114/2115
Essentially and what needs to be done
Next, let's move on to a description of the step-by-step replacement of the heater radiator (stove) on a VAZ-2114. First of all, you need to diagnose the breakdown or malfunction.
It (from auto diagnostics) consists of determining the causes of problems in heating operation and consists of the following possible options:
- Large difference between the temperature of the heat supply and heat removal pipes;
- The heating system does not supply heat to the vehicle interior;
- Antifreeze is observed leaking from the heater radiator (the heat circuit is leaking).
If the above is observed, then you should not postpone repairs until later. Especially with the upcoming seasonal cold spell. As soon as problems or malfunctions are noticed in the operation of the car’s heating system, it is necessary to urgently replace the radiator of the car’s stove (heater).
The causes of malfunctions may be:
- The heater (heater) radiator duct is clogged (over time, the pipes tend to become clogged);
- The radiator has worn out (over time, metals are depleted, this occurs due to dynamic changes in temperatures, atmospheric pressure and corrosion of metals).
Small clarification. Replacing the radiator of the VAZ-2114 heating system can be done in two ways: you can dismantle the panel (dashboard) or without dismantling the instrument panel. Service station specialists, for example, use the first option, as they are well versed in all the nuances and subtleties of the dashboard. The second method is usually used by everyone else.
What we need for work:
- Screwdrivers, different and many, preferably a good set;
- Keys, different and many, preferably a good set;
- Several clamps, new, always matching the diameter of the pipes;
- Radiator, preferably new, as advice, imported;
Important clarification. It is important to choose the right type of radiator for your internal heating system
For example, aluminum radiators have more side fins than their competitors, resulting in wider air channels, which allows for more efficient heat transfer at idle. At the same time, the disadvantage is that it cools quickly when heating up quickly, and if there is a leak, it is impossible to carry out repair work - only replacing the radiator. And copper radiators, for example, take a long time to cool down when heated for a long time, and if they leak, they can be repaired by soldering. Among the disadvantages of copper radiators, it is worth highlighting a smaller number of fins, narrow and quickly clogged channels (which is why repair work has to be carried out more often), insufficient heating at idle
Also, now they often use various impurities in the production of radiators, which you should also pay attention to when purchasing
Small clarification. Replacing a VAZ-2114 heater radiator without dismantling the dashboard (dashboard) is a very lengthy process that requires patience.
Let's move on to the repair phase:
- You need to turn off the car and raise the hood. De-energize the battery. We place a container under the stove lid to drain the antifreeze.
- The temperature regulator must be switched to the maximum value.
- Slowly unscrew the heating circuit cap to drain the liquid. If you quickly unscrew this cap, there is a chance that the generator will flood.
- We return to the car interior and move the front seats back. Be sure to cover the front seats with oilcloth or something similar, after reclining the seat backs.
- We remove (unscrew) the central pillar. To do this, unscrew the floor fasteners (right and left), top fasteners and side fasteners. Don't forget about the presence of plugs on the fasteners.
- We dismantle the glove compartment.
- We unscrew the fastenings of the instrument panel (dashboard) until it begins to shake. This is necessary so as not to remove the entire instrument panel, but simply move it aside to gain access to the radiator of the heating system (stove).
- Access to the heating tap control cables is now open. You need to remove the ends of these cables from the eyes of the adjustment levers that are located on the front seats (driver and passenger).
- The heater core shroud can now be removed.
- We also remove the pipe clamps.
- Together with your partner, very carefully, you need to lift the panel (dashboard) and pull it towards you, this will allow you to remove the old radiator and, accordingly, install a new one.
- Next, you need to reassemble the internal heating system in the reverse order.
Replace without removing the panel
But no matter what method is used, you will first have to drain the coolant from the system. Therefore, you will have to stock up on antifreeze in the required quantity in advance.
First, let's look at the replacement method without removing the panel. As already mentioned, this will require making cuts in some places.
To complete the work you will need:
- Set of screwdrivers of different lengths;
- Hacksaw blade for metal;
- Flat container for draining residual coolant from the radiator;
- Rags.
Having prepared everything and drained the coolant from the cooling system, you can begin work:
- We remove the storage box (glove compartment) from the panel, for which it is necessary to unscrew 6 screws securing it;
- Remove the side trims on the center console;
- Using a metal blade, we make the necessary cuts: The first cut is vertical, we make it on the inner wall of the panel near the center console (behind the metal strip of the glove compartment). Moreover, here you will have to make two cuts.
The second cut is horizontal, running in the upper part along the rear wall of the opening under the glove compartment.
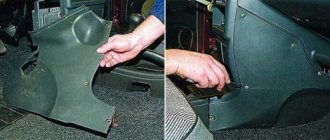
The third is also vertical, but not end-to-end. It is done on the right on the rear wall of the lower storage shelf of the panel; - After all the cuts, part of the panel together with the wall can be bent down, which will provide access to the radiator. We bend this part and fix it;
- Unscrew the near bracket for fastening the heating system flap control cable and move the cable to the side;
- Loosen the clamps of the coolant supply pipes to the radiator. In this case, you should place a prepared container under the connection points, since liquid will flow out of the heat exchanger. Remove the pipes;
- We unscrew the three screws securing the radiator, remove it and immediately inspect it.
Afterwards we replace the heat exchanger, fix it in the seat, connect the pipes to it and clamp it with clamps. To make the pipes fit easily, lubricate them with soap.
At this stage of work, you should fill the cooling system with liquid and run it to remove air pockets.
Next, it remains to make sure that the connections between the pipes and the radiator are not leaking, and that the damper and faucet are connected without errors.
After this, all that remains is to return the cut part of the panel to its place and fix it. To do this, you can use screws and plates.
The main thing is to fix it in several places so that in the future the cut off part does not rattle when moving. Use sealant or silicone.
This method is convenient because if you replace the radiator again (which is quite possible), all the work will be very simple - you just need to remove the storage box and unscrew a few screws.
In addition, all cuts are made in such places that after assembling the panel and installing the glove compartment they will not be noticeable.
Replaced by removing the panel
For those who do not want to spoil the panel, a method that involves removing it is suitable.
In this case, you will need the same tool as indicated above, except for a metal saw blade.
The main thing here is to have as many Phillips screwdrivers of different lengths on hand as possible.
And then we do everything like this:
- Remove the side panels of the center console (see above);
- We dismantle the storage box;
- Remove the center console trim. To do this, remove the tips of the heating system control sliders and the “knob” for turning on the stove fan. We remove the radio. We unscrew the screws securing the trim - at the top of the center console (hidden by a plug), above the dashboard (2 pieces) and under it (on both sides of the steering column);
- Remove the upper part of the steering column casing;
- Pull the console trim towards you. We disconnect all the connectors with wiring from it, having previously marked with a marker where each one was located (you can take a photo). After this, completely remove the cover;
- Unscrew the screws securing the panel to the body (two screws on each side near the doorways);
- We unscrew the screws holding the metal frame of the ECU (at the top under the panel and at the bottom near the floor);
- Remove the screws located above the steering column;
- After this, the panel is up and towards you;
- We move the panel towards us, and then ask an assistant or use a high jack to lift it to provide access to the radiator. You can temporarily put some kind of emphasis;
- Disconnect the radiator pipes (remembering to place a container to collect residual coolant);
- Unscrew the three fastening screws and remove the heat exchanger.
After that, all that remains is to install a new element and put everything back together.
But here are some nuances to consider:
- To reliably fix the connection points of the pipes with the radiator, the clamps should be replaced with new ones;
- It would not be superfluous to coat the joints with heat-resistant sealant;
- After installing a new heat exchanger and connecting a pipe to it, you should immediately check the tightness of the connection by filling the cooling system with antifreeze. And only after making sure that there are no leaks, you can put the panel in place.
As you can see, the second method is more labor-intensive, but the panel itself remains intact.
In addition, with this method, during assembly, you can coat all joints between the panel and the body with sealant to eliminate squeaks.
In general, both methods are good, but each of them has its own advantages and disadvantages. Therefore, which one to use is up to the car owner to decide.
Replacement without removing the panels, can you see the seams?