The section will be of interest to anyone looking for a modern repair manual for the VAZ 2115, 2114 or 2113. Here any driver will find detailed instructions for diagnosing, replacing or repairing a faulty part. The materials are presented in the form of photo reports and videos , which makes them a visual aid, much better than the printed counterpart from the manufacturer. They will allow even novice owners to master any repair procedure in the shortest period of time.
Even if you don’t currently need to repair a VAZ 2113 yourself, you should know a number of procedures that are most often of interest to car owners. Familiarization with the manual for each of them will allow you to quickly fix the breakdown and restore the functionality of the machine part. As in the case of other representatives of the Samara 2 family, the driver will need information about replacing lamps in optics, repairing the gas distribution mechanism, diagnosing the cooling system, etc.
For those who have to repair the VAZ 2114 with their own hands, it will be useful to know how to replace the stove, change the oil and replace the thermostat of the VAZ 2114. For preventive purposes or in difficult operating conditions, it may be necessary to replace the timing belt. No less useful will be the VAZ 2114 repair manual, which describes in detail the replacement of VAZ 2114 light bulbs in the headlights and car interior.
For owners of the fifteenth model, instructions on how to replace a VAZ 2115 pump will be appropriate. This part often breaks down and cannot be repaired, which makes this knowledge mandatory for those who are interested in repairing a VAZ 2115 with their own hands.
If you are interested in a specific problem, then on the pages of the portal you can always leave your question to more experienced motorists and professional mechanics. Soon after its publication, a full answer will follow, which will help to cope with the problem that has arisen in the operation of the car.
VAZ 2114 - history of the model
Like the VAZ 2113, the model was a restyling of the previous generation VAZ 2109. It received a lot of components that increased the comfort of the car. The VAZ 2114 was produced from 2001-2013. During this time it underwent several changes , most of which affected the engine.
VAZ 2114 is a 5-door hatchback. A distinctive feature of the model was the update of the front part of the body, affecting the headlights, hood, radiator trim, etc. There are also new innovations inside the cabin - a Europanel, a new heater design, and an adjustable steering wheel. Under the hood of the VAZ 2114 were the following engines:
- 8-valve engine 1.5 VAZ 2111;
- 8-valve engine 1.6 VAZ 21114;
- 8-valve engine 1.6 VAZ 11183;
- 16-valve engine 1.6 VAZ 21124;
- 16-valve engine 1.6 VAZ 21126.
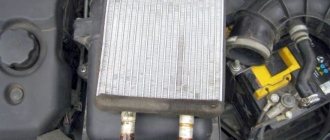
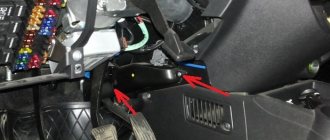
Replace without removing the panel
But no matter what method is used, the coolant must first be drained from the system. Therefore, you will need to stock up on antifreeze in the required quantity in advance.
First, let's look at a replacement method without removing the panel. As already mentioned, for this you will have to make cuts here and there.
To complete the work you will need:
- Set of screwdrivers of different lengths;
- Rags.
- Metal cloth;
- Flat container for draining remaining coolant from the radiator;
Having prepared everything and drained the coolant from the cooling system, you can start working:
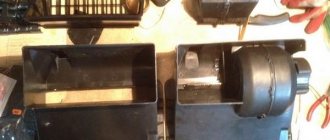
- Remove the glove box (glove compartment) from the panel, for which you need to unscrew the 6 screws that secure it;
- Remove the side trims on the center console;
- Using a metal cloth, we make the necessary cuts: the first vertical cut is made on the inner wall of the panel near the center console (behind the metal strip of the glove compartment). And here you need to make two cuts.
The second cut is horizontal, running at the top of the rear wall of the opening under the glove box.The third is also vertical, but not through. Performed on the right on the back wall of the lower shelf of the panel;
- After all the cuts, part of the panel along with the wall can be folded back to gain access to the radiator. We fold this part and fix it;
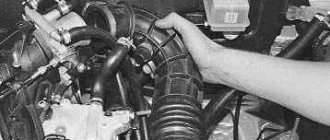
- We unscrew the nearest bracket for fastening the heating system hatch control cable and move the cable to the side;
- We loosen the clamps of the coolant supply pipes to the radiator. In this case, it is necessary to replace the prepared container under the connection points, since liquid leaks from the heat exchanger. We remove the pipes;
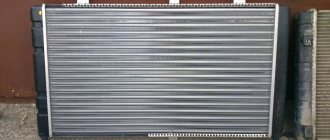
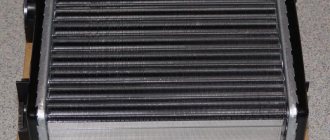
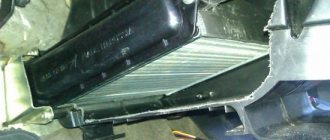
- We unscrew the three screws securing the radiator, remove it and immediately inspect it.
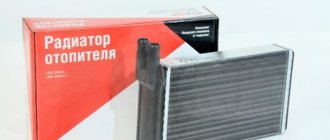
Then we replace the heat exchanger, fix it in the socket, connect the pipes to it and fix it with clamps. To make the tubes easy to insert, lubricate them with soap.
At this stage of operation, the cooling system must be filled with liquid and expelled to remove air pockets.
After this, it remains to make sure that the joints of the pipes with the radiator do not leak, and that the damper and tap are connected without errors.
After this, all that remains is to return the cut out part of the panel to its place and secure it. For this you can use screws and plates.
The main thing is to secure it in several places so that the cut part does not move when moved. Use sealant or silicone.
This method is convenient because when you replace the radiator again (which is quite possible), it will be very easy to do all the work - just remove the storage box and unscrew a few screws.
In addition, all the cuts are made in such places that after assembling the panel and installing the glove compartment, they will not be noticeable.
Everything about the rear lights of the VAZ 2115 - connection diagram, installation of LEDs
The rear light of a car is a real information board for those walking behind. And if this board does not work or works incorrectly, troubles cannot be avoided. In this article, we look at typical malfunctions of the rear lights of the VAZ 2115, learn how to change the lamps in them, and even do a little tuning of these important lighting devices.
The design of the rear lights of the VAZ 2115 - and what kind of light bulbs are in them
The VAZ 2115 has 4 rear lights - two corner ones on the sides (installed in the body) and two more slightly closer to the central axis of the car. The second ones are built into the trunk lid and merge with the side ones, giving the impression of one large lamp.
The central and side rear lights merge, creating the impression of one monolithic light fixture
But this is not the most interesting thing. On the VAZ 2115, the side lights are equipped with 2 double-helix lamps and one single-helix lamp - P21/5W and P21W.
Lamps P21/5W (left) and P21W used in the rear lights of the VAZ 2115
At the same time, this lamp is only responsible for the direction indicators, side lights and brake signal! Why does this lighting device need five spirals? Let's look into this issue.
Diagram of rear lights VAZ 2115
Let's take a look at the electrical diagram of the rear corner light of the VAZ 2115.
VAZ 2115 rear light diagram and coloring of power harness wires
The numbers on the diagram indicate:
- direction indicator, blue (right side), black and blue;
- side light, yellow (starboard), black and yellow;
- brake light, red.
Externally it looks like this:
Rear panel and board of the corner lamp VAZ 2115
It turns out that the double-spiral lamps in each lamp are switched on in parallel - five-watt spirals are responsible for the side light, twenty-one-watt ones are responsible for the brake signal. It is difficult to say why this was done.
This can be done for originality of appearance or for reliability - one lamp burns out (especially on the road you won’t notice it right away) - you can always reach the garage with a second one without creating an emergency situation.
The double “dimensions” look impressive.
Look at the small additional rear lights located in the trunk lid - they contain two P21W lamps (see photo above) each. One is responsible for the rear fog light, the second for the reverse signal. The diagram of these lights looks like this:
Diagram of the internal rear lights of the VAZ 2115 and colors of the power harness wires
In the figure the numbers indicate:
- reverse lamp, green;
- fog lamp, black and red.
Brake light repeater for VAZ 2115
How to replace lamps
Now let's move on to replacing lamps. Let's start with the interior light built into the trunk lid.
Interior tail light
Open the trunk lid and find the rear part of the lamp from inside it.
The back of the lamp is not covered by anything
We find two latches on top, marked with an arrow in the photo below.
The back cover of the flashlight is secured with two push fasteners
Press the latches and remove the back cover along with the lamps.
Removing the board with light bulbs
It is not necessary to remove the power supply when replacing light bulbs - the length of the power harness will be sufficient for the work.
The one that is closer to the side of the car is the reverse light, closer to the center is the fog light. Since in the photo below the lamp is on the right, the reverse indicator lamp is on the right. It is marked with a red arrow.
The inner rear light has 2 bulbs
The bulbs are of the same type (see above) and are removed in the same way - by turning them counterclockwise. We remove the burnt one and install a new one in its place. We snap the board into place.
Corner lantern
Open the trunk lid again and find a valve on the upholstery that closes the rear part of the lamp. It has Velcro and opens easily. Let's open it.
The corner taillights of the VAZ 2115 are covered with valves cut into the upholstery
In front of us is the back of the flashlight with the power connector sticking out of it.
The power supply sticks out from the back of the flashlight.
We remove the block by simply pulling it in the direction of movement of the car (if the length of the harness is sufficient, the block does not need to be removed).
Removing the power supply
Push the latch outwards with a screwdriver or simply with your hands (it is placed closer to the central axle of the car) and remove the board along with the lamps.
Removing the board with lamps
We have already talked about where the light bulb is. Single spiral on the side - direction indicator. Two double-spiral ones - both dimensions and feet. We remove the burnt one and install a new one. We snap the board into place, connect the connector, and close it with the valve in the upholstery.
Typical faults and methods for their elimination
There are many reasons why taillights may fail or partially not work, but the main one is failure of the flexible printed circuit board. This is, in fact, the most sore spot of the rear light devices of the VAZ 2115.
Often, flimsy contact pads that pretend to be light bulb socket contacts fail, although in fact there are no sockets in the flashlights - a plastic ring that fixes the light bulb, a plastic pressure pad (all with latches) and contact pads on the board. It couldn't be simpler, but funnier too.
That's the whole "cartridge"
The service life of such a “cartridge” is six months maximum. Considering that the car was produced for 15 years, then this approach of the developers to the flashlight, the design of which has not changed over all these years, is surprising, to say the least. But the fact is clear.
Converting the board to cartridges
You can, of course, regularly change the flexible board - this is not a problem. But, firstly, the board costs money and, in principle, should not be a consumable item in order to buy it in packages. And, secondly, when someone is dead, for example, you won’t immediately notice “stop”, which means that at any moment we risk getting “in the butt” in the literal sense of the word.
Therefore, it’s better to tinker and do what the VAZ designers should have done a long time ago - replace all this flexible hack with normal cartridges. So, we go to the store, buy three ordinary plastic lamp sockets: one for a single-helix P21W, two for a double-helix P21/5W lamp. They are practically the same in size and appearance.
For modification we will need 3 such cartridges for one flashlight
You will also have to buy a set of four-pin male-female car connectors. The photo below shows only an option, but there are many types of such connectors. In addition, any others for a larger number of contacts will do.
We'll also buy a couple of these connectors
How to disassemble the rear light board? Elementary and without any tools. For speed, you can use an awl, the tip of a knife or a screwdriver, but you can do everything with your bare hands. We press the latch (photo on the left) and pull out the plastic imitation of the cartridge. Everything else will fall apart on its own. We remove all three cartridges.
Disassembling the rear corner light board of a VAZ 2115
We completely disassemble the panel - remove the plastic lamp clamps, remove the flexible board. We mark places for new cartridges, while focusing on the position of the old ones.
Marking seats for cartridges
We remove the mounting posts for old cartridges and everything that interferes with the installation of new cartridges using, for example, a soldering iron. We drill holes of such a diameter that our new cartridges fit in there tightly and do not dangle. If there is no appropriate drill, drill with a smaller diameter, then bore with a round file.
Ready-made seats for cartridges
For the turn signal bulb we use this socket - it takes up less space, but you can put another one - just cut it a little (however, this one also had to be cut a little).
Turn signal holder
We install the cartridges in their places and fix them in any available way. In the photo below they are simply soldered with a soldering iron. Not exactly aesthetically pleasing, but reliable. But this “aesthetics” will still not be visible. We take out the wires of the “turn” cartridge through the hole made.
All that remains is to solder the connectors: – one – to the light bulbs, the other – to the flashlight power harness, having previously cut off the old one.
Panel with soldered connector